WANT TO SAVE THIS RECIPE?
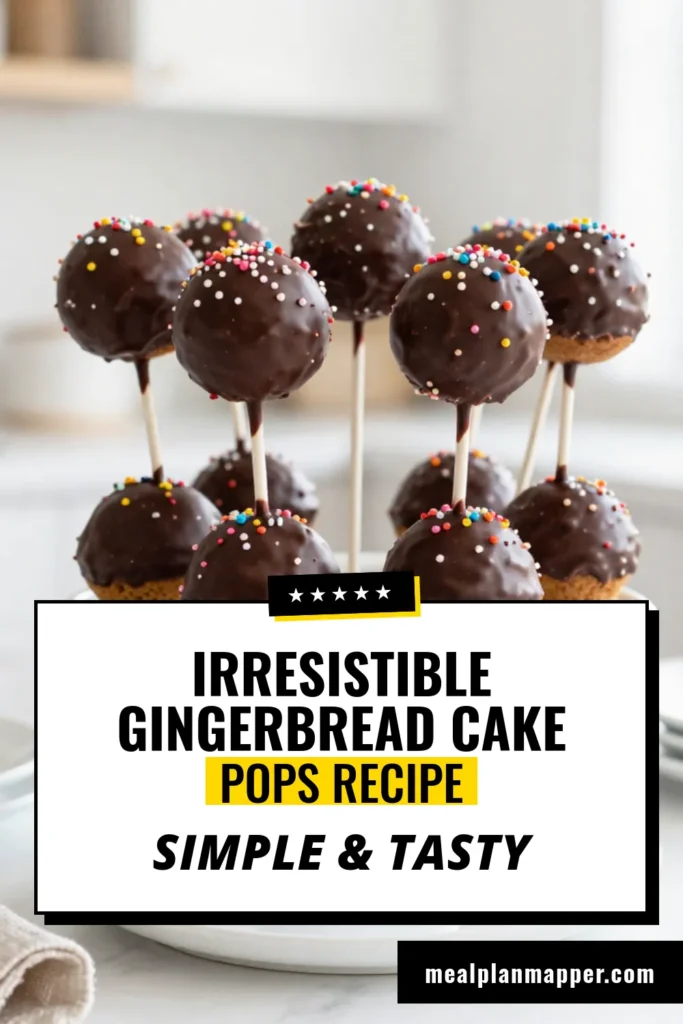
Are you ready to bring a delightful twist to your holiday treats? Gingerbread Cake Pops blend the warm flavors of gingerbread with fun, bite-sized joy. In this blog, I’ll guide you through easy steps to create these festive goodies. From perfecting the texture to finding the right ingredients, you’ll learn everything you need for a sweet holiday treat. Let’s dive in and make some magical cake pops together!

Why I Love This Recipe
- Deliciously Spiced: This cake pop recipe combines the warm flavors of ginger, cinnamon, and cloves, making every bite a delightful experience, especially during the holiday season.
- Fun to Make: Rolling cake pops is a fun activity that can involve the whole family, making it a great project for kids to help with in the kitchen.
- Perfect for Gifting: These beautifully decorated cake pops are not just tasty, but also make for charming gifts or party favors that everyone will love.
- Customizable Decor: You can personalize these cake pops with various sprinkles and chocolate coatings, allowing for endless creativity in presentation.
Ingredients
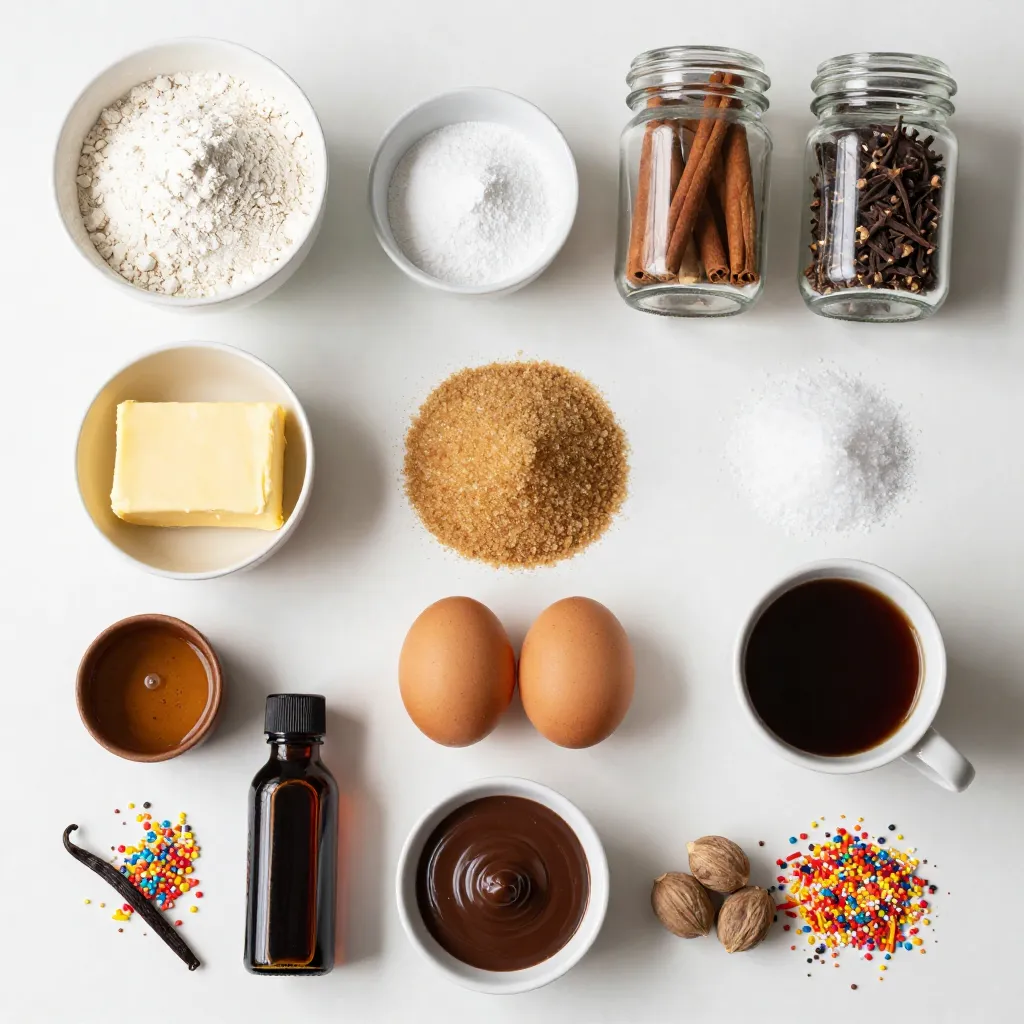
List of Ingredients
– 1 cup all-purpose flour
– 1/2 teaspoon baking soda
– 1 teaspoon ground ginger
– 1 teaspoon ground cinnamon
– 1/4 teaspoon ground cloves
– 1/4 teaspoon nutmeg
– 1/4 teaspoon salt
– 1/2 cup unsalted butter, softened
– 3/4 cup packed brown sugar
– 2 large eggs
– 1/2 cup unsulfured molasses
– 1 teaspoon pure vanilla extract
– 8 oz chocolate melts (dark or white)
– Assorted sprinkles for decoration
Key Ingredients Explained
The main star is unsulfured molasses. It gives the cake its rich flavor and moist texture. Ground spices like ginger, cinnamon, and cloves add warmth and holiday cheer. The butter helps create a soft crumb, while brown sugar brings sweetness and depth. Eggs bind everything, giving structure.
Using chocolate melts makes coating easy. They melt smoothly and harden well. Sprinkles add fun, color, and a festive touch.
Substitutions for Common Ingredients
If you need to swap ingredients, here are some easy options:
– All-purpose flour: Use gluten-free flour for a gluten-free version.
– Unsalted butter: You can use coconut oil or margarine.
– Brown sugar: White sugar works, but you’ll lose some flavor.
– Molasses: Honey or maple syrup can replace molasses, but the taste will change.
– Chocolate melts: Use real chocolate, but temper it for best results.
These swaps can help you tailor the recipe to your needs while still keeping it delicious.
Step-by-Step Instructions
Preparation Steps
First, gather your ingredients. You need:
– 1 cup all-purpose flour
– 1/2 teaspoon baking soda
– 1 teaspoon ground ginger
– 1 teaspoon ground cinnamon
– 1/4 teaspoon ground cloves
– 1/4 teaspoon nutmeg
– 1/4 teaspoon salt
– 1/2 cup unsalted butter, softened
– 3/4 cup packed brown sugar
– 2 large eggs
– 1/2 cup unsulfured molasses
– 1 teaspoon pure vanilla extract
– 8 oz chocolate melts
– Assorted sprinkles
Next, preheat your oven to 350°F (175°C). Line an 8×8 inch pan with parchment paper. Leave some paper hanging over the edges. This helps when you remove the cake.
In a medium bowl, mix together the flour, baking soda, ginger, cinnamon, cloves, nutmeg, and salt. Whisk until everything is well combined. Set this bowl aside for later.
Baking the Cake
In a large mixing bowl, cream the softened butter with brown sugar. Use an electric mixer on medium speed. Mix for 2-3 minutes until it’s light and fluffy.
Add the eggs, one at a time, beating well after each. Then, mix in the molasses and vanilla extract until smooth.
Gradually add the dry flour mixture to the wet ingredients. Stir gently until just combined. Do not overmix. This keeps your cake soft and tender.
Pour the batter into your prepared pan. Use a spatula to smooth out the top. Bake for 25-30 minutes. Check with a toothpick. It should come out clean when the cake is done.
Let the cake cool completely in the pan. After cooling, crumble the cake into fine crumbs using your hands or a fork in a large bowl.
Forming and Coating the Cake Pops
Take small amounts of the cake crumbs and roll them into balls about 1 inch wide. Place each ball on a lined baking sheet.
Melt the chocolate melts according to package directions. You can use a microwave-safe bowl or a double boiler for this.
Dip the tip of each lollipop stick into the melted chocolate. Then, insert the stick into the center of each cake ball. This helps keep the stick in place.
Refrigerate the cake pops for 15-20 minutes. This helps them firm up.
Once set, coat each cake pop in the melted chocolate. Make sure they are fully covered. Place them back on the lined baking sheet.
Before the chocolate hardens, sprinkle your favorite decorations on top. Let the cake pops cool completely at room temperature or chill them in the fridge until the chocolate sets.
Tips & Tricks
Common Mistakes to Avoid
When making gingerbread cake pops, some common mistakes can ruin your fun. One issue is overmixing the batter. This can make the cake tough, not soft. Always mix until just combined. Another mistake is not cooling the cake completely before crumbling. If it’s warm, you get clumps, not fine crumbs. Lastly, don’t skip refrigerating the cake balls before coating. This step helps the pops hold their shape.
Decorating Ideas for Cake Pops
Decorating your gingerbread cake pops can be a joyful task! You can use assorted sprinkles for a festive touch. Try using red and green sprinkles for Christmas. Drizzle melted white chocolate over dark chocolate for a nice contrast. You can also use edible glitter for a sparkly look. If you want more fun, add small candy pieces or mini marshmallows on top. Get creative and enjoy the process!
How to Achieve Perfect Consistency
Getting the right consistency for your cake pops is key. When mixing your cake batter, ensure the wet and dry ingredients blend well. The mixture should be moist but not runny. After crumbling, the cake should hold together easily when shaped into balls. If it’s too dry, you can add a bit of melted chocolate to help. For coating, melt the chocolate until it’s smooth and fluid. This helps create a nice, even layer on your pops.
Pro Tips
- Chill the Cake Balls: After forming the cake balls, chill them for a while before dipping them in chocolate. This helps them maintain their shape and prevents them from falling apart during the coating process.
- Use Quality Chocolate: Opt for high-quality chocolate melts for a smoother finish and better flavor. Dark chocolate pairs beautifully with the spices in gingerbread, while white chocolate adds a nice contrast.
- Experiment with Flavors: Add a pinch of orange zest or a splash of coffee to the cake batter for a unique twist. These flavors complement the spices and enhance the overall taste.
- Decorate Creatively: Get creative with your sprinkles and toppings. Use edible glitter, crushed candy canes, or even drizzle contrasting chocolate over the pops for a festive touch.
Variations
Gluten-Free Gingerbread Cake Pops
To make gluten-free gingerbread cake pops, swap all-purpose flour for gluten-free flour. Use a blend that works well for baking. I recommend a mix of rice flour, potato starch, and tapioca flour. This change keeps the cake soft and tasty. Follow the same recipe steps and enjoy the same warm spices.
Alternate Chocolate Coatings
While chocolate melts are popular, you can try other coatings. Candy melts come in many colors and flavors. White chocolate adds a sweet touch, while dark chocolate gives a rich taste. You can also use yogurt coating for a tangy twist. Simply melt your choice and coat the cake pops as usual.
Seasonal Flavor Variants
Get creative with seasonal flavors. Add orange zest for a bright kick or a hint of peppermint for winter cheer. You can mix in chopped nuts or dried fruits for texture. Each variation brings a unique taste to your cake pops. Experiment with spices like cardamom or nutmeg for added warmth.
Storage Info
How to Store Cake Pops
To store your gingerbread cake pops, place them in an airtight container. Make sure to add parchment paper between layers to avoid sticking. Store them at room temperature for up to three days. If you live in a warm area, refrigerate them to keep them fresh longer.
Freezing Instructions
You can freeze gingerbread cake pops for later enjoyment. First, place them on a baking sheet and freeze until solid. This usually takes about one hour. Once frozen, transfer them to a freezer-safe bag. They can last for up to three months in the freezer. Just remember to thaw them in the fridge before serving.
Best Practices for Keeping Them Fresh
– Avoid moisture: Keep cake pops in a dry area to prevent sogginess.
– Limit exposure: Only take out what you need to keep the rest fresh.
– Decorate before serving: Add sprinkles just before serving for a fresh look.
These tips will help your gingerbread cake pops stay tasty and fun for any holiday gathering!
FAQs
How do I know when the gingerbread cake is fully baked?
You can check the cake by inserting a toothpick into the center. If it comes out clean, the cake is done. The edges will also pull away from the pan slightly. Remember, every oven is different, so keep an eye on your cake around the 25-minute mark.
Can I make these cake pops ahead of time?
Yes, you can prepare the cake pops ahead of time. After forming the balls, you can store them in the fridge for up to three days. Just coat them in chocolate before serving. This makes them perfect for holiday parties!
What can I use instead of chocolate melts for coating?
You can use regular chocolate chips if you prefer. Just melt them slowly to avoid burning. White chocolate or candy coating also works well. If you want a fun twist, try using colored candy melts for a festive look!
I covered ingredients, steps, tips, and variations for making cake pops. Remember, use quality ingredients for the best flavor. Avoid common mistakes to make sure your cake pops are a hit. Experiment with different flavors and coatings to keep things fun. Store them properly to enjoy their fresh taste longer. With these tricks, you will create delicious cake pops every time. Now, go ahead and try these ideas and impress your friends and famil
Gingerbread Cake Pops
Delicious gingerbread cake transformed into fun and festive cake pops, perfect for any celebration.
Prep Time 30 minutes mins
Cook Time 30 minutes mins
Total Time 1 hour hr
Course Dessert
Cuisine American
Servings 15
Calories 150 kcal
- 1 cup all-purpose flour
- 1/2 teaspoon baking soda
- 1 teaspoon ground ginger
- 1 teaspoon ground cinnamon
- 1/4 teaspoon ground cloves
- 1/4 teaspoon nutmeg
- 1/4 teaspoon salt
- 1/2 cup unsalted butter, softened to room temperature
- 3/4 cup packed brown sugar
- 2 large eggs
- 1/2 cup unsulfured molasses
- 1 teaspoon pure vanilla extract
- 8 oz chocolate melts (dark or white chocolate)
- as needed assorted sprinkles for decoration
Preheat your oven to 350°F (175°C). To prepare your baking dish, line an 8x8 inch pan with parchment paper, allowing some overhang for easy removal later.
In a medium bowl, combine the all-purpose flour, baking soda, ground ginger, ground cinnamon, ground cloves, nutmeg, and salt. Whisk together until well mixed and set aside.
In a large mixing bowl, cream the softened unsalted butter and packed brown sugar. Beat them together using an electric mixer on medium speed until the mixture is light and fluffy, about 2-3 minutes.
Add the eggs to the butter and sugar mixture one at a time, ensuring to beat well after each addition until fully incorporated. Next, stir in the molasses and pure vanilla extract until the mixture is smooth.
Gradually add the dry ingredients to the wet mixture, stirring gently until just combined. Avoid overmixing to keep the cake tender.
Pour the cake batter into the prepared baking dish, using a spatula to smooth out the top. Bake in your preheated oven for 25-30 minutes, or until a toothpick inserted into the center comes out clean.
Once baked, allow the cake to cool completely in the pan. When cooled, crumble the cake into fine crumbs in a large mixing bowl using your hands or a fork.
With your hands, form small balls roughly the size of 1 inch from the cake crumbs. Place each ball on a baking sheet lined with parchment paper.
Following the instructions on the package, melt the chocolate melts in a microwave-safe bowl or using a double boiler. Dip the tip of each lollipop stick into the melted chocolate before inserting it into the center of each cake ball, ensuring they are securely attached.
After adding sticks to all cake balls, refrigerate the pops for about 15-20 minutes to allow them to firm up.
Once set, coat each cake pop thoroughly in the melted chocolate, ensuring they are evenly covered. Place them back on the lined baking sheet.
Before the chocolate hardens, generously sprinkle your chosen decorations on top of each cake pop. Allow the pops to cool completely at room temperature or chill them in the fridge until the chocolate has fully set.
Display the cake pops upright in a decorative stand for a charming presentation.
Keyword cake pops, dessert, gingerbread
WANT TO SAVE THIS RECIPE?