FREE DINNER EBOOK! Get your copy!
  • Cookie Policy
  • GDPR Policy
  • Disclaimer
  • Terms Of Use
  • Visit my other site: Fun Cookie Recipes
meal plan mapper
  • Home
  • Dinner
  • Desserts
  • Drinks
  • Appetizers
  • Contact
  • About
  • Privacy Policy
  • Home
  • Dinner
  • Desserts
  • Drinks
  • Appetizers
  • Contact
  • About
  • Privacy Policy
  • Cookie Policy
  • GDPR Policy
  • Disclaimer
  • Terms Of Use
Visit my other site: Fun Cookie Recipes

HOME / CATEGORIES /

Latest

To create the No-Bake Salted Caramel Chocolate Tart, you need some key ingredients. Each one plays an important role in the flavor and texture. Here’s the full list: - 1 1/2 cups chocolate cookie crumbs (or graham cracker crumbs) - 1/2 cup unsalted butter, melted - 1 cup Medjool dates, pitted and roughly chopped - 1/2 cup full-fat coconut milk - 1/2 cup creamy almond butter (or another nut/seed butter of choice) - 1 teaspoon pure vanilla extract - 1/2 cup pure maple syrup (or honey, if preferred) - 1/4 teaspoon fine sea salt (plus extra for garnishing) - 1/2 cup dark chocolate chips (dairy-free if needed) - 1 tablespoon coconut oil Using chocolate cookie crumbs gives the crust a rich taste. You can swap them for graham cracker crumbs if you prefer a milder flavor. Unsalted butter adds creaminess to the crust. The melted butter helps bind the crumbs together. Medjool dates are a natural sweetener and create a smooth caramel layer. If you want a milder sweetness, you can use fewer dates. Coconut milk adds richness and creaminess to your caramel. It also helps bind the ingredients together. Almond butter gives a nutty flavor. You can use any nut or seed butter you like, such as peanut or sunflower butter. Pure vanilla extract enhances the overall flavor of the tart. Maple syrup adds a sweet touch. If you prefer, you can substitute it with honey. Fine sea salt balances the sweetness. Always sprinkle a little extra for that salty kick. Dark chocolate chips provide that decadent chocolate layer. You can choose dairy-free chips if needed. Coconut oil helps in melting the chocolate and gives it a nice glossy finish. Feel free to experiment! You can add extra flavors or swap out ingredients to suit your taste. - In a bowl, mix 1 1/2 cups chocolate cookie crumbs with 1/2 cup melted unsalted butter. - Stir until all crumbs are coated. - Press this mixture firmly into a 9-inch tart pan. - Make sure to cover the bottom and sides evenly. - Chill the crust in the fridge for 30 minutes. - For the caramel, gather these ingredients: - 1 cup Medjool dates, pitted - 1/2 cup full-fat coconut milk - 1/2 cup creamy almond butter - 1 teaspoon pure vanilla extract - 1/2 cup pure maple syrup - 1/4 teaspoon fine sea salt - Blend these ingredients in a high-speed blender. - Keep blending until the mixture is smooth. - If it’s too thick, add a splash of water. - Pour the caramel layer over the chilled crust. - Use a spatula to spread it evenly. - Gently tap the tart pan on the counter to remove air bubbles. - Return the tart to the fridge for 1 hour to set. - In a small saucepan, combine 1/2 cup dark chocolate chips and 1 tablespoon coconut oil. - Melt these over low heat, stirring until smooth. - Remove from heat and let it cool for a few minutes. - Once the caramel has set, pour the chocolate mixture over it. - Smooth out the chocolate with a spatula. - Sprinkle a pinch of sea salt on top for extra flavor. - Chill the tart for another 30 minutes to set the chocolate. Making this tart is easy, but some errors can happen. Here are common mistakes to watch out for: - Overmixing or undermixing the crust: Mix the chocolate cookie crumbs and melted butter until they are just combined. If you mix too much, the crust can become tough. If you mix too little, the crust won’t hold together well. - Tips for achieving the silky consistency of caramel: When making the caramel, blend the dates, coconut milk, and almond butter well. If it feels too thick, add a splash of water. This helps create a smooth and pourable caramel. A beautiful tart is a treat for the eyes. Here are some simple ideas to make your tart shine: - Decorative garnishing ideas, such as whipped coconut cream: Top each slice with a dollop of whipped coconut cream. It adds a creamy texture and looks stunning. - Tips on serving with seasonal fruits: Fresh berries or slices of ripe fruit add color and freshness. Consider strawberries, raspberries, or even kiwi for a vibrant touch. Pairing your tart with the right flavors enhances the experience: - Best pairings for the tart: Serve this tart with a scoop of vanilla ice cream or a glass of cold almond milk. These pairings balance the rich flavors of the tart. - Ideal serving temperatures: The tart is best served chilled. Let it sit out for a few minutes before serving. This helps soften the chocolate topping and makes it easier to slice. {{image_4}} You can add different nut butters to this tart. Almond butter gives a creamy taste. Peanut butter adds a rich, nutty twist. You can also try cashew butter for a mild flavor. Each nut butter will change the tart's taste and texture. Another way to enhance flavor is by adding spices. A pinch of cinnamon can warm the flavor up. Espresso powder adds a nice coffee kick. Both spices will make your tart stand out. If you're vegan, swap the butter for coconut oil. Use maple syrup instead of honey. This way, you keep the tart creamy without dairy. For gluten-free options, use gluten-free cookies for the crust. They still hold together well and taste great. If you want a lower-sugar tart, use less maple syrup. You can use ripe bananas for sweetness instead. This keeps the dessert tasty but cuts down on sugar. To keep your no-bake salted caramel chocolate tart fresh, wrap it well. Use plastic wrap or place it in an airtight container. This will help prevent it from drying out. Store the tart in the refrigerator. It will stay good for about five days. If you want to keep it longer, you can freeze it. Just slice it first and wrap each piece separately. It can last up to two months in the freezer. You don’t need to heat the tart since it’s meant to be served cold. If it feels too firm after storage, let it sit at room temperature for about 10 minutes. This makes it easier to slice and enjoy. If you prefer a softer texture, you can microwave a slice for about 10-15 seconds. This will warm it slightly without melting the chocolate topping. Enjoy your tart at the perfect temperature! Yes, you can make this tart ahead of time. I suggest preparing it a day in advance. This allows the flavors to meld well together. Just store it in the fridge. Cover it tightly with plastic wrap to keep it fresh. If your caramel layer is runny, don’t worry! You can thicken it easily. Add more chopped Medjool dates to the blender. Blend until smooth. You can also chill the caramel in the fridge for a bit. This helps it firm up before pouring it on the crust. If you need a nut-free option, try sunflower seed butter. It works well and adds a nice flavor. You can also use peanut butter or cashew butter. Just pick your favorite nut or seed butter for the recipe. Yes, this tart can be gluten-free! Use gluten-free chocolate cookie crumbs or graham cracker crumbs. Always check the labels to ensure they are certified gluten-free. This way, everyone can enjoy this tasty treat without worry. This blog post covered everything you need to make a delicious tart. We discussed key ingredients like chocolate cookie crumbs and almond butter. You learned how to prepare the crust, make a silky caramel layer, and assemble the tart. We shared tips to avoid common mistakes and suggested ways to present your dessert beautifully. Lastly, you gained insight into flavor variations and proper storage. Enjoy creating your tart, and impress everyone with your skills!

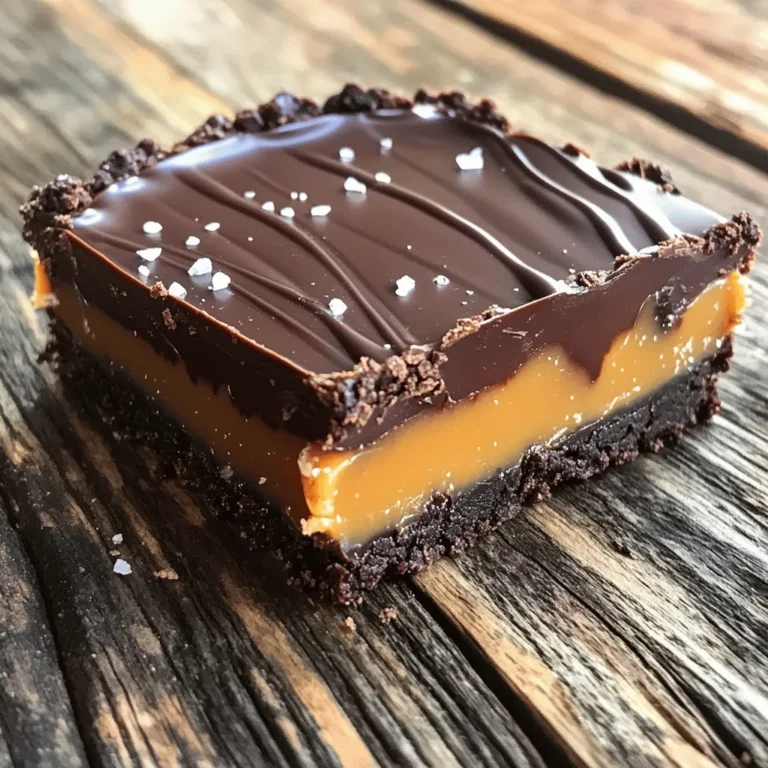
No-Bake Salted Caramel Chocolate Tart Delight

- 200g udon noodles - 300g large shrimp, peeled and deveined - 4 cloves garlic, minced - 1 tablespoon fresh ginger, grated - 1 tablespoon chili paste (adjust for heat preferences) - 2 tablespoons soy sauce - 1 tablespoon sesame oil - 1 green onion, finely chopped - 1 bell pepper, any color, thinly sliced - 1 cup snow peas, trimmed - 1 tablespoon sesame seeds (optional, for garnish) - Fresh cilantro sprigs (optional, for garnish) If you want to switch things up, you can try: - Using rice noodles instead of udon for a different texture. - Substituting shrimp with chicken or tofu for a new protein. - Adding broccoli or zucchini for extra veggies. To make this dish, you will need: - A large pot for boiling noodles - A large skillet or wok for sautéing - A spatula for stirring - Measuring spoons for accuracy - A cutting board and knife for chopping - A colander for draining noodles First, boil water in a large pot. Add the udon noodles and cook them for about 5 to 7 minutes. Check the package for exact cooking times. Drain the noodles and save a little pasta water. Set the noodles aside for later. Next, heat sesame oil in a large skillet over medium heat. Once the oil is hot, add minced garlic and grated ginger. Cook this mix for about 30 seconds. Stir often until it smells great but does not brown. Now, turn the heat to high. Add the shrimp to the skillet. Cook for 2 to 3 minutes while stirring. The shrimp should become pink and opaque. Then, add sliced bell pepper and snow peas. Stir-fry everything for another 2 minutes until the veggies are bright and slightly tender. Pour in soy sauce and chili paste. Use a spatula to mix all the ingredients. Let it cook for 1 minute to blend the flavors nicely. Then, gently add the cooked udon noodles. If it looks dry, splash in some reserved pasta water. Toss everything well to coat the noodles, then heat for another minute. Once everything is hot, take the skillet off the heat. Serve the dish right away. Top with chopped green onions, sesame seeds, and fresh cilantro. For a fun touch, you can also add a lime wedge on the side for some zing! To get the best udon noodles, follow these steps: - Use plenty of water to boil the noodles. - Cook them until they are just tender. - Drain them but keep a little pasta water. This keeps the noodles soft and helps blend flavors later. The chili paste is key for heat. Start with one tablespoon. If you want it milder, use less. For more heat, add more chili paste. Taste as you go to find your ideal spice level. Garnishes can add fun and flavor. Here are some ideas: - Top with chopped green onions for freshness. - Sprinkle sesame seeds for crunch. - Add fresh cilantro for a herbaceous touch. - A lime wedge can give a zesty kick. These small touches can elevate your dish. {{image_4}} You can swap shrimp for chicken, tofu, or beef. If you choose chicken, use bite-sized pieces. Cook them until they are no longer pink, about 5-7 minutes. For tofu, use firm or extra-firm. Cut it into cubes and sauté until golden. If you prefer beef, thinly slice it against the grain. Cook it for 3-4 minutes or until browned. Each protein adds its own flavor and texture, making the dish fun and diverse. Adding more veggies can increase the nutrients in your meal. You can use broccoli, carrots, or bok choy for a colorful mix. Just chop them into small pieces for easy cooking. Add them when you stir-fry the bell pepper and snow peas. This way, they stay bright and crisp. You can also try mushrooms for an earthy taste, or zucchini for a light touch. The more veggies, the better! If you need gluten-free options, look for gluten-free udon noodles. These noodles are made from rice or other gluten-free grains. They cook similarly to regular udon. Follow the package instructions for the best results. You can also use rice noodles, which are a great substitute. Just be sure to adjust cooking times. Enjoy your dish without worrying about gluten! To keep your leftovers fresh, store them in an airtight container. Make sure the dish cools down before sealing. This helps to lock in flavors and prevent sogginess. You can keep it in the fridge for up to three days. If you plan to eat it later, don’t add any garnishes until you reheat. When it’s time to enjoy your leftovers, you have a few options. The microwave is quick and easy. Place your udon in a microwave-safe bowl and cover it with a lid or a damp paper towel. Heat for one to two minutes, stirring halfway through. You want it warm, not hot. If you prefer the stove, heat a skillet over medium heat. Add a splash of water or broth to prevent sticking. Stir until warmed through, about five minutes. If you want to save your udon for a later date, freezing is a great option. First, let the dish cool completely. Then, portion it into freezer-safe bags or containers. Remove excess air before sealing to avoid freezer burn. You can freeze it for up to three months. When ready to eat, thaw in the fridge overnight. Reheat using your preferred method, adding a bit of water if needed to keep it moist. It takes about 5 to 7 minutes to cook udon noodles. Start by boiling water in a large pot. Once the water is boiling, add the noodles. Stir them gently to prevent sticking. Follow the package instructions for perfect results. When done, drain the noodles and set them aside. Yes, you can make this dish without shrimp. Try using chicken, tofu, or even mushrooms instead. Cook the protein until it is done, just like the shrimp. This gives you tasty options while keeping the same great flavor. If you don’t have sesame oil, use olive oil or peanut oil. These oils bring a nice flavor too. Just remember, sesame oil has a unique taste that adds to the dish. You might miss that special touch. The spice level comes from the chili paste. It offers a nice kick, but you can adjust it. Use less chili paste for a milder dish or add more for extra heat. Taste as you go to find the right balance for you. Adding vegetables is simple! You can toss in bell peppers, broccoli, or bok choy. Stir-fry them with the shrimp for about 2 minutes. This keeps them crisp and colorful. More veggies not only add nutrition but also make the dish even more delicious! In this post, we explored how to make Minute Spicy Garlic Shrimp Udon. We covered the ingredients, step-by-step cooking instructions, and useful tips. You learned how to adjust spice levels and improve your dish with extras. Plus, we discussed variations for different diets and how to store leftovers. Cooking this dish is easy and fun. I hope you feel ready to try it! Enjoy your tasty creation.

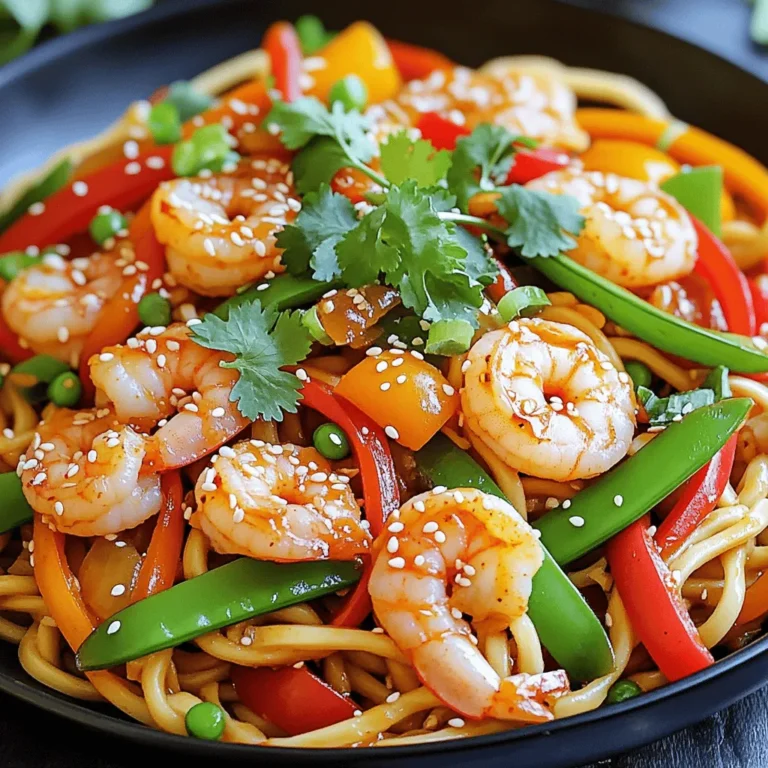
Minute Spicy Garlic Shrimp Udon Quick and Flavorful Meal

To make Sheet-Pan Garlic Butter Shrimp and Asparagus, you need the following items: - 1 pound large shrimp, peeled and deveined - 1 bunch asparagus, trimmed and cut into 2-inch pieces - 4 tablespoons unsalted butter, melted - 4 cloves garlic, minced - 1 teaspoon smoked paprika - 1 teaspoon lemon zest, finely grated - Salt and freshly ground black pepper, to taste - 1 tablespoon fresh parsley, finely chopped, for garnish - Lemon wedges, for serving You can easily adjust this recipe to fit your needs. If you dislike shrimp, try chicken or tofu. Swap asparagus for broccoli or green beans if you prefer. Use olive oil instead of butter for a dairy-free option. If you're on a low-sodium diet, reduce the salt or use herbs to add flavor. Always feel free to get creative with spices based on your taste! Using fresh ingredients makes a big difference in this dish. Fresh shrimp have a firm texture and a sweet taste that frozen ones lack. Fresh asparagus adds a crisp bite and bright flavor. When you use fresh garlic, it brings out a strong aroma and taste. Fresh lemon zest enhances the dish with a bright, citrusy note. Always choose quality ingredients for the best results! Start by gathering all your ingredients. You need shrimp, asparagus, butter, garlic, spices, and lemon. Preheat your oven to 400°F (200°C). Line a large sheet pan with parchment paper. This helps with easy cleanup. Trim the asparagus and cut it into 2-inch pieces. Peel and devein the shrimp if needed. In a small bowl, whisk together melted butter, minced garlic, smoked paprika, lemon zest, and a pinch of salt and pepper. Spread the shrimp and asparagus evenly on the sheet pan. Drizzle half of the garlic butter mixture over them. Use your hands or tongs to toss everything together. Make sure the shrimp and asparagus are in a single layer. This allows for even cooking. Place the sheet pan in the oven and bake for 10-12 minutes. The shrimp will turn pink and opaque. The asparagus should be tender but still crisp. To check if the shrimp are done, look for a pink color and opaque texture. The asparagus should be bright green and tender. If you want, you can use a fork to poke the asparagus. It should be soft but still have some snap. Once done, remove the pan from the oven. Drizzle the remaining garlic butter over the shrimp and asparagus. Toss gently to mix. For this recipe, I recommend using large shrimp. They cook evenly and stay juicy. You can also use jumbo shrimp for a heartier bite. If you prefer, try different shrimp types, like wild-caught or farmed. Each has its taste and texture. You can even swap shrimp for chicken or tofu if you want a twist. The garlic butter sauce is key to this dish. Use fresh garlic for the best flavor. Mince it finely to ensure it spreads evenly. Melt the butter before mixing to help it blend well. Make sure to balance the lemon zest with the smoked paprika. This will give your sauce a bright and rich taste. To make cooking easier, use these tools: - A large sheet pan to hold all the shrimp and asparagus. - Parchment paper for easy cleanup. - A small mixing bowl for the garlic butter sauce. - Tongs to toss the shrimp and asparagus gently. - A zester to get the lemon zest just right. Having these tools on hand will help you create this dish smoothly and enjoyably. {{image_4}} You can switch up the veggies in this dish. Try using broccoli, bell peppers, or snap peas. Carrots add a nice crunch, too. Just make sure to cut them into small pieces. This way, they cook evenly with the shrimp. Feel free to get creative with spices. Try adding chili flakes for some heat. You can also use Italian herbs like oregano or basil. For a twist, swap smoked paprika for curry powder. Each change can give the dish a new taste. To make this a full meal, serve it with rice or quinoa. Garlic bread is also a great side. A fresh salad with lemon vinaigrette pairs well, too. You can even add a fruit salad for a sweet touch. After you enjoy your meal, let the leftovers cool first. Store them in an airtight container. This helps keep the shrimp and asparagus fresh. You can keep them in the fridge for up to three days. Make sure to label the container with the date. This way, you won't forget when you made it. To reheat your leftovers, use the oven. Preheat it to 350°F (175°C). Place the shrimp and asparagus on a baking sheet. Cover them with foil to keep moisture in. Heat for about 10 minutes, or until warm. This method keeps the shrimp juicy and the asparagus crisp. You can freeze this dish if you have extra. Place it in a freezer-safe container or bag. Remove as much air as possible to prevent freezer burn. It can last for up to three months in the freezer. When you want to eat it, thaw it overnight in the fridge. Then, reheat as mentioned above for the best taste. Yes, you can use frozen shrimp. First, thaw them completely. Place the shrimp in a bowl of cold water for about 15-20 minutes. Once thawed, pat them dry with a paper towel. This step helps the shrimp cook evenly and soak up the garlic butter flavor. To make this recipe gluten-free, stick to the ingredients listed. All items in the recipe are naturally gluten-free. Just check the butter to make sure it’s labeled gluten-free. If you want to serve it with a side, choose gluten-free grains like rice or quinoa. This dish pairs well with several sides. Here are a few ideas: - Cooked rice or quinoa for a hearty base. - A simple green salad for a fresh crunch. - Garlic bread to soak up any extra garlic butter. - Roasted potatoes for a comforting addition. These sides will complement the shrimp and asparagus nicely, making your meal even more enjoyable. In this blog post, we covered the key ingredients for the dish, with options for substitutions. I shared step-by-step instructions for a tasty bake and offered tips for perfect doneness. You learned about shrimp sizes, a great garlic butter sauce, and useful kitchen tools. We explored vegetable alternatives, spice variations, and side dish ideas to make it a full meal. I also gave storage tips and answered common questions. With these insights, you can confidently create a delicious and satisfying meal. Enjoy cooking!

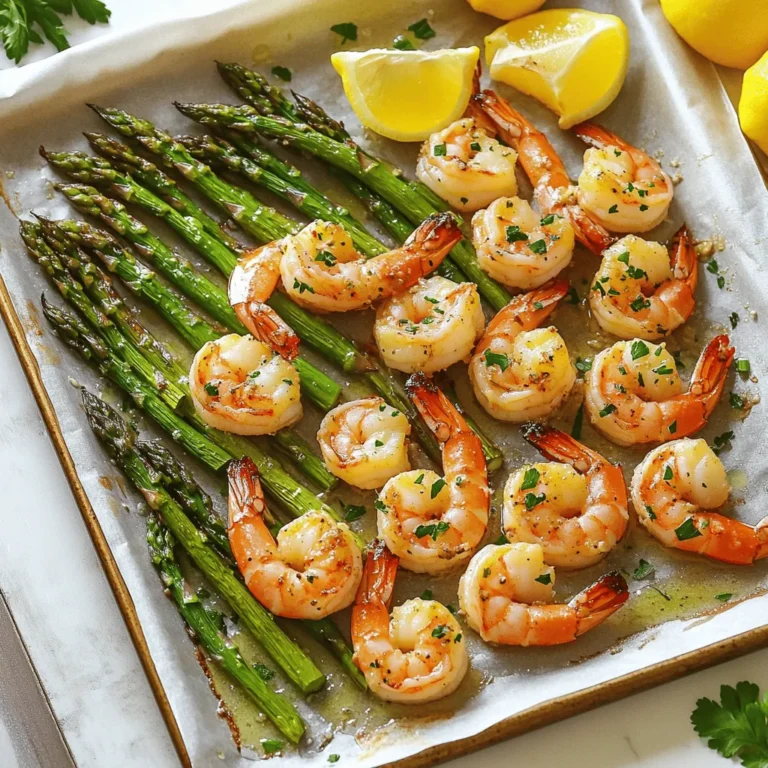
Savory Sheet-Pan Garlic Butter Shrimp and Asparagus

- 1 cup graham cracker crumbs - 1/4 cup unsalted butter, melted - 2 tablespoons brown sugar - 2 packages (8 oz each) cream cheese, softened - 1/2 cup granulated sugar - 1 teaspoon vanilla extract - 2 large eggs - 1 cup pecans, chopped - 1 cup caramel sauce - 1 teaspoon sea salt (for garnish) Graham cracker crumbs form a sweet crust that holds the bars together. Use fresh, unsalted butter for the best flavor. Cream cheese is the star of the filling, making it rich and creamy. Choose high-quality vanilla extract for a deeper taste. Pecans add crunch and flavor, so chop them well. Caramel sauce can be homemade or store-bought, depending on your time. Sea salt adds a nice contrast to the sweet topping. If you lack graham cracker crumbs, use crushed cookies or oats. Coconut oil can replace butter for a dairy-free option. For a lighter option, try using Neufchâtel cheese instead of cream cheese. Maple syrup could replace granulated sugar, but it might change the texture. If you want a nut-free version, leave out the pecans or replace them with pumpkin seeds. For a different flavor, you can use almond or hazelnut extract in place of vanilla. First, preheat your oven to 350°F (175°C). While the oven warms, grab a 9x9 inch baking dish. Lightly grease it with cooking spray or butter. This step helps the bars come out easily later. In a medium bowl, mix together the graham cracker crumbs, melted butter, and brown sugar. Stir until the mixture looks like wet sand. Press this mixture firmly into the bottom of your greased dish. Make sure it is even and compact. This crust will hold everything together. In a large bowl, use an electric mixer to beat the softened cream cheese and granulated sugar. Mix for 2-3 minutes until smooth and creamy. Add in the vanilla extract and mix it well. This creates a rich base for your cheesecake. With the mixer on low speed, add the eggs one at a time. Mix just until incorporated after each egg. Avoid overmixing to keep the cheesecake light. Pour the cheesecake filling over the crust. Bake for about 30-35 minutes. The edges should be set, but the center can jiggle a bit. It will firm up as it cools. Once baked, take the dish out of the oven. Let it cool at room temperature for about 30 minutes. After that, move the dish to the fridge. Chill for at least 2 hours. This helps the cheesecake set and makes it easier to cut. When making caramel pecan pie cheesecake bars, avoid some common pitfalls: - Overmixing: Mix the batter just enough. Too much mixing can make it dense. - Skipping the chill: Don’t skip chilling the bars. This step helps them set properly. - Ignoring the jiggle: When baking, the center should jiggle slightly. It will firm up later. To get that creamy and smooth texture in your cheesecake bars: - Room temperature ingredients: Make sure your cream cheese is soft. This helps it blend well. - Fold gently: When adding pecans, fold gently to keep the air in the batter. - Avoid high heat: Bake at 350°F. Too high can cause cracks and uneven texture. For a stunning presentation of your cheesecake bars: - Use a nice platter: Arrange the bars on a decorative dish for a great look. - Add extra caramel: Serve with extra caramel sauce in a small bowl for drizzling. - Garnish well: Top each bar with a whole pecan. This adds charm and flavor. {{image_4}} You can change the nuts in this recipe for a new taste. Walnuts or almonds work well. Both add a nice crunch. If you want a twist, try hazelnuts. They have a rich flavor that pairs nicely with caramel. Just chop them up like you do with pecans. While caramel sauce is a classic topping, you can mix it up. Try a chocolate ganache for a sweet twist. Melt dark chocolate and mix with cream for a rich topping. You can also use fresh fruit, like sliced strawberries or raspberries. They add freshness and a pop of color. Making mini cheesecake bars is easy and fun. Use a muffin tin lined with paper cups. This way, each bar is a perfect bite. Adjust the baking time to about 20-25 minutes. They will be cute and can be great for parties or snacks. To keep your caramel pecan pie cheesecake bars fresh, store them in an airtight container. Place a piece of wax paper between the bars and the lid. This will help prevent sticking. You can keep the bars in the fridge for up to five days. Make sure they are completely cool before storing. This will help them set and taste better. If you want to save some for later, you can freeze these cheesecake bars. First, cut them into squares. Wrap each square tightly in plastic wrap. Then, place the wrapped bars in a freezer-safe bag. They can last for up to three months in the freezer. When you are ready to eat them, just thaw them in the fridge overnight. If you want to enjoy them warm, you can reheat the cheesecake bars. Place a bar on a microwave-safe plate. Heat it in the microwave for about 10-15 seconds. Check to see if it is warm enough for you. Avoid overheating, as that can change the texture. Enjoy your delicious treat! Yes, you can make these cheesecake bars ahead of time. They taste even better after chilling. I suggest making them a day before your event. This gives the flavors time to blend. Just be sure to cover them well in the fridge. If you need a cream cheese substitute, try using mascarpone or ricotta cheese. Both provide a creamy texture. Another option is vegan cream cheese for a dairy-free choice. Just ensure that the substitute you select has a similar fat content. To prevent cracking, mix the batter on low speed. Avoid overmixing, as this adds too much air. Bake at a lower temperature, and do not open the oven door while baking. Cooling the cheesecake slowly helps, too. Let it cool at room temperature first. Yes, you can use a different type of crust. Options include an Oreo crust or a nut-based crust. Just make sure the crust holds up. If using a different crust, adjust the baking time if needed. Enjoy experimenting with flavors! You learned all about making cheesecake bars from ingredients to storage. We covered key notes, tips, tricks, and variations. With this guide, you can make delicious bars and impress everyone. Remember to avoid common mistakes for a great texture. Enjoy the process and feel free to experiment with flavors. Cheesecake bars are fun to make and share. Now, you’re ready to enjoy your tasty creation!

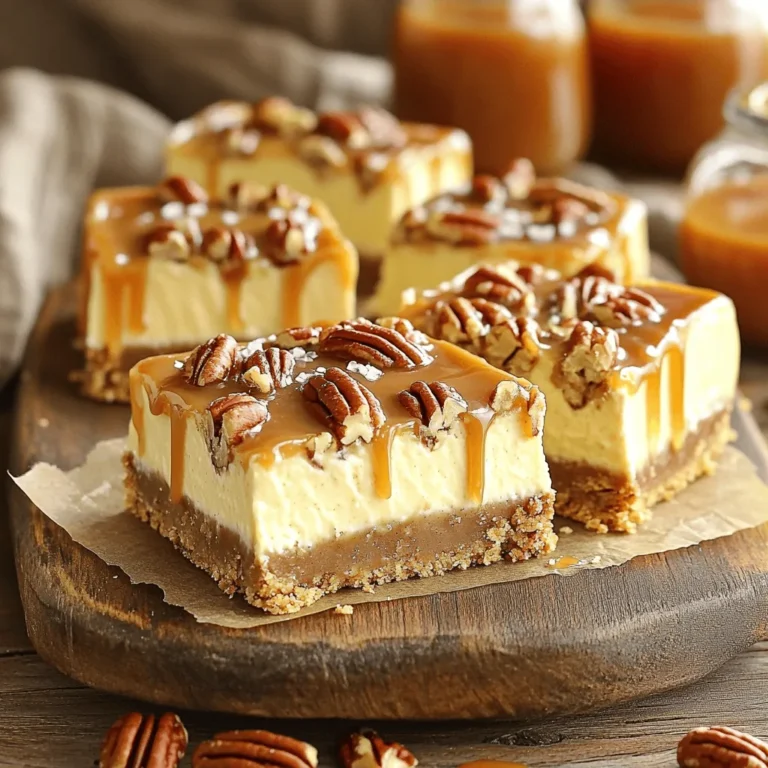
Caramel Pecan Pie Cheesecake Bars Scrumptious Delight

To make potato mochi, you need a few essential items. Here’s what you need: - 2 large russet potatoes, peeled and cut into chunks - 1 cup glutinous rice flour (mochi flour) - 1 cup shredded mozzarella cheese - 2 tablespoons potato starch (plus extra for dusting) - 1 tablespoon soy sauce - 1 teaspoon garlic powder - 1/2 teaspoon salt - 1 tablespoon butter (for pan-frying) - Chopped green onions for garnish These ingredients come together to create a soft, cheesy treat that you will love. You can customize your potato mochi. Some optional items include: - Different cheese types like cheddar or gouda for varied flavors. - Add herbs like chives or parsley for freshness. - Use sweet potatoes instead of russets for a sweet twist. If you need a gluten-free option, look for gluten-free rice flour. Keep in mind that these changes can alter the taste and texture. Potato mochi is not just tasty; it also packs some nutrition. Here’s a quick look at what you get per serving: - Calories: Approximately 220 - Protein: About 5g - Carbs: Around 30g - Fat: Around 9g This dish is a fun way to enjoy potatoes and cheese while getting some energy from carbs. {{ingredient_image_2}} First, take 2 large russet potatoes. Peel them and cut them into chunks. Place the chunks in a large pot. Fill the pot with salted water and bring it to a boil. Cook the potatoes for about 15-20 minutes. They should be fork-tender when done. Drain the potatoes well and return them to the pot. Use a potato masher or fork to mash them until smooth. Make sure there are no lumps. Allow the mashed potatoes to cool a bit so you don’t burn your hands later. In a large mixing bowl, combine the cooled mashed potatoes with 1 cup of glutinous rice flour, 2 tablespoons of potato starch, 1 tablespoon of soy sauce, 1 teaspoon of garlic powder, and 1/2 teaspoon of salt. Mix everything together well. You want a smooth dough to form. Once the dough is mixed, gently fold in 1 cup of shredded mozzarella cheese. Knead the dough lightly to spread the cheese evenly. If the dough feels too sticky, sprinkle a little more potato starch until it feels just right. Now, divide the dough into small pieces, about the size of golf balls. Roll each piece into a ball, then flatten it into a disc about ½ inch thick. This helps with even cooking. Heat a non-stick skillet over medium heat and melt 1 tablespoon of butter. Once hot and bubbling, add the mochi discs in batches. Don't crowd the pan; this helps them fry evenly. Cook each side for about 3-4 minutes until golden brown and crispy. When they are done, place the mochi on a plate lined with paper towels to soak up extra oil. Before serving, sprinkle freshly chopped green onions on top for color and flavor. To make potato mochi soft and chewy, you need the right mix of ingredients. Use glutinous rice flour, also called mochi flour. This flour gives mochi its signature texture. After mashing the potatoes, let them cool. Warm potatoes can make the dough too sticky. If your dough feels too wet, add a touch of potato starch. This helps you shape smooth discs without sticking. One common mistake is overcooking the potatoes. If they are too soft, the mochi will lack structure. Aim for fork-tender potatoes, about 15-20 minutes of boiling. Another mistake is overcrowding the pan while frying. Fry the mochi in batches to achieve that crispy, golden crust. Let them fry undisturbed for the best results. Finally, don’t skip the resting time after mixing the dough. This helps the flavors blend and the texture improve. Serve your potato mochi hot for the best taste. Arrange them on a platter and sprinkle with chopped green onions. This adds color and freshness. For extra flavor, drizzle a bit of soy sauce over the mochi or sprinkle sesame seeds. You can even pair them with a dipping sauce like spicy mayo or sweet soy sauce. Enjoy these tasty bites as a snack or a side dish! Pro Tips Use Fresh Potatoes: Always opt for fresh russet potatoes for the best flavor and texture in your mochi. Older potatoes may have excess moisture, affecting the dough consistency. Adjust Cheese Type: While mozzarella is traditional, feel free to experiment with other types of cheese, such as cheddar or pepper jack, for different flavor profiles. Keep Dough Cool: If your dough becomes too sticky while working with it, refrigerate it for a short time. This helps in managing stickiness and makes it easier to shape. Perfect Frying Temperature: Ensure your skillet is at medium heat; too high can burn the outside while leaving the inside undercooked. Test with a small piece of dough first to find the right temperature. {{image_4}} You can switch up the cheese for fun flavors. Cheddar gives a sharp taste. Gouda adds a sweet, nutty touch. For a creamy texture, try cream cheese. Always use cheese that melts well. This change keeps each bite exciting. You can boost nutrition by adding veggies or protein. Spinach or kale mixes well into the dough. Grated carrots add color and sweetness. For protein, try cooked chicken or bacon bits. Chop them finely and fold them into the dough. This makes each mochi unique and filling. You can spice up your potato mochi too! Add a pinch of chili flakes for heat. For a sweet twist, mix in some sugar or cinnamon. Fresh herbs like basil or cilantro can enhance the taste. Just chop them finely and add to the dough. These flavor changes can make a big difference. After you enjoy your potato mochi, you might have some left. Let the mochi cool to room temperature. Place them in an airtight container. Store them in the fridge for up to three days. This keeps them fresh and ready for your next meal. To reheat your potato mochi, use a skillet. Heat a little butter over medium heat. Place the mochi in the skillet and cook for about 2-3 minutes on each side. This will make them crispy again. You can also microwave them for about 30 seconds, but they won’t be as crispy. You can freeze potato mochi for later. First, let them cool completely. Then, place them on a baking sheet in a single layer. Freeze them for about an hour until firm. Once frozen, move them to a freezer bag. They can stay in the freezer for up to three months. When ready to eat, you can cook them straight from frozen. Just add a few extra minutes to your cooking time. To make potato mochi gluten-free, simply use glutinous rice flour, which is naturally gluten-free. Ensure all other ingredients, like potato starch and soy sauce, are also gluten-free. Read labels carefully to avoid hidden gluten. This way, you can enjoy mochi without worry. Yes, you can use different types of potatoes. While russet potatoes work best for their fluffy texture, you can try Yukon Gold or even sweet potatoes. Each type gives a unique flavor and texture. Experiment with what you have for fun results! The best way to reheat potato mochi is to pan-fry them again. Heat a non-stick skillet over medium heat. Add a little butter or oil and cook each mochi for 2-3 minutes on each side. This restores their crispiness and warms them evenly. You can also microwave them, but they won’t be as crispy. Potato mochi is a fun and tasty dish. You learned about the key ingredients, cooking steps, and how to avoid mistakes. We also explored flavor and texture variations, along with proper storage tips. Now, you can make perfect potato mochi at home. Experiment with different ingredients and share your creations. Remember, practice makes perfect. Enjoy your cooking journey!

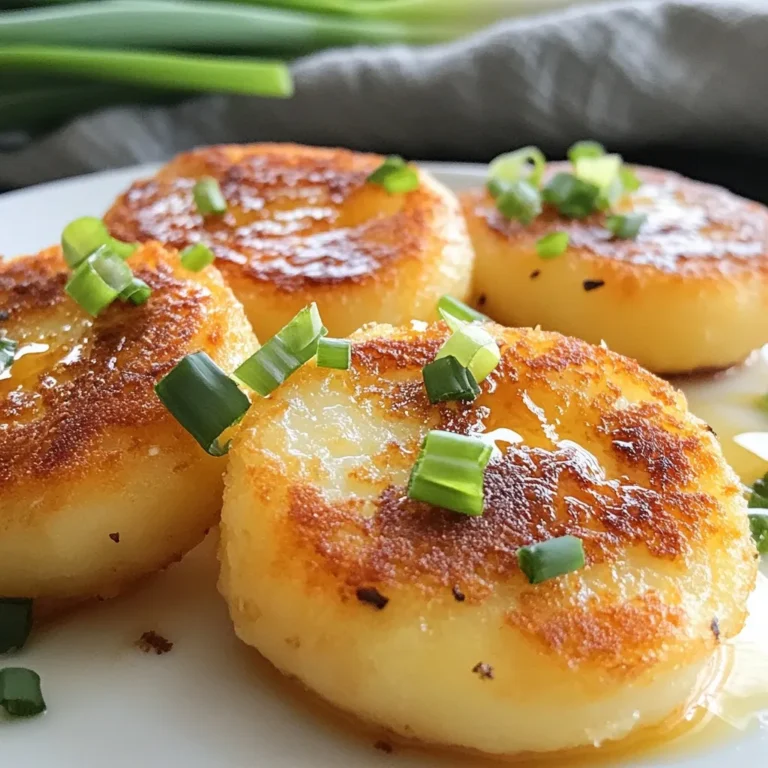
Potato Mochi Delightful and Easy Recipe Guide

- 1 ½ cups grated zucchini (about 1 medium zucchini) - 1 cup all-purpose flour - ½ cup unsweetened cocoa powder - ½ teaspoon baking soda - ½ teaspoon baking powder - ¼ teaspoon salt - 1 teaspoon ground cinnamon - ½ cup granulated sugar - ½ cup packed brown sugar - 2 large eggs - ½ cup vegetable oil - 1 teaspoon vanilla extract - ½ cup semi-sweet chocolate chips - ¼ cup chopped walnuts or pecans (optional) Zucchini is the star here. It adds moisture and fiber while keeping the bread soft. You won’t taste it much, but it helps balance the rich chocolate. Cocoa powder gives a deep chocolate flavor without too much sugar. Using both brown and granulated sugars adds sweetness and a hint of caramel. Eggs not only bind but also give the bread a lovely rise. Chocolate chips add bursts of sweetness, and nuts (if you use them) add crunch. You can swap the all-purpose flour for whole wheat flour for a healthier option. If you want a gluten-free treat, use a gluten-free flour blend. Applesauce can replace vegetable oil to cut calories. For a dairy-free version, make sure to select dairy-free chocolate chips. If you don’t have walnuts or pecans, you can use sunflower seeds or skip them altogether. {{ingredient_image_2}} Start by setting your oven to 350°F (175°C). This temperature is perfect for baking. While the oven warms up, grab a 9x5-inch loaf pan. You can grease it with butter or oil. Alternatively, use parchment paper. This makes it easier to remove the bread later. Take your grated zucchini and place it in a mixing bowl. Add a pinch of salt and let it sit for about 10 minutes. This step helps remove extra moisture. After that, take a clean kitchen towel or cheesecloth. Squeeze the zucchini firmly to get out as much moisture as you can. This makes your bread less soggy. In a large bowl, mix the dry ingredients. Whisk together all-purpose flour, cocoa powder, baking soda, baking powder, salt, and ground cinnamon. Make sure everything is blended well and airy. In another bowl, beat the sugars, eggs, vegetable oil, and vanilla extract. Mix until smooth and creamy. This helps dissolve the sugars fully. Now, take the dry mixture and slowly add it to the wet ingredients. Use a spatula or wooden spoon to stir gently. Be careful not to overmix; this keeps your bread tender. Next, fold in the zucchini, semi-sweet chocolate chips, and nuts if you choose to add them. Pour the batter into your prepared loaf pan. Smooth the top for even baking. Finally, place the loaf pan in the oven. Bake for 50 to 60 minutes. Check if it’s done by inserting a toothpick into the center. If it comes out clean or with a few moist crumbs, it’s ready. Let it cool in the pan for 10 minutes, then transfer it to a wire rack. Your delicious Double Chocolate Zucchini Bread is now ready to enjoy! To keep your Double Chocolate Zucchini Bread light, avoid overmixing the batter. When you combine the wet and dry ingredients, stir gently. Use a spatula or wooden spoon and mix just until you see no dry flour. This keeps your bread fluffy and tender. Too much moisture can make your bread soggy. After grating the zucchini, let it rest with salt for about 10 minutes. This draws out excess water. Next, squeeze the zucchini in a clean towel. This step is key for the right texture. For a beautiful finish, serve your bread warm. Dust it with powdered sugar or add a dollop of whipped cream. You can even slice it and serve with a side of fresh berries. Pair it with a hot cup of coffee or tea. It makes the perfect treat! Pro Tips Use Fresh Zucchini: Fresh, young zucchini yields the best flavor and moisture. Avoid using large, mature zucchini as they can be tough and watery. Melt the Chocolate: For an extra rich flavor, consider melting half of the chocolate chips and mixing them into the batter before folding in the rest. This creates a more cohesive chocolate experience. Cool Completely: Allow the bread to cool completely on a wire rack before slicing. This helps set the texture and prevents it from becoming gummy. Storage Tips: Store the zucchini bread in an airtight container at room temperature for up to 3 days, or wrap it tightly and freeze for up to 3 months for longer storage. {{image_4}} You can take Double Chocolate Zucchini Bread to a new level by using different chocolates. Swap semi-sweet chips for dark chocolate chips for a richer taste. White chocolate chips add a sweet and creamy element. You can also mix in chocolate chunks for a fun texture. Each type of chocolate brings its own flavor, making your bread unique. If you want to make this bread nut-free, simply skip the walnuts or pecans. The bread remains moist and delicious without the nuts. You can add extra chocolate chips for added texture and sweetness. This way, you keep the treat safe for those with nut allergies while still enjoying a yummy loaf. To make your Double Chocolate Zucchini Bread gluten-free, swap all-purpose flour for gluten-free flour blends. Make sure your baking powder and cocoa powder are also gluten-free. The bread will still be moist and tasty, with the zucchini adding a lovely texture. Just be sure to check the labels to avoid any gluten-containing ingredients. To keep your Double Chocolate Zucchini Bread fresh, store it in an airtight container. You can also wrap it tightly in plastic wrap or foil. This method blocks air and helps prevent drying. Keep it at room temperature for up to three days. If you want it to last longer, consider freezing it. Freezing your zucchini bread is easy and smart. First, let the bread cool completely. Then, slice it into pieces for easy serving later. Wrap each slice in plastic wrap, then place them in a freezer-safe bag. You can freeze the bread for up to three months. When you’re ready to enjoy, just take out a slice and thaw it. To enjoy your Double Chocolate Zucchini Bread warm, use the oven or microwave. For the oven, preheat it to 350°F (175°C). Place the slice on a baking sheet and heat for about 10 minutes. If using a microwave, heat each slice for about 15-20 seconds. Enjoy it warm for a cozy treat! You can make this recipe healthier by using whole wheat flour instead of all-purpose flour. This adds fiber and nutrients. You can also reduce the sugar by one-third. Consider using honey or maple syrup as a natural sweetener. You can replace vegetable oil with unsweetened applesauce. This swap cuts fat while adding moisture. Lastly, use dark chocolate chips for less sugar and richer flavor. Yes, you can use frozen zucchini! Just remember to thaw and drain it well. This helps remove excess water. When using frozen zucchini, the texture may be a bit softer. This will not affect the taste of your bread. Make sure to squeeze out any extra moisture before adding it to the batter. Double Chocolate Zucchini Bread pairs well with many things. You can serve it warm with butter. A dollop of whipped cream adds a nice touch, too. For a fun twist, try it with a scoop of vanilla ice cream. A hot cup of coffee or tea also complements this treat beautifully. To check if your bread is done, insert a toothpick into the center. If it comes out clean or with a few moist crumbs, the bread is ready. If the toothpick has wet batter, bake it a little longer. Keep an eye on it, as every oven can be different. This blog post covered the key ingredients for Double Chocolate Zucchini Bread and their benefits. I shared step-by-step instructions to help you bake perfectly every time. I also included tips to avoid common mistakes and suggested fun variations for your bread. Finally, I provided storage tips and answered key questions. With this knowledge, you can create a tasty treat that keeps well. Enjoy your baking journey!

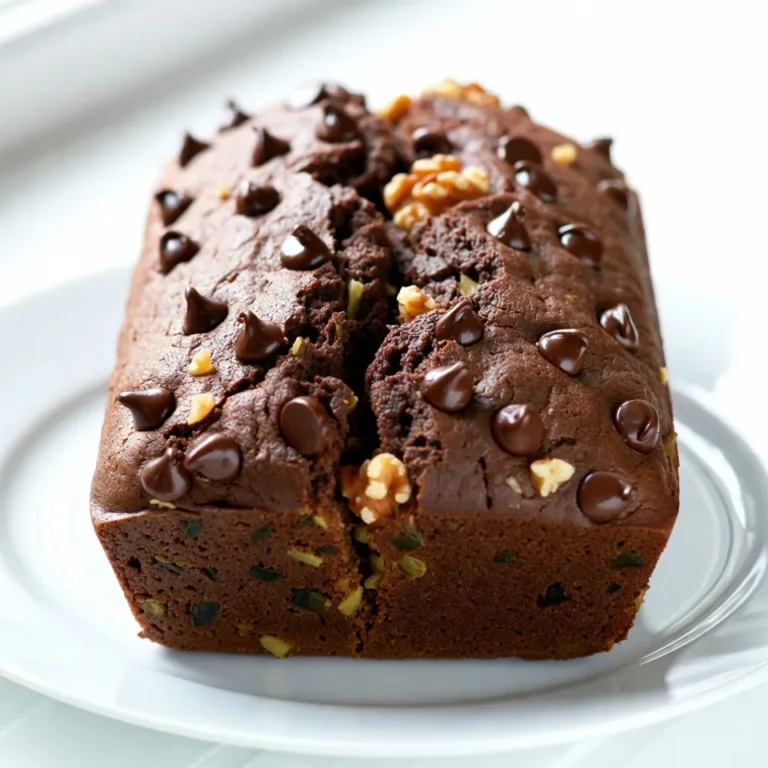
Double Chocolate Zucchini Bread Irresistible Treat

- 1 pound boneless, skinless chicken thighs - 1 tablespoon Cajun seasoning - 2 tablespoons olive oil - 1 medium onion - 1 bell pepper (any color) - 3 cloves garlic - 1 cup long-grain rice - 2 cups chicken broth - 1 can diced tomatoes (14.5 oz) - 1 cup frozen peas - 1 teaspoon smoked paprika - Salt and pepper to taste - Fresh parsley for garnish For this One Pot Cajun Chicken & Rice, each ingredient plays a key role. First, the chicken thighs give the dish a juicy, tender base. I love using boneless, skinless thighs for their rich flavor. The Cajun seasoning adds a spicy kick that really wakes up the dish. Next, the veggies! The onion and bell pepper bring sweetness and texture. I usually go for a bright bell pepper for color. Garlic adds an aromatic touch that fills the kitchen with warmth. The rice is the heart of this meal. Long-grain rice cooks up fluffy and soaks up all the delicious broth. The chicken broth and diced tomatoes create a savory liquid that infuses the rice with flavor. Lastly, we add frozen peas for a pop of color and sweetness. Smoked paprika gives a hint of smokiness. Don’t forget to add salt and pepper to taste. The fresh parsley on top brightens the dish and makes it look stunning. Gather these ingredients, and you'll be well on your way to a flavorful dinner delight! - First, take 1 pound of chicken thighs. Cut them into bite-sized pieces. - In a bowl, coat the chicken with 1 tablespoon of Cajun seasoning. Mix it well so every piece gets covered. - Heat 2 tablespoons of olive oil in a large pot over medium heat. - Add the seasoned chicken. Cook it for about 5 to 7 minutes, turning occasionally. You want it browned on all sides. Once done, set the chicken aside on a plate. - In the same pot, add 1 medium onion, finely chopped. - Next, add 1 diced bell pepper of your choice. Sauté them for about 4 to 5 minutes. Stir often until the onion turns soft and translucent. - Then, add 3 minced garlic cloves. Cook for 1 more minute. This will give your dish a nice flavor. - Now, it's time to add 1 cup of long-grain rice to the pot. Stir it well with the vegetables. - Cook for about 1 minute. This toasts the rice slightly, enhancing its flavor. - Pour in 2 cups of chicken broth and 1 can of diced tomatoes, juices included. Stir everything together and bring it to a boil. - Once boiling, reduce the heat to low. Return the cooked chicken to the pot. - Add 1 cup of frozen peas and 1 teaspoon of smoked paprika. Season with salt and pepper to taste. Stir gently to combine. - Cover the pot with a lid. Let it simmer on low heat for 20 to 25 minutes. This allows the rice to become tender and absorb most of the liquid. - After cooking, remove the lid. Use a fork to fluff the rice gently. - Let it sit for 5 minutes before serving. This resting time helps the flavors meld. - Serve the Cajun Chicken & Rice straight from the pot or in bowls. Garnish with fresh parsley for a bright touch. To make your dish pop, you can adjust the Cajun seasoning. If you like more heat, add a bit more. For a milder flavor, use less seasoning. You can also add lemon juice. Lemon brings a nice brightness to the dish. Just squeeze some on top before serving. Choosing the right type of rice is key. Long-grain rice works best for this recipe. It stays fluffy and does not become sticky. Make sure to stir well during cooking. This helps the rice cook evenly. Keep the heat low once it simmers to avoid burning. For a rustic feel, serve your Cajun Chicken & Rice straight from the pot. This makes for a cozy, family-style meal. You can also use individual bowls for a nice touch. Garnish each bowl with fresh parsley to add color. A slice of lemon on the side makes it look bright and fresh. {{image_4}} You can switch out the chicken for shrimp. Shrimp cooks quickly and adds a sweet taste. Use about 1 pound of shrimp and add them towards the end of cooking. This way, they won’t overcook. Another great option is using smoked sausage. Slice the sausage and cook it with the onions and peppers. This will give your dish a rich, smoky flavor that pairs well with the Cajun spices. Want to add more greens? Spinach or kale works well. Toss in about 2 cups of fresh spinach or chopped kale when you add the rice. They will cook down and blend in nicely. Corn can also be a sweet addition. Add a cup of frozen corn when you add the peas. It will bring a nice, sweet crunch to the dish. If you have kids, you might want to make this dish milder. Use less Cajun seasoning or skip it altogether. You can add some herbs like thyme or parsley for flavor. For those who love heat, add hot sauce. Drizzle some on top before serving or mix it in while cooking. This will give your dish a nice kick! To store leftovers, let the dish cool to room temperature. Place the Cajun chicken and rice in airtight containers. This helps keep the flavors fresh. Use glass or plastic containers that seal well to prevent moisture loss. To freeze the dish, let it cool completely first. Transfer it to freezer-safe containers or bags. Remove as much air as possible before sealing. This helps avoid freezer burn. When ready to eat, thaw overnight in the fridge. Reheat in a pot on low heat, adding a splash of broth if needed. In the fridge, One Pot Cajun Chicken & Rice lasts up to four days. If you freeze it, it can stay good for about three months. Always check for any off smells or changes in texture before eating. It takes about 40 minutes in total. You’ll spend 10 minutes prepping the ingredients. The cooking time is around 30 minutes. This includes browning the chicken and simmering all the flavors together. Yes, you can make this dish ahead of time. Just cook it as directed and let it cool. Store it in an airtight container in the fridge. It will stay fresh for up to three days. Reheat it on the stove or in the microwave before serving. This dish pairs well with a simple salad. You can also serve it with garlic bread. A side of roasted vegetables adds great color and taste. These options enhance your meal and add variety. Yes, this recipe can be gluten-free. Just ensure that the chicken broth and Cajun seasoning are gluten-free. Most brands offer gluten-free options. Always check the labels to be safe. Absolutely! If you like it mild, use less Cajun seasoning. You can also skip the smoked paprika. For more heat, add extra Cajun spice or a dash of hot sauce. Tailor it to your taste for the best experience. This recipe for One Pot Cajun Chicken & Rice combines bold flavors and easy steps. You start by seasoning juicy chicken and cooking it with colorful veggies. Then, you add rice and broth, creating a hearty meal. Remember, you can customize it with your favorite proteins and veggies. This dish is not just tasty; it’s also simple to store and reheat. Enjoy trying different spice levels and garnishes. Now, gather your ingredients and start cooking! You’ll love the results.

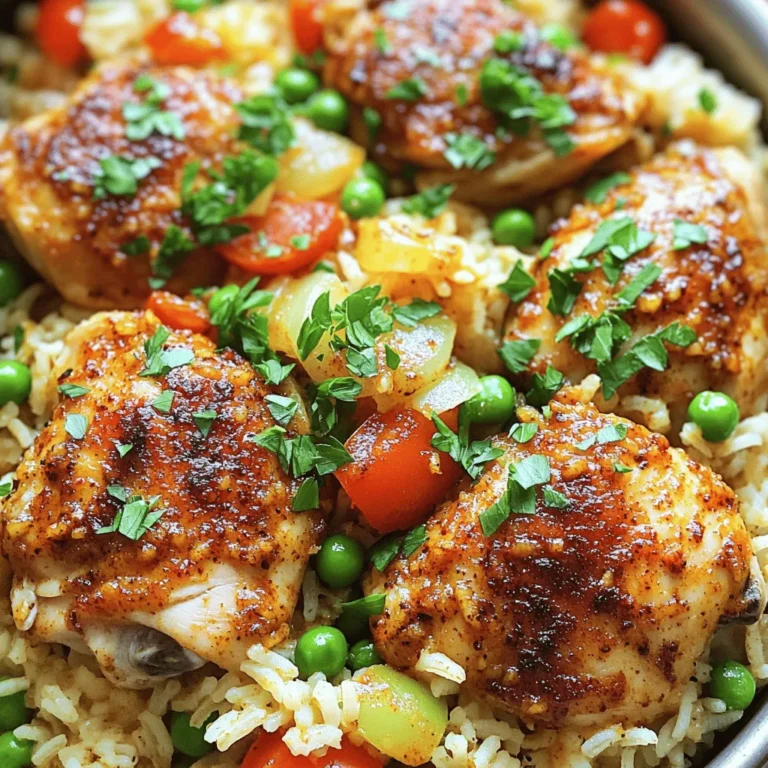
One Pot Cajun Chicken & Rice Flavorful Dinner Delight

- 2 medium zucchinis, cut into fry shapes - 1 cup panko breadcrumbs - 1/2 cup grated Parmesan cheese - 1 teaspoon garlic powder - 1 teaspoon onion powder - 1 teaspoon Italian seasoning - Salt and pepper, to taste - 2 large eggs, lightly beaten - Olive oil spray How to measure zucchini for fries To get even fries, choose medium zucchinis. Cut them into 1/4-inch thick sticks. This size helps them cook well in the air fryer. If they are too thick, they may not crisp up nicely. Alternatives for ingredients If you don’t have panko, regular breadcrumbs will work. For a twist, you can use crushed cornflakes for an extra crunch. If you want a dairy-free option, try nutritional yeast instead of Parmesan cheese. You can also leave out the eggs and use a flaxseed mixture as a binder. To make zucchini fries, start with two medium zucchinis. Cut them into fry shapes, about half an inch thick. This size helps them cook evenly. Use a sharp knife for clean edges. A cutting board keeps your workspace tidy. Make sure to wash the zucchinis well before cutting. You need three bowls for this part. In the first bowl, add one cup of panko breadcrumbs. In the second bowl, pour in two large eggs, beaten lightly. The last bowl holds the mix of half a cup of grated Parmesan cheese, one teaspoon each of garlic powder, onion powder, and Italian seasoning. Season with salt and pepper to taste. This setup helps keep things organized and makes coating easy. First, preheat your air fryer to 400°F (200°C) for about five minutes. This step warms it up for even cooking. For the fries, arrange them in a single layer in the air fryer basket. Avoid stacking them to let hot air circulate. Air fry the zucchini fries for 10-12 minutes. They should turn golden brown and crispy. Halfway through the cooking time, shake the basket gently. This action helps the fries cook evenly. When the fries are golden and crispy, they are ready. Let them cool for a moment before serving. Enjoy the perfect crunch! Using olive oil spray helps your zucchini fries get that desired crunch. After coating the fries, give them a light spritz of olive oil. This adds flavor and helps the breadcrumbs crisp up. Avoid soaking them; a fine mist is all you need. For the best results, set your air fryer to 400°F (200°C). This high heat cooks the fries fast, making them crispy on the outside and tender inside. Keeping the right temperature is key to achieving that perfect golden color. Zucchini fries shine when paired with the right dips. A small bowl of marinara sauce works well. Its tangy flavor complements the savory fries. Ranch dressing is another great choice for a creamy contrast. For added flair, garnish your fries with fresh parsley or basil. This not only looks pretty but also adds a fresh taste. Serve them hot for the best experience. One common mistake is overcrowding the air fryer basket. When the fries touch, they steam instead of crisp. Cook them in batches if needed. This ensures each fry gets enough hot air to cook well. Another mistake is not cooking them long enough. Cook for about 10-12 minutes. Check for a golden brown color. If they look pale, give them a few more minutes. This way, you will avoid undercooked or soggy fries. {{image_4}} You can add more flavor to your zucchini fries. Mix spices or herbs into the breadcrumbs. Try adding paprika or cayenne for some heat. Dried oregano or thyme can also work well. Different cheese options can give your fries a twist. Use mozzarella for a gooey texture, or feta for a salty kick. Each choice changes the taste and makes the dish fun. If you want to cut carbs, you can swap zucchini for other veggies. Try using eggplant or bell peppers instead. Both will hold up well and taste great. For a gluten-free option, use crushed nuts or ground oats for the breadcrumbs. This keeps the crunch without the gluten. You can make these fries even healthier by baking them. Preheat your oven to 425°F (220°C). Spread the coated zucchini on a baking sheet and bake for about 15-20 minutes. This method reduces oil use but still gives a nice crisp. You can also replace eggs with flaxseed or chia seeds mixed with water. This is a great vegan option. To keep your zucchini fries fresh, use an airtight container. Glass or plastic containers work well. Place a paper towel at the bottom to absorb moisture. They will stay fresh for up to three days in the fridge. The best way to reheat zucchini fries is in the air fryer. Set it to 350°F (175°C) for about 5 minutes. This method helps keep them crispy. You can also use an oven. Place them on a baking sheet and heat at 375°F (190°C) for 10 minutes. Avoid the microwave, as it makes them soggy. For extra crispiness, spritz them lightly with olive oil before reheating. To keep your zucchini fries crispy, control moisture. First, salt the zucchini strips. This draws out water. Let them sit for 15 minutes. After that, pat them dry with a towel. The less moisture, the crispier your fries will be. Yes, you can bake these fries. Preheat your oven to 425°F (220°C). Arrange the coated zucchini in a single layer on a baking sheet. Bake for 20-25 minutes. Flip them halfway through for even browning. They will still be crispy and delicious! If you need a substitute for Parmesan, try nutritional yeast. It gives a cheesy flavor and is vegan. You can also use any hard cheese, like Pecorino Romano or Grana Padano, for a similar taste. To prep ahead, cut and coat the zucchini fries. Place them on a baking sheet in a single layer. Cover and refrigerate for up to 24 hours. When ready to cook, just air fry or bake as usual. They will taste fresh and delicious! Zucchini fries are a fun and tasty way to enjoy a healthy snack. We covered ingredients, step-by-step instructions, and helpful tips to make the perfect fries. You can customize flavors, store leftovers easily, and even reheat them for later. Remember, the key to crispiness is in how you prepare and cook them. By following this guide, you'll create delicious zucchini fries every time. Enjoy your cooking journey!

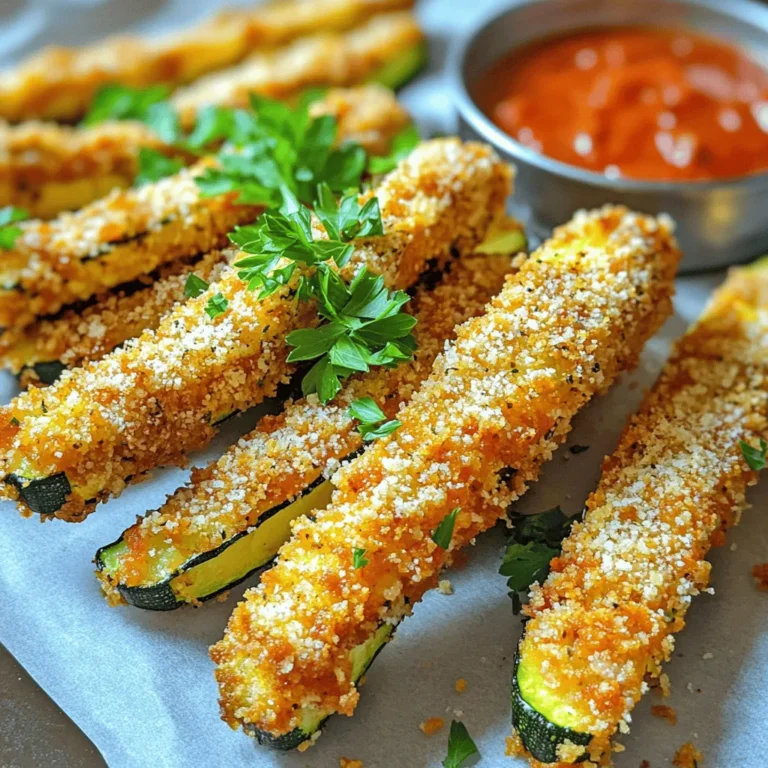
Air Fryer Parmesan Crusted Zucchini Fries Delight

To make Instant Pot garlic mashed potatoes, you need a few simple ingredients. Here’s what you will need: - 2 pounds Yukon Gold potatoes, peeled and cut into 1-inch cubes - 4 cloves garlic, left whole - 1 cup chicken broth or vegetable broth - 1/2 cup heavy cream - 4 tablespoons unsalted butter, softened - Salt, to taste - Freshly ground black pepper, to taste - Chopped chives or parsley for garnish (optional) These ingredients come together to create a creamy delight. Yukon Gold potatoes give a rich texture. Garlic adds a nice kick. Broth infuses flavor, while cream and butter make it smooth. Feel free to explore different herbs for garnish. Chives or parsley brighten up the dish. Choose what fits your taste! Start by peeling and cutting 2 pounds of Yukon Gold potatoes into 1-inch cubes. This size helps them cook evenly. Place the cubed potatoes in your Instant Pot. Next, grab 4 whole garlic cloves and add them to the pot. These cloves will add a lovely garlic flavor to your mashed potatoes. Now, take 1 cup of chicken broth or vegetable broth and pour it over the potatoes and garlic. This broth gives the potatoes great taste. Close the Instant Pot lid tightly. Set the valve to sealing. Choose the “Manual” or “Pressure Cook” setting and set the timer for 10 minutes. This cooking time ensures the potatoes become tender. Once the timer goes off, carefully do a quick release of the pressure. Be cautious of the steam! After the pressure is gone, open the lid and check the potato mix. If there is extra liquid, drain some, but keep a little for moisture. Now, add ½ cup of heavy cream, 4 tablespoons of softened butter, salt, and black pepper to taste. Use a potato masher or a hand mixer to mash until creamy. Don’t overmix; this can make them gummy. Finally, taste and adjust the seasoning if needed. Serve warm, with a sprinkle of chives or parsley on top for a nice touch. To avoid gummy mashed potatoes, use the right potatoes. Yukon Golds are great for creamy texture. Don't overmix your potatoes, as this can make them sticky. When mashing, go for a gentle touch. A potato masher gives you control over texture. It lets you achieve your perfect creaminess without overworking the potatoes. If you prefer a smoother finish, use a hand mixer. Just remember to mix on low speed to avoid overdoing it. Garlic is key in this dish, but you can switch it up! Try adding roasted garlic for a sweeter, richer flavor. Simply roast whole garlic cloves until soft, then mash them in with your potatoes. You can also bring in fresh herbs like rosemary or thyme. These herbs add a lovely depth to your garlic mashed potatoes. A pinch of smoked paprika or a dash of cayenne can give a nice kick, too. Experiment and find your favorite mix! {{image_4}} To make this dish dairy-free, swap heavy cream for coconut milk. You can use vegan butter instead of regular butter. This keeps the creamy texture while making it plant-based. The coconut milk adds a subtle sweetness too. If you want a vegetarian option, use vegetable broth instead of chicken broth. This change keeps the dish rich and flavorful without any animal products. The veggie broth enhances the garlic taste, making it a perfect choice. For extra richness, try adding cheese or sour cream. Cream cheese gives a smooth texture and tangy flavor. You could also mix in shredded cheddar or Parmesan for a cheesy twist. These additions make the mashed potatoes even more indulgent and tasty. To keep your mashed potatoes fresh, store them in an airtight container. Place the container in the fridge. They will last about three to five days. If you want to save some for later, freezing is a great option. Use a freezer-safe container or a sealable freezer bag. Make sure to remove as much air as possible before sealing. This helps prevent freezer burn. They will stay good in the freezer for up to three months. When it's time to enjoy your leftovers, the best way to reheat them is in the microwave. Use a microwave-safe dish and cover it to keep moisture in. Heat in short bursts, stirring in between, until warm. You can also reheat on the stove. Just place them in a saucepan over low heat. Stir often to keep them from sticking. To keep your mashed potatoes creamy, add a splash of milk or cream as you heat them. This will restore their smooth texture and flavor. Yes, you can use other potatoes. For example, Russet potatoes work well. They create a fluffier texture. Red potatoes are creamier but may be a bit waxy. Yukon Gold potatoes are my favorite for their buttery taste. They give a rich, smooth texture. When choosing potatoes, consider what texture you want. Garlic mashed potatoes can last about three to five days in the fridge. Store them in an airtight container. This helps keep them fresh. If they start to dry out, add a bit of cream. You can also reheat them gently on the stove or microwave. Yes, you can double or halve this recipe easily. Just adjust the ingredient amounts accordingly. For cooking time, keep the same pressure time. The Instant Pot will adjust cooking time based on the amount inside. Always check for doneness before serving. You learned how to make tasty garlic mashed potatoes using simple steps. We covered the right ingredients, cooking methods, and tips for a creamy texture. Don't forget to try different flavors by adding herbs or cheese. You can also make dairy-free options if needed. Proper storage helps leftovers last longer. Enjoy making this dish your own! It’s easy, fun, and always satisfying. Now, dive in and enjoy every bite of your homemade garlic mashed potatoes!

Instant Pot Garlic Mashed Potatoes Creamy Delight

- 2 boneless, skinless chicken breasts - 8 oz fettuccine pasta - 1 cup heavy cream - 1 cup grated Parmesan cheese - 2 tablespoons Cajun seasoning - 2 tablespoons olive oil - Salt and pepper, to taste - 1 red bell pepper, sliced - 1 green bell pepper, sliced - 1 small onion, thinly sliced - 3 cloves garlic, minced To make Cajun chicken pasta, you need fresh, quality ingredients. Start with two boneless, skinless chicken breasts for the main protein. They cook quickly and soak up flavor well. Fettuccine pasta is perfect for this dish, as it holds the creamy sauce nicely. You will also need heavy cream and grated Parmesan cheese. These make the sauce rich and smooth. Next, grab Cajun seasoning. This spice blend gives the dish its signature kick. You will also need olive oil for cooking. Salt and pepper help enhance all the flavors. For the veggies, choose a red and a green bell pepper for color. A small onion adds sweetness, while garlic gives a lovely aroma. These ingredients come together to create a delightful meal. Each component plays a role in building layers of flavor. 1. Start by boiling a large pot of salted water. 2. Once it boils, add 8 oz of fettuccine pasta. 3. Cook the pasta until it is al dente. This usually takes around 8-10 minutes. 4. After cooking, drain the pasta and set it aside. 1. While the pasta cooks, take 2 boneless, skinless chicken breasts. 2. Generously season both sides with 2 tablespoons of Cajun seasoning. 3. In a large skillet, heat 2 tablespoons of olive oil over medium-high heat. 4. Add the seasoned chicken breasts and sear them until golden brown. This takes about 5-7 minutes on each side. 5. Once cooked, remove the chicken and let it rest before slicing into strips. 1. In the same skillet, add sliced red and green bell peppers, a small sliced onion, and 3 minced garlic cloves. 2. Sauté the mixture for about 5 minutes until the vegetables are tender and fragrant. 1. Lower the heat and pour in 1 cup of heavy cream. 2. Let it simmer gently, stirring occasionally. This helps the cream thicken slightly. 3. Gradually add 1 cup of grated Parmesan cheese and mix until melted and creamy. 4. Season the sauce with salt and pepper to taste. 1. Add the drained fettuccine and sliced chicken into the skillet. 2. Toss everything together until the pasta and chicken are evenly coated in the creamy sauce. 1. Cook the combined pasta and chicken on low heat for an additional 2 minutes. 2. This step warms everything through and blends the flavors. 3. Serve the dish in bowls and garnish with fresh parsley. Enjoy your meal! To adjust the spice levels, start with less Cajun seasoning. You can always add more later. If you want a milder taste, mix in some paprika or garlic powder. For a bolder flavor, try adding cayenne pepper. Marinating the chicken adds depth. Use Cajun seasoning, olive oil, and lemon juice. Let it sit for at least 30 minutes for better flavor. If you have time, marinate overnight for the best results. To control the thickness of your cream sauce, simmer it longer. This helps it reduce and thicken. If it's too thick, add a splash of chicken broth or milk. Stir well to combine. If you need substitutes for heavy cream, you can use half-and-half or a mix of milk and butter. For a lighter option, try Greek yogurt. Just whisk it in slowly to avoid curdling. For garnishing ideas, sprinkle fresh parsley on top. This adds a nice color and flavor. You can also add some crushed red pepper for a pop of color. Serving recommendations include rustic bowls for a cozy feel. Pair the dish with a crisp green salad or garlic bread to balance the flavors. This makes your meal look inviting and delicious. {{image_4}} You can switch the chicken for shrimp. Shrimp cooks fast and adds a nice flavor. Just sauté the shrimp in the same skillet. Cook them until they’re pink and firm. If you want a vegetarian dish, try using tofu. Press the tofu to remove extra water. Cut it into cubes and season it like chicken. It will soak up the Cajun spice and taste great. While fettuccine is classic, you can use penne or linguine too. Both types hold the sauce well. Penne adds a fun, chewy texture. Linguine gives a nice twist to your dish. If you need gluten-free options, look for rice or quinoa pasta. They cook differently, so follow the package instructions. They still offer a delicious meal that everyone can enjoy. To boost flavor, add sun-dried tomatoes. They give a sweet and tart taste that pairs well. Spinach is another great option. It wilts down nicely and adds nutrients. Feel free to mix in other veggies too. Zucchini, mushrooms, or asparagus can work well. This way, you make the dish your own and add extra colors. To store leftovers of Cajun chicken pasta, let it cool down first. Place it in an airtight container. Make sure to seal it tightly to keep it fresh. You can store it in the fridge for up to three days. I recommend using glass containers. They do not stain and help keep flavors intact. For reheating, the best method is using the stovetop. Place the pasta in a skillet over low heat. Add a splash of cream or water to keep it moist. Stir often to avoid burning. If you use a microwave, cover it with a damp paper towel. This helps prevent the pasta from drying out. Avoid reheating it too long, as it can get soggy. You can freeze portions of Cajun chicken pasta for future meals. Divide it into single servings and place them in freezer-safe bags. Remove as much air as possible to prevent freezer burn. It can last for up to three months in the freezer. When ready to eat, thaw it overnight in the fridge. After thawing, reheat it using the stovetop method for the best texture. Cajun chicken pasta is a creamy, spicy dish. It combines tender chicken, fettuccine, and bell peppers. The bold flavors come from Cajun seasoning. This dish is rich and satisfying, perfect for a weeknight dinner. Yes, you can prepare Cajun chicken pasta in advance. Cook the chicken and veggies, then mix them with the sauce. Store the pasta and sauce separately to keep it fresh. When ready to eat, just reheat and combine. Cajun chicken pasta has a medium spice level. Cajun seasoning varies in heat. If you prefer less heat, use less seasoning or choose a mild blend. For more spice, add extra seasoning or red pepper flakes. Many sides pair well with Cajun chicken pasta. Here are a few ideas: - Garlic bread for a crunchy bite. - A fresh green salad for a light touch. - Steamed vegetables for extra nutrition. - Corn on the cob for a sweet contrast. This blog post covered creating a tasty Cajun chicken pasta dish. We looked at key ingredients, cooking steps, and how to enhance flavor with seasonings and vegetables. You can adjust spice levels or switch proteins for variety. Storing and reheating tips ensure leftovers taste great, too. With these steps, you can impress family and friends with a delicious meal they will love. Enjoy making this dish your own!

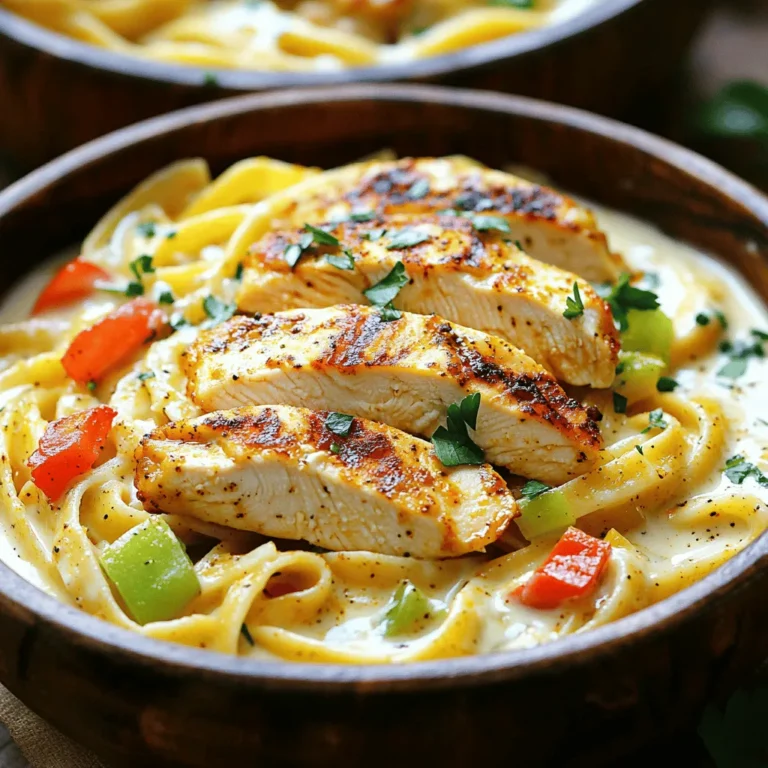
Cajun Chicken Pasta Flavorful and Easy Dinner Delight

PREV 1 … 18 19 20 … 48 NEXT
meal plan mapper

explore

DessertsDinnerAppetizersDrinks

Our Policies

  • Cookie Policy
  • Copyright Policy
  • Disclaimer
  • GDPR Policy
  • Terms Of Use
Back to Top
  • About
  • Contact Us
  • Privacy Policy
© 2025 meal plan mapper