FREE DINNER EBOOK! Get your copy!
  • Cookie Policy
  • GDPR Policy
  • Disclaimer
  • Terms Of Use
  • Visit my other site: Fun Cookie Recipes
meal plan mapper
  • Home
  • Dinner
  • Desserts
  • Drinks
  • Appetizers
  • Contact
  • About
  • Privacy Policy
  • Home
  • Dinner
  • Desserts
  • Drinks
  • Appetizers
  • Contact
  • About
  • Privacy Policy
  • Cookie Policy
  • GDPR Policy
  • Disclaimer
  • Terms Of Use
Visit my other site: Fun Cookie Recipes

HOME / CATEGORIES /

Latest

Cornbread brings warmth and comfort. This Cheddar Jalapeño Cornbread has bold flavors. Here are the ingredients you need to make it: - 1 cup cornmeal - 1 cup all-purpose flour - 1 tablespoon baking powder - 1/2 teaspoon salt - 1/4 teaspoon cayenne pepper (optional for a spicy kick) - 2 large eggs - 1 cup buttermilk - 1/4 cup vegetable oil - 2 tablespoons honey - 1 cup sharp cheddar cheese, finely grated - 1/2 cup diced jalapeños (fresh or pickled) Using sharp cheddar adds a rich taste. The jalapeños bring heat. You can choose fresh or pickled jalapeños based on your taste. Mixing honey balances the spice while adding a hint of sweetness. When you gather your ingredients, ensure they are fresh. Quality matters for the best flavor in your cornbread. {{ingredient_image_2}} Start by preheating your oven to 400°F (200°C). This heat helps the cornbread rise and cook evenly. Next, grease a 9-inch cast-iron skillet or baking dish with a little oil or butter. This step stops the cornbread from sticking to the pan. In a large mixing bowl, whisk together the cornmeal, all-purpose flour, baking powder, salt, and cayenne pepper if you want some heat. Make sure these dry ingredients mix well. This helps create a fluffy cornbread. In a separate medium bowl, whisk together the eggs, buttermilk, vegetable oil, and honey. Aim for a smooth mixture without lumps. This blend adds moisture and flavor to the cornbread. Gently pour the wet ingredients into the dry ones. Use a spatula or wooden spoon to stir them together until just combined. Remember, avoid overmixing! A few lumps won't hurt the final product. Carefully fold in the grated cheddar cheese and diced jalapeños into the batter. This step is key for even distribution throughout the cornbread. You want every bite to have that bold flavor. Pour the cornbread batter into the greased skillet or baking dish. Use a spatula to smooth the surface of the batter evenly. This helps it bake evenly and look nice. Place the skillet or dish in the preheated oven. Bake for about 20-25 minutes. Your cornbread is ready when it turns golden brown. To test doneness, insert a toothpick into the center. It should come out clean. Once baked, remove the cornbread from the oven and let it cool for a few minutes in the skillet. After cooling, slice it into wedges. For added flavor, drizzle some extra honey on top before serving. This cornbread goes great with chili or soup, making a tasty meal. To avoid dense cornbread, keep these tips in mind: - Use fresh ingredients. Old baking powder can lead to poor rise. - Mix the dry ingredients well. This helps create air pockets. - Do not overmix the batter. A few lumps are okay. - Bake right after mixing. This keeps the batter light and fluffy. You can add spices or herbs to make the cornbread pop. Here are a few ideas: - Mix in a teaspoon of garlic powder for depth. - Add chopped fresh herbs like cilantro or chives for freshness. - Try a teaspoon of smoked paprika for a smoky flavor. - Experiment with different cheeses, like pepper jack for more heat. Cheddar jalapeño cornbread pairs well with many dishes. Here are some tasty ideas: - Serve it alongside a warm bowl of chili. The heat complements each other. - Enjoy it with a hearty vegetable soup. The cornbread adds a nice crunch. - Top it with butter or honey for added sweetness. This balances the spice. - Try it as a side for barbeque dishes. The flavors blend beautifully. Pro Tips Use Fresh Jalapeños: Fresh jalapeños will provide a brighter flavor and a better texture compared to pickled ones, adding a nice crunch to your cornbread. Experiment with Cheese: While sharp cheddar is delicious, try using a combination of cheeses like pepper jack or Monterey jack for a different flavor profile. Storage Tips: Store leftover cornbread in an airtight container at room temperature for up to 2 days, or refrigerate it for up to a week. You can also freeze it for longer storage. Serving Suggestions: Serve warm with butter or a spread of cream cheese for a rich and creamy contrast to the spicy cornbread. {{image_4}} You can make a sweeter cornbread. To do this, add 1/4 cup of sugar. You can also use 3 tablespoons of honey instead of two. This will give it a nice sweet flavor. Try adding corn kernels for extra sweetness and texture. They will add a nice bite and moisture. If you want a spicier cornbread, you can increase the jalapeño amount. Use one cup of diced jalapeños for more heat. You can also try different peppers like serrano or habanero. Each pepper adds a unique flavor and heat level. Adjust based on your heat tolerance. For a gluten-free cornbread, swap out all-purpose flour with a gluten-free blend. Look for a blend that has xanthan gum. This will help with texture and rise. You can also use almond flour or coconut flour. These will change the flavor but are great for gluten-free diets. To keep your cornbread fresh, wrap it tightly in plastic wrap. You can also place it in an airtight container. Store it at room temperature for up to two days. If you live in a humid area, refrigerate it to prevent mold. Make sure to let it cool before storing. Reheat your cornbread in several ways. The oven keeps it warm and crispy. Preheat your oven to 350°F (175°C). Wrap the cornbread in foil and heat for about 10-15 minutes. You can also use a microwave. Place a slice on a plate and cover it with a damp paper towel. Heat in 15-second bursts until warm. Avoid overheating, so it stays moist. Freezing cornbread is a great way to save it for later. First, let it cool completely. Then, slice it into pieces for easy thawing. Wrap each piece in plastic wrap, then in foil. Place them in a freezer bag. Label the bag with the date. Cornbread can last up to three months in the freezer. To thaw, take it out and let it sit at room temperature for a few hours. You can also reheat it directly from the freezer using the oven or microwave. Yes, you can use fresh jalapeños. Fresh jalapeños give a bright, bold flavor. They add a crunchy texture, too. Pickled jalapeños, however, bring a tangy, mellow taste. If you want spice with a bite, go fresh. For a milder flavor, pickled works well. If you don’t have buttermilk, use plain yogurt or milk mixed with vinegar. Just add one tablespoon of vinegar to one cup of milk. Let it sit for five minutes. You can also use almond milk for a dairy-free option. Cornbread is done when it turns golden brown. A toothpick inserted in the center should come out clean. You can also gently press the top. If it springs back, it’s ready. Keep an eye on the time; bake it for about 20-25 minutes. Yes, you can make it vegan! Replace eggs with flax eggs or applesauce. Use non-dairy milk instead of buttermilk. Choose a vegan cheese or skip it for a simpler cornbread. This way, you still get great flavor without dairy or eggs. You now have a complete guide to making delicious cornbread. We covered all important ingredients and detailed steps. I shared tips for perfect texture and flavor. You also saw variations to make it sweet or spicy. Storing leftovers and reheating them is easy. With this knowledge, you can craft your cornbread just right. Enjoy your baking and the tasty results!

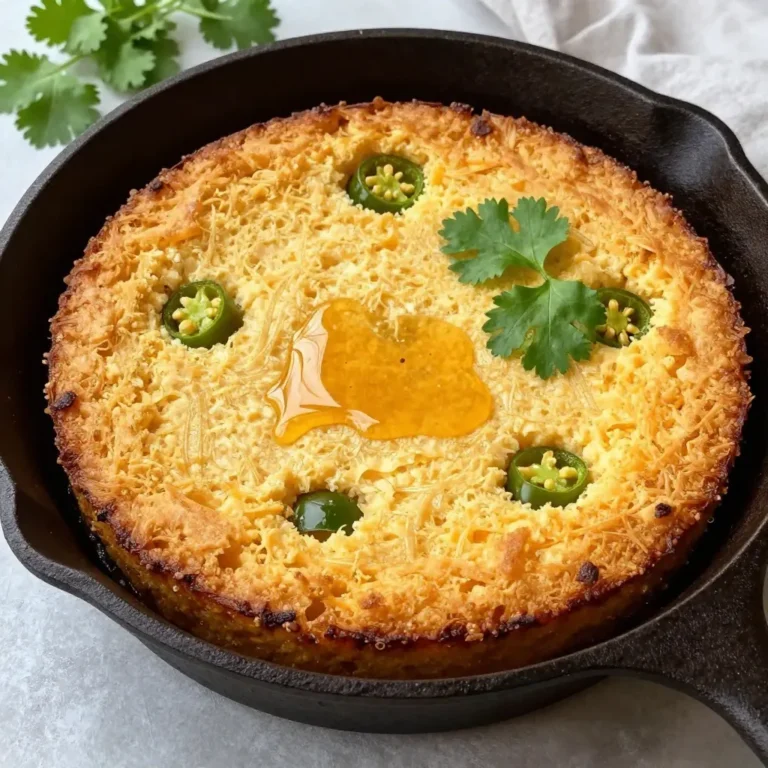
Cheddar Jalapeño Cornbread Bold Flavor in Every Bite

For these truffles, I use 1 cup of dark chocolate. Choose chocolate that has 70% cocoa or higher. This type gives a rich, deep flavor that pairs perfectly with raspberries. You’ll need 1/2 cup of heavy cream. This cream adds smoothness and richness to the truffles. It helps the chocolate melt well and makes each bite creamy. Use 1/2 cup of fresh raspberries. They add a burst of fruity flavor. Plus, they create a lovely marbled look in the truffles. Keep some extra for garnish to make your truffles even prettier. Add 1 teaspoon of pure vanilla extract. This ingredient enhances the chocolate flavor. It adds warmth and a hint of sweetness that balances the tartness of the raspberries. You’ll need 1/4 cup of cocoa powder for dusting. This gives the truffles a classic chocolate finish. It also adds a slight bitterness that complements the sweetness. If you want some crunch, consider adding 1/4 cup of crushed pistachios. They add a nice texture and a pop of color. Feel free to experiment with other nuts or toppings that you enjoy. {{ingredient_image_2}} To start, take a small saucepan and add the heavy cream. Heat it over medium heat. Watch closely as it warms up. When you see small bubbles forming, take it off the heat. This step is key. You want it hot but not boiling. Next, finely chop the dark chocolate. Add it to the hot cream. Let it sit for a few minutes. This helps the chocolate to soften. Then, stir it well. Keep stirring until it becomes smooth and shiny. This mixture is the base of your truffles. Now, gently fold in the fresh raspberries and vanilla extract. Be careful not to mash the raspberries too much. You want some chunks to keep that vibrant look. The raspberries will bring a burst of flavor that pairs well with chocolate. Once everything is mixed, sprinkle a pinch of sea salt into the bowl. This enhances all the flavors. Cover the bowl with plastic wrap and place it in the fridge. Let it chill for about 2 hours. This makes the mixture firm and easy to handle. After chilling, it’s time to shape your truffles. Use a melon baller or your hands to scoop out small portions. Aim for about 1 inch in size. Roll each portion into a smooth ball using your palms. This step is fun and messy! Prepare a plate with cocoa powder. Roll each truffle in the powder until coated. If you like, roll some in crushed pistachios for extra crunch. Place the truffles on a parchment-lined plate. Chill them for another 30 minutes to set the flavors. To make great truffles, start with high-quality dark chocolate. I suggest using chocolate that has at least 70% cocoa. This will give your truffles a rich, deep flavor. Look for brands with a smooth texture. The better the chocolate, the better your truffles will taste. Getting the texture just right is key. After melting the chocolate and cream, fold in the raspberries gently. You want some pieces to stay whole for bursts of flavor. Let the mixture chill until firm. This makes it easier to shape into smooth balls. If the mixture is too soft, your truffles will not hold their shape. Presentation matters! To make your truffles look stunning, roll them in cocoa powder. You can also use crushed pistachios for a fun crunch. Place your truffles on a nice plate. Add whole raspberries as a garnish. A light dusting of cocoa powder on top will make them look fancy and inviting. Pro Tips Quality Chocolate Matters: Use high-quality dark chocolate with at least 70% cocoa for rich flavor and smooth texture in your truffles. Chill for Perfect Texture: Allow the truffle mixture to chill thoroughly in the refrigerator; this ensures they're firm enough to roll without sticking to your hands. Garnish Creatively: Get creative with coatings! Besides cocoa powder and crushed pistachios, consider rolling truffles in toasted coconut or chopped nuts for added flavor and texture. Serve at Room Temperature: For the best taste experience, let the truffles sit at room temperature for a few minutes before serving to enhance their rich flavors. {{image_4}} You can change how your truffles look and taste by using different coatings. Instead of cocoa powder, try rolling them in: - Finely chopped nuts - Shredded coconut - Crushed graham crackers Each of these gives a new flavor twist. Nuts add crunch, while coconut brings a tropical vibe. Graham crackers offer a sweet touch that pairs well with chocolate. You can add more flavor to your truffles by mixing in different ingredients. Here are some fun ideas: - A splash of orange zest - A few drops of peppermint extract - A hint of almond extract These flavors blend well with chocolate and raspberries. Experiment to find your favorite combination. Just remember to keep the amount small, so it doesn't overpower the truffles. Want to make these truffles fit your diet? Here are some easy swaps: - Use dairy-free chocolate and cream for a vegan version. - Replace heavy cream with coconut cream for a rich, creamy texture. - Swap fresh raspberries with freeze-dried ones for a unique crunch and flavor. These adjustments help you enjoy the truffles no matter your taste or diet. Have fun creating your own version! To keep your Raspberry Dark Chocolate Truffles fresh, store them in an airtight container. Place parchment paper between layers to avoid sticking. Keep the container in the fridge, away from strong odors. This helps maintain their flavor and texture. When stored properly, truffles last about one week in the fridge. If you want them to last longer, consider freezing. They may lose some texture but still taste great. Always check for signs of spoilage before enjoying them. To freeze your truffles, first chill them in the fridge for 30 minutes. Once firm, place them in a single layer on a baking sheet. Freeze until solid, then transfer them to a freezer-safe bag. They can last up to three months in the freezer. When ready to eat, thaw them in the fridge overnight for the best taste. Yes, you can! While raspberries shine in this recipe, you can swap them for other fruits. Try using strawberries, cherries, or blueberries for a unique twist. Each fruit brings its own flavor and fun color. Just ensure the fruit is fresh to keep your truffles tasty. To make dairy-free truffles, simply replace the heavy cream with coconut cream or almond milk. Use dairy-free dark chocolate for the best results. This way, you can still enjoy rich, creamy truffles without any dairy. Adjust the sweetness if needed to balance the flavors. You can find Raspberry Dark Chocolate Truffles at many specialty chocolate shops and gourmet stores. Some bakeries may also sell them. If you want them fresh, consider making them at home. It’s fun and lets you control the flavors! Serve your truffles on a beautiful platter. Garnish with whole raspberries and a light dusting of cocoa powder. This adds a lovely touch and makes them look fancy. You can also pair them with coffee or dessert wine for a delightful experience. Absolutely! You can make these truffles a day or two ahead. Just store them in the fridge in an airtight container. This allows the flavors to meld together, making them even more delicious. Enjoy them at your next gathering! This blog post covered making delicious raspberry dark chocolate truffles. We explored key ingredients, step-by-step instructions, and helpful tips for the best results. Remember, you can customize your truffles with various flavors and coatings. Store them properly for lasting freshness. This dessert is fun to make and share. Enjoy surprising friends and family with your tasty creations! Happy truffle-making!

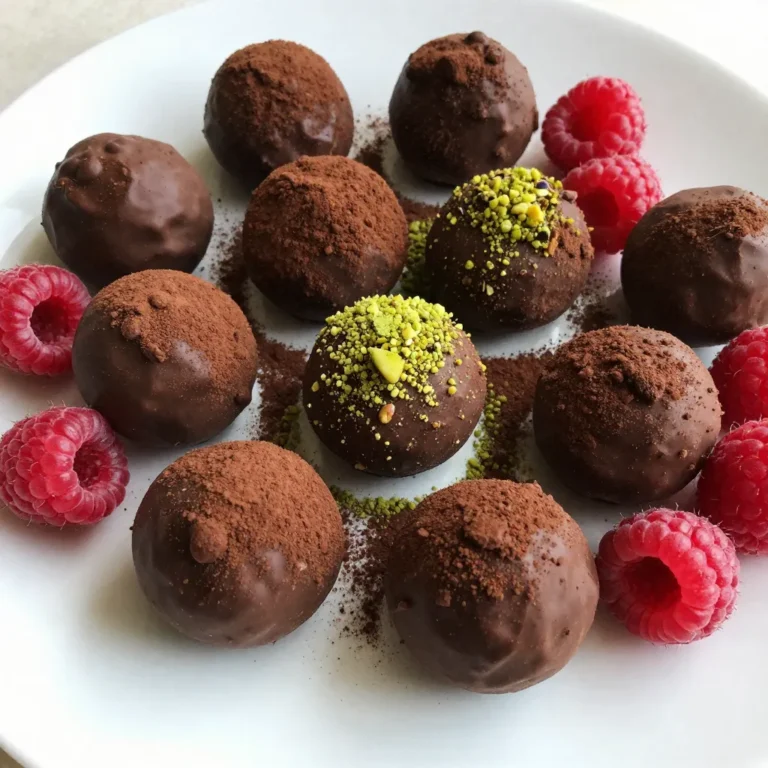
Raspberry Dark Chocolate Truffles Delightful Sweet Treat

To make the best butternut squash apple soup, you will need: - 1 medium butternut squash, peeled and diced into 1-inch cubes - 2 large apples, cored and chopped into bite-sized pieces - 1 medium onion, finely chopped - 2 cloves garlic, minced - 4 cups vegetable broth (low-sodium preferred) - 1 teaspoon ground ginger - 1 teaspoon ground cinnamon - 1 tablespoon olive oil - Salt and black pepper to taste - ¼ cup coconut milk (optional, for added creaminess) - Chopped fresh parsley or chives for garnish Each ingredient plays a big role. The butternut squash gives a creamy base. The apples add a sweet touch. Onion and garlic provide a savory depth. Spices like ginger and cinnamon warm the soup with cozy flavor. For this soup, I love using Granny Smith or Honeycrisp apples. - Granny Smith: These apples are tart and balance the sweetness of the squash. - Honeycrisp: They are sweet and juicy, adding a nice flavor punch. Feel free to mix these varieties for even more depth in taste. You can add a few optional ingredients to boost flavor: - A pinch of nutmeg for warmth. - A splash of apple cider for extra sweetness. - A sprinkle of red pepper flakes for heat. These additions make the soup even more delightful. Try them based on your taste! {{ingredient_image_2}} To make Butternut Squash Apple Soup, start with your ingredients. First, peel and dice one medium butternut squash into cubes. Aim for 1-inch pieces for even cooking. Next, core and chop two large apples. Granny Smith or Honeycrisp work well for a sweet-tart flavor. Then, finely chop one medium onion. Lastly, mince two cloves of garlic. This prep takes about 15 minutes. In a large pot, heat one tablespoon of olive oil over medium heat. Once the oil is hot, add the chopped onion. Cook it for about five minutes, stirring often. You want the onion to be soft and translucent. Add the minced garlic, one teaspoon of ground ginger, and one teaspoon of ground cinnamon. Stir this mixture for one minute until it smells great. Next, add the diced butternut squash and chopped apples into the pot. Stir everything together so the flavors mix well. Pour in four cups of low-sodium vegetable broth. Make sure the squash and apples are fully covered by the broth. Bring this mix to a boil. Once boiling, lower the heat and let it simmer. Cover the pot and let it cook for 20 to 25 minutes. The squash and apples should be tender when you poke them with a fork. After cooking, it's time to blend the soup. Use an immersion blender to puree the soup right in the pot. If you don’t have one, transfer the soup in batches to a standard blender. Blend until it is smooth and creamy. If you want extra richness, stir in ¼ cup of coconut milk at this point. Adjust the flavor by adding salt and pepper as needed. If the soup cooled down, warm it gently over low heat before serving. Serve the soup hot, garnished with freshly chopped parsley or chives. You can also drizzle a swirl of coconut milk on top for a nice touch. Enjoy! To boost the taste of your soup, try adding a splash of apple cider vinegar. This gives a nice tang. You can also mix in a pinch of nutmeg for warmth. If you want more spice, add a dash of cayenne pepper. Fresh herbs like thyme or sage can brighten the flavors too. Serve your soup in deep bowls for a cozy feel. After ladling in the soup, sprinkle fresh parsley or chives on top. For a fun look, drizzle some coconut milk on the surface. Pair the soup with warm bread for dipping. This makes a lovely meal. If your soup tastes bland, check the seasoning. Add more salt or pepper to enhance the flavor. If your soup is too thick, stir in extra vegetable broth or water to loosen it. Should it be too thin, simmer it longer without the lid to thicken it up. Pro Tips Choose the Right Apples: Opt for tart varieties like Granny Smith or Honeycrisp for a balanced flavor that complements the sweetness of butternut squash. Perfectly Cooked Squash: Ensure the butternut squash is diced into uniform cubes to guarantee even cooking and a creamy texture. Adjusting Consistency: If the soup is too thick after blending, add more vegetable broth or water gradually until you reach your desired consistency. Flavor Enhancements: For a deeper flavor, consider adding a pinch of nutmeg or some red pepper flakes for a subtle heat. {{image_4}} Want to boost the nutrients? You can add different veggies. Carrots or sweet potatoes work well. They add sweetness and color. You can also mix in leafy greens like spinach. Stir them in at the end for a fresh touch. If you're dairy-free, skip the coconut milk. Instead, use almond milk or cashew cream. These options keep the soup creamy. You can also add a bit of nutritional yeast. It gives a cheesy flavor without dairy. Spices can change the flavor a lot. Add a pinch of nutmeg for warmth. If you like heat, try red pepper flakes. They can give your soup a nice kick. Experiment to find what you like best. You can store leftover butternut squash apple soup in the fridge. Use an airtight container to keep it fresh. It will stay good for about 3 to 5 days. Before serving, check for any changes in smell or texture. If it seems off, it's best to toss it out. Freezing this soup is easy and great for later meals. Allow the soup to cool completely. Pour it into freezer-safe bags or containers, leaving space for expansion. It will keep well for up to 3 months. When you are ready to enjoy it again, just thaw it overnight in the fridge. Reheat the soup gently on the stove over low heat. Stir it often to ensure even warming. If it seems too thick, add a splash of vegetable broth or water. You can also microwave it in a bowl. Cover it to prevent splatters, and heat in short bursts, stirring in between. Enjoy your cozy treat! Yes, you can use frozen butternut squash. It saves time and is convenient. Just add it directly to the pot without thawing. The cooking time may need a slight increase. Check when the squash is tender before blending. To adjust the soup's thickness, you have a few options. If the soup is too thick, add more vegetable broth or water. Stir well and heat again. If it’s too thin, simmer it longer to reduce the liquid. You can also blend in more squash for thickness. This soup pairs well with many sides. Consider serving it with warm, crusty bread or a fresh salad. Grilled cheese sandwiches are also a hit. You might enjoy a sprinkle of nuts or seeds on top for added crunch and nutrition. You now have all the details to make a delicious Butternut Squash Apple Soup. We covered key ingredients, recommended apple varieties, and optional items to boost flavor. The step-by-step guide helps you prepare, cook, and blend the soup smoothly. Plus, I shared tips for flavor, presentation, and common fixes. You can explore variations for added nutrition, dairy-free options, and spice adjustments. Finally, I supplied storage guidelines and answered common questions. Dive into this simple, tasty recipe, and enjoy your soup-making journey!

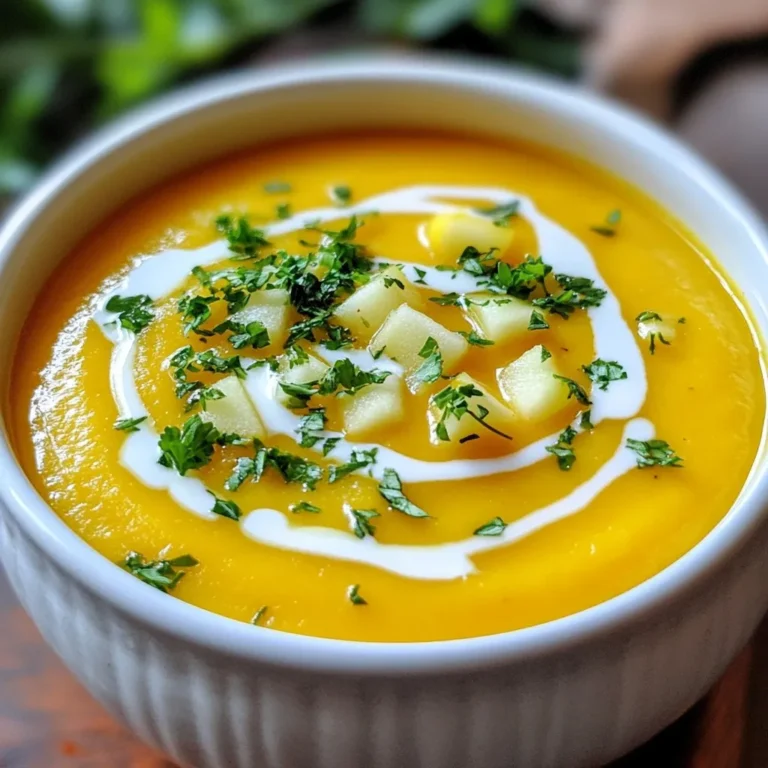
Butternut Squash Apple Soup Delicious and Cozy Treat

To make these easy and delicious gluten-free blueberry muffins, you need the following ingredients: - 2 cups gluten-free all-purpose flour - 1 tablespoon baking powder - ½ teaspoon salt - ½ teaspoon ground cinnamon - ¼ cup coconut sugar (or substitute with brown sugar) - 2 tablespoons pure maple syrup - 1 cup yogurt (dairy-free option available) - 2 large eggs - 1 teaspoon vanilla extract - 1 ½ cups fresh blueberries (frozen blueberries are acceptable) - 2 tablespoons melted coconut oil (can replace with vegetable oil) Each ingredient plays a key role in making these muffins tasty. The gluten-free flour gives structure. Baking powder helps them rise. Salt and cinnamon add flavor. Coconut sugar sweetens the mix. Maple syrup brings moisture. Yogurt keeps them soft. Eggs bind everything together. Vanilla adds warmth. Blueberries bring a burst of flavor. Finally, the oil ensures a moist crumb. Feel free to switch ingredients based on your needs. For example, use dairy-free yogurt if you prefer. This recipe offers flexibility while still delivering fantastic muffins. - Preheat your oven to 375°F (190°C). - Prepare a muffin tin with paper liners or grease it lightly. - In a large bowl, combine 2 cups of gluten-free flour, 1 tablespoon of baking powder, ½ teaspoon of salt, ½ teaspoon of ground cinnamon, and ¼ cup of coconut sugar. Stir well to mix. - In a separate bowl, whisk together 1 cup of yogurt, 2 tablespoons of maple syrup, 2 large eggs, 1 teaspoon of vanilla extract, and 2 tablespoons of melted coconut oil until smooth. - Carefully fold the wet ingredients into the dry ingredients. Mix until just combined. Do not overmix; this helps keep the muffins fluffy. - Gently add 1 ½ cups of fresh blueberries to the batter. Make sure they are evenly distributed without crushing them. - Scoop the batter into the muffin cups, filling each about ¾ full. This space allows them to rise as they bake. - Place the muffin tin in the preheated oven and bake for 18-22 minutes. Check doneness by inserting a toothpick; it should come out clean. - Let the muffins cool in the pan for about 5 minutes. Then, transfer them to a cooling rack. This keeps them moist and helps avoid sticking. To bake gluten-free muffins, precise measurements are key. Gluten-free flour can vary in density. Use a scale for accuracy. Spoon the flour into your measuring cup and level it off. This helps avoid dense muffins. Another tip is to mix gently. Overmixing can make muffins tough. Stir until ingredients are just combined. This keeps your muffins light and fluffy. If you need a dairy-free option, use plant-based yogurt. There are many tasty brands available. You can also switch sweeteners. Coconut sugar works well, but try maple syrup for a different flavor. Honey is another good choice if you’re not vegan. Each sweetener gives a unique taste to your muffins. To make your muffins look special, dust them with powdered sugar. A sprinkle adds a nice touch. Serve them warm for the best flavor. Pair muffins with fresh blueberries on the side. This adds color and freshness to your plate. Enjoy the delightful look and taste! {{image_4}} You can swap blueberries for other fruits. Raspberries and strawberries work well. Both add great flavor and color. Try using 1 ½ cups of fresh raspberries or chopped strawberries. This change keeps the muffins fresh and exciting. Each fruit brings a unique taste, so feel free to experiment. Adding nuts or seeds gives your muffins a nice crunch. Walnuts or pecans add a lovely texture. You can also toss in chia seeds for a healthy boost. Use about ½ cup of chopped nuts or seeds in your batter. This little change makes your muffins even more nutritious and filling. For a fun twist, try different flavors. Adding lemon zest brightens up the muffins. You can also use almond extract for a rich taste. Just a teaspoon of either will change the whole muffin. Mix these flavors into the wet ingredients for a delightful surprise in every bite. To keep your muffins fresh, store them in an airtight container. This will help keep them moist. Line the container with a paper towel, then place the muffins inside. The paper towel absorbs excess moisture. Close the lid tightly and store at room temperature for up to three days. If you want to enjoy them longer, freezing is a great option. Freezing is simple and keeps your muffins tasty. First, let the muffins cool completely. Then, wrap each muffin in plastic wrap. You can also use freezer bags for easier storage. Make sure to squeeze out as much air as possible. Label the bags with the date, and they will last for up to three months in the freezer. When you're ready to eat one, just take it out and let it thaw. To enjoy your muffins fresh again, reheating is key. You can use the microwave for quick results. Heat each muffin for about 10 to 15 seconds. If you prefer a crispier texture, use the oven. Preheat the oven to 350°F (175°C). Place the muffins on a baking sheet and heat for about 5 to 10 minutes. This method keeps the outside nice and warm while the inside stays soft. Yes, you can use frozen blueberries. They work well in this recipe. Frozen blueberries may release more juice. This can make the muffins a bit moister. Just be sure to add them straight from the freezer. Don't thaw them first. This helps keep their shape and color. You can alternate between fresh and frozen blueberries based on what you have. To make these muffins vegan, you can replace the eggs and yogurt. Use flax eggs instead of regular eggs. To make one flax egg, mix 1 tablespoon of ground flaxseed with 2.5 tablespoons of water. Let it sit for a few minutes to thicken. For yogurt, use a dairy-free option like coconut yogurt or almond yogurt. Both swaps work well and maintain the muffin’s taste. Gluten-free all-purpose flour is a blend of different flours. It typically includes rice flour, tapioca flour, and potato starch. This mix mimics the texture of regular flour. It helps create fluffy baked goods without gluten. Always check the label for added ingredients. Some brands may include xanthan gum, which improves texture. You can check if the muffins are done with a toothpick. Insert a toothpick into the center of a muffin. If it comes out clean or with a few crumbs, the muffins are ready. If it has wet batter, they need more time. Keep an eye on them while baking to avoid overcooking. This way, you'll enjoy soft, moist muffins every time. These gluten-free blueberry muffins are simple to make and delicious. You learned the best ingredients, step-by-step instructions, and helpful tips for baking. Remember, proper measurements and gentle mixing are key for fluffy muffins. You can also try different fruits or flavors to mix it up. Store leftovers in a container, or freeze them for later. Enjoy fresh muffins any time! With these easy recipes, you can savor tasty treats without the gluten. Happy baking!

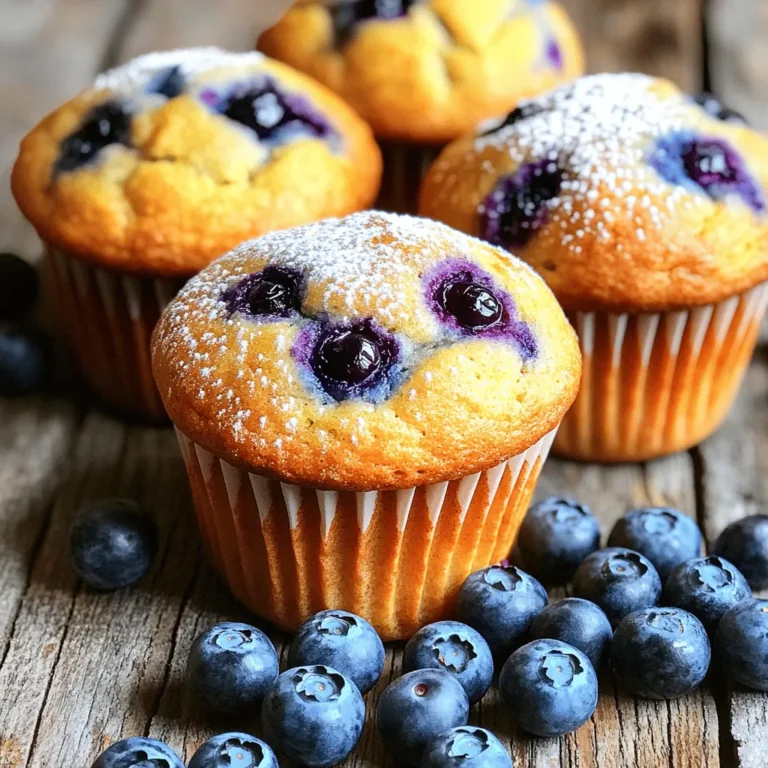
Gluten-Free Blueberry Muffins Easy and Delicious Recipe

- 1 pound chicken breast, diced into bite-sized pieces - 1 pound potato gnocchi - 1 cup heavy cream - 2 cups fresh spinach, roughly chopped - 1 teaspoon Italian seasoning - Fresh basil for garnish - 1/2 cup freshly grated Parmesan cheese - Large pot - Cooking utensils In this one-pot creamy chicken gnocchi recipe, we use simple yet tasty ingredients. The chicken breast adds protein and flavor, while the gnocchi provides a soft and chewy base. Heavy cream gives the dish its rich texture, and fresh spinach adds color and nutrition. For seasoning, Italian seasoning brings warmth and depth. Fresh basil brightens the dish, making your meal look and taste amazing. Don’t forget the Parmesan cheese! It adds a salty, nutty flavor that ties everything together. You only need a large pot and your favorite cooking tools. This makes cleanup easy and keeps your kitchen neat. Enjoy cooking this simple delight! To cook the chicken, first, heat olive oil in a large pot over medium heat. When the oil is hot, add the diced chicken. Season it with salt and pepper. Sauté the chicken for about 5 to 7 minutes. You want it to be browned and cooked through. Browning adds great flavor to the dish. Once done, take the chicken out and set it aside on a plate. In the same pot, toss in the diced onion. Sauté it for about 3 to 4 minutes until it gets soft and clear. This makes a nice base for your sauce. Then, add minced garlic and cook for 1 to 2 minutes more. Be careful not to burn the garlic. Next, pour in the chicken broth and bring it to a gentle simmer. After that, stir in the heavy cream. Mix well until everything blends together smoothly. Now, it's time to add the gnocchi. Follow the package instructions. Usually, this takes about 2 to 3 minutes. Look for the gnocchi to float to the top; that means they are cooked. After the gnocchi is ready, gently fold in the chicken, fresh spinach, halved cherry tomatoes, and Italian seasoning. Cook this mixture for another 2 to 3 minutes. The spinach should wilt down nicely, and everything should heat through perfectly. To make your sauce just right, adjust the creaminess by adding more or less heavy cream. If you want a richer taste, add a bit more cheese. To keep the sauce from separating, stir gently and avoid high heat. This helps the sauce stay smooth and creamy. To know when the gnocchi is done, watch for them to float to the surface. This means they are cooked. Be careful not to overcook them. If you leave them too long, they can become mushy. For a nice presentation, serve the dish in shallow bowls. Drizzle a bit of olive oil or balsamic glaze on top. You can also add a sprinkle of cracked pepper for a pop of color and flavor. Pair this dish with a simple green salad or crusty bread for a complete meal. {{image_4}} You can easily make this dish fit your diet. For gluten-free gnocchi, look for brands made from rice or corn flour. Many stores offer these options now. For dairy-free alternatives, use coconut milk or almond milk instead of heavy cream. These options still give a creamy texture without the dairy. Want to change the taste? Add more veggies! Try bell peppers, carrots, or zucchini. They add color and nutrition. You can also mix in different herbs like thyme, rosemary, or dill. Each herb brings a new twist to the dish. If you prefer turkey, use ground turkey instead of chicken. Cook it in the same way. For seafood lovers, shrimp works great too! Just add shrimp when you add the gnocchi. If you want a meatless option, use chickpeas or tofu. They soak up flavors and keep the dish hearty. To keep your One-Pot Creamy Chicken Gnocchi fresh, follow these steps: - Refrigerate: Let the dish cool down first. Place it in the fridge within two hours. - Containers: Use airtight containers. Glass or plastic works well. Avoid metal containers for long-term storage. When it's time to enjoy leftovers, here’s how to do it right: - Stovetop: Heat in a pot over low heat. Stir often to prevent sticking. - Microwave: Use a microwave-safe bowl. Heat in short bursts, stirring in between. - Creamy Texture: Add a splash of cream or broth while reheating. This keeps the sauce smooth and tasty. Can you freeze this dish? Yes, but with care: - Freezing: Portion out the gnocchi dish into containers. Leave space for expansion. - Thawing: Move it to the fridge overnight. Reheat gently on the stovetop or microwave. Avoid freezing if you want the best texture. Creamy sauces can separate when frozen. Yes, you can prep this dish ahead of time. Cook the chicken and sauce, then store them separately. Keep the gnocchi and sauce in the fridge for up to a day. When ready to eat, just heat the chicken and sauce. Then, cook the gnocchi fresh to maintain its texture. This ensures your meal stays creamy and delicious! If you need a substitute for heavy cream, there are a few great options. You can use half-and-half or whole milk for a lighter dish. Coconut cream adds a nice flavor if you want a dairy-free choice. Greek yogurt can also work, but mix it with a bit of water to thin it. This keeps your dish creamy without using heavy cream. One-Pot Creamy Chicken Gnocchi lasts about 3 to 4 days in the fridge. Always store it in an airtight container to keep it fresh. When you reheat, add a splash of broth or cream to help it stay creamy. Enjoy your leftovers with the same tasty flavors! This blog post covered how to make One-Pot Creamy Chicken Gnocchi. You learned about the key ingredients like chicken, gnocchi, and spinach. We discussed the best cooking methods and essential tips for perfecting the sauce and gnocchi texture. Finally, we explored variations to fit different diets and how to store leftovers. With this knowledge, you can cook a delicious, creamy dish that impresses everyone. Enjoy your cooking journey!

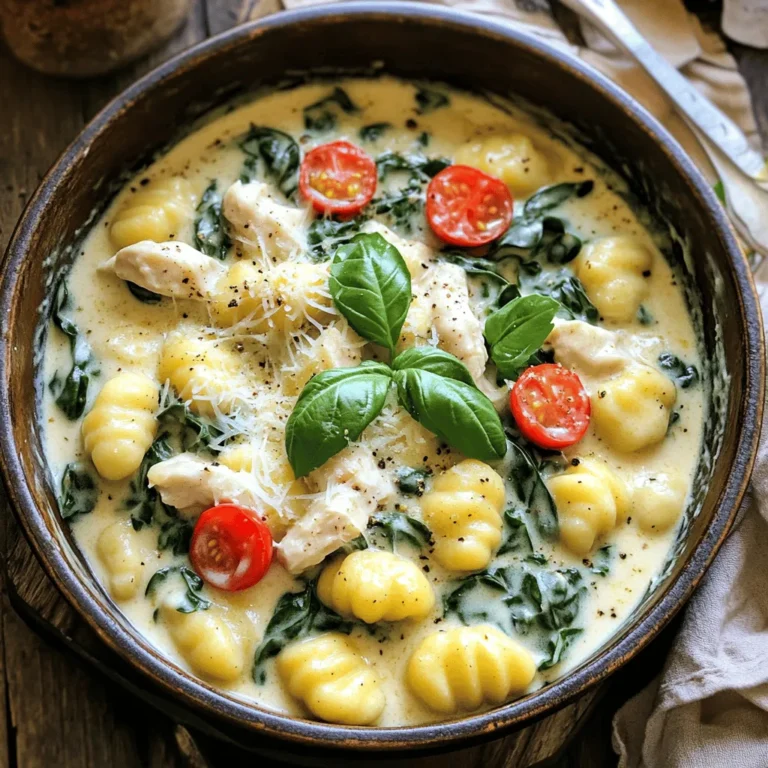
One-Pot Creamy Chicken Gnocchi Simple Delight Recipe

- 1 lb ground beef - 1 can (15 oz) black beans, drained and rinsed - 1 cup corn kernels (can be fresh, frozen, or canned) - 1 can (10 oz) diced tomatoes with green chilies - 1 cup shredded cheddar cheese - 1 cup diced bell peppers (mix of red and yellow for a vibrant appearance) - 1 small onion, finely chopped - 2 cloves garlic, minced - 1 teaspoon chili powder - ½ teaspoon ground cumin - 1 teaspoon smoked paprika - 1 package (1 lb) frozen tater tots - Olive oil for sautéing - Salt and black pepper to taste For this cowboy casserole, I start with a solid base. Ground beef gives a hearty feel. Black beans add protein and fiber. Corn kernels lend sweetness and color. Diced tomatoes with green chilies pack a punch. Next, I add cheese and veggies. Shredded cheddar cheese melts beautifully, creating a creamy layer. Bell peppers bring crunch and color, while onion and garlic add depth. These ingredients work together to create a rich flavor. Seasoning brings everything to life. Chili powder adds warmth, while ground cumin gives an earthy note. Smoked paprika introduces a subtle smokiness. The tater tots on top create a crispy, golden finish. Olive oil helps everything sauté nicely. Lastly, I use salt and pepper to enhance the flavors. This cowboy casserole is not just filling; it's a fun mix of tastes and textures. Each ingredient plays a role in making it a family favorite. {{ingredient_image_2}} 1. Preheat your oven to 375°F (190°C). This makes sure your casserole cooks evenly. 2. Sauté your vegetables. In a large skillet, drizzle olive oil over medium heat. Add the chopped onion and diced bell peppers. Cook for about 4-5 minutes until they soften and the onion turns clear. 3. Cook the ground beef. Add minced garlic to the skillet. Stir and cook for another minute. Then, add the ground beef. Break it apart with a spatula. Cook until it turns brown and is no longer pink, about 5-7 minutes. Drain any extra fat if needed. 1. Add beans, corn, and seasonings. Stir in the black beans, corn, and diced tomatoes with green chilies. Add the chili powder, ground cumin, and smoked paprika. Season with salt and pepper. Mix everything well to blend the flavors. 2. Transfer to baking dish and top with cheese. Pour the beef and vegetable mix into a greased 9x13 inch baking dish. Spread it evenly. Top it off with shredded cheddar cheese to melt as it bakes. 1. Layer tater tots. Carefully arrange the frozen tater tots on top of the cheese. Place them in a single layer for a nice bake. 2. Baking time. Put the casserole in the oven and bake for 30-35 minutes. Check for a golden brown and crispy top on the tater tots. Once done, take it out and let it cool for a few minutes before serving. To ensure even browning of beef, start with a hot skillet. Use medium heat to cook the meat thoroughly. Break it into smaller pieces with a spatula as it cooks. This helps it brown well. To avoid soggy tater tots, layer them on top of the cheese. Make sure they are in a single layer. This allows them to crisp up nicely in the oven. Baking them directly over the cheese ensures they stay crunchy. Garnish your cowboy casserole with fresh cilantro or sliced green onions. This adds color and a fresh taste. A dollop of sour cream or guacamole pairs nicely too. It adds creaminess and richness to each bite. For side dishes, consider a simple green salad or cornbread. Both are easy to make and balance the flavors of the casserole. Store any leftovers in an airtight container. Keep them in the fridge for up to three days. For reheating, use the oven for best results. Set it at 350°F (175°C) and heat until warm. If you want to freeze leftovers, place them in a freezer-safe dish. They can last up to three months. Thaw overnight in the fridge before reheating. This keeps the casserole tasty and fresh. Pro Tips Choose Lean Meat: Opt for lean ground beef or turkey to reduce the fat content in your casserole without sacrificing flavor. Customize the Vegetables: Feel free to mix in other vegetables such as zucchini or spinach to add more nutrition and flavor to your dish. Layer for Flavor: When layering the cheese and tater tots, make sure to cover the entire surface for even melting and a crispy top. Let it Rest: Allow the casserole to cool for a few minutes after baking; this helps it set and makes serving easier. {{image_4}} You can change the meat in cowboy casserole. Use lean turkey or chicken for a lighter dish. Both options keep the flavor rich and hearty. If you need a dairy-free meal, try using dairy-free cheese. It melts well and offers a tasty twist. Want to spice things up? Add some cayenne pepper or red pepper flakes for heat. This will make every bite exciting! You can also mix in different veggies. Try zucchini, spinach, or even mushrooms. Each choice adds a new layer of flavor. If you need a gluten-free dish, choose gluten-free tater tots. They bake up just as crispy and delicious. For thickening, use cornstarch or arrowroot powder instead of regular flour. This keeps the casserole rich without gluten. A serving of Cowboy Casserole has about 450 calories. This meal is filling and perfect for family dinners. - Protein: Each serving offers around 25 grams of protein. This comes mainly from the ground beef and black beans, supporting muscle health. - Fat: There are about 20 grams of fat per serving. The cheese and beef contribute to this, adding flavor and richness. - Carbohydrates: Each serving contains about 45 grams of carbohydrates. The tater tots and corn provide most of these, giving you energy. Cowboy Casserole is not suitable for everyone. It contains meat and dairy, which some avoid. Here are some key points: - Gluten: Standard tater tots contain gluten. Use gluten-free options if needed. - Dairy: The cheese can be replaced with dairy-free cheese for lactose-free diets. - Beans: Black beans may trigger allergies for some. Consider skipping them or using a different protein source. This casserole is a hearty choice for many, but always check for allergies or dietary needs! Leftovers of Cowboy Casserole can last for about 3 to 4 days in the fridge. Make sure to store them in an airtight container. This helps keep the flavors fresh and safe to eat. If you see any signs of spoilage, like a strange smell or mold, throw it away. Reheat leftovers in the microwave or oven until they are hot all the way through. Yes, you can freeze Cowboy Casserole! To freeze, let it cool completely first. Then, place it in a freezer-safe container. You can also use heavy-duty aluminum foil. This keeps it safe from freezer burn. It can stay frozen for about 2 to 3 months. When you’re ready to eat, thaw it in the fridge overnight. Reheat in the oven until hot. You can also microwave individual portions if you want a quick meal. Cowboy Casserole pairs well with many sides. Here are a few ideas: - Green salad: A simple green salad adds crunch and freshness. - Cornbread: Sweet cornbread complements the savory casserole. - Sour cream or guacamole: These toppings add creaminess and flavor. - Steamed veggies: Broccoli or green beans are great for extra color and nutrition. These sides enhance the meal and make it even more enjoyable! In this blog post, we explored the delicious Cowboy Casserole. We covered the key ingredients, from ground beef to tater tots. You learned how to prepare, combine, and bake it perfectly. I shared tips to ensure success while serving and storing leftovers. Cowboy Casserole is versatile, allowing you to make many variations. You can adjust ingredients for different diets and tastes. This dish offers warmth and comfort for everyone at your table. Enjoy making it your own and savor the flavors!

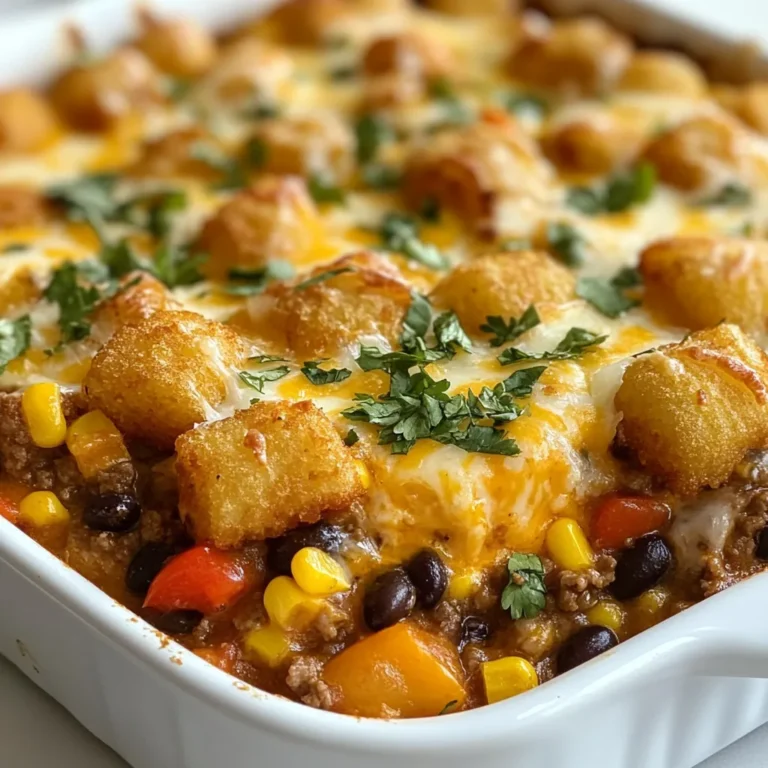
Cowboy Casserole Hearty and Flavorful Family Meal

- 1 cup orzo pasta - 1 ½ cups cherry tomatoes, halved - ½ cucumber, diced into small cubes - ½ red onion, finely chopped - ½ cup feta cheese, crumbled - ¼ cup Kalamata olives, pitted and sliced - ¼ cup fresh parsley, chopped - ¼ cup fresh mint, chopped - 3 tablespoons extra-virgin olive oil - 2 tablespoons freshly squeezed lemon juice - 1 teaspoon dried oregano - Salt and freshly ground pepper to taste Orzo pasta is a great source of carbs. It gives energy for your day. Cherry tomatoes are full of vitamins and antioxidants. They help keep your skin healthy. Cucumbers provide hydration due to their high water content. They are low in calories too. Red onions contain quercetin, which may reduce inflammation. Feta cheese offers protein and calcium. It supports strong bones and muscles. Kalamata olives are rich in healthy fats, which can improve heart health. Fresh parsley and mint add flavor and nutrients. They also aid digestion. Olive oil is a good fat that can help lower cholesterol levels. If you can't find orzo, consider using quinoa or couscous. Cherry tomatoes can be swapped with grape tomatoes or diced bell peppers. For a crunch, you can replace cucumber with zucchini. If you prefer a milder taste, use green onions instead of red onions. For a dairy-free option, you can skip feta or use a vegan cheese. Black olives work well if you can’t find Kalamata olives. You can add other herbs like basil or dill for a new twist. To start, bring 4 cups of salted water to a boil in a medium pot. Once the water bubbles, add 1 cup of orzo pasta. Cook it for 8-10 minutes until it is al dente, meaning it is firm when you bite it. After cooking, drain the orzo in a colander. Rinse it with cold water to stop the cooking. Set the orzo aside to cool. Next, gather all your fresh veggies. In a large mixing bowl, combine 1 ½ cups of halved cherry tomatoes, ½ diced cucumber, and ½ finely chopped red onion. Add ¼ cup of sliced Kalamata olives, ¼ cup of chopped parsley, and ¼ cup of chopped mint. Toss these ingredients gently to mix them well. Now, let's make the dressing. In a small bowl, whisk together 3 tablespoons of extra-virgin olive oil, 2 tablespoons of freshly squeezed lemon juice, and 1 teaspoon of dried oregano. Add a sprinkle of salt and freshly ground pepper. Mix until everything is well blended. It’s time to bring the salad together. Add the cooled orzo to the bowl with the vegetables. Drizzle the dressing over the top. Gently fold in ½ cup of crumbled feta cheese. Be careful not to crush the cheese while mixing. For a great presentation, serve the salad on a large platter or in individual bowls. You can garnish with extra mint leaves and a light drizzle of olive oil. For the best taste, let the salad chill in the fridge for about 30 minutes. This helps all the flavors blend beautifully. Enjoy your fresh and flavorful Mediterranean Orzo Salad! To cook orzo perfectly, use a large pot with enough water. Bring the water to a rolling boil. Add salt to enhance flavor. Cook the orzo for 8 to 10 minutes until it is al dente. Stir occasionally to prevent sticking. After cooking, drain the orzo in a colander. Rinse it under cold water to stop the cooking process. This keeps it from getting mushy. Store leftover Mediterranean orzo salad in an airtight container. Place it in the fridge to keep it fresh. Enjoy the salad within three days for the best taste. If you want to keep it longer, you can freeze it. However, the texture may change after thawing. To change the flavor of your orzo salad, try adding more herbs. Fresh basil or dill can brighten the dish. If you like a bit of heat, add red pepper flakes. You can also change the acidity. Try using lime juice instead of lemon. For a richer taste, add more feta cheese or olives. Always taste as you go. This helps you find the perfect balance. {{image_4}} You can add grilled chicken to this salad for extra protein. Simply season chicken breast with salt, pepper, and oregano. Grill until cooked through, then slice it thin. Mix the chicken with the orzo, veggies, and feta. This version is filling and perfect for a main dish. To make this salad vegan, skip the feta cheese. You can use avocado for creaminess instead. For added texture, try adding chickpeas. They provide protein and fiber, making the salad hearty. This way, everyone can enjoy a fresh and vibrant meal. Seasonal veggies can enhance this salad's flavor. In spring, consider adding asparagus or peas. In summer, bell peppers and zucchini work well. In fall, try roasted butternut squash for a sweet touch. Mixing in seasonal produce keeps the dish exciting and fresh! To keep your Mediterranean Orzo Salad fresh, store it in an airtight container. This helps keep moisture out and flavors in. You can keep it in the fridge for up to three days. If you want to enjoy it later, make sure to keep the dressing separate until you are ready to eat. This keeps the salad crisp and tasty. You can freeze Mediterranean Orzo Salad, but it may change texture. First, store it in a freezer-safe container. Make sure to leave space at the top for expansion. The salad can last for up to three months in the freezer. When you’re ready to eat, thaw it overnight in the fridge. After thawing, add fresh herbs and dressing for best flavor. The shelf life of Mediterranean Orzo Salad is about three days in the fridge. To keep it at its best, check for any signs of spoilage like an off smell or slimy texture before eating. If you notice these signs, it’s best to toss it. To enjoy a fresh taste, try to eat it soon after making it. Yes, you can make Mediterranean Orzo Salad ahead of time. Prepare it in advance and store it in the fridge. The flavors will blend well if you let it chill for 30 minutes or more. Just remember to toss it gently before serving. You can serve Mediterranean Orzo Salad with many dishes. It pairs nicely with grilled chicken or fish. You can also enjoy it alongside pita bread or hummus. This salad is a great side for barbecues or picnics, too. The traditional orzo pasta is not gluten-free, as it is made from wheat. However, you can use gluten-free orzo or another gluten-free pasta. Look for brands that offer gluten-free options to keep the salad safe for those with gluten sensitivities. You can customize your Mediterranean Orzo Salad in many ways. Add different veggies like bell peppers, artichokes, or spinach. You can also swap feta cheese for goat cheese or omit cheese for a vegan option. For a protein boost, try adding grilled shrimp or chickpeas. The choice is yours! You learned how to make a healthy Mediterranean Orzo Salad. We covered the ingredients and their benefits, plus easy substitutes. I shared step-by-step cooking tips to enhance flavor and texture. Remember, you can adjust the recipe to fit your taste and diet needs. This salad is great for meals or snacks. Try it fresh or save leftovers for later. Enjoy this fun, delicious dish!

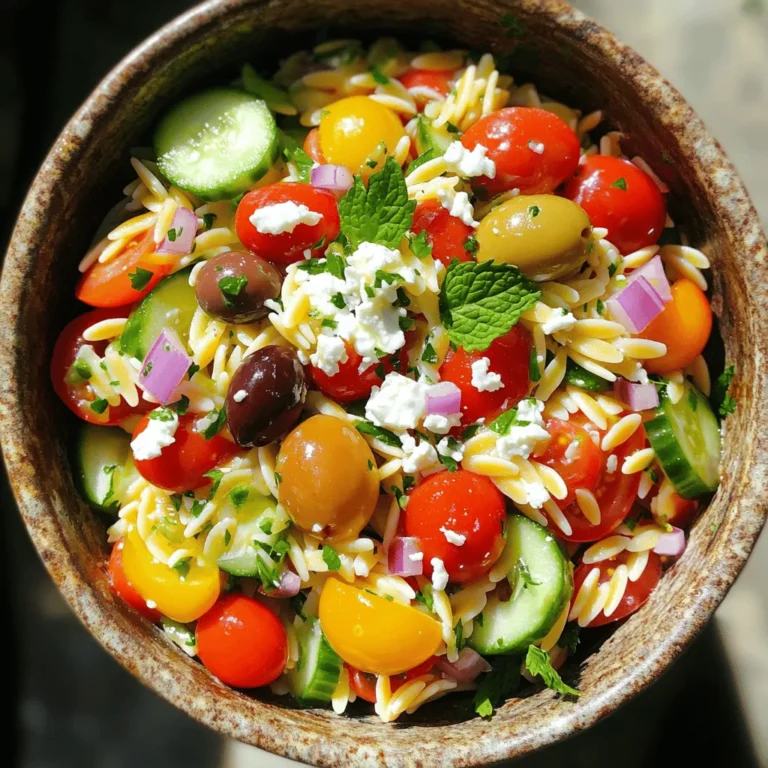
Mediterranean Orzo Salad Fresh and Flavorful Recipe

To make Air Fryer Zucchini Parmesan Chips, you will need: - 2 medium zucchinis, thinly sliced - 1 cup breadcrumbs (panko or regular) - ½ cup grated Parmesan cheese - 1 teaspoon garlic powder - ½ teaspoon onion powder - ½ teaspoon dried oregano - ½ teaspoon salt - ¼ teaspoon black pepper - 2 large eggs, beaten - Olive oil spray You can swap the breadcrumbs for crushed cornflakes for a gluten-free option. If you want a different cheese flavor, try using cheddar or mozzarella. Fresh herbs can replace dried oregano for a fresher taste. For a spicy kick, add a pinch of cayenne pepper to the breadcrumb mix. One serving of these chips offers: - Calories: 150 - Protein: 7g - Carbohydrates: 12g - Dietary Fiber: 1g - Sugars: 2g - Fat: 8g - Saturated Fat: 2g - Sodium: 360mg This tasty snack is not only crunchy but also packs a punch of flavor without too many calories. Enjoy these healthy chips as a fun way to eat more veggies! First, preheat your air fryer to 400°F (200°C). This step takes about 5 minutes. Preheating helps the chips cook evenly. A hot air fryer gives you that perfect crispy finish. Next, grab two medium zucchinis. Wash them well, then slice them thin. Aim for about 1/4 inch thick. Thin slices cook faster and crisp up nicely. Lay the slices flat on a paper towel to absorb extra moisture. This helps prevent soggy chips. Now, let’s make the coating. In a shallow bowl, mix together: - 1 cup breadcrumbs (panko or regular) - ½ cup grated Parmesan cheese - 1 teaspoon garlic powder - ½ teaspoon onion powder - ½ teaspoon dried oregano - ½ teaspoon salt - ¼ teaspoon black pepper Stir until everything blends well. In another bowl, beat two large eggs. Dip each zucchini slice into the egg first, letting any extra drip off. Then, coat it in the breadcrumb mix. Press gently to help the crumbs stick. Place the coated zucchini chips in the air fryer basket. Make sure they are in a single layer. Avoid overlapping the chips. If your air fryer is small, do this in batches. Lightly spray the tops with olive oil for extra crunch. Cook for 10-12 minutes, flipping halfway. Look for a golden brown color. Once done, carefully take the chips out. Place them on a wire rack to cool. This keeps them crispy, not soggy. Enjoy your chips as a snack or with your favorite dipping sauce! To get that perfect crunch, keep a few key tips in mind. First, slice your zucchini thinly. Aim for about 1/4 inch thick. Thinner slices cook better and crisp up nicely. Second, use panko breadcrumbs if you can. They are light and create a great texture. Don’t skip the olive oil spray. A light mist before cooking helps achieve that golden finish. Soggy chips can ruin the fun. To avoid this, make sure to dry your zucchini slices well. Use a paper towel to remove excess moisture before coating. Also, avoid overcrowding the air fryer basket. Cook in batches if needed. This ensures hot air circulates freely. Finally, let them cool on a wire rack rather than a plate. This helps them stay crisp. Dipping sauces can elevate your chips. A classic marinara sauce works perfectly with these zucchini chips. For a creamy option, try ranch or tzatziki. If you like a spicy kick, mix some sriracha with mayo. Experiment with different flavors to find your favorite! {{image_4}} You can switch up the cheese for more flavor. Try using mozzarella or cheddar. Both melt well and add a rich taste. For a bolder flavor, use feta or goat cheese. Mix different cheeses for a tasty twist. Just remember to adjust the amount based on the cheese type. Experiment with herbs and spices to enhance your chips. You might try basil or thyme for a fresh taste. Add a pinch of cayenne for heat or smoked paprika for a smoky flavor. Just sprinkle your choice into the breadcrumb mix. This simple change can make your zucchini chips unique each time. You can easily make your chips gluten-free. Use gluten-free breadcrumbs instead of regular ones. You can find these at most stores or make your own. Just blend gluten-free bread into crumbs. This way, everyone can enjoy your tasty zucchini parmesan chips! After enjoying your zucchini chips, allow them to cool completely. Place them in an airtight container. This will keep them fresh for up to three days. If you want to keep them crisp, try to avoid stacking them. You can also use paper towels to absorb any moisture. To reheat your zucchini chips, use the air fryer again. Set it to 350°F (175°C) for about 5 minutes. This will help restore their crunch. You can also use an oven. Simply spread them on a baking sheet and heat for the same time. If you want to save some chips for later, freezing is a great option. First, make sure they are completely cool. Lay them in a single layer on a baking sheet. Freeze them for about an hour. Once frozen, transfer the chips to a freezer bag. They can last for up to two months. When ready to eat, you can reheat them straight from the freezer. Yes, you can use regular zucchini. Just remember, larger zucchinis may have more seeds and water. This can change the texture of your chips. For best results, choose zucchini that feels firm and is not too large. I recommend slicing zucchini into thin rounds, about 1/8 inch thick. Use a sharp knife or a mandoline for even slices. Thin slices cook more evenly and become crispier in the air fryer. Consistency is key for great chips. Zucchini chips are done when they are golden brown and crispy. This usually takes about 10-12 minutes in the air fryer. Flip them halfway through to ensure even cooking. Always check them a minute or two before the timer ends. Yes, you can! Preheat your oven to 425°F (220°C). Place the chips on a baking sheet lined with parchment paper. Bake for about 20-25 minutes or until they are crispy. Flip them halfway for the best texture. We covered how to make crispy zucchini chips with simple steps. You learned about the ingredients you need and some tasty swaps. I shared tips for the best crunch and ways to avoid sogginess. You also discovered storage methods, reheating tips, and answered common questions. Enjoying healthy snacks can be easy. With these zucchini chips, you can feel good while indulging. Give them a try and explore your favorite flavors!

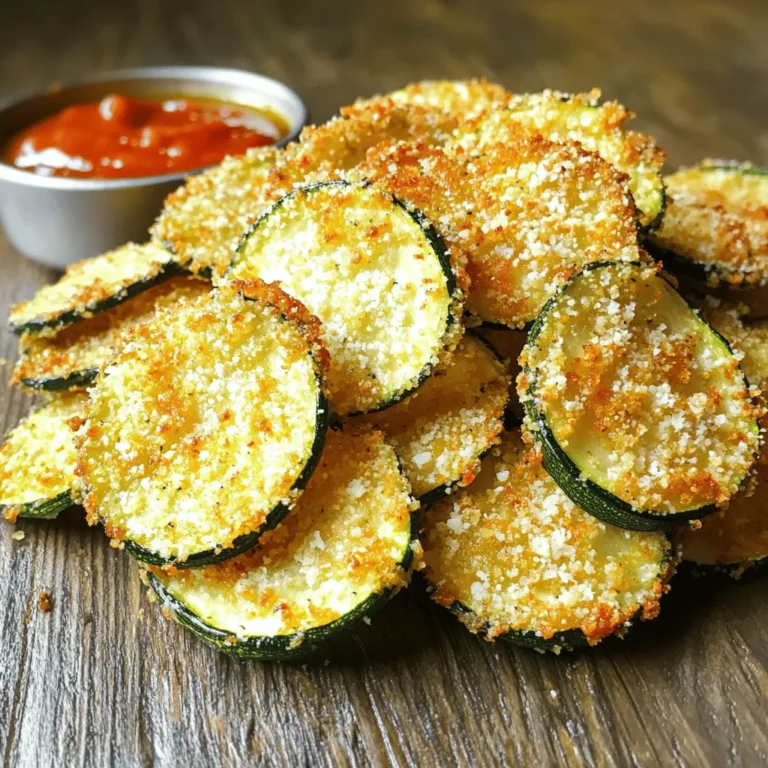
Savory Air Fryer Zucchini Parmesan Chips Recipe

To make Chocolate Chip Banana Oat Cookies, you need a few simple ingredients. These items come together to create a tasty treat that feels good to eat. Here’s what you will need: - 2 ripe bananas, well-mashed - 1 cup rolled oats - 1/2 cup almond flour - 1/2 teaspoon baking soda - 1/4 teaspoon fine salt - 1/4 cup honey or pure maple syrup - 1/2 teaspoon vanilla extract - 1/3 cup dark chocolate chips - Optional: 1/4 cup chopped walnuts or pecans Each ingredient plays a key role. The ripe bananas add natural sweetness and moisture. Rolled oats give the cookies a hearty texture. Almond flour makes them soft and nutty. Baking soda helps them rise. Fine salt balances the sweetness. Honey or maple syrup adds extra flavor. Vanilla extract gives a warm touch. Dark chocolate chips bring rich taste. If you like, add nuts for crunch! Gather these ingredients before you start. This helps make the process smooth and fun. Enjoy the journey of baking these delicious cookies! 1. Preheating the oven: Start by preheating your oven to 350°F (175°C). This step ensures your cookies bake evenly. 2. Preparing the baking sheet: Line your baking sheet with parchment paper. This helps prevent sticking and makes cleanup easy. 3. Mashing the bananas: Take your ripe bananas and mash them in a large bowl. Use a fork or potato masher. Aim for a smooth texture with no big lumps. 4. Combining dry and wet ingredients: Add the rolled oats, almond flour, baking soda, and fine salt to the mashed bananas. Mix well until all ingredients are combined into a sticky batter. 5. Forming the cookie dough: Next, pour in the honey or maple syrup and the vanilla extract. Stir until the dough is smooth and free from dry spots. 6. Folding in chocolate chips: Carefully mix in the dark chocolate chips. If you want, add chopped walnuts or pecans for extra crunch. 7. Dropping dough onto the baking sheet: Using a tablespoon or cookie scoop, drop spoonfuls of dough onto your prepared sheet. Leave about 2 inches between each cookie. 8. Flattening the cookie tops: Gently press the tops of each cookie with the back of a spoon. This helps them bake evenly and gives a nice shape. 9. Baking time and temperature: Place the baking sheet in the oven. Bake for 12-15 minutes, or until the edges turn golden brown. Let the cookies cool on the baking sheet for about 5 minutes. Then, move them to a wire rack to cool completely. Enjoy your tasty cookies! - Sugar substitute options: You can use stevia, agave, or coconut sugar. Each adds a unique flavor. Adjust the amount based on your chosen substitute. Start with less and taste, as some options are sweeter than honey. - Gluten-free variations: Replace almond flour with coconut flour or gluten-free oat flour. Ensure your oats are certified gluten-free. This keeps the cookies tasty while meeting dietary needs. - Achieving the perfect texture: For chewy cookies, don’t overmix the dough. Mix just until combined. This keeps the cookies soft and moist. Also, be careful not to bake them longer than needed. - Preventing cookies from spreading too much: Chill the dough for 30 minutes before baking. This helps the cookies hold their shape. Also, make sure you use enough oats to bind the mixture together. - Presentation ideas: Stack cookies on a decorative plate. Add a few chocolate chips on top for a fun touch. You can also dust them lightly with powdered sugar for a pretty look. - Pairing with beverages: These cookies pair well with milk, coffee, or tea. The chocolate and banana flavors enhance the drink's taste. Try them warm for a delightful treat that brings comfort on any day. {{image_4}} You can make these cookies even tastier. Try adding spices like cinnamon or nutmeg. Just a pinch can boost the flavor. You can also mix in dried fruits. Raisins or chopped dates work well. These additions bring new textures and flavors to your cookies. Nuts add crunch and flavor to cookies. You can swap in pecans or macadamia nuts for a different taste. If you want a nut-free version, you can skip the nuts altogether. This keeps the cookies safe for those with allergies. If you're looking for different ways to sweeten your cookies, consider using stevia or coconut sugar. These options are great for cutting down on sugar. If you use stevia, start with a small amount, as it is much sweeter than sugar. Adjust the measurements as needed to keep the cookie dough from becoming too dry. To keep your cookies fresh, use an airtight container. A glass jar or plastic container works well. Make sure the lid seals tightly. If you leave cookies at room temperature, they stay soft for up to a week. If your kitchen is warm, consider placing them in the fridge. This helps them last longer, but they may become a bit firmer. Freezing cookies is a great way to save some for later. To freeze, place the cookies in a single layer on a baking sheet. Once frozen, transfer them to a freezer bag. Make sure to remove as much air as you can. This helps prevent freezer burn. To thaw, take out the cookies and leave them at room temperature for about 30 minutes. You can also warm them in the oven for a few minutes for that fresh-baked taste. These cookies stay fresh for about one week at room temperature. If stored in the fridge, they can last up to two weeks. If you freeze them, they can last for about three months. Look for signs of spoilage like hard texture or an off smell. If you see any mold or discoloration, it's best to toss them. Enjoy your cookies while they are at their best! Yes, you can use overripe bananas. In fact, they are best for flavor! Overripe bananas have more sweetness and a smooth texture. This makes your cookies extra tasty. Look for bananas with brown spots. They are perfect for baking! Absolutely! To make these cookies vegan, you can swap honey for maple syrup. Use a plant-based milk if you like. Almond flour is already vegan, so you’re all set. Just ensure your chocolate chips are dairy-free. This way, everyone can enjoy these treats. To get chewy cookies, use less flour. You can add a little more banana too. Another tip is to bake them a bit less. Take them out when they are soft in the center. Let them cool on a rack; they will firm up nicely. If your dough feels dry, add a splash of milk or water. You can also mash an extra banana. This will bring moisture back into the dough. Mix well until it feels sticky but not too wet. Adjusting the moisture helps create the perfect cookie! These tasty cookies blend ripe bananas and oats for a great snack. We covered how to prepare, mix, and bake them perfectly. Use tips to modify ingredients or enhance flavors. Remember to store cookies to keep them fresh. Experiment with different nuts and sweeteners for variety. With these steps, you will bake cookies everyone loves. Enjoy your baking journey!

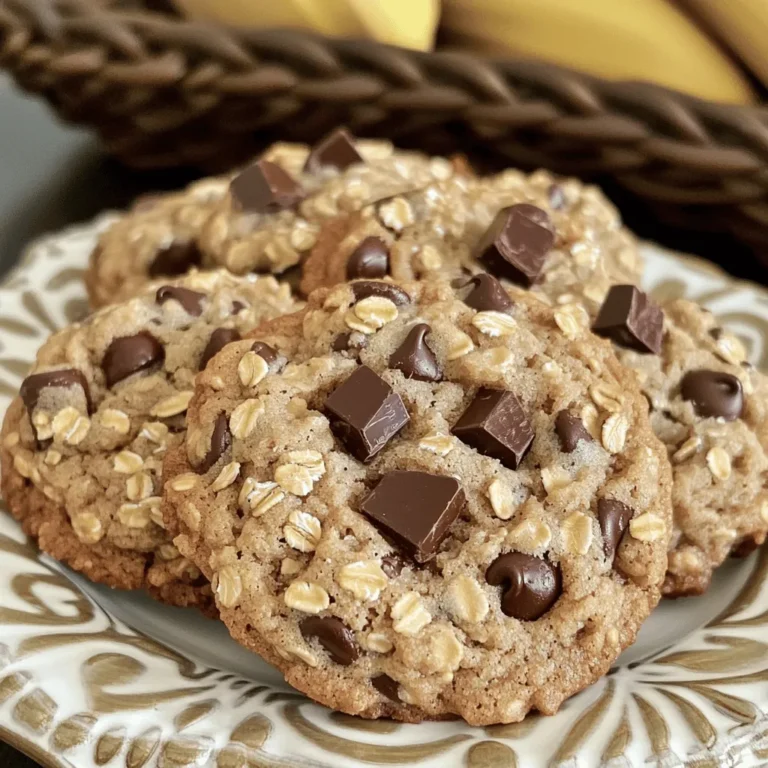
Chocolate Chip Banana Oat Cookies Quick and Easy Treat

- 2 large sweet potatoes, peeled and cut into 1-inch cubes - 1 (15 oz) can of black beans, drained and rinsed - 1 (15 oz) can of kidney beans, drained and rinsed - 1 (14 oz) can of diced tomatoes, with juices - 1 bell pepper, chopped into bite-sized pieces - 1 medium onion, finely chopped - 3 cloves garlic, minced - 1 cup vegetable broth (low-sodium recommended) - 2 tablespoons chili powder - 1 tablespoon ground cumin - 1 teaspoon smoked paprika - Salt and black pepper to taste - 2 tablespoons extra virgin olive oil - Fresh cilantro, chopped (for garnish) - Slices of ripe avocado (for serving) In this vegan sweet potato chili, you will find a mix of hearty ingredients. Sweet potatoes bring natural sweetness and a creamy texture. Beans add protein and fiber. Tomatoes provide a rich base, while peppers and onions add crunch and flavor. I love using colorful bell peppers. They make the dish look vibrant. The spices create a warm, cozy feeling. Chili powder gives a kick, and cumin adds depth. Smoked paprika brings a unique, smoky taste. Olive oil is perfect for sautéing. It helps to soften the onions and peppers. Lastly, fresh cilantro and creamy avocado make the chili even better. They add freshness and balance the heat. This dish is not just filling; it is also full of nutrients. Each bite offers a burst of flavor and satisfaction. Gather these ingredients, and you are ready to create a delicious meal! Start by gathering all your ingredients. For the sweet potatoes, peel them and cut them into 1-inch cubes. You want them to cook evenly. Chop one bell pepper into bite-sized pieces. A vibrant red or earthy green one adds nice color. Finely chop one medium onion and mince three cloves of garlic. Set these aside. Next, measure out your spices. You will need two tablespoons of chili powder, one tablespoon of ground cumin, and one teaspoon of smoked paprika. Also, get one cup of low-sodium vegetable broth and one can of diced tomatoes, including the juices. Now, heat two tablespoons of extra virgin olive oil in a large pot over medium heat. Once hot, add your chopped onion and bell pepper. Sauté these for about five minutes until they are soft and translucent. Add the minced garlic along with the chili powder, cumin, and smoked paprika. Stir well and let this cook for one to two minutes. This helps the spices release their rich aroma. Next, add the diced sweet potatoes to the pot. Stir to coat them well in the onion and spice mixture. Pour in the vegetable broth and the can of diced tomatoes. Then, add the drained black beans and kidney beans. Stir everything together until well mixed. Increase the heat and bring your chili to a gentle boil. Once boiling, reduce the heat to low, cover the pot, and let it simmer for about 30 to 35 minutes. Check for tenderness by piercing the sweet potatoes with a fork. Stir occasionally to avoid sticking. Once the sweet potatoes are tender, taste your chili. Adjust the flavor with salt and black pepper as needed. For a final touch, serve the chili hot. Garnish generously with chopped fresh cilantro and top with slices of creamy avocado. To make your presentation pop, serve the chili in colorful bowls. Add a wedge of lime on the side for a zesty finish. Enjoy this hearty, flavorful chili that is sure to please! To ensure sweet potatoes cook evenly, cut them into 1-inch cubes. This size helps them cook through at the same rate. Stir the chili often while it simmers. This action helps distribute heat and prevents sticking. Avoiding spice overload is key for balance. Start with the recommended chili powder. If you want more heat, add a little at a time. You can always add more, but it’s hard to take it out once it's in. For complementary toppings, fresh cilantro and avocado slices are perfect. They add creaminess and freshness. A squeeze of lime also brightens the flavors nicely. Best sides to serve with chili include warm cornbread or tortilla chips. Both options add texture and make the meal more filling. Pairing with a simple green salad brings a nice crunch and freshness to the table. {{image_4}} You can switch up the beans in your chili. If you want a different flavor, try using chickpeas or pinto beans. These beans add their own unique taste and texture to the dish. For a heartier chili, lentils work well too. You can also change the vegetables based on what you have. For example, zucchini, corn, or carrots can be great additions. If you want a bit of crunch, try adding some diced celery. You can also use quinoa or rice instead of sweet potatoes for a different base. If you like a kick, add some spicy peppers. Jalapeños or serrano peppers can add heat. Just chop them up and mix them in with the onions. If you want more flavor, try adding chipotle peppers in adobo sauce. They give a smoky taste that pairs well with sweet potatoes. Using unique spices can also elevate your chili. Try adding cinnamon for warmth or cocoa powder for depth. Both can surprise your taste buds. You can also play with herbs like oregano or thyme for a fresh twist. Keep tasting and adjusting until you find the perfect mix! To store leftover Vegan Sweet Potato Chili, let it cool first. Place it in an airtight container. This helps keep it fresh. I recommend using glass containers with tight-fitting lids. They prevent spills and keep flavors strong. You can store it in the fridge for up to 5 days. To freeze your chili, first, let it cool completely. Use freezer-safe bags or containers. Make sure to leave some space for expansion. Label the bags with the date. You can freeze it for about 3 months. When you're ready to eat, thaw it in the fridge overnight. For quick thawing, place the bag in warm water. To reheat, warm it on the stove over low heat. Stir it often to avoid hot spots. You can also microwave it in a safe bowl. Just heat in short bursts, stirring in between. Enjoy your warm, hearty meal! Yes, you can make this chili in a slow cooker. First, sauté the onions, garlic, and spices in a pan. Then, add all the ingredients to the slow cooker. Cook on low for 6-8 hours or on high for 3-4 hours. This method gives the flavors time to mix well. Yes, this vegan sweet potato chili is gluten-free. All the ingredients are naturally gluten-free. Just ensure that your vegetable broth is also gluten-free. It’s a great option for those with gluten sensitivities. To make the chili spicier, add more chili powder. You can also toss in chopped jalapeños or other hot peppers. For extra heat, add some cayenne pepper. Start small and taste as you go. You can always add more spice! Absolutely! You can add any vegetables you like. Zucchini, corn, or even spinach work great. Just chop them into small pieces and add them when you add the sweet potatoes. This way, they will cook evenly and soak up all the flavors. This blog post covered the key ingredients for a delicious chili. You learned how to prep and cook it step by step. Tips on even cooking and flavor balance were included. I shared ways to change up the recipe using different beans or spices. Lastly, I provided storage tips for leftovers. Chili is fun to make and enjoy. You can always tweak it to fit your taste. Enjoy creating your perfect bowl!

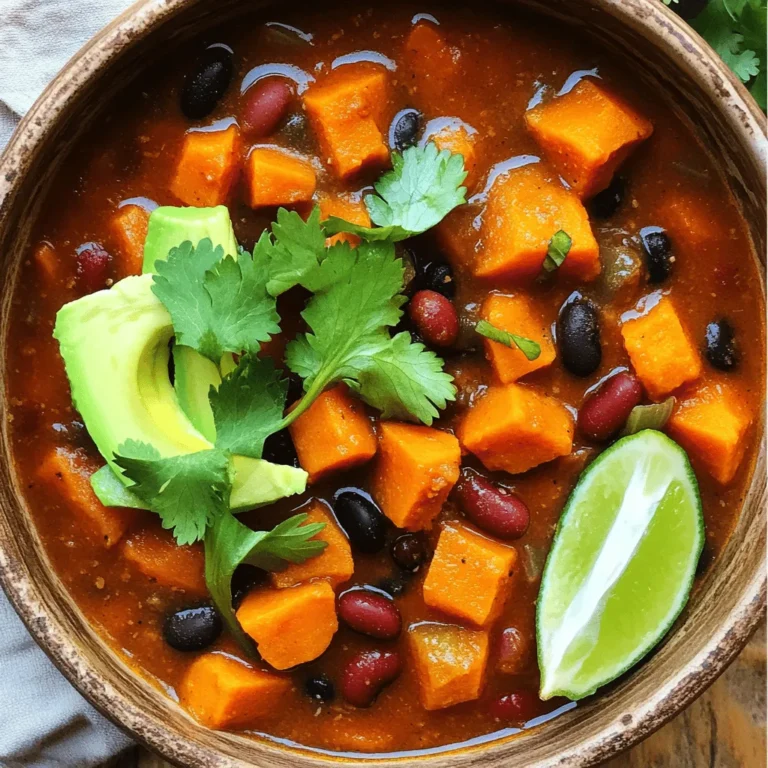
Vegan Sweet Potato Chili Hearty and Flavorful Dish

PREV 1 … 19 20 21 … 48 NEXT
meal plan mapper

explore

DessertsDinnerAppetizersDrinks

Our Policies

  • Cookie Policy
  • Copyright Policy
  • Disclaimer
  • GDPR Policy
  • Terms Of Use
Back to Top
  • About
  • Contact Us
  • Privacy Policy
© 2025 meal plan mapper