FREE DINNER EBOOK! Get your copy!
  • Cookie Policy
  • GDPR Policy
  • Disclaimer
  • Terms Of Use
  • Visit my other site: Fun Cookie Recipes
meal plan mapper
  • Home
  • Dinner
  • Desserts
  • Drinks
  • Appetizers
  • Contact
  • About
  • Privacy Policy
  • Home
  • Dinner
  • Desserts
  • Drinks
  • Appetizers
  • Contact
  • About
  • Privacy Policy
  • Cookie Policy
  • GDPR Policy
  • Disclaimer
  • Terms Of Use
Visit my other site: Fun Cookie Recipes

HOME / CATEGORIES /

Latest

To make creamy broccoli cheddar soup, gather these fresh ingredients: - 4 cups fresh broccoli florets - 1 medium onion, diced - 2 cloves garlic, minced - 4 cups vegetable broth - 1 cup heavy cream - 2 cups sharp cheddar cheese, grated - 1 teaspoon mustard powder - 1/2 teaspoon paprika - Salt and freshly ground pepper to taste - 2 tablespoons olive oil - Optional: Crusty bread for serving - Use a dry measuring cup for the cheese and cream. - Chop broccoli into small, even pieces. This helps it cook faster. - Dice the onion small for even cooking and better flavor. - Use fresh garlic for a stronger taste, but pre-minced works too. If you need some swaps, try these: - Use cauliflower for a low-carb option instead of broccoli. - Swap heavy cream for half-and-half for a lighter soup. - Cheddar can be replaced with Gruyère or mozzarella for a twist. - For a vegan version, use coconut cream and nut cheese. - Vegetable broth can be replaced with chicken broth for added flavor. Feel free to mix and match based on what you have on hand. Enjoy the cooking process! Start by heating two tablespoons of olive oil in a large pot over medium heat. Add one diced onion. Sauté for about five minutes until the onion looks clear. Then, add two minced garlic cloves. Cook for one more minute until you smell the garlic's rich aroma. This step builds a great base for your soup. Next, toss in four cups of fresh broccoli florets. Pour in four cups of vegetable broth. Bring the mix to a gentle boil. Once it boils, lower the heat. Let it simmer for about ten to twelve minutes. The broccoli should become tender and bright green. This is when the flavors meld together. After the broccoli is ready, grab an immersion blender. Carefully blend the soup until it is smooth. If you like some pieces of broccoli, blend only half of the soup. This gives you a nice mix of textures, making each bite interesting. Reduce the heat to low. Gradually stir in one cup of heavy cream and two cups of grated sharp cheddar cheese. Mix in one teaspoon of mustard powder and half a teaspoon of paprika. Keep stirring until the cheese melts and the soup turns creamy. This step makes the soup rich and comforting. Taste your soup and add salt and freshly ground pepper as needed. If you want a thinner soup, add more broth or cream. Once seasoned, ladle the soup into bowls. Serve it hot, and if you wish, add slices of crusty bread. This makes it perfect for dipping and enjoying every drop. To get the best texture, blend the soup well. Use an immersion blender for a smooth feel. If you want some chunks, blend half the soup. This gives a nice bite with creamy parts. You can also adjust the thickness. Add more broth for a thinner soup. For a thicker soup, blend it less. Boost the flavor with simple spices. Mustard powder adds depth, while paprika gives a hint of warmth. You can also add a splash of lemon juice for brightness. Try fresh herbs like thyme or parsley. These will lift the flavor and make it even better. Always taste the soup while cooking. Adjust the salt and pepper to your liking. Presentation matters in making soup look inviting. Ladle the soup into bowls. Garnish with extra cheese on top and a few broccoli florets. This adds color and makes it pop. Serve with slices of crusty bread. It’s perfect for dipping and adds a nice touch to your meal. Enjoy making your soup look as good as it tastes! {{image_4}} You can boost the soup's flavor and make it heartier by adding protein. A few great options include: - Cooked chicken: Shred or dice cooked chicken and stir it in. - Bacon: Crispy bacon bits add a smoky taste. - Tofu: Firm tofu gives a nice texture for a vegetarian choice. Choose one or mix a few for a tasty twist. Adding more veggies increases nutrition and flavors. Here are some fun ideas: - Carrots: Diced carrots add sweetness and color. - Cauliflower: This veggie blends well and adds creaminess. - Spinach: Stir in fresh spinach just before serving for a pop of green. Feel free to experiment with what you have on hand; the soup will still taste amazing. While sharp cheddar is classic, you can mix it up with different cheeses. Some tasty options include: - Gruyère: This cheese brings a nutty and rich flavor. - Monterey Jack: For a creamier melt, try Monterey Jack. - Parmesan: Sprinkle some grated Parmesan for a salty kick. Mix and match cheeses to find your favorite flavor profile in this creamy soup. Store leftover creamy broccoli cheddar soup in an airtight container. It keeps well in the fridge for up to four days. Make sure the soup cools to room temperature before sealing it. This helps maintain its creamy texture. You can freeze this soup for longer storage. Place it in freezer-safe containers. Leave some space at the top, as the soup will expand when frozen. It can last for up to three months in the freezer. To thaw, move it to the fridge overnight. To reheat, pour the soup into a pot. Warm it over medium heat, stirring often. If the soup seems too thick, add a splash of broth or cream. Heat until it is hot throughout, and enjoy! You can also microwave it in short bursts, stirring in between. Yes, you can use frozen broccoli. Frozen broccoli works well in this soup. Just add it to the pot with the broth and cook until tender. Frozen broccoli is often picked at peak freshness. This helps keep its flavor and nutrients. To make this soup gluten-free, simply ensure your vegetable broth is gluten-free. Most store-bought broths are gluten-free, but always check the label. Avoid using any flour-based thickeners. The heavy cream and cheese will keep the soup rich and creamy. This soup pairs well with crusty bread. A nice baguette or sourdough is great for dipping. You can also serve it with a simple salad for a light meal. A side of roasted veggies adds color and nutrients. Creamy broccoli cheddar soup lasts about 3 to 4 days in the fridge. Store it in an airtight container to keep it fresh. If you see any signs of spoilage, like off-smells or mold, discard it. Reheat on the stove or in the microwave before serving. Yes, you can make this soup without heavy cream. Substitute it with whole milk or a non-dairy milk like almond or oat milk. For a thicker texture, blend in some cooked potatoes or cashews. This keeps the soup creamy while reducing fat. You now have a complete guide to creating a delicious broccoli cheddar soup. We covered each ingredient, measurement tips, and helpful substitutes. You learned how to cook and blend the soup, add cream, and season it perfectly. Remember the tips for texture, flavor, and presentation. Explore variations with protein, veggies, or different cheeses. Lastly, know how to store and reheat your leftovers. Enjoy your cooking and share this delightful soup with friends!

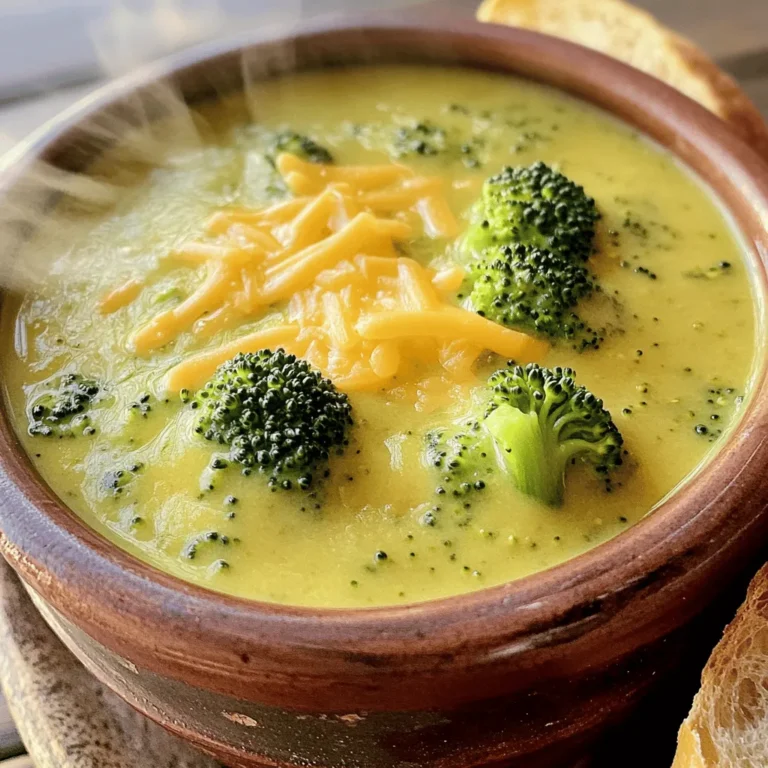
Creamy Broccoli Cheddar Soup Recipe That’s Flavorful

To make crispy air fryer falafel, gather the following ingredients: - Chickpeas: 1 can (15 oz), thoroughly drained and rinsed - Vegetables: 1 small onion, roughly chopped - Fresh Herbs: 1/4 cup parsley, coarsely chopped - Fresh Herbs: 1/4 cup cilantro, coarsely chopped - Spices: 1 teaspoon ground cumin - Spices: 1 teaspoon ground coriander - Spices: Salt and pepper to taste - Leavening Agents: 1/2 teaspoon baking powder - Leavening Agents: 1/2 teaspoon baking soda - Oils and Flour: 2 tablespoons olive oil - Oils and Flour: 1/4 cup all-purpose flour (or chickpea flour for a gluten-free option) Each ingredient plays a key role. The chickpeas provide protein and texture. Onions and garlic add depth of flavor. Fresh herbs bring brightness, while spices like cumin and coriander give warmth and earthiness. Baking powder and baking soda help the falafel rise, making them light and crisp. Olive oil adds richness, and flour helps bind everything together. This mix ensures your falafel will be flavorful and easy to make. Start by gathering your ingredients. Take the drained chickpeas, chopped onion, minced garlic, parsley, and cilantro. Place them in your food processor. Pulse the mix until it’s coarse. Be careful not to make it a paste. You want some texture to keep it interesting. Next, add your spices. Sprinkle in the ground cumin and coriander. Then, toss in the baking powder and baking soda. Season with salt and pepper to taste. Pulse the mixture again until the spices blend in well. This step adds warmth and depth to your falafel. Now, it’s time to shape your falafel. Scrape down the sides of the food processor. Add the olive oil and flour to the mix, then pulse until just combined. The mixture should hold its shape when you press it together. If it feels too sticky, you can add a bit more flour. Form the mixture into balls, about 1.5 inches in diameter. Wet your hands lightly to help shape them without sticking. To get your falafel crispy, lightly brush or spray them with olive oil before air frying. This small step adds a lovely crunch. It also enhances the flavor, making each bite more delicious. Air fry the falafel in a single layer. Avoid overcrowding the basket. This allows hot air to circulate around each piece. Flip the falafel halfway through cooking for even browning. This method helps create that perfect crispy outside. Check for doneness by looking for a golden brown color. The falafel should be crispy on the outside. If they look good, they are ready to come out of the air fryer. Enjoy the crispy texture and flavorful taste! {{image_4}} If you want a gluten-free option, use chickpea flour. This works great in place of all-purpose flour. It keeps the falafel light and crispy. Plus, it adds a nice nutty taste. Just swap the flour in the recipe, and you’re set! You can make your falafel even more exciting! Try adding different herbs. Fresh mint or dill can give a fresh twist. These herbs add brightness and complexity. Just chop them finely and mix them in with your other ingredients. Your taste buds will thank you! Want to boost the nutrition? Consider adding finely chopped nuts or seeds. Walnuts, almonds, or sunflower seeds are great choices. They add texture and healthy fats. Just mix them into the falafel mixture before shaping. This little change can make a big difference! You can store leftover falafel in an airtight container. They will stay fresh for up to 3 days in the fridge. Just make sure the container is sealed well to keep them from drying out. To reheat, use the air fryer. This keeps the falafel crispy. Set the air fryer to 375°F and cook for about 5-7 minutes. Check them often to make sure they do not burn. You can freeze uncooked falafel balls for later use. Lay them flat on a baking sheet and freeze until solid. Once frozen, transfer the balls to a freezer bag. When you are ready to eat, air fry them directly from frozen. Cook for 12-15 minutes at 375°F, and enjoy a quick meal! Simply use a potato masher or fork to mash chickpeas and mix ingredients by hand. Start by draining and rinsing your chickpeas. Then, mash them until they are mostly smooth but still a bit chunky. Chop your onion, garlic, parsley, and cilantro finely. Mix everything in a bowl. This method takes a little more effort but still gives you tasty falafel. Yes, you can bake at 375°F for about 20-25 minutes until crispy. To bake, form the falafel balls and place them on a lined baking sheet. Brush them lightly with olive oil to help them crisp up. Bake them in the oven, flipping halfway through for even cooking. Keep an eye on them to ensure they don’t burn. Recommended sides include tahini sauce, tzatziki, pita bread, and fresh veggies. Tahini sauce adds a creamy, nutty flavor that pairs well with falafel. Tzatziki offers a cool, refreshing taste. Pita bread is great for wrapping the falafel, and fresh veggies like cucumber or tomatoes add a nice crunch. These sides make your meal more complete and delicious. You now know how to make delicious falafel using simple ingredients. We covered each step, from preparing the mixture to air frying for that perfect crisp. Remember, using fresh herbs and spices makes a huge difference in taste. You can switch up flavors and even store leftovers easily. Try it with different dips or sides for a fun meal. Enjoy your cooking and experiment with this tasty dish!

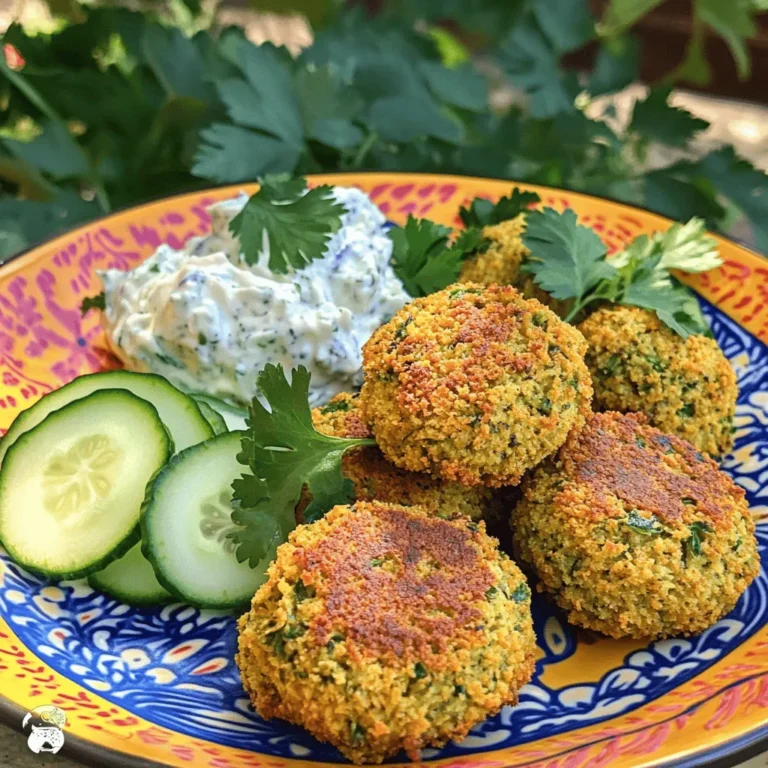
Crispy Air Fryer Falafel Flavorful and Easy Recipe

- 1 cup fresh spinach leaves, tightly packed - 1 ripe banana, peeled - 1/2 cup pineapple chunks (can be fresh or frozen) - 1/2 cup coconut water - 1/2 ripe avocado, pitted and scooped - 1 tablespoon chia seeds - Juice of 1 lime (about 2 tablespoons) - 1/2 inch piece of fresh ginger, peeled and finely grated - Ice cubes (optional, for a chilled smoothie) To make the Tropical Green Smoothie, you need fresh ingredients. Start with tightly packed spinach leaves. Spinach adds a great green color and loads of nutrients. Next, grab a ripe banana. It adds natural sweetness and creaminess. Pineapple chunks are next. They give a fruity punch that brightens the flavor. You can use fresh or frozen. Coconut water keeps the smoothie light and refreshing. Avocado adds a silky texture. It also packs healthy fats. Chia seeds are tiny powerhouses. They add fiber and omega-3s. Lime juice brings a zesty kick. Fresh ginger adds warmth and spice. Lastly, ice cubes are optional. They make your smoothie cold and refreshing. Gather these ingredients, and you are ready to blend your way to a tasty treat! 1. Start by putting the packed spinach leaves into your blender. Add the coconut water too. Blend on high until smooth. You want no spinach bits left. 2. Next, add the peeled banana, pineapple chunks, and the scooped avocado. Squeeze in the lime juice, add chia seeds, and the grated ginger. 3. Blend all the ingredients together. You want a creamy and uniform mix. If you like it thicker and colder, toss in a handful of ice cubes. Blend again until you reach the right consistency. 4. Taste your smoothie. If it needs more sweetness, add half a banana or a few extra pineapple chunks. Blend again to mix. 5. Once your smoothie is perfect, pour it into two glasses. For a nice touch, sprinkle some chia seeds on top. You can also add a lime slice or extra pineapple chunks to make it look great. To make your smoothie the best it can be, focus on the texture. A smooth drink feels nice and creamy. Start with the spinach and coconut water. Blend them well until there are no bits left. This step is key for a smooth finish. When blending, add the ingredients in the right order. Begin with liquids first, then add softer fruits and greens. This method helps everything blend better. If you want a thicker smoothie, toss in ice cubes at the end. Selecting ripe fruits is crucial. For the banana, look for yellow skin with a few brown spots. This means it's sweet and ready. For the avocado, give it a gentle squeeze. If it feels soft, it’s perfect for your smoothie. Spinach and avocado are super healthy choices. Spinach is loaded with vitamins A and K. It also offers iron, which is good for your blood. Avocado gives you healthy fats that keep you full longer. Chia seeds are tiny but mighty. They add fiber and protein to your drink. Plus, they help keep you hydrated. One tablespoon has about 58 calories and 2 grams of protein. Each serving of this smoothie gives you a tasty mix of nutrients. You get vitamins, healthy fats, and fiber. It’s a great start to your day or a refreshing snack! {{image_4}} You can switch up the fruits in your Tropical Green Smoothie. For a fun twist, try using mango or kiwi. These fruits add a unique taste and great nutrients. Mango gives a sweet, creamy texture. Kiwi adds a tangy kick and vibrant color. If you want to change the liquid, coconut water is not your only option. You can use orange juice for a citrusy flavor or almond milk for creaminess. Each choice will change the taste, so feel free to get creative! When it comes to greens, spinach is a classic choice, but kale is also a great option. Kale has a stronger flavor, so you may want to start with a smaller amount. It packs a punch of nutrients, making your smoothie even healthier. To enhance the flavor, consider adding fresh herbs like mint or basil. These herbs add a refreshing note that pairs well with the tropical fruits. Just a few leaves can elevate your smoothie to a new level of deliciousness. For your Tropical Green Smoothie, storing it well keeps it fresh. Here’s how to do it: - Refrigeration: Keep your smoothie in an airtight container. It stays good in the fridge for up to 24 hours. Shake it well before drinking, as it may separate a bit. - Freezing: If you have leftovers, pour your smoothie into ice cube trays. Once frozen, transfer the cubes to a zip-top bag. This way, you can blend them later for a quick treat. Sometimes, you may have extra smoothie. Here are fun ways to use it: - Ideas for Recipes: You can mix the leftover smoothie into yogurt or oatmeal for a fruity twist. It adds flavor and nutrition. - Smoothie Bowls: Use the leftover smoothie to create a smoothie bowl. Pour it into a bowl and top with your favorite fruits, nuts, or seeds. This makes a filling breakfast or snack. You can make your smoothie sweeter by adding more fruit. Half a banana or extra pineapple chunks work well. You can also add a splash of honey or agave syrup for added sweetness. Yes, adding protein powder is a great choice! It boosts nutrition and keeps you full longer. Just mix in a scoop when you blend your smoothie. Absolutely! Frozen fruits work great in smoothies. They keep your drink cold and add thickness. You can use frozen pineapple or even frozen banana. You can store your smoothie in the fridge for about one day. Keep it in a sealed container to maintain freshness. Shake it well before drinking again. Spinach is a top choice because it blends well and has a mild taste. Kale is another option, but it has a stronger flavor. You can also try Swiss chard or even lettuce for variety. This blog post shared a simple and tasty smoothie recipe. We covered key ingredients like spinach, banana, and avocado. I gave tips to blend for the best texture and flavor. You learned how to store your smoothies and even use leftovers creatively. Remember, you can swap out fruits or greens to make it your own. Enjoy experimenting with your healthy smoothies!

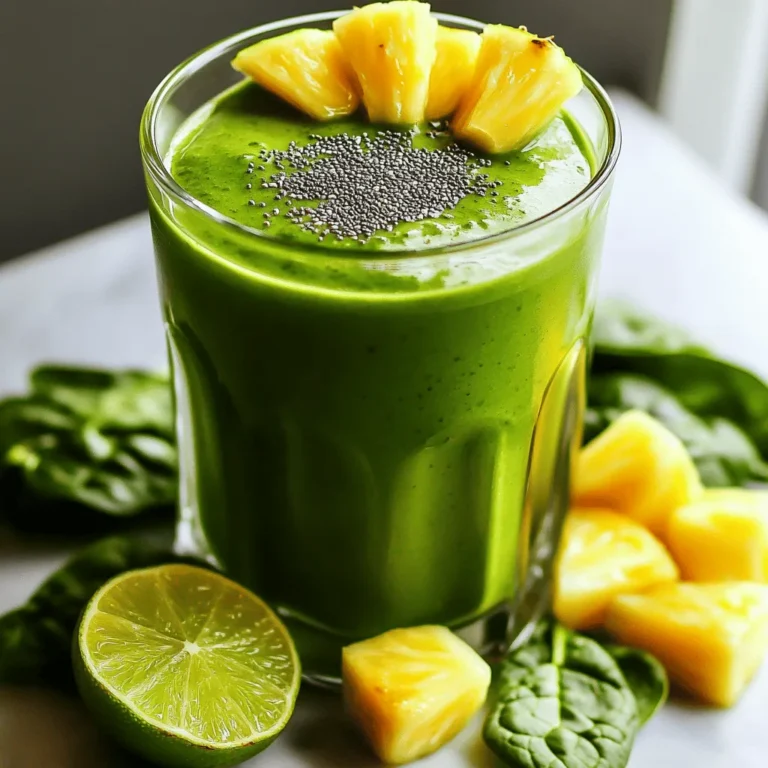
Tropical Green Smoothie Refreshing and Healthy Drink

- 1 lb sirloin steak, cut into bite-sized pieces - 4 tablespoons unsalted butter - 4 cloves garlic, minced - Fresh rosemary and thyme - Salt and pepper - Fresh parsley - Extra virgin olive oil To create garlic butter steak bites, you first need quality ingredients. I choose sirloin steak for its rich flavor and tenderness. Cutting the steak into bite-sized pieces helps with quick cooking. Next, you need unsalted butter. It adds a creamy richness without extra salt. Garlic is a must; it gives the dish a lovely aroma and taste. For herbs, fresh rosemary and thyme make the dish pop with flavor. Don’t forget salt and pepper. They bring out the natural taste of the steak. Lastly, fresh parsley is perfect for garnish. It adds color and freshness. A drizzle of extra virgin olive oil enhances the dish's richness. Gather these ingredients, and you are ready to whip up a meal that is both delicious and fast! First, take the sirloin steak and cut it into bite-sized pieces. This helps them cook evenly. Next, season the steak pieces well with salt and freshly ground black pepper. It’s important to use enough seasoning for flavor. Let the steak rest at room temperature for about 15 minutes. This resting time allows the steak to cook more evenly and keeps it juicy. Now, it’s time to heat your pan. Use a large, heavy-bottomed skillet. Heat the extra virgin olive oil over medium-high heat until it shimmers but does not smoke. This is the right temperature for searing. Carefully add the seasoned steak bites to the hot skillet in a single layer. Avoid overcrowding the pan; it can lead to steaming instead of searing. Cook the steak bites for 2-3 minutes on each side. You want a nice, browned crust and the steak cooked to your liking. Once done, transfer the steak bites to a plate and set them aside. Lower the heat to medium. In the same skillet, add the unsalted butter. Watch as it melts into the pan. After the butter melts, add the minced garlic, chopped rosemary, and thyme. Stir this mixture for about 1-2 minutes. The garlic should become fragrant and lightly golden. Keep an eye on it; burnt garlic can taste bitter. Now, return the cooked steak bites to the skillet. Toss the steak gently in the garlic butter until each piece is well-coated. This step is crucial for flavor. Let them cook together for about one more minute. This warms the steak bites and infuses them with that delicious garlic butter flavor. Finally, remove the skillet from the heat. Garnish with freshly chopped parsley for a bright finish before serving. When making steak bites, I always choose sirloin. It offers great flavor and tenderness. Look for cuts with some fat. This fat adds flavor and keeps the bites juicy. Avoid cuts that are too lean. They can be tough and dry when cooked. To cook steak bites well, ensure your pan is hot. Heat the skillet over medium-high heat. This helps form a nice crust on the steak. If your pan is not hot enough, the meat will steam, not sear. Also, do not overcrowd the skillet. Cook in batches if needed. This allows each piece to brown properly. For extra flavor, try adding herbs like oregano or basil. You can also mix in chili flakes for some heat. If you want a bright twist, add lemon zest. This can elevate your steak bites to a new level. Adjust the spices to fit your taste. Don’t be afraid to get creative! {{image_4}} You can switch up the meat in this recipe. Chicken and shrimp work great. For chicken, use bite-sized pieces of boneless breast or thighs. For shrimp, choose large, peeled shrimp. Cook them the same way as the steak. Both options soak up the garlic butter flavor well, making them equally tasty. Want to spice it up? Add chili flakes for a kick. Just sprinkle some in the garlic butter while it cooks. This gives your dish a nice heat without overpowering the flavors. You can also add lemon or lime zest. The citrus gives a bright taste that balances the richness of the butter and meat. Think about how to serve your steak bites. They pair well with crusty bread or a fresh salad. You can also create dips or sauces. A garlic aioli or a zesty chimichurri sauce complements the dish nicely. Keep it fun and mix it up based on what you enjoy! To store your garlic butter steak bites, place them in an airtight container. Let them cool first. You can keep them in the fridge for up to three days. If you want to keep them longer, consider freezing them. They last for about two months in the freezer. Just make sure to wrap them tightly to prevent freezer burn. When you reheat steak bites, the best method is on the stove. Heat a skillet over medium heat. Add a little butter or oil to keep them moist. Heat for about 3-5 minutes until warm. You can also use the microwave, but be careful. This method can dry out the meat. If you use the microwave, cover the steak bites with a damp paper towel. This helps retain moisture. To keep the tenderness and flavor, avoid overheating. Check them often while reheating. Enjoy the rich garlic butter flavor just like when you first made them! To cook steak bites to medium-rare, aim for an internal temperature of 130°F to 135°F. Start by searing the steak bites in a hot skillet for about 2-3 minutes on each side. Use a meat thermometer to check the temperature. Once they reach the right heat, remove them from the pan. Let them rest for a few minutes; this helps keep them juicy. Yes, you can use frozen steak, but there are some tips. Thaw the steak in the fridge overnight for best results. If you're short on time, you can use a microwave to defrost it. Make sure to pat it dry before cooking. This helps the steak sear better. Cooking from frozen may take a bit longer, so check the doneness carefully. Garlic butter steak bites pair well with several sides. Here are some great options: - Crusty bread: Perfect for soaking up the garlic butter. - Fresh salad: A light arugula or spinach salad adds freshness. - Roasted vegetables: Carrots, asparagus, or green beans complement the dish nicely. - Mashed potatoes: Creamy potatoes balance the bold flavors. - Rice or couscous: These grains can soak up the savory juices. This blog post covered how to make delicious garlic butter steak bites. We discussed main ingredients like sirloin steak, butter, and garlic. I shared step-by-step instructions for seasoning, cooking, and making the sauce. We explored helpful tips for selecting the right cut and techniques to enhance flavor. Lastly, I provided ideas for variations and storage tips. Enjoy creating your own steak bites, and remember, practice makes perfect!

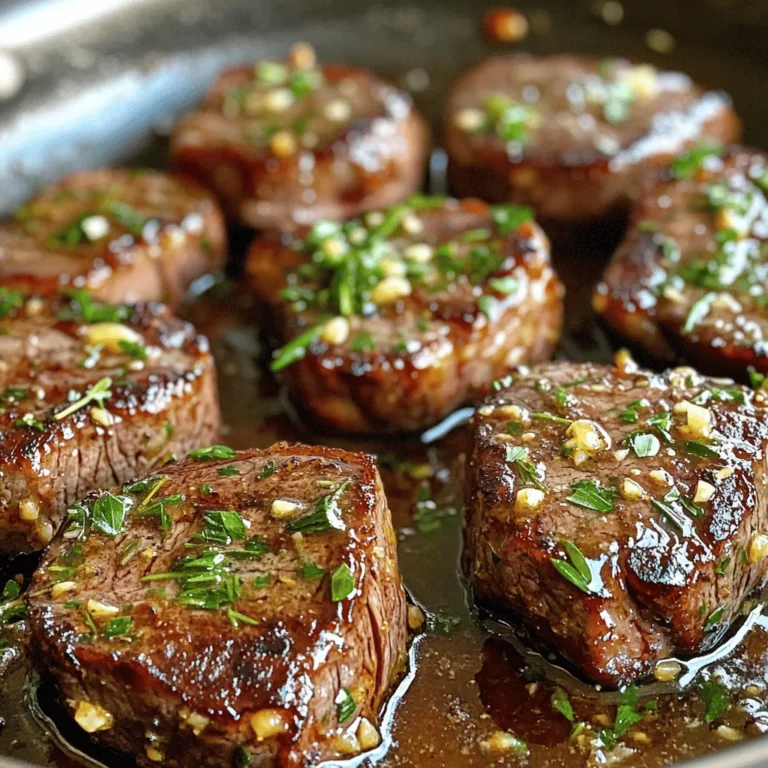
Garlic Butter Steak Bites Flavorful Quick Dinner Dish

To make this creamy sun-dried tomato pasta, you need a few key items. First, pick your pasta. You can use penne, fettuccine, or spaghetti. Each type brings a unique texture. Next, grab one cup of sun-dried tomatoes in oil. Drain them and chop them finely. You'll also need one cup of heavy cream and one cup of grated Parmesan cheese. These ingredients make the sauce rich and creamy. For flavor, we need some simple seasonings. Mince two garlic cloves to add a nice aroma. Use one teaspoon of dried basil and one teaspoon of dried oregano for a taste boost. Don’t forget salt and freshly ground pepper to make it pop. To make your dish look pretty, add some fresh basil leaves on top. You can also sprinkle extra Parmesan cheese for more flavor. These little touches make the meal feel special. Start by boiling a large pot of salted water. Once the water reaches a rolling boil, add 8 oz of your favorite pasta. Cook it until it is al dente, which usually takes about 8 to 10 minutes. This means it should be firm but not hard. Before you drain the pasta, make sure to reserve about 1/2 cup of that starchy pasta water. This water will help your sauce later. After reserving, drain the pasta and set it aside in a large bowl. Now, take a large skillet and pour in 1 tablespoon of olive oil. Heat it over medium heat. Once the oil is hot, add 2 minced garlic cloves. Sauté the garlic for about 1 minute. You want it to smell nice, but be careful not to burn it. Burnt garlic can make your dish taste bitter. Next, stir in 1 cup of finely chopped sun-dried tomatoes. Cook this mixture for another 2 to 3 minutes. This helps the flavors blend together. Lower the heat to keep things gentle. Now, pour in 1 cup of heavy cream, stirring well to mix. Let this simmer for about 2 to 3 minutes. You want it to thicken a bit. While stirring, add 1 cup of grated Parmesan cheese, along with 1 teaspoon of dried basil and 1 teaspoon of dried oregano. Continue stirring until the cheese melts completely. Finally, season the sauce with salt and freshly ground pepper to your taste. Next, add the drained pasta to your skillet. Toss it gently so that every piece is coated in the creamy sauce. If the sauce feels too thick, you can add some of that reserved pasta water. Add it a little at a time until you find the right consistency. After everything is combined, let the pasta sit for about a minute. This helps the sauce cling to the pasta better. Enjoy your delicious creamy sun-dried tomato pasta! To avoid a burnt garlic taste, be careful with the heat. Always sauté garlic on medium heat. Stir it often and watch closely. It should smell great, not burnt. If it burns, the sauce will taste bitter. For the right sauce thickness, let it simmer gently after adding the cream. Stir often and keep an eye on it. If it gets too thick, add some reserved pasta water. This water adds flavor and helps adjust the sauce. Salting the water is key for tasty pasta. Use a good amount of salt. It should taste like the sea. This adds flavor to the pasta while it cooks. Timing is important for al dente pasta. Follow the package instructions, usually 8-10 minutes. Test a piece a minute or two before the time is up. It should be firm but not hard. Serve this creamy sun-dried tomato pasta with a side salad or garlic bread. These pair well and add freshness to your meal. For plating, use deep bowls for a nice look. Top with fresh basil leaves for color. A sprinkle of Parmesan cheese adds a touch of elegance. Drizzle a little olive oil for extra richness. Enjoy your delicious meal! {{image_4}} You can try different pasta types. Gluten-free options like brown rice or chickpea pasta work well. They have great taste and texture. For a dairy-free choice, use cashew cream instead of heavy cream. It gives a creamy feel without dairy. Adding protein can make your meal heartier. Try grilled chicken or shrimp for a nice twist. You can also add vegetables like spinach or peas. They add color and nutrients to your dish. Cheese can change the taste of your pasta. You can swap Parmesan for feta or mozzarella. Feta gives a tangy flavor, while mozzarella makes it milder. Experiment with these cheeses to find your favorite blend. To store leftovers, let the pasta cool down first. Place it in an airtight container. This keeps the flavors fresh. Make sure to eat it within three days for the best taste. Use glass or BPA-free plastic containers. These work best for creamy pasta. They seal well and prevent spills. The best way to reheat pasta is on the stove. Use a non-stick skillet over low heat. Add a splash of water or extra cream. This helps the sauce stay creamy. Stir often to heat evenly. You can also use the microwave. Place the pasta in a bowl and cover it. Heat in short bursts, stirring in between. This method works, but it may dry out the pasta. Yes, you can freeze creamy sun-dried tomato pasta. However, the texture may change when thawed. The cream can separate a bit. To freeze, let the pasta cool completely. Then, use freezer-safe containers or bags. Remove as much air as possible before sealing. When ready to eat, thaw it overnight in the fridge. Reheat it gently on the stove, adding a bit of cream or water to restore creaminess. Yes, you can easily make this recipe vegan. Here are some substitutions: - Replace heavy cream with coconut cream or cashew cream. - Use nutritional yeast instead of Parmesan cheese for a cheesy flavor. - Make sure the sun-dried tomatoes are packed in oil with no animal products. These changes will keep the dish rich and flavorful without dairy. To add some heat, you can try these tips: - Add red pepper flakes to the sauce while it simmers. - Mix in diced jalapeños or fresh chili peppers when sautéing garlic. - Use a spicy olive oil when cooking the garlic and tomatoes. These options will give your creamy sun-dried tomato pasta a nice kick. If the sauce feels too thick, here’s how to fix it: - Gradually add the reserved pasta water, mixing until it reaches the right consistency. - If you don’t have pasta water, use vegetable broth as a substitute. - Stir well to ensure the sauce blends smoothly with the pasta. These steps will help your sauce become creamy and perfect for coating your pasta. This blog post shared a tasty creamy sun-dried tomato pasta recipe. I covered key ingredients and seasonings, plus step-by-step cooking steps. You learned tips to perfect your sauce and make variations. Finally, we discussed storage and reheating options. I hope you feel ready to make this dish your own. With a few simple tweaks, you can enjoy different flavors and styles. Dive in and have fun cooking!

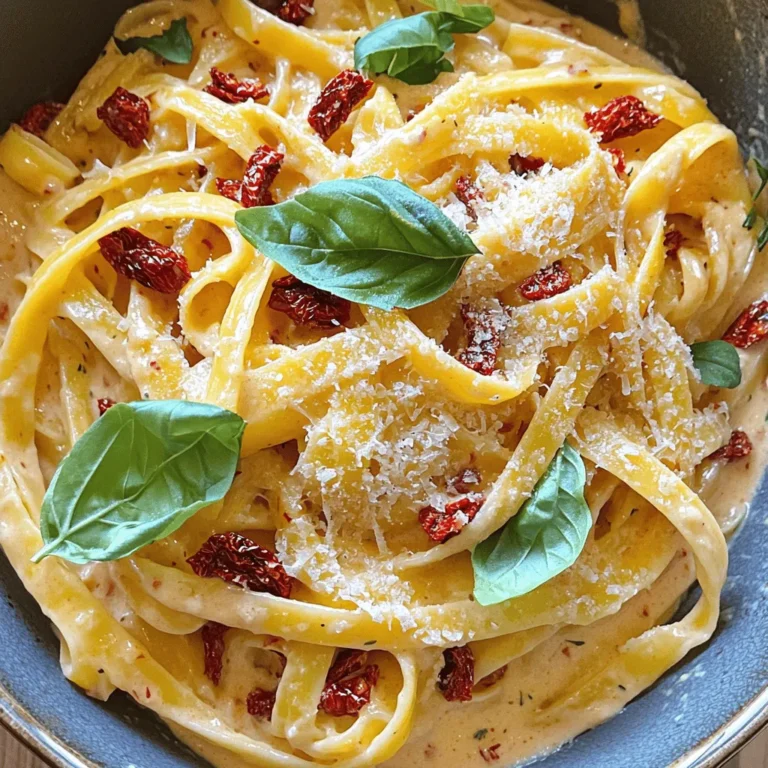
Creamy Sun-Dried Tomato Pasta Flavorful Dinner Delight

- 1 lb Brussels sprouts, trimmed and halved - 2 tablespoons extra virgin olive oil - Sea salt and freshly cracked black pepper, to taste - 3 tablespoons pure honey - 2 tablespoons Sriracha sauce - 1 tablespoon low-sodium soy sauce - 1 garlic clove, minced - 1 teaspoon sesame seeds (optional, for garnish) - 2 tablespoons chopped green onion (for garnish) For the best flavor, choose bright green Brussels sprouts. Look for firm sprouts with no yellow leaves. Fresh sprouts should feel heavy for their size. Wash them just before you cook to keep them crisp. Store them in the fridge in a breathable bag. This keeps them from getting soggy and losing flavor. If you can't find Brussels sprouts, try broccoli or green beans. For honey, maple syrup works well for a similar sweetness. If Sriracha is too spicy, use a milder hot sauce. You can replace soy sauce with tamari for a gluten-free option. Feel free to switch garlic with garlic powder if needed. First, you need to get the Brussels sprouts ready. Start with one pound of fresh Brussels sprouts. Trim the ends and cut them in half. This helps them cook evenly. Place the halved sprouts in a large bowl. Add two tablespoons of extra virgin olive oil. Sprinkle in some sea salt and freshly cracked black pepper. Toss everything well to coat the sprouts. Now, let’s roast those sprouts! Preheat your oven to 400°F (200°C). This high heat makes the sprouts crispy. Spread the seasoned Brussels sprouts on a baking sheet lined with parchment paper. Make sure they are in one layer. This helps them roast well. Bake them for 20 to 25 minutes. Stir them halfway through for even cooking. Look for a golden color and a fork-tender feel. While the Brussels sprouts roast, let’s make the sauce. In a small bowl, mix together three tablespoons of pure honey, two tablespoons of Sriracha sauce, one tablespoon of low-sodium soy sauce, and one minced garlic clove. Whisk this until it is smooth. When your Brussels sprouts are golden and crispy, drizzle the sauce over them. Toss gently to coat each sprout. Then, return them to the oven for another five minutes. This step adds a nice caramelized touch. Finally, transfer your sprouts to a serving dish and enjoy! To get the right sweet and spicy mix, start with fresh honey and Sriracha. Use three tablespoons of honey and two tablespoons of Sriracha. This gives a nice kick without being too hot. Adjust the honey if you want it sweeter. You can also add more Sriracha if you like it spicier. Taste the sauce before you coat the sprouts. This helps you find your perfect balance. One common mistake is not trimming the Brussels sprouts correctly. Always trim the ends and cut them in half. This helps them cook evenly. Another mistake is overcrowding the baking sheet. Give them space so they can roast properly. Lastly, don’t skip stirring them halfway through. This ensures every sprout gets crisp and golden. For the crispiest Brussels sprouts, preheat your oven to 400°F (200°C) first. Use extra virgin olive oil to coat the sprouts. This oil helps them brown nicely. Spread the sprouts in a single layer on the baking sheet. Avoid stacking them; this keeps them from steaming. Roast for 20-25 minutes, stirring halfway. This method gives you that crunchy outside and tender inside. {{image_4}} You can change up the taste of your Honey Sriracha Brussels sprouts. Try adding lime juice for a fresh twist. A dash of ginger gives it a warm kick. For a nutty flavor, consider adding peanut butter to the sauce. You can also use maple syrup instead of honey. This gives it a different sweet note. You can make these Brussels sprouts in an air fryer. Set it to 375°F (190°C) and cook for 15-20 minutes. Shake the basket halfway through to ensure even cooking. If you prefer the stovetop, heat a pan over medium heat. Add the Brussels sprouts and cook for 10-12 minutes. Stir often to get a nice brown color on each side. These Brussels sprouts work well as a side dish for many meals. Serve them with grilled chicken or fish for a balanced dinner. They also pair nicely with rice or quinoa. For a fun snack, enjoy them on their own or with a cool dip. You can sprinkle some extra green onion on top for added flavor. To keep your Honey Sriracha Brussels sprouts fresh, store them in an airtight container. This helps lock in flavor and moisture. Place the container in the fridge. They stay good for about 3 to 4 days. Always let them cool down before storing. This prevents condensation that can make them soggy. When it’s time to eat leftovers, reheating is key. Use your oven for the best results. Preheat it to 350°F (175°C). Spread the Brussels sprouts on a baking sheet. Heat them for about 10 to 15 minutes. This will keep them crispy and warm. You can also use a skillet on medium heat. Just stir them often to avoid burning. If you want to save them for later, freezing works too. First, let them cool completely. Then, place them in a freezer-safe bag or container. Make sure to remove as much air as possible. They freeze well for up to 2 months. When you’re ready to eat, thaw them in the fridge overnight. Reheat them in the oven for the best taste and texture. Yes, Honey Sriracha Brussels sprouts are quite healthy. Brussels sprouts are packed with vitamins, minerals, and fiber. They can help support digestion and boost your immune system. The honey adds natural sweetness, while Sriracha gives it a spicy kick. Using olive oil instead of butter keeps it light and heart-healthy. Absolutely! To make this recipe vegan, simply replace honey with maple syrup or agave syrup. Both options give a sweet flavor without using animal products. The other ingredients are already vegan-friendly, so it’s easy to adapt. You’ll know Brussels sprouts are done when they are fork-tender and golden brown. They should have a crispy outer layer. Roasting them for 20-25 minutes typically does the trick. Stir them halfway through to ensure even cooking. These Brussels sprouts pair well with many dishes. Try serving them alongside grilled chicken or fish for a balanced meal. They also complement rice bowls, tacos, or any Asian-inspired dishes. The sweet and spicy flavor enhances many savory options. Yes, you can use frozen Brussels sprouts. However, you should thaw and drain them first. This helps to avoid extra moisture. Frozen sprouts may not get as crispy as fresh ones, but they will still taste great with the honey Sriracha sauce. We explored how to prepare Honey Sriracha Brussels Sprouts in detail. You learned about key ingredients, cooking steps, and tips for the best flavor. Achieving the right balance of sweet and spicy is key to success. Avoid common mistakes for perfect texture and taste. Enjoy different methods and variations to keep things fresh. Remember, proper storage helps maintain their deliciousness. Embrace these simple ideas to make your meal exciting and tasty!

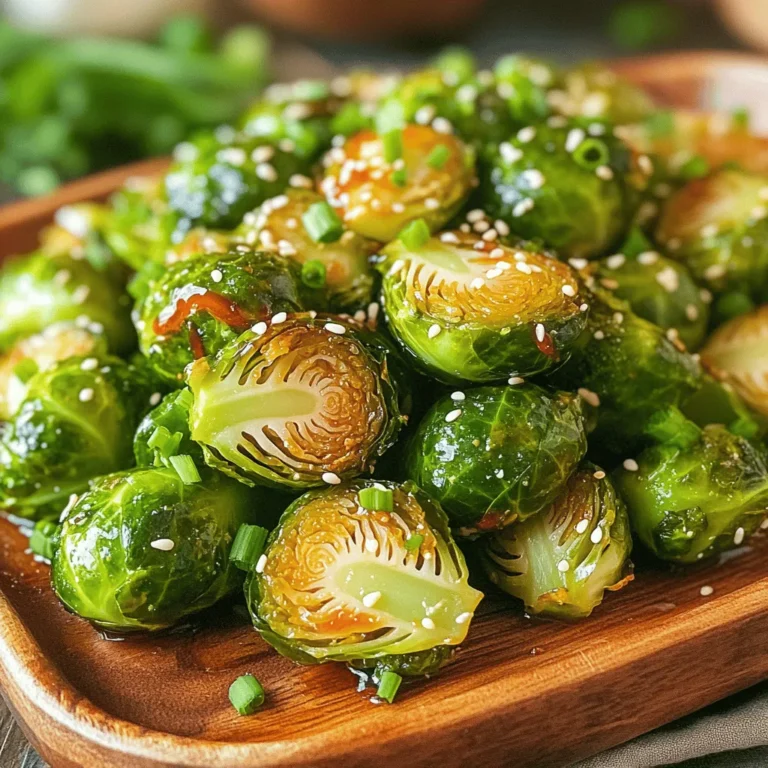
Honey Sriracha Brussels Sprouts Savory and Tangy Snack

- 4 cups fresh spinach leaves, thoroughly washed and gently dried - 2 cups ripe strawberries, hulled and sliced into thin rounds - 1/2 cup creamy feta cheese, crumbled into small pieces - 1/4 cup red onion, carefully thinly sliced - 1/4 cup sliced almonds, toasted until golden for enhanced flavor - 1/4 cup high-quality olive oil - 2 tablespoons apple cider vinegar - 1 tablespoon natural honey - 2 tablespoons poppy seeds - Salt and freshly cracked black pepper, to taste To create this vibrant salad, you need fresh ingredients. Start with 4 cups of fresh spinach leaves. Make sure to wash and dry them well. This ensures a crisp texture. Next, grab 2 cups of ripe strawberries. Slice them into thin rounds to let their sweet flavor shine. The strawberries add a lovely contrast to the greens. You also need 1/2 cup of creamy feta cheese. Crumble it into small pieces to sprinkle over the salad. Feta adds a tangy kick that pairs well with the strawberries. For a bit of sharpness, use 1/4 cup of thinly sliced red onion. It brings a burst of color and flavor. To complete your salad, include 1/4 cup of sliced almonds. Toast them in a skillet. This adds a nutty crunch that enhances the dish. Now, let’s talk about the dressing. You will need 1/4 cup of high-quality olive oil. This serves as the base. Add 2 tablespoons of apple cider vinegar for a zesty touch. For sweetness, mix in 1 tablespoon of natural honey. This balances the tanginess of the vinegar. Finally, stir in 2 tablespoons of poppy seeds. They add a nice texture and a pop of flavor. Season with salt and freshly cracked black pepper to taste. With these ingredients, you are set to make a delicious Strawberry Spinach Poppy Seed Salad. Enjoy the fresh flavors! - Washing and Drying Spinach: Start by rinsing the spinach leaves under cold water. Make sure to shake off any extra water. Lay them on a clean kitchen towel and gently pat them dry. This helps keep the leaves fresh and crisp. - Arranging Strawberry Slices: Take your ripe strawberries and remove the green tops. Slice them into thin rounds. Lay the slices over the spinach. Try to spread them out evenly to make the salad look pretty. - Layering Feta Cheese and Red Onion: Crumble the feta cheese into small pieces. Sprinkle it over the strawberries. Then, take the red onion and slice it thinly. Add it on top for a nice crunch and a pop of color. - Toasting Almonds: Get a small, dry skillet and heat it on medium-low. Add the sliced almonds. Stir them often for about 3-4 minutes. Watch them closely until they turn golden brown. Remove them from the heat and add them to your salad. - Mixing Olive Oil and Vinegar: In a small bowl, pour in the olive oil and apple cider vinegar. This will be the base of your dressing. - Whisking in Honey and Seasoning: Add the honey and a pinch of salt and pepper to the bowl. Use a whisk to mix everything together until it’s smooth. - Combining Poppy Seeds: Finally, add the poppy seeds to the dressing. Give it a good stir to combine all the flavors. - Drizzling Dressing Over Salad: Just before serving, drizzle the dressing over the salad. This keeps the spinach crisp and fresh. - Tossing Salad Gently: Use two large spoons or tongs to toss the salad gently. Make sure all the ingredients get a good coating of the dressing without crushing the spinach. - Plating for Presentation: Serve the salad in a clear glass bowl. This lets everyone see the bright colors. For a nice touch, add some whole strawberries on top and sprinkle a few poppy seeds. Enjoy your fresh delight! - Selecting Ripe Strawberries Look for strawberries that are bright red and firm. They should smell sweet and have no bruises. Fresh strawberries bring a juicy burst of flavor to the salad. - Opting for High-Quality Feta Use creamy feta cheese for the best taste. Check for a smooth texture and rich flavor. Crumbled feta enhances the salad with its salty goodness. - Adding Protein (e.g., Chicken or Tofu) For a heartier salad, add grilled chicken or sautéed tofu. Both options provide protein and make the salad more filling. This small change can turn a side dish into a main meal. - Varying Nut Choices You can swap sliced almonds with walnuts or pecans. Each nut adds its own flavor. Choose what you like best or what you have on hand. - Serving in Clear Bowls Use clear bowls to show off the vibrant colors of the salad. This simple trick makes the dish more inviting. Guests love to see the fresh ingredients. - Garnishing Tips Add whole strawberries on top for a pop of color. A light sprinkle of poppy seeds also adds a nice touch. These small details make the salad look professional and appealing. {{image_4}} - Using Other Berries You can swap strawberries for other berries. Blueberries, raspberries, or blackberries work well. These swaps add unique flavors and colors. Each berry brings a different taste. For example, blueberries add sweetness, while raspberries add a tart kick. - Different Greens If you want to use different greens, try kale or arugula. Both greens give a fresh twist. Kale adds a hearty texture, while arugula offers a peppery flavor. Mixing greens can create a fun salad experience. - Vegan Cheese Alternatives For a vegan version, use dairy-free cheese. Look for options made from nuts or soy. These cheeses can mimic the taste of feta. They add creaminess and depth to the salad. - Substituting Honey To keep the salad vegan, swap honey for maple syrup. Maple syrup works well in the dressing. It provides sweetness without losing flavor. You can also use agave nectar as another sweet option. To keep your Strawberry Spinach Poppy Seed Salad fresh, refrigerate it right away. Use an airtight container to prevent air from wilting your greens. You can layer a paper towel on top of the salad. This will absorb extra moisture and keep the spinach crisp. Your salad is best enjoyed fresh, but you can store it for up to three days in the fridge. Look for signs of spoilage, like slimy spinach or mushy strawberries. If you see these signs, it’s time to toss the salad. Always trust your senses—if it smells off, don’t eat it! You can prepare this salad ahead of time. Wash and dry the spinach, then store it in a sealed container. Slice strawberries and keep them in a separate container. Mix the dressing and store it in the fridge. Just combine everything when you are ready to serve. This way, the salad stays fresh and crunchy. Yes, you can use frozen strawberries. However, thaw them first and drain excess liquid. Fresh strawberries taste better, but frozen ones work in a pinch. They add a nice sweetness, even if they are not as firm. If you lack poppy seeds, use sesame seeds or sunflower seeds instead. They will still give your dressing a nice crunch. A simple vinaigrette made from olive oil and vinegar can also work well. Absolutely! This salad is great for meal prep. Keep each component separate until serving. This helps maintain freshness and texture. You can make it a few days in advance. Just toss and enjoy when you are ready. This salad pairs well with grilled chicken or fish for protein. It also goes nicely with whole-grain bread. For a light meal, serve it with a bowl of soup. You can even enjoy it with a glass of iced tea or lemonade. This salad combines fresh spinach, strawberries, and feta for a tasty mix. You learned how to prepare each ingredient carefully. I shared tips on choosing the best items and making the salad shine. With options for customization, you can make it just how you like. Remember to store leftovers well for freshness. You can always make this dish your own. Enjoy creating your delicious salad!

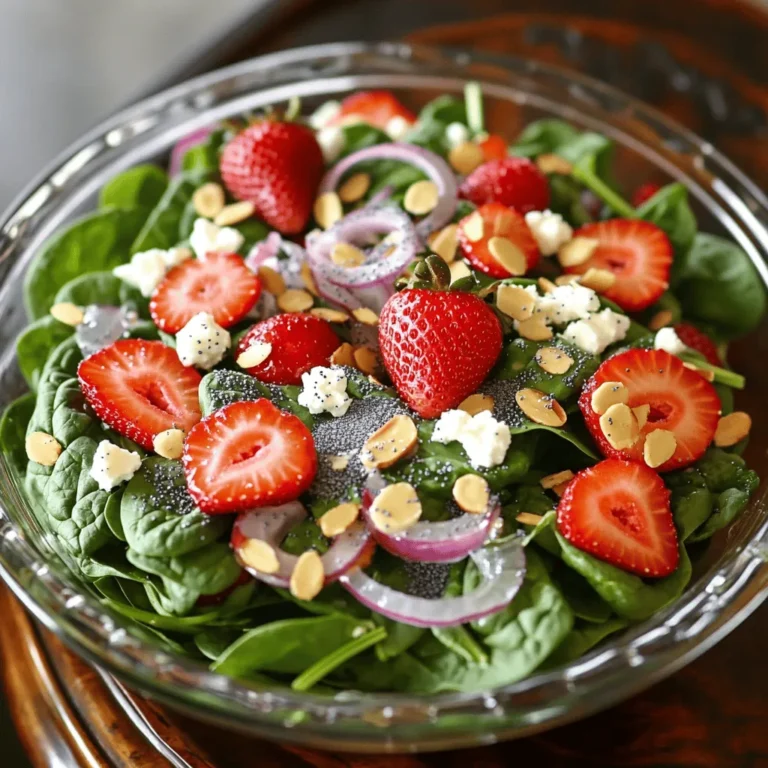
Strawberry Spinach Poppy Seed Salad Fresh Delight

- 12 oz penne pasta - 1 lb smoked sausage (like Andouille) - 1 cup heavy cream - 2 teaspoons Cajun seasoning - Sea salt and freshly ground black pepper - 1 medium onion - 1 bell pepper (red or green) - Fresh parsley and grated Parmesan cheese Gathering the right ingredients is key for great flavor. Start with the pasta. I love penne for its ridges, which hold the sauce well. The smoked sausage adds a savory kick. Andouille is my favorite choice. It brings a rich, smoky taste that truly shines. Next, we need heavy cream. It makes the sauce rich and smooth. Cajun seasoning adds a perfect zesty touch. You can adjust the amount if you like more heat. Don’t forget salt and pepper for balance. Now, for the veggies! Onions and bell peppers give a nice crunch and sweetness. Chop them up, and you’re ready to enhance the dish. Fresh parsley adds a pop of color and brightness. Grated Parmesan cheese on top? It’s the icing on the cake! Bring a large pot of salted water to a boil. Add the penne pasta. Cook it until it is al dente, which takes about 10 to 12 minutes. Once done, drain the pasta and set it aside in a large bowl. Heat a tablespoon of olive oil in a big skillet over medium heat. Add the sliced smoked sausage. Cook it for about 5 to 7 minutes. Stir it as it cooks until it turns a nice brown. When it's ready, transfer the sausage to a plate. In the same skillet, add the diced onion and bell pepper. Cook them for about 5 minutes, stirring often. You want them to be tender and a bit clear. Now, add the minced garlic. Cook it for another minute until it smells great. Pour in the low-sodium chicken broth to deglaze the skillet. This lifts up the tasty bits stuck on the bottom. Bring it to a gentle simmer. Next, stir in the heavy cream and the Cajun seasoning. Keep stirring until the sauce is well mixed. Let it simmer for 3 to 5 minutes until it thickens a little. Add the cooked sausage back into the skillet along with the halved cherry tomatoes. Stir gently so everything is coated in the creamy sauce. Let it bubble for about 2 minutes to warm the tomatoes. Now, add the drained penne pasta to the skillet. Toss everything together carefully. Make sure the pasta is well coated in the creamy sauce. Finally, season with sea salt and freshly ground black pepper to your taste. To cook pasta just right, aim for al dente texture. This means it should be firm but not hard. Follow the package instructions for timing, usually 10 to 12 minutes for penne. It’s key to salt your water well. This adds flavor to the pasta as it cooks. Use about 1-2 tablespoons of sea salt per gallon of water. The salt helps the pasta taste better. To make the dish pop, adjust the spice as you like. If you enjoy heat, add more Cajun seasoning. Start with the recommended amount, then taste and add more if needed. The type of sausage you use matters too. Smoked sausage, like Andouille, gives a rich flavor. You can also use spicy sausage for a kick. Feel free to experiment with flavors you love! To serve this dish beautifully, use wide, shallow bowls. This gives it an inviting look. For garnish, sprinkle fresh parsley on top. It adds color and freshness. You can also add grated Parmesan cheese for richness. Place a few cherry tomatoes on top for a pop of color. These small touches make your meal stand out and look appetizing! {{image_4}} You can change the protein in this dish. Instead of smoked sausage, try chicken or shrimp. Chicken adds a mild flavor, while shrimp cooks quickly and tastes great with Cajun spices. For a vegetarian option, use plant-based sausage. There are many brands that mimic the texture and flavor of meat. You can also add chickpeas or lentils for protein. Both options keep the dish filling and tasty. Adding veggies can change the flavor and texture. Spinach is a great choice. It wilts down nicely and adds nutrients. Mushrooms also work well. They bring an earthy taste that pairs well with cream. You can make the dish spicier too. Add more Cajun seasoning or a splash of hot sauce. This will give your pasta a nice kick. You can adjust the heat to your liking. If you need gluten-free options, choose gluten-free pasta. Many types are available, like brown rice or chickpea pasta. They cook well and taste good in this dish. For a dairy-free version, replace heavy cream with coconut cream. It adds a rich flavor while keeping the dish creamy. This swap is perfect for those who avoid dairy. To keep your creamy Cajun sausage pasta fresh, store leftovers in an airtight container. This helps prevent moisture loss and keeps flavors intact. You can keep it in the fridge for about 3 to 4 days. Make sure it cools down a bit before sealing to avoid steaming. When it’s time to enjoy your leftovers, reheating is key. The best method is to use a skillet over medium heat. Add a splash of chicken broth or water to keep it moist. Stir often to avoid sticking. If you prefer the microwave, use a microwave-safe dish. Heat it in short bursts, stirring in between to ensure even warming. This helps prevent dryness. If you want to save some for later, freezing works well. First, let the dish cool completely. Then, portion it into freezer-safe containers. It can last about 2 to 3 months in the freezer. When you’re ready to eat, thaw it overnight in the fridge. Reheat it in a skillet with a little broth to restore its creamy texture. For a true Cajun flavor, I recommend using Andouille sausage. This smoked sausage has a rich taste and a bit of spice. You can also try other smoked sausages if you can't find Andouille. Just look for something with a bold flavor to match the Cajun seasoning. Yes, you can make this dish ahead of time! Cook the pasta and sausage, then store them separately. You can mix them just before serving. Store in airtight containers in the fridge for up to three days. Reheat on low heat to keep the sauce creamy. To kick up the heat, add more Cajun seasoning. You can also mix in red pepper flakes or diced jalapeños. For a smoky flavor, try adding chipotle peppers in adobo sauce. Just remember to taste as you go to find the right spice level for you. This pasta pairs well with a side salad or garlic bread. A fresh green salad adds crunch and balance. For garlic bread, simply toast baguette slices with olive oil and garlic. These sides will make your meal complete and satisfying. This article shared a simple, tasty Cajun sausage pasta recipe, emphasizing main ingredients and cooking steps. You learned to create a rich sauce and combine it perfectly with pasta. We also explored tips for flavor, variations, and storage advice. Remember, this dish can be adjusted to suit your taste, whether you prefer chicken over sausage or need a vegetarian option. Enjoy experimenting with flavors and making this dish your own!

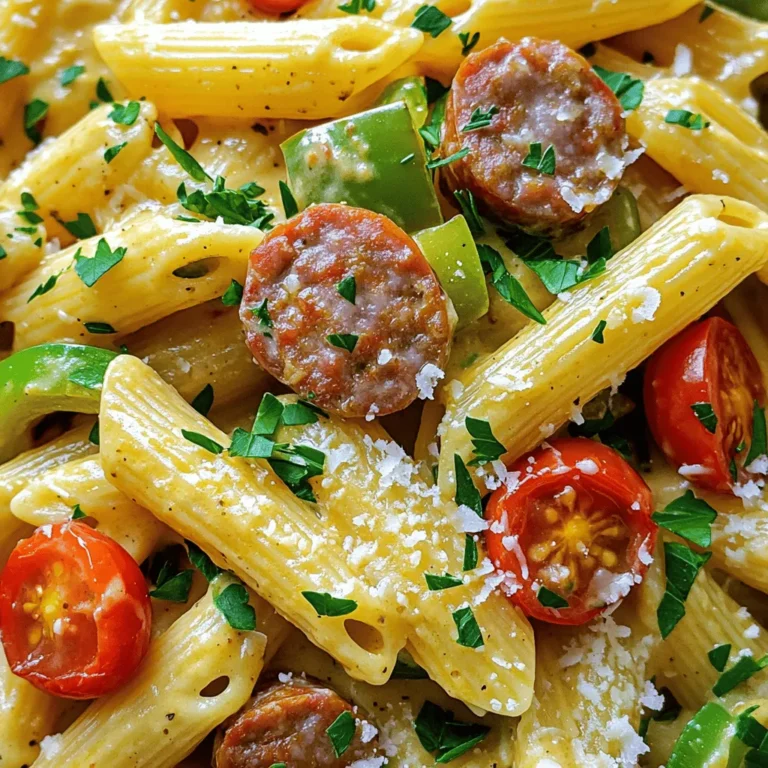
Creamy Cajun Sausage Pasta Flavorful and Filling Dish

To make Strawberry Basil Bruschetta, gather these main ingredients: - Baguette - Fresh strawberries - Fresh basil leaves - Balsamic glaze - Honey - Lemon zest - Sea salt - Black pepper - Optional: Ricotta cheese and olive oil The baguette gives the bruschetta a nice crunch. Fresh strawberries add sweet and juicy flavor. Fresh basil leaves bring a lovely herbal note. The balsamic glaze adds a tangy sweetness, while honey enhances the natural sweetness of the strawberries. Lemon zest brightens the dish with a fresh zing, and a pinch of sea salt helps balance the flavors. Black pepper adds a little warmth and depth. If you choose to use ricotta cheese, it will add creaminess and richness. Brushing olive oil on the baguette slices adds flavor and helps them toast evenly. Gather these ingredients, and you're ready to create a delicious summer treat! 1. Preheat the oven to 400°F (200°C). This helps the bread toast nicely. 2. Place the baguette slices on a baking sheet. 3. Brush olive oil on each slice. This adds flavor and color. 4. Bake for 8-10 minutes. Watch closely until golden brown. 1. In a bowl, mix diced strawberries and chopped basil. 2. Add balsamic glaze, honey, lemon zest, salt, and black pepper. 3. Toss gently to coat all the pieces. 4. Let it sit for 5-10 minutes. This allows the flavors to blend well. 1. If you like, spread ricotta cheese on each toasted slice. 2. Spoon the strawberry mixture on top. 3. Drizzle extra balsamic glaze for a touch of sweetness. To make the best bruschetta, toasting properly is key. Start by preheating your oven to 400°F (200°C). This temperature gives the bread a nice crunch. Place the sliced baguette in a single layer on a baking sheet. Use a brush to coat the top with olive oil. This helps achieve a golden finish. - Avoiding burning: Keep a close eye on the baguette as it bakes. Set a timer for about 8 minutes. Check if they are golden brown and crisp. If they look too dark, take them out right away. - Achieving the right crispness: You want a crisp texture that holds the toppings. Bake until just golden, then let them cool for a moment. This cooling helps keep them crispy. Using fresh ingredients makes your bruschetta shine. Fresh strawberries and basil add bright flavors. Always pick ripe strawberries for sweetness. The basil should smell fragrant and look vibrant. - Recommended storage of toppings: If you have leftovers, store the topping in the fridge. Place it in an airtight container. Keep the bread separate to maintain its crunch. Plating your bruschetta well makes it even more inviting. Use a rustic wooden platter or a slate board. This adds charm to your dish. - Ideal plating techniques: Arrange the bruschetta in a circle or line. Add extra basil leaves and strawberry slices around the edge. This creates a beautiful look. - Complementary beverages to serve: Pair your bruschetta with a light white wine or sparkling water. These drinks enhance the flavors of the dish. {{image_4}} You can change up your bruschetta with different fruits. Peaches add a sweet twist. Diced tomatoes bring a fresh taste. You can also try different herbs. Mint adds a cool flavor. Parsley gives a nice touch too. Each option opens up new tastes. If you want a vegan option, skip the ricotta. You can use avocado for creaminess. For gluten-free bruschetta, look for gluten-free baguettes. Many stores carry them now. This way, everyone can enjoy this tasty treat. You can give bruschetta an Italian twist. Use classic toppings like tomatoes and garlic. For a Mediterranean style, add olives or feta cheese. These changes will create a unique flavor. Feel free to experiment and find your favorite mix! To keep your bruschetta fresh, store the bread and toppings separately. This way, the bread stays crisp. Place the toasted baguette slices in an airtight container or a zip-lock bag. The toppings should go in a separate container. They can last up to three days in the fridge. But for the best taste, eat them within one day. To reheat your bruschetta without losing crispness, use an oven. Preheat it to 350°F (175°C). Place the baguette slices on a baking sheet. Heat them for about 5-7 minutes. Check them often, so they don’t burn. This method keeps the bread nice and crunchy. You can freeze the bruschetta components for later use. For the bread, slice it and place it in a freezer bag. Make sure to remove as much air as possible. For the topping, mix and freeze it in a separate container. You can keep both for up to three months. When you’re ready to eat, thaw them in the fridge overnight. Reheat the bread as mentioned above before serving. Strawberry Basil Bruschetta is a fresh and tasty appetizer. It features toasted baguette slices topped with a sweet and savory mix of strawberries and basil. The dish combines juicy strawberries with aromatic basil, honey, and balsamic glaze. This mix creates a burst of flavor that dances on your taste buds. Optional creamy ricotta adds a rich layer to the bruschetta. This dish is a perfect summer treat that looks and tastes amazing. You can prep the toppings early. Chop the strawberries and basil and mix them with the other ingredients. Store this mix in the fridge for a few hours. This helps the flavors come together. Keep the baguette slices separate until you are ready to serve. Toast them fresh for the best crunch. This way, your bruschetta stays crisp and delightful when you serve it. Yes, you can use frozen strawberries. However, they may change the texture a bit. Frozen strawberries can be softer when thawed. This could make the topping less crunchy. To keep the flavor, thaw them and drain excess juice. For the best taste, fresh strawberries are always ideal. But if you only have frozen ones, they will still add a nice flavor to the bruschetta. Strawberry basil bruschetta is simple and delicious. We covered key ingredients, like fresh strawberries and basil, plus the perfect way to toast the baguette. Remember to mix flavors and consider serving tips for a great look. You can also try different toppings or modify for diets. Storing and reheating correctly helps you enjoy every bite. This dish is easy to make ahead, ensuring you impress your guests. Get creative and make it your own!

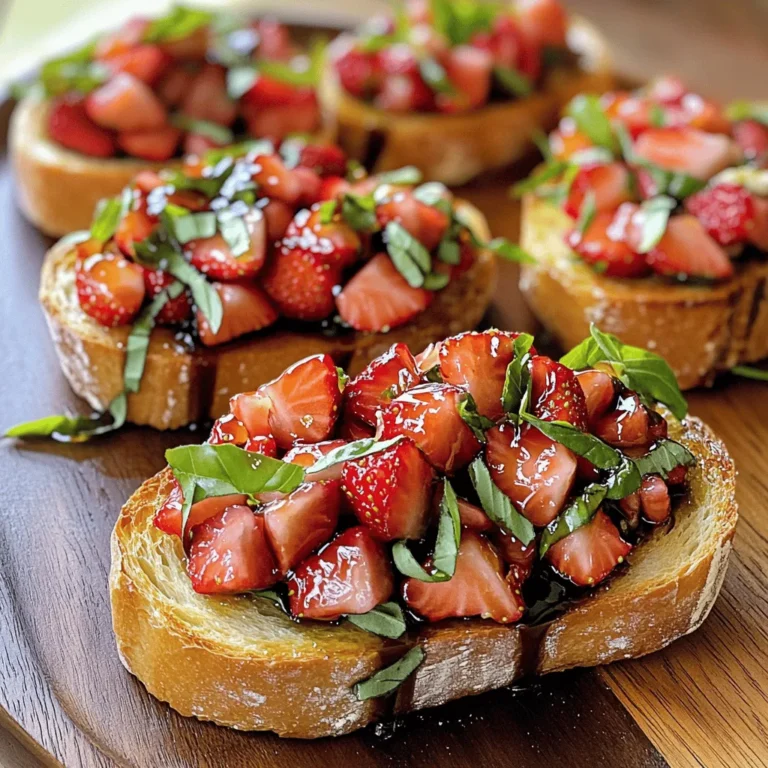
Strawberry Basil Bruschetta Flavorful Summer Treat

Here are the ingredients you need to make creamy spinach Parmesan gnocchi: - 500g potato gnocchi - 2 cups fresh spinach, roughly chopped - 1 cup heavy cream - 1 cup finely grated Parmesan cheese - 2 tablespoons olive oil - 3 cloves garlic, minced - Salt and freshly cracked black pepper to taste - 1/2 teaspoon freshly grated nutmeg - Chopped fresh parsley for garnish Each ingredient plays a key role in crafting this dish. The potato gnocchi brings a soft and pillowy texture. Fresh spinach adds color and nutrition. Heavy cream creates a rich base, while Parmesan gives a salty punch. Garlic brings warmth and depth. Nutmeg introduces a subtle spice that lifts the flavors. Don't forget the salt and pepper to taste! Finally, parsley brightens the plate and adds freshness. Gather these items, and you’ll be ready to cook a delightful meal that impresses. - Bring a large pot of salted water to a boil. - Add the potato gnocchi to the boiling water. - Cook until they float to the top, which shows they are done. - Drain the gnocchi in a colander and set aside. - Heat olive oil in a large skillet over medium heat. - Add the minced garlic and sauté for about one minute. - Cook until the garlic smells great but does not turn brown. - Stir in the roughly chopped spinach into the skillet. - Let the spinach cook for about 2-3 minutes until it wilts. - Pour in the heavy cream and reduce the heat to low. - Allow this mixture to simmer for five minutes until it thickens. - Gradually mix in the finely grated Parmesan cheese and nutmeg. - Season the sauce with salt and freshly cracked black pepper to taste. - Carefully add the drained gnocchi to the creamy sauce in the skillet. - Gently toss the gnocchi to coat them well with the sauce. - Heat everything together for an extra two minutes. This process creates a rich and creamy dish that highlights the flavors of spinach and Parmesan. Enjoy the simple yet delicious steps to create your creamy spinach Parmesan gnocchi! To make your cream sauce just right, you can adjust its thickness. If it's too thick, add a splash of pasta water. This water has starch, which helps bind the sauce. If it’s too thin, let it simmer longer. This will help it thicken. For the best flavor, balance the salt and nutmeg. Nutmeg adds warmth, while salt brings out the cream’s richness. Taste as you go. This way, you can make sure the sauce is perfect. Be careful not to overcook the gnocchi. They cook fast, and you want them soft but firm. Once they float in the water, they are ready. Drain them quickly to prevent mushiness. Using fresh gnocchi makes a big difference. Fresh gnocchi has a light, fluffy texture that tastes great. Store-bought gnocchi can work too, but fresh is always best for this dish. To make your dish look even better, serve it in shallow bowls. This adds elegance to your meal. Sprinkle extra Parmesan on top for a cheesy finish. Chopped parsley is a great garnish. It adds color and a fresh taste. You can also drizzle a bit of good olive oil on top. This adds richness and makes the dish pop. {{image_4}} You can easily add protein to your creamy spinach Parmesan gnocchi. Chicken or shrimp both work well. For chicken, use bite-sized pieces. Sauté the chicken in olive oil before adding garlic. Cook until golden brown, then add the spinach. For shrimp, add them after the garlic. Cook until they turn pink. Both options boost flavor and make your meal more filling. Don’t stop with spinach! You can mix in other veggies for extra taste. Mushrooms add a nice earthiness. Sauté them with garlic until soft. Bell peppers give a sweet crunch. Chop them and add with the spinach. Feel free to experiment with your favorite veggies. Broccoli or zucchini could also be great choices. You can change this dish with the seasons. In spring, add fresh peas for a pop of color. In summer, cherry tomatoes bring a juicy burst. In fall, butternut squash adds sweetness and creaminess. Winter means hearty greens like kale. Adjust the ingredients based on what’s fresh. This keeps your meal exciting and full of flavor. To keep your Creamy Spinach Parmesan Gnocchi fresh, use airtight containers. Glass or plastic containers work well. Make sure they are clean and dry before adding the food. Store the leftovers in the fridge for up to three days. If you want to keep them longer, consider freezing. However, the creamy sauce may change texture when frozen. To freeze, place the gnocchi in a freezer-safe bag, removing as much air as possible. When it's time to enjoy leftovers, avoid the microwave if you can. Instead, use a skillet. Place the gnocchi in a skillet over low heat. Add a splash of cream or water to help refresh the sauce. Stir gently until heated through. This method helps keep the gnocchi soft and prevents them from becoming mushy. For an added touch, sprinkle a little more Parmesan cheese on top while reheating. This will enhance the flavor and texture. Yes, you can use frozen gnocchi. Frozen gnocchi cooks well in this dish. Just add them straight to boiling water without thawing. They will take a little longer to float, so check after a few minutes. Once they float, they are ready to use. This makes the recipe quick and easy. If you want a lighter option, you can use whole milk or half-and-half. Almond milk or coconut cream also works well for a dairy-free choice. Use unsweetened and unflavored versions. These options may change the texture slightly, but they still taste great. To make this dish vegan, swap the heavy cream with coconut cream or a plant-based cream. Use nutritional yeast instead of Parmesan cheese for that cheesy flavor. You can also add in some sautéed mushrooms or bell peppers for extra texture. These changes keep the dish tasty and plant-based. This blog post shared a simple, delicious recipe for creamy spinach gnocchi. You learned how to cook gnocchi, sauté garlic, and prepare a rich cream sauce. Tips helped you achieve the best flavor and texture. Plus, I suggested easy variations for extra protein and veggies. In the end, this dish is versatile and easy to make. Enjoy experimenting with flavors and ingredients. Cooking should be fun and rewarding!

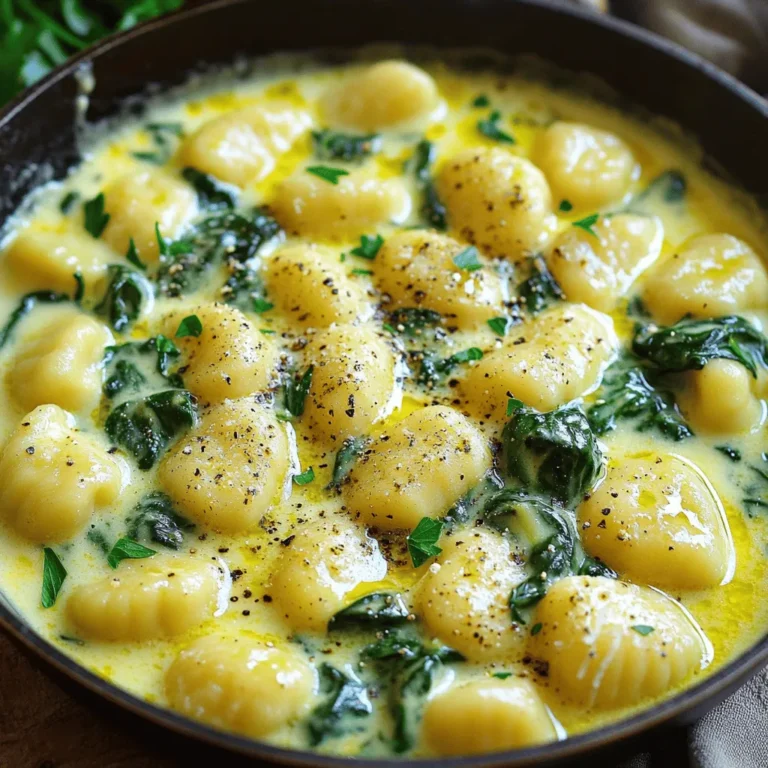
Creamy Spinach Parmesan Gnocchi Delicious Quick Meal

PREV 1 … 20 21 22 … 48 NEXT
meal plan mapper

explore

DessertsDinnerAppetizersDrinks

Our Policies

  • Cookie Policy
  • Copyright Policy
  • Disclaimer
  • GDPR Policy
  • Terms Of Use
Back to Top
  • About
  • Contact Us
  • Privacy Policy
© 2025 meal plan mapper