FREE DINNER EBOOK!
Get your copy!
Cookie Policy
GDPR Policy
Disclaimer
Terms Of Use
Visit my other site:
Fun Cookie Recipes
Home
Dinner
Desserts
Drinks
Appetizers
Contact
About
Privacy Policy
Home
Dinner
Desserts
Drinks
Appetizers
Contact
About
Privacy Policy
Cookie Policy
GDPR Policy
Disclaimer
Terms Of Use
Visit my other site:
Fun Cookie Recipes
HOME / CATEGORIES /
Latest
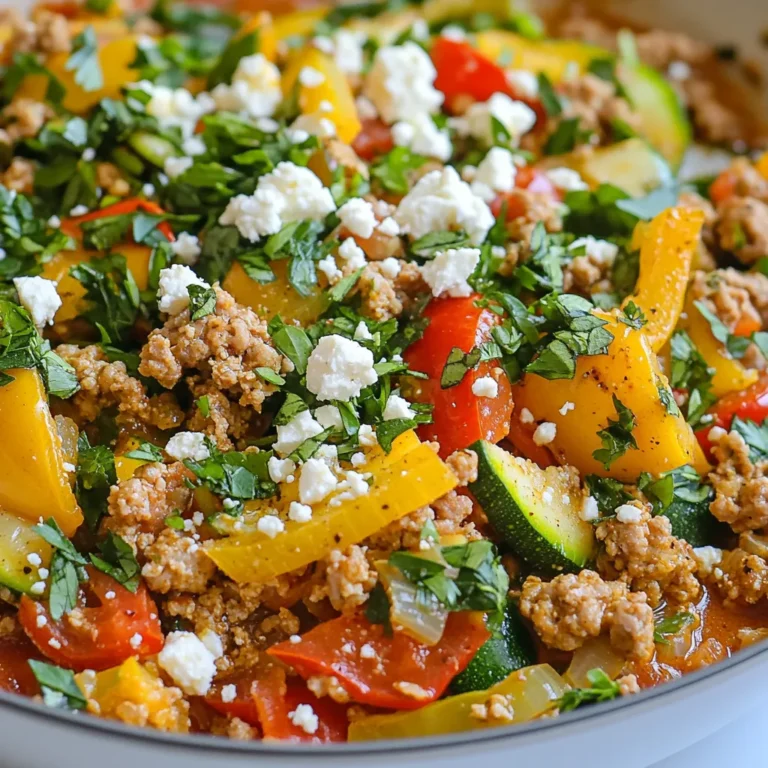
Savory Ground Turkey Skillet Flavorful and Quick Meal
Sweet Chili Chicken Meatballs Flavorful Dinner Option
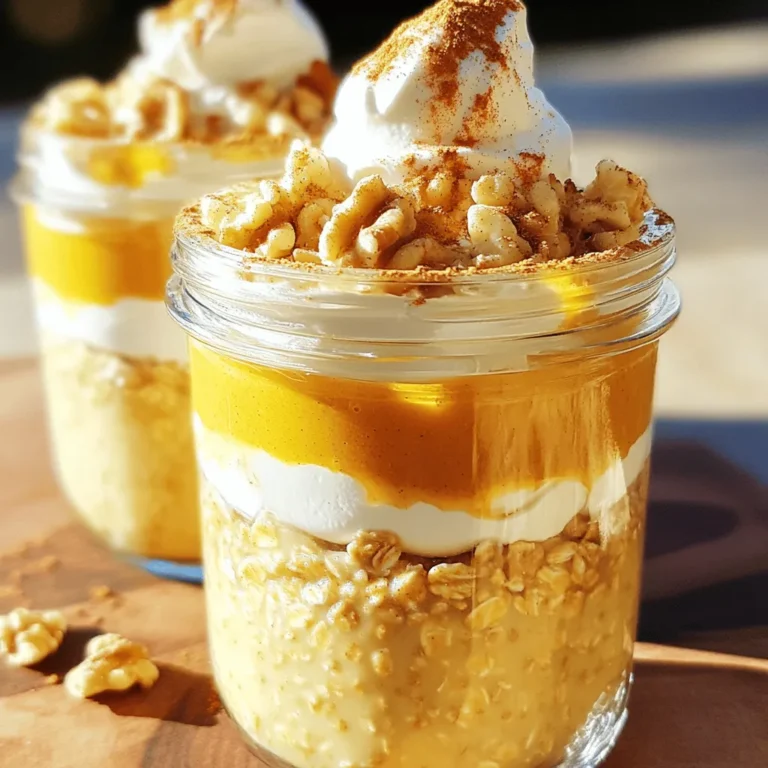
Pumpkin Pie Overnight Oats Simple and Tasty Recipe
Dublin Coddle Simple and Hearty Irish Comfort Dish
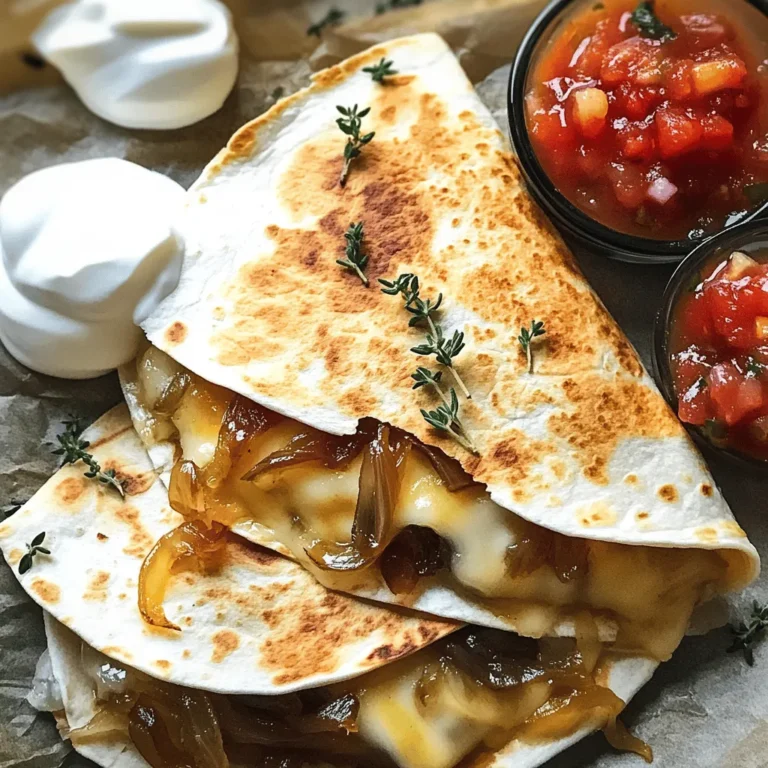
Caramelized Onion Gruyere Quesadillas Delicious Treat
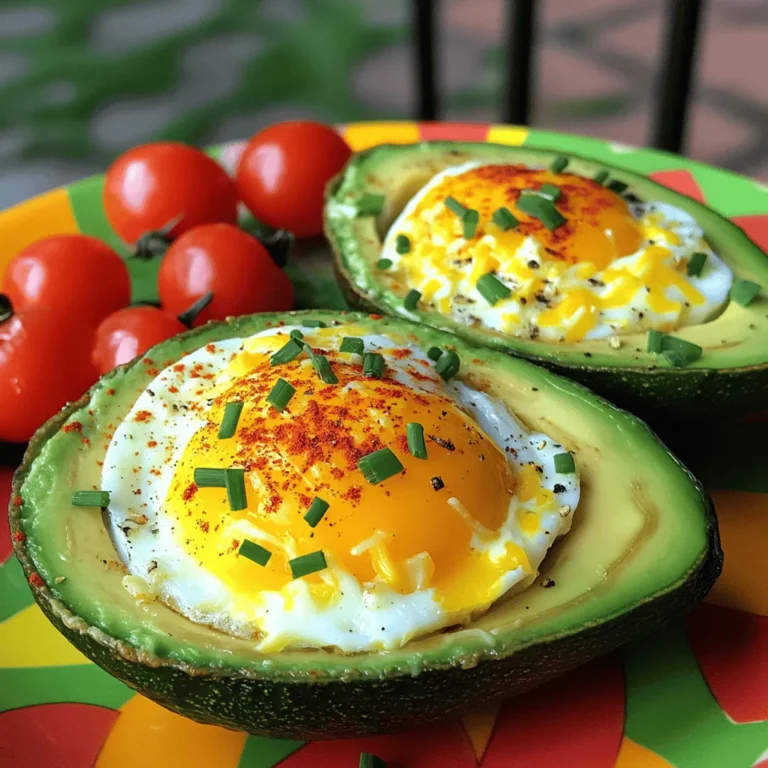
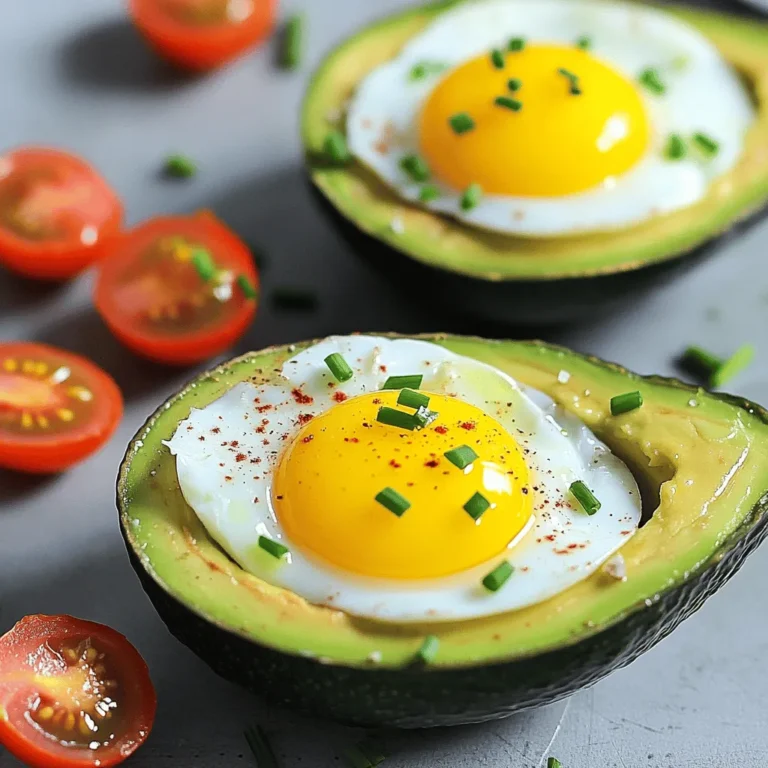
Avocado Egg Breakfast Boats Tasty and Easy Recipe
Caramelized Onion Gruyere Quesadillas Delicious Treat
Avocado Egg Breakfast Boats Tasty and Easy Recipe
Prosciutto Melon Skewers Flavorful Summer Delight
Pumpkin Spice Snickerdoodles Irresistible Fall Treat
PREV
1
…
23
24
25
…
48
NEXT


![- Ripe cantaloupe - Ripe honeydew melon - Thinly sliced prosciutto - Fresh basil leaves - Balsamic glaze - Freshly cracked black pepper - Skewers (wooden or metal) To make tasty prosciutto melon skewers, you need simple and fresh ingredients. First, select your melons. Ripe cantaloupe and honeydew provide sweet and juicy flavors. Their bright colors add to the dish's appeal. - Choosing ripe cantaloupe: Look for a firm, rounded shape. The skin should be a yellow or beige color. It should also have a sweet aroma at the stem end. - Choosing ripe honeydew melon: Select a honeydew that feels heavy for its size. The skin should be smooth and creamy yellow, with a slight give when pressed. Freshness is key to great flavor. Pick melons that feel heavy, as this means they are juicy. A ripe melon should smell sweet and fragrant, hinting at its natural sugars. - Types of prosciutto: Look for prosciutto di Parma or prosciutto San Daniele. These types are known for their rich taste and soft texture. - Sourcing high-quality prosciutto: Buy prosciutto from a trusted deli or specialty store. If you can, ask for it sliced thin, as this will enhance the eating experience. Quality prosciutto makes a big difference. It adds a savory component to the sweetness of the melons. When you find a good source, you can elevate your dish to a gourmet level. For the complete recipe, check out the [Full Recipe]. - Soaking wooden skewers: If you choose wooden skewers, soak them in water for 10 minutes. This keeps them from burning. - Wrapping melon with prosciutto: Take a piece of prosciutto and wrap it around a cube of cantaloupe, making sure to cover all sides. - Proper skewering technique: Carefully push the wrapped melon onto the skewer. This prevents the melon from falling off. - Layering cantaloupe, honeydew, and basil: After the cantaloupe, add a fresh basil leaf and a cube of honeydew. This gives a nice mix of flavors and colors. Repeat until the skewer feels full, leaving space at both ends for easy handling. - Drizzling with balsamic glaze: Once your skewers are ready, drizzle balsamic glaze over them. This adds a sweet and tangy finish. - Adding cracked black pepper: Finish by sprinkling freshly cracked black pepper on top. This enhances the flavors and adds a slight kick. After these steps, your prosciutto melon skewers are ready to impress! For the full recipe, check the main article. To make prosciutto melon skewers shine, balance the sweetness of melons with the saltiness of prosciutto. The sweet cantaloupe and honeydew pair perfectly with the rich, savory meat. This contrast creates a delightful bite. You can also enhance flavors with a drizzle of balsamic glaze. It adds a tangy touch that complements the sweetness. Freshly cracked black pepper gives a nice kick, too. For a twist, try adding a sprinkle of chili flakes for heat or a squeeze of lime for a zesty finish. When serving prosciutto melon skewers, presentation matters. Use a colorful platter to show off the vibrant colors of the ingredients. Place skewers upright in a jar or stand for a fun display. You can also lay them flat on a wooden board for a rustic look. Garnish the plate with fresh basil leaves or edible flowers for a pop of color. Drizzling the balsamic glaze over the entire platter adds visual appeal. This makes the dish look even more tempting. One mistake is overwrapping the prosciutto. Keep it thin, so it doesn’t overpower the melon. A light wrap lets the flavors blend nicely. Also, pay attention to skewer sizes. If they are too long, the skewers can be hard to handle. Use shorter skewers for easy eating. This way, your guests can enjoy every bite without any fuss. By following these tips, you ensure your prosciutto melon skewers impress everyone. Don't forget to check out the Full Recipe for detailed steps and ingredient lists! {{image_4}} You can easily switch up the fruits in your skewers. Try using ripe peaches or juicy plums instead of melon. Both fruits add a nice sweetness. You can even mix berries for a colorful touch. Fresh herbs also enhance the flavor. Instead of basil, consider using mint or cilantro for a fresh twist. These herbs bring a bright taste that pairs well with prosciutto. Mixing sweet and savory makes these skewers exciting. For instance, you can add a slice of creamy goat cheese or feta cheese to each skewer. This creamy texture balances the sweet melon. Nuts like toasted almonds or walnuts also work great. They add a nice crunch and nutty flavor, which pairs well with the salty prosciutto. These skewers shine in the summer with fresh fruits. Cantaloupe and honeydew are perfect choices. As the seasons change, you might try autumn fruits, like pears or apples. These fruits create a new flavor profile, making them great for fall gatherings. Adjusting your ingredients with the seasons keeps this dish fresh and fun. To keep your prosciutto melon skewers fresh, wrap them well. Use plastic wrap or place them in an airtight container. This helps prevent them from drying out. Store them in the fridge right after serving. The cold will keep the flavors bright and fresh. These skewers last about three days in the fridge. But they taste best within the first day. Look for signs of spoilage like a slimy texture or off smell. If you see or smell anything odd, it’s best to toss them out. You can make prosciutto melon skewers a few hours ahead. Just store them in the fridge until you’re ready to serve. Avoid adding balsamic glaze until just before serving. This keeps the skewers looking nice and fresh. If you need to reheat them, do so very lightly. You can use a microwave but only for a few seconds. Enjoy them cold for the best taste! To make these delicious skewers, follow these steps: 1. Soak wooden skewers in water for 10 minutes. 2. Wrap a slice of prosciutto around a cube of cantaloupe. 3. Thread the wrapped cantaloupe onto a skewer. 4. Add a basil leaf for extra flavor. 5. Alternate with a cube of honeydew melon. 6. Repeat until the skewer is filled. 7. Drizzle with balsamic glaze and sprinkle black pepper on top. 8. Serve immediately or chill in the fridge. For the full recipe, check out the detailed instructions above. Yes, you can! Try these alternatives: - Serrano ham offers a similar saltiness. - Bacon adds a smoky twist. - Salami provides a robust flavor. Each option brings its unique taste to the dish. You can enhance your skewers with these garnishes: - Crumbled feta adds creaminess. - Chopped mint offers a fresh touch. - A dash of chili flakes gives heat. These extras can elevate the flavor and presentation. Absolutely! Here are some serving suggestions: - Arrange the skewers on a large platter. - Use colorful plates for a festive look. - Offer small cups of balsamic glaze for dipping. These ideas make your prosciutto melon skewers perfect for gatherings! This guide has taken you through the simple steps to make delicious prosciutto melon skewers. We covered key ingredients, tips for selecting ripe melons, and the best prosciutto types. You learned how to assemble and enhance the flavors for a perfect dish. Remember, balance is key, and feel free to get creative with your ingredients. Enjoy these skewers at your next gathering or as a tasty snack. With practice, you'll master this dish and impress everyone with your skills.](https://mealplanmapper.com/wp-content/uploads/2025/07/4f0b0011-3a9e-4dd1-9972-cea9dee54363-768x768.webp)
![- 1 cup unsalted butter, softened to room temperature - 1 cup granulated sugar - 1 cup packed light brown sugar - 1 large egg, at room temperature - 1 teaspoon pure vanilla extract - 1 cup pumpkin puree (canned or freshly made) - 4 cups all-purpose flour - 2 teaspoons cream of tartar - 1 teaspoon baking soda - 1 teaspoon ground cinnamon - 1 teaspoon pumpkin pie spice - ½ teaspoon salt - ½ cup granulated sugar (for rolling) - 2 tablespoons ground cinnamon (for rolling) When I make these Pumpkin Spice Snickerdoodles, I love using fresh pumpkin puree. It adds a rich taste and bright color. You can also use canned puree for a quick option. Both work well in this recipe. For the best cookies, always use room temperature ingredients. This helps the butter mix well with the sugars. It makes the dough smooth and easy to work with. I enjoy measuring the flour correctly. Too much flour can make the cookies dry. Always spoon it into the measuring cup and level it off with a knife. The spices are key to that warm, fall flavor. The mix of cinnamon and pumpkin pie spice gives these cookies a cozy taste. They smell amazing while baking! This recipe makes about 24 cookies. Each bite is soft, chewy, and full of flavor. They are perfect for sharing with friends or family. You can find the Full Recipe at the end of this article. - Calories per cookie: Approximately 150 calories - Macronutrient breakdown: Each cookie contains about 6g of fat, 23g of carbs, and 1g of protein. Knowing the calories and nutrients helps you enjoy these treats wisely. They are a fun way to celebrate fall while still being mindful of what you eat. 1. Preheat your oven and prepare the baking sheet. Set your oven to 350°F (175°C). This step is key for even baking. Line a large baking sheet with parchment paper. This prevents the cookies from sticking. 2. Creaming butter and sugars. In a large bowl, mix 1 cup of softened unsalted butter, 1 cup of granulated sugar, and 1 cup of packed light brown sugar using a hand mixer or stand mixer. Blend until the mixture is fluffy and light in color, about 2-3 minutes. 3. Incorporating eggs, vanilla, and pumpkin. Now, add 1 large egg, 1 teaspoon of pure vanilla extract, and 1 cup of pumpkin puree to the creamed mix. Beat everything until smooth and well combined. 1. Whisking together dry components. In a separate bowl, whisk together 4 cups of all-purpose flour, 2 teaspoons of cream of tartar, 1 teaspoon of baking soda, 1 teaspoon of ground cinnamon, 1 teaspoon of pumpkin pie spice, and ½ teaspoon of salt. Make sure everything is mixed evenly. 2. Combining wet and dry mixtures. Gradually add the dry mix to the wet ingredients. Stir gently with a spatula or wooden spoon. Stop mixing once everything is just combined. The dough should feel slightly sticky but easy to manage. 1. Rolling dough and coating with cinnamon-sugar. In a small bowl, combine ½ cup of granulated sugar and 2 tablespoons of ground cinnamon. Mix well. Scoop out about 1.5 tablespoons of dough and roll it into a ball. Repeat this for all the dough. 2. Baking time and temperature specifics. Roll each dough ball in the cinnamon-sugar mix, ensuring they are fully coated. Place the balls on the prepared baking sheet, leaving about 2 inches between each. Bake for 10-12 minutes. The edges should be golden while the centers remain soft. 3. Cooling instructions. After baking, let the cookies cool on the baking sheet for 5 minutes. Then, transfer them to a wire rack to cool completely. Enjoy your Pumpkin Spice Snickerdoodles! To achieve the perfect cookie texture, focus on the creaming step. Beat the butter and sugars until fluffy. This traps air and makes the cookies light. Use room temperature butter for best results. Avoid overmixing the dough once you add the flour. Mix just until the flour disappears. This keeps your cookies tender and soft. Overmixing can lead to tough cookies. For a cozy presentation, arrange the cookies on a rustic wooden platter. You can sprinkle a pinch of pumpkin pie spice on top for extra flair. Pair these cookies with a warm beverage like apple cider or chai tea. They also taste great with a dollop of whipped cream on the side. It’s a fun way to enjoy them! Overbaking is a big mistake. Keep an eye on your cookies. They should look slightly golden around the edges while the centers stay soft. Be careful with ingredient substitutions. Using margarine instead of butter can change the taste and texture. Stick to the recipe for the best results. For the full recipe, check out the detailed cooking instructions. {{image_4}} You can make Pumpkin Spice Snickerdoodles even more fun by adding nuts or chocolate chips. Chopped pecans or walnuts add a nice crunch. Dark chocolate chips offer a rich flavor that pairs well with pumpkin. You can also try different spices. Nutmeg gives a warm feel, while ginger adds a zesty kick. Mix and match to find your favorite blend. If you need a gluten-free option, you can use a gluten-free flour blend. This swap keeps the cookies soft and tasty. For vegan substitutions, replace the egg with a flax egg. Mix one tablespoon of flaxseed meal with three tablespoons of water, then let it sit for five minutes. You can also use coconut oil in place of butter for a dairy-free treat. To enhance the festive feel, try adding a drizzle of cream cheese frosting on top. This gives a sweet touch that many will love. You can also present the cookies on a rustic wooden platter. Sprinkle a pinch of pumpkin pie spice on top for a beautiful look. Pair them with whipped cream for dipping, and you’ll impress your guests. For the holidays, consider cookie gift boxes to share this seasonal delight. For the complete recipe, check the [Full Recipe]. To keep your Pumpkin Spice Snickerdoodles fresh at room temperature, store them in an airtight container. This will help keep them soft and chewy. I recommend using a glass or plastic container with a tight lid. - Make sure the cookies cool completely before sealing them. - A single layer works best to avoid squishing them. If you want to save some for later, freezing is a great option. Here’s how you can do it: 1. Allow the cookies to cool completely. 2. Place them in a freezer-safe bag or container. 3. Separate layers with parchment paper to prevent sticking. When you're ready to enjoy them, just take them out. Here’s how to reheat: - Preheat your oven to 350°F (175°C). - Place the frozen cookies on a baking sheet for about 5-10 minutes. You’ll enjoy your Pumpkin Spice Snickerdoodles for several days when stored properly. Here’s what to know: - At room temperature, they last about 3-5 days. - If frozen, they can last up to 3 months. Look for these signs of spoilage: - Changes in texture—if they feel hard or dry. - Strange smells or off-tastes. Keeping track of these details will ensure your cookies stay delicious! For the complete instructions, check the Full Recipe. To soften butter fast, cut it into small cubes. Place the cubes in a bowl. Leave it at room temperature for about 10-15 minutes. If you’re in a hurry, you can use the microwave. Put the butter on a microwave-safe plate. Heat it in short bursts of 5 seconds. This way, you avoid melting it. Yes, you can prepare the dough ahead of time. After mixing the dough, wrap it tightly in plastic wrap. Store it in the fridge for up to 3 days. When ready to bake, let it sit at room temperature for a few minutes before rolling. You can also freeze the dough for up to 3 months. Just thaw it overnight in the fridge before baking. You’ll know your cookies are done when the edges are slightly golden. The centers should still look soft and puffy. This helps keep them chewy. Another sign is when the cookies look slightly cracked. Let them cool on the baking sheet for about 5 minutes before moving them. Snickerdoodles are unique because of their cinnamon-sugar coating. They also use cream of tartar, giving them a tangy flavor. This helps make them soft and chewy. Unlike sugar cookies, Snickerdoodles have a distinct spice kick. They are perfect for fall with their warm flavors. For the complete Pumpkin Spice Snickerdoodles recipe, [click here](insert-link). In this post, I shared the best way to make Pumpkin Spice Snickerdoodles. You learned about the key ingredients, step-by-step instructions, and helpful tips. I included variations and storage tips for your cookies. With these easy steps, tasty cookies can be yours. Enjoy these treats with friends or family. Baking is fun, and sharing makes it even better! Get ready to let your kitchen fill with warm spices.](https://mealplanmapper.com/wp-content/uploads/2025/07/d8a894a1-6f64-43d8-9d76-14cc601427a1-768x768.webp)