FREE DINNER EBOOK! Get your copy!
  • Cookie Policy
  • GDPR Policy
  • Disclaimer
  • Terms Of Use
  • Visit my other site: Fun Cookie Recipes
meal plan mapper
  • Home
  • Dinner
  • Desserts
  • Drinks
  • Appetizers
  • Contact
  • About
  • Privacy Policy
  • Home
  • Dinner
  • Desserts
  • Drinks
  • Appetizers
  • Contact
  • About
  • Privacy Policy
  • Cookie Policy
  • GDPR Policy
  • Disclaimer
  • Terms Of Use
Visit my other site: Fun Cookie Recipes

HOME / CATEGORIES /

Latest

- 2 tablespoons coconut oil - 1 pound boneless, skinless chicken breast, cut into bite-sized pieces - 1 medium onion, finely diced - 3 cloves garlic, minced - 1-inch piece of fresh ginger, grated - 2 medium carrots, diced - 1 red bell pepper, diced - 1 can (14 ounces) full-fat coconut milk - 4 cups low-sodium chicken broth - Zest and juice of 2 fresh limes - 2 tablespoons fish sauce (omit if vegetarian) - Salt and pepper to taste - Fresh cilantro, chopped (for garnish) - Sliced green onions (for garnish) - Lime wedges (for serving) Coconut oil is my go-to for a rich flavor. It gives the soup a warm, tropical touch. Use fresh ginger for the best taste. It adds a zing that works well with lime. The full-fat coconut milk makes the soup creamy and smooth. Low-sodium chicken broth helps to control salt levels. You can skip the fish sauce if you prefer a vegetarian option. Just add a little extra salt for flavor. If you want a lighter soup, you can use low-fat coconut milk. For a vegetarian twist, swap the chicken for tofu or chickpeas. You can also use vegetable broth instead of chicken broth. For a spicy kick, add some red pepper flakes or diced jalapeños. Mixing in other veggies, like spinach or snap peas, can add color and nutrition. Feel free to get creative with these substitutions! {{ingredient_image_2}} 1. First, gather all your ingredients. This makes cooking smooth and fun. 2. Dice the chicken into bite-sized pieces. This helps it cook quickly and evenly. 3. Finely chop the onion, mince the garlic, and grate the ginger. Aromas will fill your kitchen! 4. Dice the carrots and red bell pepper. These add color and nutrients to your soup. 1. Heat the coconut oil in a large pot over medium heat. Wait for it to shimmer. 2. Add the diced chicken to the pot. Cook for about 5-7 minutes. Aim for a golden brown color. 3. Remove the chicken and set it aside. This keeps it juicy. 4. In the same pot, add the onion, garlic, and ginger. Sauté for 3-4 minutes. The onion should become clear. 5. Toss in the diced carrots and red bell pepper. Cook for another 5 minutes. Stir often to avoid burning. 6. Add the chicken back to the pot. Mix well. 7. Pour in the coconut milk and chicken broth. Stir until everything is blended. 8. Add lime zest, lime juice, and fish sauce, if using. Season with salt and pepper. 9. Raise the heat and bring the soup to a gentle simmer. Cook uncovered for 15-20 minutes. 10. Taste the soup and adjust seasoning. Add more lime juice for extra zing. 1. Ladle the soup into bowls. 2. Garnish with fresh cilantro and sliced green onions. 3. Serve lime wedges on the side for a fresh burst. 4. For fun, add red pepper flakes or toasted coconut flakes on top. Enjoy every spoonful! To boost the flavor of your soup, use fresh lime juice. The zest adds a nice aroma. You can also try adding more garlic or ginger for a stronger taste. For a spicy kick, toss in some red pepper flakes. Fresh herbs, like cilantro, give a bright taste. You can add them right before serving. One mistake is overcooking the chicken. Cook it just until it’s done. If you let it sit too long, it can become dry. Another mistake is not tasting your soup during cooking. Adjust the seasoning as needed. Don't skip the lime juice; it brightens the whole dish. When cooking chicken, cut it into even pieces. This helps it cook evenly. Start with a hot pan to get a nice sear. This locks in the juices. Use a meat thermometer to make sure it reaches 165°F. Let the chicken rest for a few minutes after cooking. This keeps it juicy in your soup. Pro Tips Use Fresh Ingredients: Fresh lime juice and zest can significantly enhance the flavor of your soup, making it taste vibrant and zesty. Customize the Spiciness: If you enjoy a spicy kick, consider adding chopped jalapeños or red pepper flakes to the soup while it simmers. Make It Vegetarian: Swap the chicken for tofu or chickpeas and use vegetable broth instead of chicken broth for a delicious vegetarian version. Storage Tips: This soup can be made ahead and stored in the refrigerator for up to 3 days. Reheat gently on the stove for the best texture. {{image_4}} To make this soup vegetarian or vegan, swap the chicken for tofu or tempeh. Use vegetable broth instead of chicken broth. Omit the fish sauce or replace it with soy sauce or a splash of coconut aminos. This keeps the umami flavor without any animal products. You can use various proteins in this soup. Shrimp or fish work well, adding a fresh taste. For a heartier option, consider using beef or pork. Just be sure to adjust the cooking time based on the protein you choose. Cook seafood until just done, while other meats may need longer. Spices can bring new life to your soup. Add a pinch of red pepper flakes for heat. Consider using curry powder for a warm depth of flavor. Fresh herbs like basil or mint can also brighten the dish. Don't be afraid to experiment to find your perfect blend! To keep your Coconut Lime Chicken Soup fresh, let it cool first. Place it in an airtight container. Store it in the fridge for up to four days. Make sure to label the container with the date. This keeps track of how long it’s been there. When ready to enjoy your leftovers, pour the soup into a pot. Heat it over medium heat on the stove. Stir it often to prevent sticking. You can also use a microwave. Place the soup in a microwave-safe bowl, cover it, and heat for two to three minutes. Stir halfway for even heating. If you want to keep the soup longer, freeze it. Use a freezer-safe container or a zip-top bag. Leave some space for the soup to expand as it freezes. It can last up to three months in the freezer. When you're ready to eat it, thaw it in the fridge overnight. Reheat it on the stove or in the microwave. Yes, you can use low-fat coconut milk. It will make the soup lighter. However, the soup may lose some creamy texture. If you prefer a rich flavor, stick with full-fat coconut milk. This soup lasts about 3 to 4 days in the fridge. Make sure to store it in an airtight container. Always check the soup for any signs of spoilage before eating. Serve this soup hot in bowls. Garnish with fresh cilantro and sliced green onions. Add lime wedges on the side for extra zest. You can also serve it with crispy bread for a nice crunch. Yes, this soup is gluten-free. The main ingredients do not contain gluten. Just make sure to check the fish sauce label if you use it. This post covered key ingredients for Coconut Lime Chicken Soup and their possible swaps. I shared step-by-step cooking instructions and serving suggestions. You learned tips to enhance flavor and avoid common mistakes. We explored variations for different diets and proteins. I also offered storage tips, reheating advice, and answered FAQs. When you try this soup, enjoy how it warms and delights. Your flavor journey starts now!

Coconut Lime Chicken Soup Flavorful and Easy Recipe

- 1 lb ground beef or turkey - 1/2 cup breadcrumbs - 1/4 cup Parmesan cheese - 1 large egg - 2 cloves garlic - 1 tsp onion powder - 1/2 tsp salt - 1/4 tsp black pepper - 1/2 cup honey - 1/4 cup soy sauce or tamari - 1 tbsp rice vinegar - 1/2 tsp sesame oil - 1/2 tsp chili flakes (optional) To make slow cooker honey garlic meatballs, gather these ingredients. You can use beef or turkey for a lighter meal. Breadcrumbs and Parmesan cheese add flavor and texture. The egg acts as a binder. Garlic and seasoning enhance the taste. For the sweet sauce, combine honey, soy sauce, and rice vinegar. Sesame oil adds richness. If you like heat, toss in chili flakes. These ingredients create a wonderful balance of sweet and savory. You can adjust the sauce to fit your taste. With these ingredients ready, you will create a dish that is both delicious and simple to prepare. {{ingredient_image_2}} First, I take a large bowl. I combine 1 pound of ground beef or turkey, 1/2 cup of breadcrumbs, 1/4 cup of grated Parmesan cheese, 1 beaten egg, 2 minced garlic cloves, 1 teaspoon of onion powder, 1/2 teaspoon of salt, and 1/4 teaspoon of black pepper. I mix these well with my hands. It should feel like a sticky dough. Next, I form small meatballs, about 1 inch wide. I place them neatly on a plate or a baking sheet. This recipe makes about 20 meatballs. It is fun to shape them, and I love the smell of garlic in the air. Now, I prepare the sauce. In a medium bowl, I whisk together 1/2 cup of honey, 1/4 cup of soy sauce (or tamari for gluten-free), 1 tablespoon of rice vinegar, 1/2 teaspoon of sesame oil, and optional 1/2 teaspoon of chili flakes. I make sure the mixture is smooth and combined. This sauce is sweet and savory, perfect for our meatballs. I transfer the meatballs into the slow cooker. I pour the honey garlic sauce over them, making sure each meatball is coated. I cover the slow cooker and set it to cook. I choose low for 6 hours or high for 3 hours. During cooking, the meatballs get tender and soak up all the wonderful flavors. Once they are done, I gently stir the meatballs in the sauce. This helps them absorb even more flavor before serving. To make great meatballs, start with cold ingredients. This keeps the meat firm. Mix your ground beef or turkey with breadcrumbs, cheese, egg, garlic, and spices. Use your hands to combine everything. This ensures a good texture. When forming meatballs, aim for one inch in size. This helps them cook evenly. Place them on a baking sheet for easy transfer. Cooking times matter too. For slow cooking, set your cooker to low for 6 hours or high for 3 hours. The meatballs will be soft and juicy when done. You can add more flavor by including vegetables. Chopped bell peppers or grated carrots blend well. They add nutrients and taste. Adjust the sweetness too. If you like it sweeter, add more honey. For a spicy kick, toss in extra chili flakes. This gives your dish a fun twist. Presentation makes your meal pop! Serve the meatballs over rice or noodles. Drizzle extra honey garlic sauce on top. It looks great and tastes amazing. Garnish with sliced green onions. This adds color and crunch. Pair your meatballs with steamed veggies for a balanced meal. The mix of flavors and textures will impress everyone at the table. Pro Tips Use a Meat Thermometer: Ensure your meatballs are cooked to the proper internal temperature of 160°F (70°C) for ground beef or turkey to guarantee safety and juiciness. Customize Your Sauce: Feel free to adjust the honey and soy sauce ratio to suit your sweetness preference, or add a splash of sriracha for an extra kick! Batch Cooking: Make a double batch and freeze half for an easy meal later. Just reheat in the sauce when you're ready to serve! Garnish for Flavor: Don’t skip the green onions! They add a fresh crunch and vibrant color that enhances the overall dish. {{image_4}} If you want to make this dish gluten-free, use tamari instead of soy sauce. You can also swap regular breadcrumbs for gluten-free breadcrumbs. For a low-carb option, try ground meat without breadcrumbs. Use almond flour or crushed pork rinds instead. If you need dairy-free options, skip the Parmesan cheese. You can add nutritional yeast for a cheesy flavor without dairy. To change the taste, try adding different spices. A pinch of paprika or garlic powder can enhance the flavor. You might also add a splash of lemon juice for a fresh zing. If you prefer a different meat, ground chicken or pork works well too. Each meat brings its unique taste and texture to the dish. You can give your meatballs a cultural spin. For a Thai twist, use fish sauce and add some chopped cilantro. You could also add coconut milk for a creamy sauce. If you want a Teriyaki version, mix in some ginger and top with sesame seeds. These variations keep your meal exciting and fresh, no matter what you choose. To store your honey garlic meatballs, place them in an airtight container. Make sure to let them cool down first. You can store them in the fridge for up to four days. If you want to keep them longer, freezing is a great option. To freeze cooked meatballs, lay them on a baking sheet in a single layer. Freeze for about two hours, then transfer them to a freezer bag. This way, they won’t stick together. You can freeze them for up to three months. When you are ready to eat, simply take out the meatballs. Reheat them in the microwave or on the stove. If using the microwave, heat in short bursts to avoid overcooking. On the stove, simmer them in a bit of sauce until warmed through. Enjoy the sweet and savory flavors again! You should cook the meatballs for 6 hours on low or 3 hours on high. This time ensures the meatballs are tender and fully cooked. The slow heat allows the sweet and savory honey garlic sauce to soak in well. It also helps the flavors blend nicely, giving you a delicious meal. Yes, you can use frozen meatballs! Just add them directly to the slow cooker. You may need to increase the cooking time by 30 minutes to 1 hour, depending on your slow cooker. Using frozen meatballs makes this recipe even easier. It saves time and effort while still delivering that tasty honey garlic flavor. You can serve honey garlic meatballs with many sides. Here are some great options: - Steamed rice - Warm noodles - Fresh vegetables - Salad These sides balance the sweet meatballs. They add freshness and texture to your meal. You can also drizzle extra honey garlic sauce on everything for added flavor. Enjoy the colorful mix on your plate! In this blog post, we explored how to make delicious slow cooker honey garlic meatballs. You learned about the main ingredients, including ground beef or turkey, breadcrumbs, and a sweet honey garlic sauce. I shared easy steps for preparing, cooking, and garnishing your meatballs. Remember, you can customize flavors and make them healthier with substitutes. Now, it's time to enjoy your tasty meatballs. With a little practice, you'll make perfect dishes everyone will love. Happy cooking!

Slow Cooker Honey Garlic Meatballs Tasty Meal Idea

To make classic deviled eggs, you need a few simple ingredients. Here’s the list: - 6 large eggs - 3 tablespoons high-quality mayonnaise - 1 teaspoon Dijon mustard - 1 teaspoon apple cider vinegar - 1/4 teaspoon smoked paprika plus extra for garnish - Sea salt and freshly cracked black pepper to taste - 2 green onions, finely chopped (for final garnish) - 1 teaspoon capers, rinsed and finely minced (for a zesty kick) Each ingredient plays a key role. The eggs form the base, while mayonnaise gives creaminess. Dijon mustard adds a hint of spice, and apple cider vinegar gives a tangy touch. Smoked paprika creates depth of flavor and color. Sea salt and black pepper season the filling just right. Green onions provide freshness, and capers add a nice zesty kick. Using high-quality mayo makes a big difference. It enhances the smooth texture and rich taste. Fresh ingredients always yield the best results. So, make sure to pick the finest eggs and spices. When you combine these ingredients, you create a delightful filling that everyone will love. Enjoy your cooking! {{ingredient_image_2}} - Gently place eggs in a saucepan and fill with cold water. - Bring to a boil, then cover and remove from heat. Start by placing six large eggs in a medium saucepan. Make sure the water covers the eggs by about one inch. This helps them cook evenly. Once you see bubbles, cover the pot and take it off the heat. Let the eggs sit for 12 minutes. This method gives you perfect, hard-boiled eggs. - Transfer eggs to ice water for cooling. - Peel the eggs under cool running water. Next, carefully move the eggs to a bowl of ice water. Let them cool for at least five minutes. This step stops the cooking. It also makes peeling easier. When you peel the eggs, do it under cool running water. The water helps remove the shell without damaging the egg. - Slice eggs in half and scoop yolks into a bowl. - Mix yolks with mayonnaise, mustard, vinegar, smoked paprika, salt, and pepper. - Optional: Fold in minced capers for added flavor. Now, take a sharp knife and cut each egg in half lengthwise. Scoop the bright yellow yolks into a bowl. Add three tablespoons of mayonnaise, one teaspoon of Dijon mustard, one teaspoon of apple cider vinegar, and a quarter teaspoon of smoked paprika. Sprinkle in some sea salt and freshly cracked black pepper. Mix this all together until it's smooth. For more flavor, fold in one teaspoon of minced capers. They add a nice twist! - Spoon yolk mixture back into egg whites or use a piping bag. - Garnish with green onions and smoked paprika. Time to fill the egg whites! You can spoon the yolk mixture back into the whites or use a piping bag for a fun design. Once they’re filled, sprinkle chopped green onions and a bit more smoked paprika on top. This makes them look great for any gathering! To avoid green rings on yolks, use the right boiling method. After boiling, remove the pan from heat and cover it. Let the eggs sit for 12 minutes. This method keeps yolks bright and creamy. For cooling, use ice water. This stops the cooking process and helps with peeling. Leave the eggs in the ice water for at least 5 minutes. Add extra spices to boost flavor. You can try garlic powder, cayenne pepper, or dill. These spices add a unique twist to your classic deviled eggs. For mayonnaise, choose high-quality brands like Hellmann's or Duke's. They have rich flavors that make a big difference. For mustard, Dijon is great, but you can also try spicy brown mustard for a kick. Garnishing can make your deviled eggs stand out. Top them with finely chopped green onions or a sprinkle of smoked paprika. You can also add whole capers or a small sprig of dill for extra flair. When serving, arrange the eggs on a colorful platter. This makes them look even more appetizing and fun. Pro Tips Perfect Boiling Technique: For perfectly cooked eggs, ensure that the water is at a rolling boil before removing from heat to steep. This method prevents overcooking and helps avoid that greenish hue around the yolk. Cooling Down: Immediately transferring the eggs to an ice water bath after boiling is crucial. This not only stops the cooking process but also makes peeling the eggs significantly easier. Flavor Boost: Consider adding a splash of hot sauce or a pinch of cayenne pepper to the yolk mixture for an extra kick. This can elevate the flavor profile and add a delightful surprise for your guests. Presentation Matters: Use a piping bag to fill the egg whites for a professional look. You can also experiment with different garnishes like microgreens or edible flowers for a visually stunning presentation. {{image_4}} For a Southern twist, you can add sweet pickle relish and a dash of hot sauce. These ingredients give the eggs a sweet and spicy kick. The sweetness balances the creamy yolk mix. This classic style often includes a sprinkle of paprika for color. You can also use crumbled bacon on top for extra crunch. If you like heat, try spicy deviled eggs. Add a few drops of hot sauce to the yolk mix. You can also mix in finely chopped jalapeños for a fiery flavor. The kick of spice works well with the creamy filling. Garnish with a slice of jalapeño on top for a bold look. You can make deviled eggs vegan by swapping the mayo for avocado or cashew cream. Use mashed avocado for a rich and creamy filling. Add lemon juice for tanginess. You can also replace the eggs with tofu, mixing it with spices for a similar texture. This way, everyone can enjoy delicious deviled eggs! To keep your deviled eggs fresh, store them in the fridge. Place them in an airtight container. If you do not have a container, you can cover them with plastic wrap. Make sure they are in a single layer to avoid squishing. Try to eat them within two days for the best taste. Can you freeze deviled eggs? I do not recommend freezing them. The texture of the egg whites changes when frozen. They can become watery and rubbery when thawed. If you must freeze them, try to only freeze the yolk mixture. Mix and store it in a freezer-safe bag. Defrost it in the fridge when ready to use. How long do deviled eggs last in the fridge? They can last about three to four days. Always check for any off smell or discoloration before eating. If you notice any change, it’s best to throw them away. Keeping track of storage time helps ensure you enjoy them at their best. To hard-boil eggs, start by placing them gently in a saucepan. Cover them with cold water, about an inch above the eggs. Heat the pan on medium until the water boils. Once boiling, cover the pan and remove it from heat. Let the eggs sit in this heat for 12 minutes. This method keeps the yolks bright and creamy. Yes, you can make deviled eggs a day ahead. Prepare the filling and store it in the fridge. Keep the egg whites separate until you're ready to serve. This helps them stay fresh and tasty. You can customize deviled eggs easily. Try adding spices like garlic powder or hot sauce for a kick. You can also mix in ingredients like bacon bits or chopped herbs for extra flavor. Each addition can give your eggs a unique twist. Deviled eggs pair well with many dips and sides. Consider serving them with a light salad, fresh veggies, or crackers. They also go nicely with dips like hummus or guacamole. This makes for a fun and tasty spread at any gathering. In this post, I shared a simple recipe for delicious deviled eggs. We covered key ingredients, step-by-step instructions, and helpful tips. You learned how to boil, cool, and fill the eggs properly. I also offered variations for classic, spicy, and plant-based options. Keep these tips in mind for tasty deviled eggs that impress. Enjoy your cooking and get creative in the kitchen!

Classic Deviled Eggs Tasty Recipe for Every Occasion

- 2 cups crumbled chocolate cake - 2 cups fresh cherries, pitted and sliced in half - 2 cups whipped cream or non-dairy whipped topping - 1 cup mascarpone cheese - 1/2 cup powdered sugar - 1 teaspoon vanilla extract - 1/2 cup chocolate shavings or chips - 1 tablespoon cherry juice (optional) This Black Forest Trifle is a delight. It layers flavors that make your taste buds sing. You start with soft, crumbled chocolate cake. This cake can be store-bought or homemade. Next, you add fresh cherries. Their bright taste pairs well with chocolate. The whipped cream brings lightness to the dish. You can use regular or non-dairy whipped topping. Mascarpone cheese adds creaminess. The powdered sugar sweetens the mixture. Vanilla extract brings warmth and depth. You can sprinkle chocolate shavings or chips on top. They add a nice crunch and visual appeal. If you want, you can soak the cake with cherry juice. This step enhances the chocolate flavor and makes it even more delicious. Gather your ingredients, and let’s create this decadent dessert! {{ingredient_image_2}} To start, gather your ingredients. In a mixing bowl, combine: - 1 cup mascarpone cheese - 1/2 cup powdered sugar - 1 teaspoon vanilla extract Next, use an electric mixer or whisk. Blend these ingredients until you get a smooth and creamy mix. This step is key for a rich flavor. In another bowl, whip 2 cups of cream. Beat it until you see soft peaks form. This means the cream holds its shape but is still fluffy. Now, gently fold the whipped cream into the mascarpone mixture. Use a spatula to combine them. Be careful not to deflate the airy cream. This will keep your trifle light and creamy. Let’s layer our trifle! Start with 2 cups of crumbled chocolate cake. You can use store-bought or homemade cake. Place a sturdy layer at the bottom of a glass dish or individual cups. Next, add a generous dollop of the mascarpone mixture. Spread it evenly over the cake. Then, add a layer of 2 cups of fresh cherries, pitted and sliced in half. Scatter them evenly on top of the cream layer. Repeat the layers. Start with more crumbled cake, then cream, and finally cherries again. Keep layering until you reach the top of your dish. Finish with a final layer of the cream mixture. For a lovely touch, sprinkle chocolate shavings or chips on top. You can also add a few whole cherries as decoration. Refrigerate the trifle for at least 2 hours. This chill time helps the flavors blend and the layers set perfectly. Enjoy every delicious bite! To soak the cake effectively, drizzle cherry juice over the crumbled chocolate cake. Use about one tablespoon of cherry juice for every two cups of cake. Let it soak for a few minutes. This quick step adds a rich cherry flavor. It also keeps the cake moist as it sits in the trifle. Garnishing with chocolate shavings makes the trifle look fancy. Use a vegetable peeler to create delicate shavings from a chocolate bar. Sprinkle these shavings generously on top just before serving. Whole cherries also make a great decoration. Place a few on top for a fresh touch. This adds color and invites your guests to dig in. Chilling the trifle is key for flavor melding. Refrigerate it for at least two hours. This waiting time allows the flavors to blend well. The layers set nicely, making each bite a delight. A well-chilled trifle tastes better and looks more appealing. The cold layers are refreshing and perfect for any occasion. Pro Tips Use Fresh Cherries: Opt for fresh, ripe cherries for the best flavor and texture. Frozen cherries can release too much liquid, which may make the trifle soggy. Chill the Cream: Ensure your mixing bowl and beaters are chilled before whipping the cream. This helps achieve better volume and stability. Layering Technique: For a visually appealing trifle, try to layer the ingredients in a way that each layer is visible through the glass. This adds to the presentation. Make Ahead: You can prepare the trifle a day in advance. Just cover it tightly with plastic wrap and refrigerate it to allow the flavors to meld. {{image_4}} You can switch up the cake in your trifle. Try vanilla or red velvet cake for a twist. These cakes add unique flavors that blend well with cherries. If you're looking for non-dairy options, you can use coconut cream or almond-based whipped toppings. These alternatives still give you a creamy texture without dairy. Consider adding more than just cherries. Strawberries and raspberries make great additions. Their tartness complements the sweetness of chocolate. You might also think about flavored jellies or sauces. A cherry or raspberry sauce can add an exciting new layer of taste. Get creative with seasonal themes! For spring, add fresh berries and a hint of lemon zest. For fall, think about pumpkin spice cake with spiced apples. These twists make your trifle special for any holiday. You can even use colors that match the season for a festive look. To keep your Black Forest trifle fresh, store it in the fridge. Place any leftovers in an airtight container. This will help keep the layers intact and fresh. Always cover the trifle tightly with plastic wrap if you use a serving dish. You can enjoy it for up to three days in the refrigerator. You can freeze the trifle, but it may change the texture. I recommend freezing only the crumbled cake and the cherries separately. This helps keep the whipped cream and mascarpone light. When ready to serve, thaw the cake and cherries in the fridge overnight. Then, layer them again with fresh cream before serving. The trifle stays fresh for about three days in the fridge. If you freeze the components, the cake and cherries can last for up to three months. Just remember, the cream layers do not freeze well. Enjoy your trifle soon for the best taste and texture! You can use either store-bought or homemade chocolate cake. For store-bought, choose a rich, moist cake. Look for options that do not have too much frosting. If you want to make it from scratch, a simple chocolate cake recipe works well. Moisture is key. This ensures each layer stays soft and tasty. Yes, you can make this dessert a day early. This actually helps the flavors mix well. Just layer it and keep it in the fridge. This way, the cake soaks up the cream and cherry flavors. Avoid adding chocolate shavings until you serve it. This keeps them fresh and crunchy. If you can’t find mascarpone, you have choices. Cream cheese works well if you soften it first. Mix it with a bit of sour cream for a similar taste. Another option is Greek yogurt; it adds a nice tang. Each will give you a creamy layer, just like mascarpone. This blog covered how to make a delicious chocolate cherry trifle. We explored the ingredients, from crumbled chocolate cake to whipped cream, and the smooth mascarpone mix. I shared tips for enhancing flavor and presentation, as well as variations for different tastes. Remember to chill your trifle for the best flavor. You can store leftovers in the fridge or freeze them if needed. With these easy steps, you can create a lovely dessert for any occasion. Enjoy your trifle adventure!

Black Forest Trifle Decadent Chocolate Dessert Delight

- 1.5 lbs chicken, cut into bite-sized pieces - 4 large ripe tomatoes, blended until smooth - 1 red bell pepper, blended until smooth - 1 green bell pepper, blended until smooth - 1 medium onion, finely chopped - 3 cloves garlic, minced - 1-inch piece of fresh ginger, grated - 2 scotch bonnet peppers, finely chopped - 1 cup chicken broth (preferably low-sodium) - 1/4 cup vegetable oil (or palm oil for authentic flavor) - 2 teaspoons ground cumin - 2 teaspoons paprika (smoked paprika for depth of flavor) - 1 teaspoon dried thyme - 1 bay leaf - Salt and freshly ground black pepper, to taste - Fresh parsley or cilantro, chopped, for garnish This stew shines with its main ingredients. They create a rich base full of flavor. The chicken gives protein, while the tomatoes and peppers add freshness and brightness. If you want more flavor, try smoked paprika or ground cumin. These spices will lift the dish higher. Don't forget fresh herbs for garnish. They add a lovely touch and color. {{ingredient_image_2}} Start by heating 1/4 cup of vegetable oil in a large pot. Use medium heat until it shimmers. Add 1 medium onion, finely chopped. Sauté the onion for about 5 minutes. You want it soft and clear. Next, add 3 minced garlic cloves, 1-inch of grated ginger, and 2 finely chopped scotch bonnet peppers. Stir this mix for 1-2 minutes. It should smell amazing! Now, blend 4 large ripe tomatoes and 1 red and 1 green bell pepper until smooth. Pour this blend into the pot. Cook for 10-15 minutes, stirring often. This thickens your sauce and deepens the taste. It's time to season your sauce! Add 2 teaspoons of ground cumin, 2 teaspoons of paprika, 1 teaspoon of dried thyme, salt, and black pepper to taste. Toss in 1 bay leaf for flavor. Now, add 1.5 lbs of chicken, cut into bite-sized pieces. Make sure each piece is covered in the sauce. Pour in 1 cup of chicken broth and stir gently. Bring the stew to a gentle simmer. Cover the pot and lower the heat. Let it cook for 30-40 minutes. Stir occasionally to prevent sticking. Your chicken should be cooked and tender. After cooking, taste your stew. Adjust seasoning as needed. If you want more heat, add more chopped scotch bonnet. Remove the bay leaf before serving. Ladle the hot stew into deep bowls. Garnish with chopped parsley or cilantro for a fresh touch. Serve with jollof rice or steamed rice. Fried plantains make a great side too. Enjoy every spicy bite! To make your stew spicier, add more scotch bonnet peppers. These peppers pack a punch! Start with one and taste as you go. You can also add chili powder or cayenne pepper for extra heat. If you need to tone it down, add more tomatoes or a bit of cream. This balances the heat and keeps it tasty. Use fresh ingredients for the best flavor. Always brown the onions first; it builds a rich base. Cook the chicken until it’s tender and juicy. Stir the pot gently to avoid breaking up the chicken. Simmering on low heat helps the flavors blend well. Keep an eye on it to prevent burning at the bottom. Serve your stew in deep bowls for a cozy feel. Garnish with fresh parsley or cilantro for a pop of color. Pair it with jollof rice or steamed rice. This soaks up the sauce and adds texture. Fried plantains on the side make a delightful addition too. It looks great and tastes even better! Pro Tips Adjust the Heat: If you're unsure about the spice level, start with one scotch bonnet pepper and taste the stew as it cooks. You can always add more at the end for extra heat. Marinate the Chicken: For deeper flavor, marinate the chicken pieces in a mix of spices (cumin, paprika, salt, and pepper) for at least 30 minutes before cooking. Use Fresh Ingredients: Opt for fresh tomatoes and peppers instead of canned for a richer and more vibrant flavor in your stew. Serve with Sides: Enhance your meal by serving the stew with traditional sides like jollof rice, steamed rice, or fried plantains for a complete dining experience. {{image_4}} You can swap chicken for other meats. Try turkey or beef for a twist. If you want seafood, shrimp works well too. Just adjust the cooking time. Fish cooks faster, so add it later in the stew. For a vegetarian option, use chickpeas or lentils. They add protein and texture. A mix of mushrooms can give a meaty feel. You can also add more veggies like carrots and zucchini for extra flavor. If you have allergies, here are some swaps. Use olive oil instead of vegetable oil. For a gluten-free option, check your broth. You can also skip the bay leaf if needed. Always taste as you go to ensure the flavors work for you. After enjoying your spicy Nigerian chicken stew, let it cool down. Transfer the stew to an airtight container. This helps keep the flavors fresh. Store it in the fridge. It lasts for about 3 to 4 days. Make sure to label the container with the date. This way, you know when to eat it. When you're ready to eat the leftovers, grab a pot. Pour the stew inside and heat it over low to medium heat. Stir it often to avoid burning. You can also reheat it in the microwave. Use a microwave-safe bowl and cover it loosely. Heat in short bursts, stirring in between. Make sure it’s hot all the way through. If you want to save your stew for longer, freezing works well. Let it cool completely before freezing. Use freezer-safe containers or bags. Divide the stew into portions, so you can thaw just what you need. It can last up to 3 months in the freezer. When ready to eat, thaw it overnight in the fridge. Then reheat as mentioned above. Enjoy your delicious stew anytime! Yes, you can use other peppers. If you like milder heat, try jalapeños or poblano peppers. For more spice, you can use habaneros. Each pepper brings its own flavor. Feel free to mix and match to suit your taste. Just remember to adjust the amount to keep the heat level you prefer. Spicy Nigerian Chicken Stew lasts about 3 to 4 days in the fridge. Store it in an airtight container to keep it fresh. Let it cool completely before putting it away. If you want to enjoy it later, you can freeze it. Just make sure to label the container with the date. This stew pairs great with jollof rice or steamed rice. These sides soak up the rich sauce well. Fried plantains add a sweet touch that balances the heat. You can also serve it with a fresh salad or crusty bread to complete the meal. Spicy Nigerian chicken stew is a vibrant dish full of flavor. We discussed key ingredients, detailed steps for cooking, and ways to adjust spiciness. You learned how to store leftovers and how to personalize the recipe. Embrace the variations to suit your tastes or needs. Remember, cooking should be fun and creative! Enjoy making this dish, sharing it with friends and family, and savoring the rich flavors.

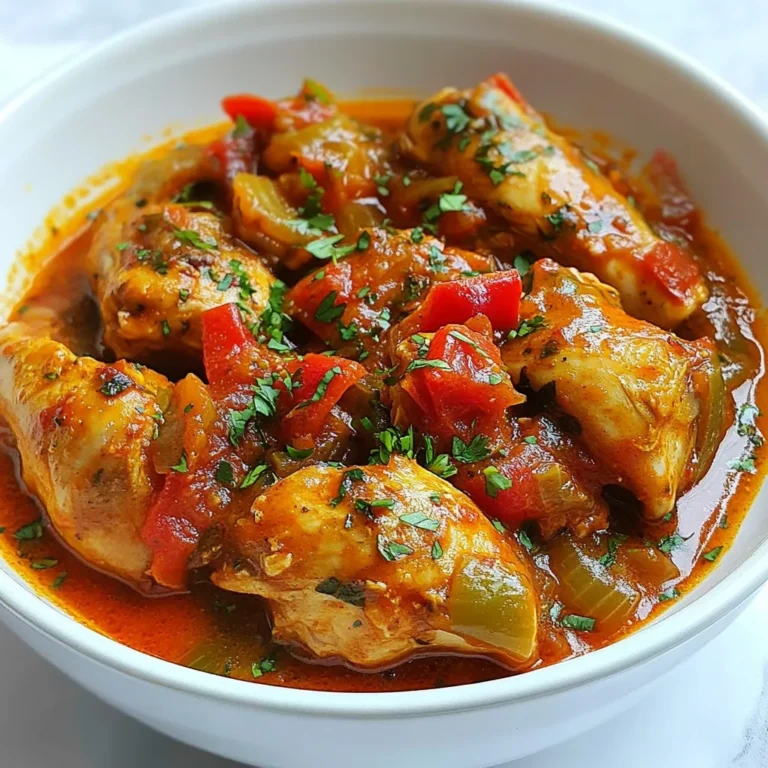
Spicy Nigerian Chicken Stew Quick and Flavorful Recipe

For this delightful cranberry orange bundt cake, you will need: - 2 cups all-purpose flour - 1 ½ cups fresh cranberries, roughly chopped - 1 cup granulated sugar - ½ cup unsalted butter, softened - ½ cup Greek yogurt - 3 large eggs, at room temperature - 1 tablespoon freshly grated orange zest - ½ cup freshly squeezed orange juice (about 2 oranges) - 1 teaspoon baking powder - ½ teaspoon baking soda - ½ teaspoon salt - 1 teaspoon pure vanilla extract These ingredients work together to create a moist and flavorful cake. The fresh cranberries add a burst of tartness, while the orange zest brings a bright, citrusy note. To elevate your cake, make a simple glaze with: - 1 cup powdered sugar - 2 tablespoons freshly squeezed orange juice - 1 teaspoon freshly grated orange zest This glaze adds a sweet finish and a beautiful shine to your cake. You can try some fun twists on this recipe: - Add ½ cup of chopped nuts, like walnuts or pecans, for crunch. - Mix in ½ cup of chocolate chips for a sweet treat. - Substitute the cranberries with blueberries for a different flavor. These variations can make your bundt cake even more special. Experiment and find your favorite! {{ingredient_image_2}} Start by preheating your oven to 350°F (175°C). Take your bundt pan and grease it well. You can use unsalted butter or non-stick spray. Make sure to cover every nook. This step helps the cake slide out easily later. In a large bowl, add the softened butter and granulated sugar. Use an electric mixer and blend on medium speed for 3-4 minutes. The mixture should look light and fluffy. Next, add the eggs one at a time. Mix well after each egg. Add the Greek yogurt, orange zest, and vanilla extract. Blend until smooth and well combined. In another bowl, whisk together the all-purpose flour, baking powder, baking soda, and salt. Gradually add this dry mix to the wet ingredients. Alternate with the freshly squeezed orange juice. Start and end with the flour mix. Stir gently to avoid overmixing. Now, fold in the chopped cranberries carefully, ensuring they are spread evenly. Pour the batter into your prepared bundt pan. Use a spatula to smooth the top. Bake the cake for 50-60 minutes. Check for doneness by inserting a toothpick in the center. It should come out clean with a few moist crumbs. Once done, let the cake cool in the pan for about 10-15 minutes. Then, invert it onto a wire rack to cool completely. For the glaze, mix the powdered sugar, orange juice, and zest in a bowl. Whisk until smooth. Once the cake is cool, drizzle the glaze over the top. Let it flow down the sides for a lovely finish. Enjoy your beautiful cranberry orange bundt cake! To get a great bundt cake texture, start with room temperature ingredients. This includes your eggs and butter. Mixing these well helps the cake rise nicely. Cream the butter and sugar until fluffy. This step adds air and lightens the cake. When adding flour, mix gently. Overmixing can make your cake dense. Lastly, fold in the cranberries with care. You want them spread out, not crushed. One big mistake is not greasing the bundt pan well. If you skip this, your cake may stick. Also, check your oven's temperature. An oven that is too hot can burn the cake. Another common error is not letting the cake cool long enough before removing it. Give it about 10-15 minutes in the pan. This helps it set and keeps it from breaking apart. For serving, place the cake on a pretty stand. This makes it look special. Surround it with fresh cranberries and orange slices. This adds color and charm. When you drizzle the glaze, let it run down the sides. This gives it a nice finish. You can also slice the cake while still on the stand. This keeps the pieces neat and tidy. Enjoy every bite with a cup of tea or coffee! Pro Tips Freshest Ingredients: Use fresh cranberries for the best flavor and texture. If you can’t find fresh cranberries, frozen ones can work, but do not thaw them before adding to the batter. Room Temperature Eggs: Ensure your eggs are at room temperature before mixing. This helps them incorporate more easily into the batter, resulting in a lighter cake. Don’t Overmix: When combining wet and dry ingredients, mix just until combined. Overmixing can lead to a denser cake texture, which we want to avoid. Cool Completely: Allow the cake to cool completely before glazing. This ensures the glaze won’t melt and will adhere beautifully to the cake. {{image_4}} You can swap a few ingredients for dietary needs. If you want a gluten-free option, use gluten-free flour. For a dairy-free cake, replace unsalted butter with coconut oil and Greek yogurt with almond yogurt. If you're vegan, use flax eggs instead of chicken eggs. Just mix one tablespoon of ground flaxseed with three tablespoons of water for each egg. This keeps the cake moist and fluffy. You can add new flavors to this cake. Try adding a teaspoon of cinnamon or nutmeg for warmth. If you love chocolate, mix in some dark chocolate chips with the cranberries. For a tropical twist, add shredded coconut or pineapple bits. This makes the cake even more fun and exciting! Adding nuts gives the cake a nice crunch. Walnuts or pecans work great. Chop them up and fold them in with the cranberries. You can also add other fruits. Diced apples or pears mix well with the orange flavor. Just make sure to adjust the sugar if you use very sweet fruits. This makes your cake unique and adds fun textures! To keep your cranberry orange bundt cake fresh, wrap it tightly. Use plastic wrap or aluminum foil to cover the cake. This helps prevent it from drying out. Store the wrapped cake in an airtight container. Place it in a cool, dry place, like your kitchen counter. If your kitchen is warm, the fridge may be better. Just be sure to wrap it well to keep it moist. You can freeze your bundt cake for up to three months. First, let the cake cool completely. Then, wrap it tightly in plastic wrap. After that, cover it in aluminum foil. This two-layer wrap helps avoid freezer burn. Label the cake with the date for easy tracking. When you're ready to enjoy it, let it thaw in the fridge overnight. Your cranberry orange bundt cake will last about three days at room temperature. If you store it in the fridge, it can last up to a week. Proper storage is key to keeping it fresh. After one week, the flavor may fade. So, enjoy your delicious cake while it’s at its best! Yes, you can make this cake ahead of time. Bake it a day or two before your event. Once cooled, wrap it tightly in plastic wrap. This keeps it fresh and moist. If you don’t have Greek yogurt, use sour cream. You can also use plain yogurt. Both options will keep the cake moist and tasty. Yes, frozen cranberries work well in this cake. Do not thaw them before adding to the batter. This helps keep the cake from turning too wet. A non-stick bundt pan works best for this cake. It helps the cake release easily after baking. Look for one with a detailed design for a pretty finish. A sunken cake can happen for a few reasons. It may be underbaked or overmixed. Always check the cake with a toothpick. If it comes out clean, it’s done. Avoid mixing too much after adding flour; this keeps the cake light. You learned about the key ingredients and steps for a delicious Bundt cake. I shared tips to avoid mistakes and achieve great texture. You also saw ways to store leftovers and variations to spice things up. Baking can be fun and rewarding. Remember, practice makes perfect. Each cake you bake teaches you something new. Enjoy your baking journey!

Cranberry Orange Bundt Cake Delightful and Simple Treat

- 2 ribeye steaks (approx. 1 inch thick) - Salt and freshly ground black pepper - 2 tablespoons olive oil - 4 cloves garlic (finely minced) - 1 cup heavy cream - 1 tablespoon Dijon mustard - 1 tablespoon Worcestershire sauce (optional) - 1 teaspoon fresh thyme leaves or ½ teaspoon dried thyme - 1 tablespoon fresh parsley (for garnish) The ingredients for this steak recipe are simple yet essential. The ribeye steaks are the star of the dish. You want them to be about one inch thick for the best texture and juiciness. I always use freshly ground black pepper and good salt. They enhance the flavor and help create a nice crust when you sear the steaks. For the sauce, garlic is key. It gives that rich and creamy sauce a punch of flavor. You will want to mince it finely so it cooks evenly. Heavy cream makes the sauce silky and smooth. Dijon mustard adds a slight tang, while Worcestershire sauce deepens the flavor. Fresh thyme brings a lovely herbal note. Finally, parsley not only adds color but a fresh touch to the dish. When you gather your ingredients, make sure they are fresh. Fresh ingredients make a big difference in taste. Prepare everything before you start cooking. It makes the process smooth and fun! {{ingredient_image_2}} Start by taking the ribeye steaks out of the fridge. Let them rest at room temperature for about 30 minutes. This helps them cook evenly. Next, generously season both sides of the steaks with salt and freshly cracked black pepper. Heat a large skillet over medium-high heat and add 2 tablespoons of olive oil. Wait until the oil shimmers. Carefully place the seasoned steaks into the hot skillet. Sear the steaks for about 4 minutes on each side for a medium-rare finish. If you want a different doneness, adjust the cooking time. Once done, transfer the steaks to a plate and cover them loosely with aluminum foil. This keeps them warm while they rest. Do not wipe the skillet after cooking the steaks. Lower the heat to medium. Add the 4 cloves of minced garlic to the skillet. Sauté the garlic for about 1 minute, just until it becomes fragrant. Be careful not to let the garlic burn, as burnt garlic tastes bitter. Slowly pour in 1 cup of heavy cream while stirring to mix it with the garlic. Next, add 1 tablespoon of Dijon mustard and 1 tablespoon of Worcestershire sauce if you want extra flavor. Whisk everything together and let it simmer gently for about 3 to 5 minutes until it thickens slightly. Then, add 1 teaspoon of fresh thyme and season with salt and pepper to taste. It’s important to remove the skillet from heat to avoid overcooking the sauce. Once the steaks have rested, slice them against the grain into thick pieces. Arrange the slices nicely on plates. Drizzle the creamy garlic sauce generously over the steaks. For a pop of color, sprinkle 1 tablespoon of chopped parsley on top. This adds freshness to the dish. Enjoy your meal! - Using a meat thermometer for precision: A meat thermometer helps you hit the right doneness. For medium-rare, aim for 130°F. Insert the probe into the thickest part of the steak. - Adjusting cooking times for varying preferences: If you like your steak more done, add a minute or two to each side. For medium, target 140°F, and for well-done, go for 160°F. - Tips on sautéing garlic without bitterness: Sauté garlic on medium heat. If you cook it too fast, it burns. Stir it just until it's fragrant, about one minute. This keeps the taste sweet and mild. - Using fresh vs. dried herbs: Fresh thyme gives a bright flavor. If fresh is not available, dried thyme works too, but use half the amount. Fresh herbs add a pop of color and taste. - Serving on rustic boards vs. plates: A rustic wooden board creates a casual, inviting vibe. A clean white plate makes the dish look elegant and refined. Choose based on your meal's mood. - Pairing sides for visual appeal: Bright green vegetables like asparagus or broccoli make great sides. Creamy mashed potatoes add a lovely contrast. This combination creates a feast for the eyes and the palate. Pro Tips Let the Steaks Rest: Allowing the steaks to rest for at least 5-10 minutes after cooking helps redistribute the juices, ensuring a moist and flavorful bite. Use a Meat Thermometer: For perfect doneness, consider using a meat thermometer. Aim for 130°F (54°C) for medium-rare, adjusting according to your preference. Mind the Garlic: When sautéing garlic, keep a close eye on it to avoid burning. Burnt garlic can impart a bitter flavor to your sauce. Enhance the Flavor: For an extra depth of flavor, consider adding a splash of red wine to the sauce after sautéing the garlic, letting it reduce for a minute before adding the cream. {{image_4}} You can switch ribeye steak for sirloin or filet mignon. Ribeye is rich and juicy. Sirloin offers a leaner choice with good flavor. Filet mignon is tender and melts in your mouth. Each cut cooks well with creamy garlic sauce. Choose what fits your taste and budget. You can add more herbs and spices to the sauce. Fresh basil, rosemary, or oregano work well. They bring new flavors to your dish. Want some heat? Add red pepper flakes. Just a pinch can spice it up. Adjust the heat level to match your taste. You can also swap heavy cream for lighter options. Use low-fat cream or half-and-half for fewer calories. If you want a dairy-free version, try coconut cream or cashew cream. Both add a nice creaminess without dairy. These choices let everyone enjoy this tasty dish. To keep your creamy garlic sauce and steak fresh, store leftovers in the fridge. Place the steak in an airtight container. Let it cool before sealing. The sauce can go into a separate container. Store both for up to three days. Label them with the date. This way, you won't forget when you made it. If you want to save your steak and sauce for later, freezing works well. Wrap the steak tightly in plastic wrap. Then, place it in a freezer bag. For the sauce, pour it into a freezer-safe container. Leave some space at the top, as liquids expand when frozen. You can keep both for up to three months. When ready to eat, thaw them in the fridge overnight. When reheating, aim to keep the flavor and texture. For the steak, heat it gently. Use a skillet on low heat. Add a bit of olive oil to keep it moist. For the sauce, pour it into a small pot. Heat it on low, stirring often. If it’s too thick, add a splash of cream or broth. This helps it regain its silkiness. Enjoy your steak just as delightful as the first time! To get a perfect medium-rare steak, sear each side for about 4 minutes. This gives the steak a nice crust and keeps it juicy. If you want your steak more done, adjust the time slightly. For medium, go for 5-6 minutes per side, and for well done, aim for 7-8 minutes. Use a meat thermometer for accuracy. A medium-rare steak should reach 130-135°F. Yes, you can make parts of this dish ahead. Cook the steaks and let them rest. Store them in the fridge for up to 2 days. You can also prepare the sauce ahead. Just heat it gently before serving. Keep the sauce in an airtight container. This saves time when you are ready to eat. To complement the steak, you can serve: - Creamy mashed potatoes - Garlic bread - Roasted seasonal vegetables like carrots or asparagus - A fresh green salad with a light dressing These sides balance the rich flavors of the steak and sauce, making your meal complete. To lighten the sauce, consider these options: - Use half-and-half instead of heavy cream. - Substitute Greek yogurt for a creamy texture with fewer calories. - Reduce the amount of oil used when cooking the steak. These changes keep the flavor but cut down on fat and calories. This blog post outlined how to prepare a delicious ribeye steak with creamy garlic sauce. We covered essential ingredients, step-by-step cooking methods, and helpful tips for perfecting your dish. You can choose different cuts and enhance flavors to match your taste. Remember, proper storage is key for leftovers, and reheating can maintain the dish's integrity. Enjoy creating your meal, as it’s simple and satisfying! This recipe could be your go-to for a delightful dinner.

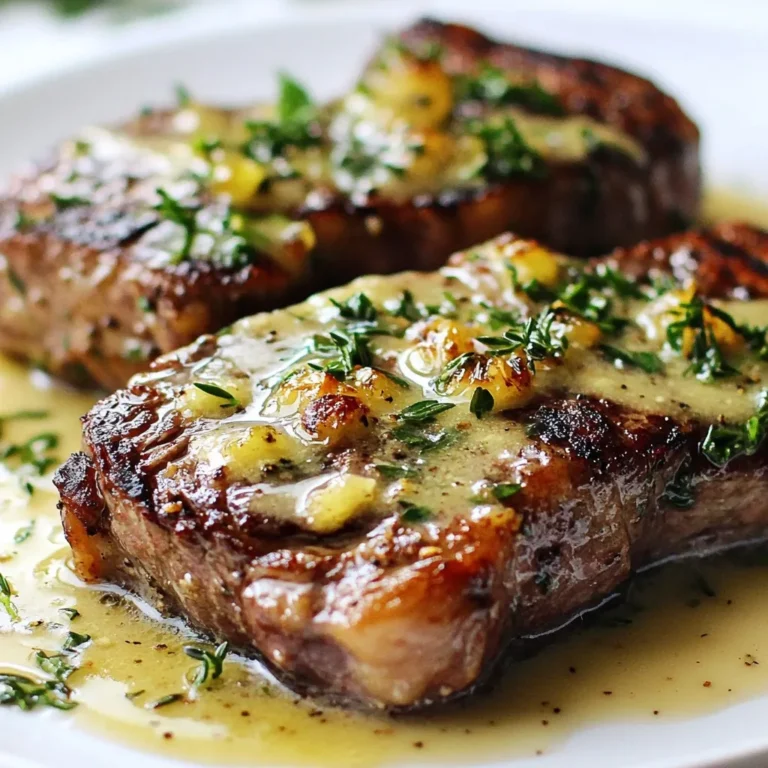
Steak with Creamy Garlic Sauce Irresistible Recipe

- Chicken and Broth - 1 lb boneless, skinless chicken breast - 8 cups chicken broth Chicken is the heart of this dish. The broth adds warmth and flavor. Together, they create a rich base for the soup. - Vegetables - 1 large onion, diced - 2 garlic cloves, minced - 2 medium carrots, diced - 2 celery stalks, diced These vegetables bring texture and taste. The onion and garlic give a fragrant note. Carrots and celery add sweetness and crunch. - Seasoning and Garnish - 1 cup orzo pasta - 3 large eggs - 1/2 cup fresh lemon juice - 1 tablespoon lemon zest - Salt and pepper to taste - Fresh dill or parsley, finely chopped for garnish Orzo adds a nice chewiness to the soup. Eggs and lemon juice make it creamy and bright. Fresh herbs act as a finishing touch, enhancing the flavors. {{ingredient_image_2}} Sautéing the Vegetables Start by heating a large pot over medium heat. Drizzle some olive oil into it. Once hot, add diced onion, carrots, and celery. Sauté these veggies for about 5-7 minutes. You want them to soften and become fragrant. Next, toss in minced garlic and sauté for 1 more minute. Make sure not to burn the garlic. Cooking the Chicken Pour in the chicken broth and add the chicken breasts. Increase the heat until it boils, then lower it to a simmer. Let the soup simmer for 20-25 minutes. The chicken should be cooked through and tender at this point. Shredding the Chicken Once cooked, carefully remove the chicken from the pot. Use two forks to shred it into bite-sized pieces. Return the shredded chicken back into the soup. Cooking the Orzo Stir in the orzo pasta and cook according to package instructions. This usually takes about 8-10 minutes. Make sure the orzo is al dente for the best texture. Preparing the Egg Mixture While the soup is simmering, grab a separate bowl. In this bowl, whisk together eggs, fresh lemon juice, and lemon zest until it’s frothy and well combined. Tempering the Eggs To temper the egg mixture, slowly add one ladle of the hot soup into the eggs while whisking. This step is vital to prevent the eggs from curdling. After tempering, gradually pour the egg mixture back into the pot while stirring constantly. This will give your soup that creamy lemon flavor. Season the soup with salt and pepper to taste. Let it cook for an additional 2-3 minutes. Avoid boiling again to keep the creamy texture. Finally, stir in fresh dill or parsley for a burst of fresh flavor. Enjoy your delicious Greek Lemon Chicken Soup! - Preventing Curdling: To stop the eggs from curdling, slowly add hot soup to the egg mix. This warms the eggs gently. Whisk as you pour to keep the mixture smooth. Adding the egg mix back into the soup should also be done slowly, with constant stirring. This creates a creamy texture without lumps. - Ensuring Perfectly Cooked Orzo: Add orzo to the soup as it simmers. Follow the package instructions for cooking time. Stir it occasionally so it does not stick. Cook until it's just al dente. This ensures the pasta stays firm and does not get mushy in the soup. - Presentation Ideas: Serve the soup in deep bowls. You can garnish it with a sprinkle of dill or parsley. A fresh lemon slice on the side adds color and zest. This makes the dish look beautiful and appetizing. - Ideal Pairings: Greek Lemon Chicken Soup pairs well with crusty bread or a light salad. The bread is great for dipping, while the salad adds crunch. Both options enhance the meal and make it more satisfying. Pro Tips Use Fresh Ingredients: Fresh herbs and vegetables enhance the flavor of the soup, making it more aromatic and delicious. Properly Temper the Eggs: Always temper the egg mixture with hot soup before adding it to prevent curdling, resulting in a smooth, creamy texture. Adjust Lemon to Taste: Depending on your preference, you can adjust the amount of lemon juice and zest to make the soup more or less tangy. Save Leftovers Wisely: If you have leftovers, store the soup without the orzo, as it will absorb liquid and become mushy. Add fresh orzo when reheating. {{image_4}} You can swap the chicken for other proteins. Try using turkey or shredded rotisserie chicken. If you prefer seafood, shrimp works well too. Each option brings its own flavor. Feel free to mix up the vegetables. Add peas for sweetness or spinach for color. You can also use zucchini or bell peppers. These changes keep the soup fresh and exciting. Boost the flavor with spices. Consider adding a pinch of cumin or paprika for warmth. A little crushed red pepper can add a nice kick. Experiment and find what you like best. You can adjust the soup's acidity. Add more lemon juice for a tangy taste or less for mildness. Taste as you go to find your perfect balance. Season with salt and pepper to enhance all the flavors. - Refrigeration Tips: After making Greek Lemon Chicken Soup, let it cool down. Store it in an airtight container. This soup stays fresh for up to 4 days in the fridge. When you are ready to eat, just take out what you need. - Freezing Guidelines: To freeze, first let the soup cool completely. Use freezer-safe containers or bags. Make sure to leave some space for expansion. It can last for about 3 months in the freezer. When you want some, thaw it in the fridge overnight before reheating. - Best Methods for Reheating: The best way to reheat the soup is on the stove. Pour it into a pot and warm it over medium heat. Stir often to heat evenly. You can also use a microwave. Place the soup in a bowl and heat it in short bursts, stirring in between. - Tips for Maintaining Flavor and Consistency: When reheating, add a splash of chicken broth or a bit of lemon juice. This helps keep the flavors bright and fresh. Avoid boiling the soup, as this can change its creamy texture. Stir well to keep it smooth and delicious. Can I use a different type of pasta? Yes, you can! If you don't have orzo, try using small pasta shapes like ditalini or acini di pepe. These will still soak up the broth nicely and keep the soup hearty. How can I make it vegetarian? To make this soup vegetarian, skip the chicken and use vegetable broth instead of chicken broth. Add chickpeas or tofu for protein. You can also increase the amount of veggies for a filling meal. What can I serve with Greek Lemon Chicken Soup? Serve this soup with crusty bread or a light salad. A side of Greek salad works well, too. You can also pair it with a glass of white wine for a perfect meal. Caloric Content per Serving Each serving of Greek Lemon Chicken Soup has about 300 calories. The chicken and orzo provide protein and carbs, making it a balanced dish. Dietary Considerations This soup can be gluten-free if you use gluten-free pasta. For low-carb diets, consider adding more vegetables and skipping the pasta. This way, you still enjoy the soup's flavors without the extra carbs. This blog post walks you through making a delicious Greek Lemon Chicken Soup. We discussed key ingredients, like chicken, veggies, and seasonings, and shared simple steps for cooking. With tips on avoiding curdling and storing leftovers, you're prepared for a great meal. You can experiment with different proteins and flavors too. Finally, follow our guide for serving suggestions. Enjoy making this comforting soup, and remember, variations can make it uniquely yours.

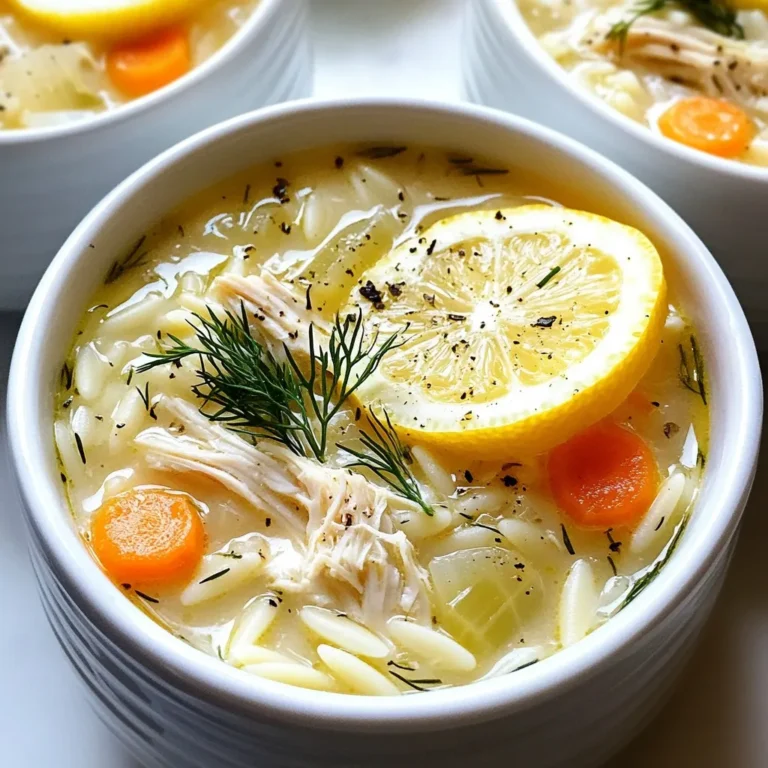
Greek Lemon Chicken Soup Comforting and Savory Dish

- 8 oz elbow pasta - 1 cup raw cashews, soaked in water for at least 4 hours or overnight - 1 cup unsweetened almond milk - 1/4 cup nutritional yeast - 2 tablespoons freshly squeezed lemon juice - 1 tablespoon extra virgin olive oil - 1 teaspoon garlic powder - 1/2 teaspoon onion powder - 1/2 teaspoon smoked paprika - Salt and black pepper, to taste - Optional: Fresh chives or parsley, finely chopped, for garnish Making vegan mac and cheese starts with the right ingredients. First, you need elbow pasta. It gives the dish its classic shape. If you want a gluten-free option, pick gluten-free elbow pasta. Next, raw cashews are key to our creamy sauce. Soak them for at least four hours. This makes them soft and easy to blend. You’ll also need unsweetened almond milk. It gives the sauce a smooth texture. Nutritional yeast adds a cheesy flavor. Use a quarter cup for the best taste. Fresh lemon juice brightens the dish and gives a zesty kick. Olive oil helps blend the sauce and adds richness. Garlic powder and onion powder give depth to the flavor. Smoked paprika adds a hint of smokiness. Finally, season with salt and black pepper to taste. For a nice touch, consider garnishing with fresh chives or parsley. They add color and freshness. With these ingredients, you will create a creamy and delicious vegan mac and cheese that everyone will enjoy. {{ingredient_image_2}} - Start by bringing a large pot of salted water to a boil. - Add the elbow pasta to the boiling water. Cook for about 8-10 minutes. You want the pasta to be al dente. - Once cooked, drain the pasta. Set it aside while you make the sauce. - First, prepare your soaked cashews. You should soak them in water for at least 4 hours. - In a high-speed blender, combine the soaked cashews with 1 cup of almond milk. - Add 1/4 cup of nutritional yeast, 2 tablespoons of lemon juice, and 1 tablespoon of olive oil. - Next, sprinkle in 1 teaspoon of garlic powder, 1/2 teaspoon of onion powder, and 1/2 teaspoon of smoked paprika. - Blend on high until the mixture is smooth and creamy. If it’s too thick, add more almond milk. - Return the drained pasta to the same pot you used before. - Pour the creamy cashew sauce over the pasta. Use a spatula to mix well. - Heat the pot over low heat. Stir constantly for about 2-3 minutes. This warms everything through. - Taste your dish and adjust the seasoning. Add more salt, pepper, or lemon juice if needed. Soaking cashews is key for a smooth sauce. Soak them for at least four hours. This helps them blend well, creating a creamy texture. If your sauce is too thick, simply add more almond milk. Start with a little, then mix until you reach the right thickness. A high-speed blender makes this task easy. It blends the cashews and liquids into a silky sauce. Nutritional yeast plays a big role in making this dish cheesy. It adds a nutty and savory taste. You can also use spices like garlic powder and smoked paprika for extra flavor. Adjust these spices to fit your taste. A pinch of salt and pepper can also bring out the best in your sauce. Serve your vegan mac and cheese in a nice bowl for visual appeal. A sprinkle of nutritional yeast on top adds a nice touch. Fresh herbs like chives or parsley make it look bright and inviting. You can even add lemon wedges on the side. They give a zesty kick for those who want it. Pro Tips Soak Cashews Properly: Ensure you soak the cashews for at least 4 hours or overnight to achieve a smooth and creamy sauce. Adjust Consistency: If the sauce is too thick, gradually add more almond milk until you reach your desired creaminess. Season to Taste: Taste the sauce before serving and adjust the seasoning with salt, pepper, or more lemon juice as needed for enhanced flavor. Garnish for Flair: Don't skip the fresh herbs! Garnishing with chives or parsley adds color and freshness to your dish. {{image_4}} You can easily make this dish gluten-free. Just swap regular elbow pasta for gluten-free pasta. There are many great options, like brown rice or quinoa pasta. These alternatives cook well and taste great. Always check the package for cooking times. Some gluten-free pastas may cook faster or slower. If you want to skip nuts, use sunflower seeds instead of cashews. Soak the seeds in water for a few hours to soften them. Blend the seeds with almond milk and the other sauce ingredients. This will keep the sauce creamy and delicious without nuts. Adding veggies or proteins can make your mac and cheese even better. Try mixing in steamed broccoli, peas, or spinach. For proteins, consider adding cooked lentils or chickpeas. You can also play with spices to change the flavor. Try adding a pinch of cayenne for heat or some Italian herbs for freshness. Experimenting with flavors makes this dish your own! Store your vegan mac and cheese in an airtight container. This helps keep it fresh. Let it cool completely before sealing. Refrigerate your leftovers within two hours to stay safe. You can enjoy it for up to four days. For best results, use glass or BPA-free plastic containers. To reheat, warm your mac and cheese on the stove. Use low heat and stir often. This keeps it creamy without burning. If it seems thick, add a splash of almond milk. You can also microwave it in short bursts. Stir in between to warm it evenly. Enjoy your creamy vegan mac and cheese just like fresh! Yes, you can freeze vegan mac and cheese. To freeze, let it cool completely. Then, place it in an airtight container or freezer bag. Make sure to remove as much air as possible. It will stay fresh for about 2 to 3 months. When you are ready to eat, thaw it in the fridge overnight. Reheat on the stove over low heat. Add a splash of almond milk to bring back its creaminess. If you need a substitute for nutritional yeast, try these options: - Miso paste: Adds a rich umami flavor. Use it sparingly as it is salty. - Cheese powder: Great for a cheesy taste. Look for vegan options. - Ground sunflower seeds: They give a nutty flavor and can thicken sauces. These alternatives will change the flavor slightly but still give a nice taste. To add some heat to your vegan mac and cheese, try these ideas: - Cayenne pepper: Start with a pinch and adjust to your taste. - Red pepper flakes: Sprinkle them into the sauce for a nice kick. - Hot sauce: Add a few drops while mixing the sauce. This gives a flavor boost too. Experiment with these spices to find the heat level that works best for you! This recipe for vegan mac and cheese has all you need. You learned about the tasty ingredients, how to cook the pasta, and blend a smooth sauce. Tips helped you get the right texture and flavors. You also discovered ways to make it suit your needs, like gluten-free options. Storing and reheating your leftovers is easy, too. I hope you enjoy making this dish. It's simple, fun, and delicious!

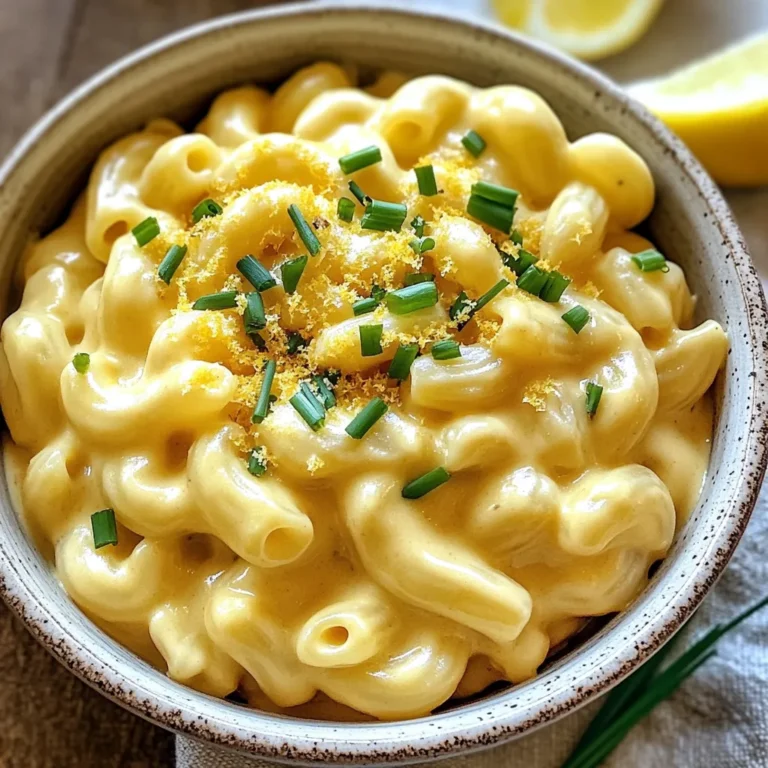
Vegan Mac and Cheese Creamy and Delicious Recipe

- 1 cup cornmeal - 1 cup all-purpose flour - 1 tablespoon baking powder - 1/2 teaspoon salt - 1/4 teaspoon baking soda - 1 cup buttermilk (or make your own by adding 1 teaspoon vinegar to 1 cup milk) - 1/4 cup unsalted butter, melted - 2 large eggs - 1 cup shredded sharp cheddar cheese - 1-2 jalapeños, finely chopped (remove seeds for milder flavor) The main ingredients create a perfect balance of flavors and texture. Cornmeal gives the cornbread its classic taste, while flour adds structure. Baking powder and baking soda help it rise, making it light and fluffy. Buttermilk adds moisture and a slight tang, which pairs well with cheddar and jalapeños. - 1/4 cup honey (optional, for a hint of sweetness) Adding honey gives a sweet touch to the cornbread. You can adjust the amount based on your taste. If you want more spice, feel free to add extra jalapeños. - Large mixing bowl - Whisk - Spatula - 8-inch square baking dish or cast iron skillet - Oven Having the right tools makes cooking easier. A large bowl helps mix ingredients without mess. A whisk is great for blending wet ingredients smoothly. A spatula ensures you fold in cheese and jalapeños gently. Using a cast iron skillet adds a lovely crust to the cornbread. {{ingredient_image_2}} First, set your oven to 400°F (200°C). This step is key for perfect cornbread. While it heats, get your baking dish ready. Use an 8-inch square dish or a cast iron skillet. Grease it well with butter or oil to prevent sticking. In a large bowl, add the following dry ingredients: - 1 cup cornmeal - 1 cup all-purpose flour - 1 tablespoon baking powder - 1/2 teaspoon salt - 1/4 teaspoon baking soda Whisk these together until smooth. This helps combine the flavors and ensures even baking. In another bowl, mix these wet ingredients: - 1 cup buttermilk (or homemade with vinegar and milk) - 1/4 cup melted unsalted butter - 2 large eggs - Optional: 1/4 cup honey for sweetness Blend well until the mix is smooth. If using honey, stir it in now. Gently pour the wet mixture into the dry bowl. Use a spatula to mix gently. Stir until just combined; do not over-mix. Next, add: - 1 cup shredded sharp cheddar cheese - 1-2 finely chopped jalapeños (remove seeds for less heat) Fold these in carefully. This ensures the cheese and jalapeños spread evenly. Pour the batter into your greased baking dish. Use a spatula to smooth the top. Place it in the oven and bake for 20-25 minutes. The cornbread is done when golden brown. A toothpick inserted in the center should come out clean. When it's baked, take it out of the oven. Let it cool for 5-10 minutes. This makes slicing easier. Enjoy the warm, flavorful cornbread! To get the best texture, mix your dry and wet ingredients well. Be careful not to stir too much. Over-mixing can make your cornbread tough. I like to mix just until the flour disappears. This keeps it light and fluffy. Adding buttermilk helps too. It gives a nice moisture that makes the cornbread tender. Want more heat? Add extra jalapeños! You can use one or two for a kick. Removing the seeds makes it milder. If you want less spice, only use one jalapeño. You can also add a pinch of cayenne for more flavor without too much heat. Taste the batter before baking to find your perfect spice level. To bake evenly, make sure your oven is hot enough. Preheat to 400°F. A cast iron skillet is great for baking cornbread. It helps with even cooking. If using a baking dish, smooth the top of the batter. This helps it rise nicely. Check for doneness by inserting a toothpick; it should come out clean. Let it cool for a few minutes before slicing. This makes cutting easier! Pro Tips Use Fresh Jalapeños: Fresh jalapeños provide a vibrant flavor and heat level that dried or pickled versions can't match. Adjust the quantity based on your heat tolerance. Check for Doneness: To ensure perfect cornbread, insert a toothpick into the center. It should come out clean when the cornbread is fully baked. Let It Rest: Allow the cornbread to cool for a few minutes before slicing. This helps to set the texture and makes serving easier. Experiment with Cheese: While sharp cheddar is delicious, try mixing in other cheeses like pepper jack for added flavor and a bit of spice. {{image_4}} You can make this cornbread gluten-free by swapping all-purpose flour with a gluten-free blend. Look for a mix that has xanthan gum. This ingredient helps bind the cornbread. The rest of the recipe stays the same. Enjoy the same flavors without gluten! To create a vegan version, replace eggs with flax eggs. Mix one tablespoon of ground flaxseed with three tablespoons of water for each egg. Let it sit for five minutes until it forms a gel. Use almond milk instead of buttermilk. For butter, use coconut oil or a vegan butter. This way, you keep all the tastes while staying plant-based. Feel free to get creative! You can add cooked bacon bits for a smoky flavor. Chopped green onions or corn kernels also work well. For toppings, consider a sprinkle of extra cheese or sliced jalapeños before baking. A drizzle of honey adds a nice sweetness, too. Customize it to fit your taste! To keep your leftover cornbread fresh, let it cool first. Place it in an airtight container. If you don't have one, wrap it tightly in plastic wrap. Store it at room temperature for up to two days. For longer storage, move it to the fridge. In the fridge, it can last up to a week. When you want to enjoy your cornbread again, preheat your oven to 350°F (175°C). Place the cornbread in a baking dish. Cover it with foil to prevent it from drying out. Heat for about 10-15 minutes until warm. You can also use the microwave. Just heat for about 20-30 seconds. Watch closely to avoid drying it out. To freeze cornbread, first, slice it into pieces. Wrap each piece in plastic wrap, then place them in a freezer bag. Remove as much air as possible. Cornbread can be frozen for up to three months. When you're ready to eat it, thaw it overnight in the fridge. Then reheat as needed. Enjoy your cornbread anytime! Yes, you can! Here are some easy swaps: - Use whole wheat flour instead of all-purpose flour. - Swap buttermilk with regular milk or a non-dairy milk. - Try a plant-based butter if you want a dairy-free option. - You can replace cheddar with any cheese you like, such as pepper jack. For a spicier kick, add more jalapeños. - Use 3-4 jalapeños if you love heat. - Mix in some diced serrano or habanero peppers. - Add a pinch of cayenne pepper to the dry mix. Serve it warm and fresh from the oven. - Pair it with chili or soups for a hearty meal. - Enjoy it with a dollop of sour cream or guacamole. - Add a drizzle of honey for a sweet contrast. Homemade cornbread stays good for about 3-4 days. - Store it in an airtight container at room temperature. - If you want it to last longer, refrigerate it for up to a week. Yes, you can use many types of pans! - Cast iron skillets give a nice crust. - Muffin tins make perfect cornbread muffins. - Just adjust the baking time if you change the pan size. You learned how to make Jalapeño Cheddar Cornbread, from ingredients to baking. We covered key ingredients, tools, and step-by-step instructions. You found tips to perfect texture and spice levels, as well as variations for different diets. Storing and reheating your cornbread is easy with the right methods. Try this recipe soon. You'll enjoy the great flavor and warmth it brings to your meals. Happy baking!

Jalapeño Cheddar Cornbread Tasty and Simple Recipe

PREV 1 … 24 25 26 … 48 NEXT
meal plan mapper

explore

DessertsDinnerAppetizersDrinks

Our Policies

  • Cookie Policy
  • Copyright Policy
  • Disclaimer
  • GDPR Policy
  • Terms Of Use
Back to Top
  • About
  • Contact Us
  • Privacy Policy
© 2025 meal plan mapper