FREE DINNER EBOOK! Get your copy!
  • Cookie Policy
  • GDPR Policy
  • Disclaimer
  • Terms Of Use
  • Visit my other site: Fun Cookie Recipes
meal plan mapper
  • Home
  • Dinner
  • Desserts
  • Drinks
  • Appetizers
  • Contact
  • About
  • Privacy Policy
  • Home
  • Dinner
  • Desserts
  • Drinks
  • Appetizers
  • Contact
  • About
  • Privacy Policy
  • Cookie Policy
  • GDPR Policy
  • Disclaimer
  • Terms Of Use
Visit my other site: Fun Cookie Recipes

HOME / CATEGORIES /

Latest

For these delightful Key Lime Pie Bars, you will need the following ingredients: - 1 cup graham cracker crumbs - 1/4 cup granulated sugar - 1/2 cup unsalted butter, melted - 2 large eggs - 1 (14 oz) can sweetened condensed milk - 1/2 cup fresh key lime juice (or regular lime juice) - Zest of 2 limes - 1/4 teaspoon salt - Whipped cream (for topping) - Lime slices (for garnish) Each ingredient plays an important role in creating this zesty treat. The graham cracker crumbs form the crust. The sugar adds sweetness, while the butter binds everything together. Eggs bring richness and help the filling set. Sweetened condensed milk gives the bars their creamy texture. Fresh key lime juice and zest provide that signature tang. A pinch of salt enhances all the flavors. Lastly, whipped cream and lime slices make the bars look and taste amazing. They add a fresh touch and a pop of color. These ingredients come together to create a dessert that is both easy to make and hard to resist! {{ingredient_image_2}} Start by preheating your oven to 350°F (175°C). This step is key for even baking. A hot oven helps the crust and filling cook perfectly. In a medium mixing bowl, mix together: - 1 cup graham cracker crumbs - 1/4 cup granulated sugar - 1/2 cup unsalted butter, melted Stir the ingredients until they look like wet sand. This will form a tasty base for your bars. In a separate bowl, whisk together: - 2 large eggs - 1 (14 oz) can sweetened condensed milk - 1/2 cup fresh key lime juice - Zest of 2 limes - 1/4 teaspoon salt Mix until the filling is smooth. This will create a zesty and creamy filling for your pie bars. Pour the lime filling over the crust. Use a spatula to spread it evenly. Bake in your preheated oven for 15 to 20 minutes. The edges should set, but the center can still jiggle slightly. After baking, take the pie bars out of the oven. Let them cool at room temperature for about 30 minutes. Then, refrigerate them for at least 2 hours. This chilling time helps them firm up nicely. Once the bars are chilled, lift them from the pan using parchment paper, if used. Cut into squares or bars with a sharp knife. Top each bar with whipped cream and a slice of lime for a fresh touch. Enjoy the delightful flavors! To make a great crust, use fresh graham cracker crumbs. You can crush them in a bag or food processor. Mix the crumbs with sugar and melted butter. Press the mixture tightly into your pan. This helps it hold together. Bake it until golden brown. This gives it a nice crunch. For the filling, whisk the eggs and sweetened condensed milk well. Make sure there are no lumps. Add fresh key lime juice and zest. This adds great flavor. When you bake the bars, watch for a slight jiggle in the center. This shows they are perfectly set. Too firm means they might be overbaked. When ready to serve, use a sharp knife to cut the bars. Top each bar with whipped cream. A slice of lime on top looks great too. For a fun twist, sprinkle extra lime zest over the whipped cream. Serve these bars on a bright plate. The colors will catch everyone’s eye! Pro Tips Use Fresh Limes: For the best flavor, always opt for fresh key limes or regular limes instead of bottled juice. Fresh juice elevates the taste of your bars significantly. Chill Thoroughly: Allow the bars to chill in the refrigerator for at least 2 hours. This helps them set properly, making them easier to cut into clean squares. Adjust Sweetness: If you prefer a less sweet dessert, reduce the amount of sweetened condensed milk slightly, or add more lime juice to enhance the tartness. Garnish Creatively: Enhance the presentation by garnishing with lime zest and mint leaves in addition to whipped cream. This adds a pop of color and a refreshing aroma. {{image_4}} You can switch key limes for other citrus fruits. Try using fresh limes, lemons, or even oranges. Each fruit brings a unique flavor. Lemons add a bright tartness. Oranges offer a sweet and zesty twist. This gives you more fun ways to enjoy these bars. If you need a gluten-free dessert, use gluten-free graham cracker crumbs. Many brands offer these now. You can also make your own from gluten-free cookies. This way, you can still enjoy the great taste of key lime bars without gluten. Want to add some fun texture? Consider mixing in fruits or nuts. You can fold in fresh berries like blueberries or raspberries. They pair well with the tart lime. Chopped nuts, like almonds or pecans, bring a nice crunch. Just sprinkle them on top before baking. This makes your bars even more special and tasty! To keep your Key Lime Pie Bars fresh, place them in an airtight container. Make sure they are fully cooled before storing. You can store them in the fridge for up to 5 days. This helps maintain their zesty flavor and creamy texture. You can freeze these bars if you want to save some for later. First, let the bars cool completely. Then, wrap them tightly in plastic wrap. You can also use aluminum foil. Place the wrapped bars in a freezer-safe container. They will stay fresh for about 2 to 3 months. When you're ready to enjoy them, thaw them in the fridge overnight. If you prefer your Key Lime Pie Bars warm, here’s how to do it. Preheat your oven to 350°F (175°C). Place the bars in an oven-safe dish. Heat them for about 10 minutes. Keep an eye on them to avoid overcooking. Serve warm with whipped cream for a tasty treat! Yes, you can use regular limes. Key limes are smaller and have a unique taste. They add tartness and a special aroma. If you use regular limes, the bars will be a bit different. The flavor will be more acidic and less sweet. Still, they will taste great! Look for the edges to be set and the center to jiggle slightly. The filling should not be too wobbly. It should look firm around the edges. A slight jiggle in the middle means they are perfect. Overbaking can make them dry, so watch closely! Yes, you can make them ahead of time! Bake the bars and chill them. They keep well in the fridge for up to three days. This is great for parties or gatherings. Just slice and add whipped cream before serving. Key Lime Pie comes from the Florida Keys. It uses key limes, which grow there. The pie became popular in the early 20th century. It has a rich history tied to the area’s fishing culture. People used simple ingredients like eggs, milk, and lime juice. Today, it is a classic American dessert! In this post, we covered how to make delicious Key Lime Pie Bars. We explored the essential ingredients, from graham cracker crumbs to fresh key lime juice. I shared step-by-step instructions for preparing the crust and baking the bars. Don’t forget the helpful tips for perfecting texture and serving suggestions. Variations like alternative citrus and gluten-free options can add some fun. Lastly, we discussed how to store and reheat them. Enjoy making these tasty bars; they are easy and sure to impress!

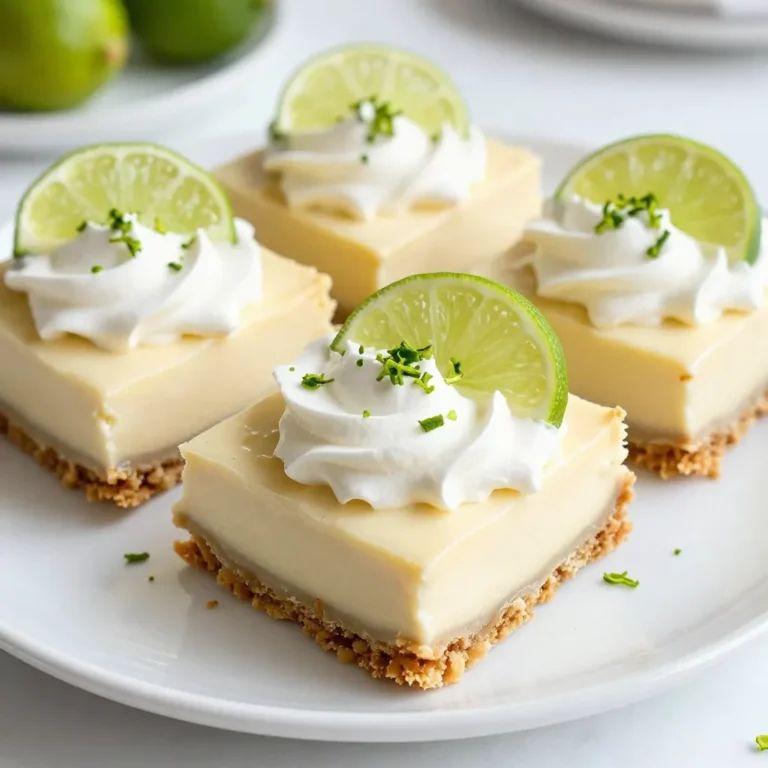
Key Lime Pie Bars Delightful and Easy Recipe

To make Sriracha honey glazed Brussels sprouts, you need a few key items: - 1 pound fresh Brussels sprouts, halved - 2 tablespoons extra virgin olive oil - 3 tablespoons natural honey - 2 tablespoons Sriracha sauce - 2 cloves garlic, minced finely - Sea salt and freshly ground black pepper to taste - 1 tablespoon toasted sesame seeds (for garnish) - Fresh cilantro leaves or finely sliced green onions (for garnish) Each ingredient plays a role. The Brussels sprouts provide the base. Olive oil helps them roast well. Honey adds sweetness, while Sriracha gives a spicy kick. Garlic adds depth, and salt and pepper enhance all the flavors. Sesame seeds and herbs bring freshness and texture. You can swap some ingredients based on your needs. If you can't find fresh Brussels sprouts, try frozen ones. They may not get as crispy but will still taste good. For a different oil, use avocado oil or canola oil instead of olive oil. If you want a milder glaze, reduce the Sriracha or use sweet chili sauce. For a vegan option, you can use agave syrup in place of honey. You can also skip the sesame seeds or replace them with chopped nuts for crunch. To make this dish, you will need a few tools: - A large mixing bowl for combining ingredients - A whisk for blending the glaze - A baking sheet lined with parchment paper for roasting - A spatula for tossing and serving These tools will help you create a delicious meal with ease. The right tools make cooking fun and efficient. Enjoy your time in the kitchen as you prepare this tasty side dish! {{ingredient_image_2}} Start by preheating your oven to 400°F (200°C). This step is key. A hot oven helps the Brussels sprouts roast evenly and get that nice, caramelized flavor. Take 1 pound of fresh Brussels sprouts and cut them in half. Place them in a large bowl. Drizzle 2 tablespoons of extra virgin olive oil over the sprouts. Add sea salt and freshly ground black pepper to taste. Toss the sprouts well. You want to coat them evenly with oil and seasoning. This will enhance their natural taste. In a small bowl, mix 3 tablespoons of natural honey, 2 tablespoons of Sriracha sauce, and 2 cloves of minced garlic. Whisk these ingredients together until they blend smoothly. This glaze will add a sweet and spicy kick to your dish. Now, pour the Sriracha honey glaze over the seasoned Brussels sprouts. Use a spatula to toss the sprouts gently. Make sure every sprout is well coated with the glaze. This step is important for flavor. Line a baking sheet with parchment paper. Spread the Brussels sprouts in a single layer on the sheet. Roast them in the preheated oven for 20 to 25 minutes. Stir the sprouts halfway through cooking. This helps them cook evenly and brown nicely. Once the Brussels sprouts are roasted, take them out of the oven. Sprinkle 1 tablespoon of toasted sesame seeds on top. You can also add chopped fresh cilantro or finely sliced green onions as a garnish. Serve these hot as a tasty side dish. Enjoy the sweet and spicy flavor! To get the best roast, start with fresh Brussels sprouts. Halve them for even cooking. Use a large mixing bowl to toss them with olive oil, salt, and pepper. This helps the glaze stick better. Spread them in one layer on the baking sheet. This ensures even cooking. Roast them until they are tender and slightly crispy. Stir them halfway through to avoid burning. If you prefer less heat, reduce the Sriracha. Start with one tablespoon and taste the glaze. You can always add more later. For extra spice, add more Sriracha or a dash of cayenne. Remember to taste as you go. This way, you control the heat. Want more flavor? Try adding a splash of soy sauce to the glaze. This adds a savory touch. You can also mix in some chopped bacon or pancetta for richness. Nuts like walnuts or pecans can add crunch too. Fresh herbs like thyme or rosemary can give a nice aroma. Experiment with your favorite flavors to make this dish your own. Pro Tips Choose Fresh Sprouts: Select Brussels sprouts that are firm and bright green for the best flavor and texture. Adjust the Heat: Modify the amount of Sriracha in the glaze according to your spice preference; start with less if you're unsure! Uniform Size: Ensure Brussels sprouts are cut into even halves to promote even roasting and cooking. Garnish with Flair: Experiment with different garnishes like crushed nuts or a drizzle of lime juice for an extra flavor boost. {{image_4}} You can mix in other vegetables to brighten your dish. Try adding diced sweet potatoes for sweetness. Broccoli florets work great too, adding a nice crunch. Carrots, cut into thin strips, bring a pop of color and flavor. You can also add bell peppers for a sweet twist. Just remember to adjust roasting times for each vegetable. For a vegan dish, replace honey with maple syrup or agave nectar. This keeps the sweetness without animal products. Use tamari instead of soy sauce to stay gluten-free. Ensure your Sriracha is gluten-free, as some brands may contain it. These swaps keep the dish flavorful while catering to your needs. You can experiment with other sauces for a unique twist. Try using hoisin sauce instead of Sriracha for a sweet and savory mix. A barbecue sauce can add a smoky flavor that pairs well. If you like it tangy, mix in some soy sauce or balsamic vinegar. Each sauce can change the taste, so have fun with it! After you enjoy your Sriracha honey glazed Brussels sprouts, store any leftovers properly. Place them in an airtight container. This keeps the flavor fresh and prevents drying. You can store them in the fridge for up to three days. Make sure they cool down before sealing the container. This helps avoid condensation. When it's time to eat leftovers, reheating is key. I like to use the oven for the best results. Preheat your oven to 350°F (175°C). Spread the Brussels sprouts on a baking sheet. Heat them for about 10-15 minutes. This keeps them crispy and flavorful. You can also microwave them if you're in a hurry, but be careful. Microwaving may make them a bit soft. Freezing is a great option for long-term storage. First, cool the Brussels sprouts completely. Then, place them in a freezer-safe bag. Remove as much air as you can. Label the bag with the date. You can freeze them for up to three months. When you’re ready to eat, thaw them in the fridge overnight. Reheat as mentioned for the best taste. To make your Brussels sprouts even spicier, add more Sriracha sauce to the glaze. Start with one extra tablespoon. You can also mix in red pepper flakes or spicy chili powder for more heat. Taste the glaze before tossing it with the sprouts. Adjust until it is just right for your taste buds. Yes, you can use frozen Brussels sprouts, but fresh is best. If using frozen, thaw and drain them first. Pat them dry to remove extra moisture. This helps them roast better. You may need to adjust the cooking time, so keep an eye on them in the oven. Sriracha Honey Glazed Brussels sprouts pair well with many dishes. They make a great side for roasted chicken or grilled salmon. You can also serve them with rice or quinoa for a hearty meal. Try them alongside Asian-inspired dishes like stir-fried noodles or spicy tofu. These delicious sprouts last 3 to 5 days in the fridge when stored in an airtight container. The flavors may intensify over time, making them tasty leftover bites. Just be sure to reheat them properly before serving to regain some of that crispy texture. Yes, you can make the Sriracha honey glaze ahead of time. Store it in a sealed container in the fridge for up to a week. When you are ready to use it, give it a good stir. If it thickens, you can thin it out with a splash of water or extra olive oil for easier mixing. In this blog post, we explored the key ingredients and tips for making Sriracha Honey Glazed Brussels Sprouts. We discussed ingredient options, tool recommendations, and steps for perfect roasting. I shared ways to adjust flavors and suggested fun variations. Don’t forget about storage tips for leftovers. With these insights, you can create tasty dishes that impress. Enjoy cooking and sharing your culinary success!

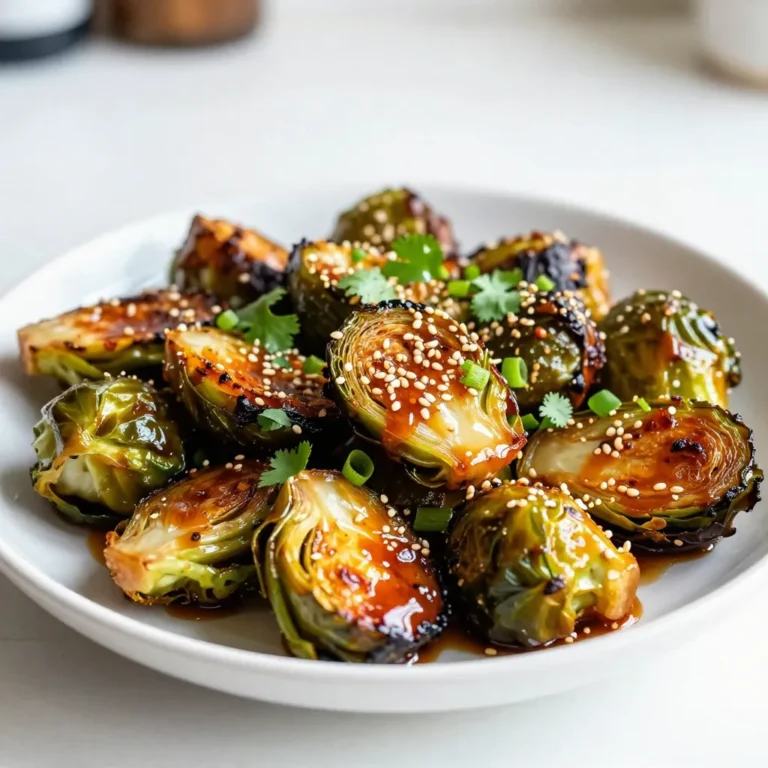
Sriracha Honey Glazed Brussels Sprouts Flavor Boost

- 4 boneless, skinless chicken breasts - 1 cup pretzels, finely crushed - 1/2 cup seasoned breadcrumbs - 1/2 cup honey - 1/4 cup Dijon mustard - 2 tablespoons extra virgin olive oil - 1 teaspoon garlic powder - Salt and freshly ground black pepper to taste - Fresh parsley, finely chopped (for garnish) To make this dish, use a cup for the pretzels and honey. Measure the Dijon mustard with a quarter cup. Use two tablespoons for olive oil and one teaspoon for garlic powder. A pinch of salt and pepper to taste will help enhance the flavor. For the chicken, I suggest using boneless and skinless breasts for a tender bite. When crushing pretzels, I find that a food processor works best. If you don’t have one, place the pretzels in a plastic bag and crush them with a rolling pin. This creates a fine crumb, perfect for coating. You can add a touch of spice to the mix. A pinch of cayenne pepper can give it a nice kick. If you like herbs, try adding dried thyme or oregano to the breadcrumbs. For a sweet twist, mix in some brown sugar with the honey. These add-ins can elevate the flavor and make this dish even more exciting! {{ingredient_image_2}} 1. First, preheat your oven to 375°F (190°C). This helps the chicken cook evenly. 2. Line a baking sheet with parchment paper. It makes cleanup easy and quick. 3. In a mixing bowl, whisk together honey, Dijon mustard, olive oil, garlic powder, salt, and pepper. You want a smooth marinade. 4. Place the chicken breasts in a shallow dish or resealable bag. Pour the marinade over the chicken, making sure each piece gets coated. 5. Let the chicken marinate in the fridge for at least 30 minutes. This step makes the chicken super flavorful. 1. While the chicken marinates, crush your pretzels until they are fine crumbs. This will give the chicken a crunchy coating. 2. In a separate bowl, mix the crushed pretzels with seasoned breadcrumbs. Stir until well combined. 3. After marinating, take the chicken out of the fridge. Let any extra marinade drip off. 4. Dredge each chicken breast in the pretzel mixture. Press gently to make sure it sticks well. 5. Place the coated chicken on your prepared baking sheet. Leave space between each piece for even cooking. 6. Bake for 25-30 minutes, or until the chicken is cooked through. It should reach 165°F (75°C) inside. 1. Once baked, take the chicken out and let it rest for 5 minutes. This helps keep it juicy. 2. Just before serving, sprinkle freshly chopped parsley on top for a nice touch. 3. For a fun presentation, serve the chicken on a rustic board. You can add a small bowl of extra honey mustard for dipping. 4. Pair it with roasted seasonal veggies or a crisp salad for a complete meal. To get that crunchy crust, use finely crushed pretzels. This helps them stick well. Mix the pretzels with seasoned breadcrumbs for extra flavor. Press the chicken into this mix firmly. This ensures every bite has that tasty crunch. If you find the crust isn’t sticking, try adding a bit more marinade. Marinating the chicken is key for great taste. Use a mix of honey, Dijon mustard, olive oil, garlic powder, salt, and pepper. Make sure each piece of chicken is covered in the marinade. Let it sit in the fridge for at least 30 minutes. This time helps the chicken soak up the flavors. For best results, marinate for a few hours or overnight. Avoid these mistakes to get the best chicken. First, don’t skip the marinating step; it adds flavor. Second, watch your oven temperature. If it’s too high, the crust may burn before the chicken cooks. Lastly, don’t rush the resting time. Letting the chicken rest for five minutes keeps it juicy and tender. These tips will help you make the best Honey Mustard Pretzel Chicken! Pro Tips Marinate Longer for More Flavor: For an even richer taste, consider marinating the chicken for a few hours or overnight. This allows the flavors to penetrate deeper into the meat. Use Fresh Pretzels: If possible, use fresh, soft pretzels instead of store-bought pretzel crumbs. Fresh pretzels will yield a better texture and flavor in the crust. Check Chicken Temperature: Always use a meat thermometer to ensure the chicken is cooked to the proper internal temperature of 165°F (75°C) for safety and juiciness. Add Heat: If you enjoy a bit of spice, consider adding a pinch of cayenne pepper or a splash of hot sauce to the marinade for an extra kick! {{image_4}} You can swap the pretzel coating for crushed cornflakes or panko crumbs. Cornflakes give a nice crunch and add a sweet flavor. Panko offers a lighter texture and helps the chicken stay crispy. For a spicy kick, try adding crushed red pepper to your coating mix. This small change can elevate your dish with a fun twist. While honey mustard is a star, try a barbecue sauce for zest. You can mix honey with maple syrup for a sweeter taste. Adding soy sauce and ginger creates a tasty Asian flair. For a tangy option, consider using balsamic vinegar instead of mustard. Each marinade change lets you explore new flavors and mood in your cooking. Serve this chicken with mashed potatoes for comfort. Roasted veggies pair well and bring color to your plate. A fresh green salad adds crunch and lightness. Try sweet potato fries for a fun twist on the classic. Every side dish choice enhances the meal and creates a balanced plate. To keep your Honey Mustard Pretzel Chicken fresh, place it in an airtight container. Make sure it cools down first. Store it in the fridge for up to three days. If you have a lot left, you can slice the chicken for easy meals later. When it's time to eat leftovers, preheat your oven to 350°F (175°C). Place the chicken on a baking sheet. Cover it with foil to keep it moist. Heat for about 15-20 minutes or until it's warm all the way through. You can also use a microwave, but that may make the crust less crispy. If you want to save some for later, freeze the chicken. Wrap each piece tightly in plastic wrap, then place it in a freezer bag. This helps prevent freezer burn. It can stay good for up to three months. When you're ready to eat, thaw it in the fridge overnight before reheating. You can use yellow mustard if you need a quick swap. It has a milder taste. Honey mustard also works well for added sweetness. If you like heat, try spicy brown mustard. Each option gives a unique twist to your dish. Yes, you can use boneless thighs instead of breasts. Thighs are juicier and have more flavor. They may take a bit longer to cook, so check the temperature. Aim for an internal temperature of 165°F (75°C) to ensure they are fully done. The best way to know if chicken is fully cooked is using a meat thermometer. Insert it into the thickest part of the chicken. When it reaches 165°F (75°C), it's safe to eat. If you don’t have a thermometer, cut into the chicken. The juices should run clear, not pink. This article covered key ingredients and their measurements, along with useful techniques. You learned step-by-step instructions for preparing and cooking your dish. Tips helped enhance flavor and avoid mistakes. I shared variations to keep meals fresh and exciting. Lastly, you now know how to store, reheat, and freeze your leftovers. With these insights, you can create delicious meals every time. Enjoy cooking and experimenting with your recipes!

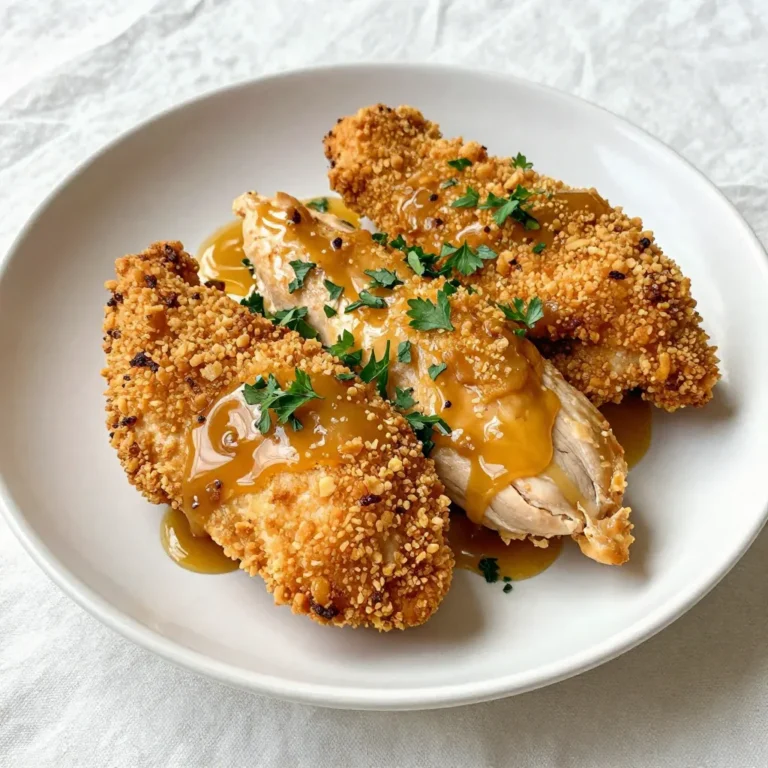
Honey Mustard Pretzel Chicken Savory Flavor Delight

- 1 lb boneless, skinless chicken thighs, sliced into thin strips - 2 tablespoons vegetable oil - 1 red bell pepper, sliced into thin strips - 1 green bell pepper, sliced into thin strips - 1 cup broccoli florets - 1 large carrot, julienned - 2 green onions, chopped (whites and greens separated) - 3 cloves garlic, minced - 1 tablespoon fresh ginger, minced - 1/4 cup low-sodium soy sauce - 2 tablespoons honey - 1 tablespoon rice vinegar - 1 teaspoon toasted sesame oil - 1 tablespoon cornstarch mixed with 2 tablespoons water (optional, for thickening the sauce) - Sesame seeds, for garnish The chicken thighs are the star. They stay juicy and tender. Bell peppers add crunch and color. Broccoli and carrots bring vitamins and fiber. Garlic and ginger give a nice kick. The sauce blends sweet and salty, creating a great flavor. - Additional Vegetables: Snap peas, mushrooms, or zucchini work well. - Protein Alternatives: Tofu or shrimp can replace chicken for variety. - Garnishes: Chopped nuts or more green onions add flair and taste. Feel free to mix and match these options. You can create your unique version or stick to the classic. The goal is to enjoy a fresh, flavorful meal! {{ingredient_image_2}} - Slicing Chicken Thighs Start with 1 pound of boneless, skinless chicken thighs. Use a sharp knife to cut them into thin strips. Make sure the slices are even for quick cooking. This helps the chicken cook evenly and stay juicy. - Cooking the Chicken Thoroughly Heat 2 tablespoons of vegetable oil in a large skillet over medium-high heat. Add the sliced chicken to the hot pan. Spread it out so each piece cooks well. Sauté for 5 to 7 minutes. Check that there is no pink left. The chicken should reach 165°F (75°C). Once cooked, set the chicken aside on a plate. - Timing for Garlic and Ginger In the same skillet, add 3 minced garlic cloves and 1 tablespoon of minced ginger. Stir them for about 30 seconds. You want to smell their wonderful aroma. Be careful not to let them burn. - Cooking Vegetables for Optimal Texture Now add 1 sliced red bell pepper, 1 sliced green bell pepper, 1 cup of broccoli florets, and 1 julienned carrot. Stir-fry these veggies for about 3 to 4 minutes. They should be bright and tender-crisp. This keeps their color and crunch. - Mixing Chicken with Vegetables Return the cooked chicken to the skillet. Mix it well with the sautéed vegetables. Make sure the chicken is evenly distributed throughout. - Making and Adding the Sauce In a small bowl, combine 1/4 cup of low-sodium soy sauce, 2 tablespoons of honey, 1 tablespoon of rice vinegar, and 1 teaspoon of toasted sesame oil. Whisk it all together. Pour this sauce over the chicken and vegetables. Stir to coat everything evenly. If you want a thicker sauce, add 1 tablespoon of cornstarch mixed with 2 tablespoons of water. Stir for another minute until it thickens. Once it's done, toss in chopped green onion whites. Cook for one more minute to heat through. Now you are ready to plate your delicious teriyaki chicken stir fry! - Optimal Heat Levels for Stir-frying: Use medium-high heat. This allows your chicken to sear and cook evenly. If the heat is too low, the chicken will steam instead of fry. - How to Use a Wok vs. Skillet: A wok is great for high heat and quick cooking. Its shape helps toss ingredients well. A skillet works too, but it may not heat as evenly. - Adjusting Sweetness and Saltiness: You can tweak the honey and soy sauce. If you like it sweeter, add more honey. For saltiness, just a splash of soy sauce can make a big difference. - Using Fresh Ingredients vs. Frozen: Fresh veggies bring better flavor and color. Frozen vegetables can save time, but they may have a softer texture. - Recommended Side Dishes: Serve your stir fry with steamed rice or noodles. Both soak up the tasty sauce well and add a nice base. - Presentation Ideas for a Beautiful Plate: Arrange the stir fry in the center. Use bright colors to make it pop. Add sesame seeds and green onion greens on top for a fresh look. Pro Tips Marinate for Flavor: For an even more flavorful dish, consider marinating the chicken in the soy sauce, honey, and ginger mixture for at least 30 minutes before cooking. This allows the flavors to penetrate the meat. Veggie Variations: Feel free to mix and match vegetables based on your preference or what you have on hand. Snow peas, snap peas, or zucchini can add a nice crunch and variety to the dish. Use High Heat: Stir-frying requires high heat for quick cooking. Ensure your skillet or wok is really hot before adding the chicken to get a nice sear and avoid steaming the meat. Leftovers Make Great Lunches: This stir-fry keeps well in the fridge for up to 3 days. It can be served cold over a salad or reheated for a quick lunch option, making it perfect for meal prep! {{image_4}} You can switch up the protein in your Teriyaki Chicken Stir Fry for fun. - Teriyaki Tofu Stir Fry: Use firm tofu instead of chicken. Cut it into cubes. Cook it until golden brown for a tasty, plant-based meal. - Shrimp or Beef Teriyaki: Shrimp cooks fast and adds a sweet touch. Beef gives a rich taste. Just slice it thinly and sauté. Diet needs can change your dish, and that's okay! - Gluten-Free Options: Use gluten-free soy sauce. Coconut aminos also work well. They give the same great taste without gluten. - Low-Carb Alternatives: Skip the rice or noodles. Serve your stir fry over zucchini noodles or cauliflower rice for a low-carb twist. Make your stir fry unique with some flavor changes. - Spicy Teriyaki Stir Fry: Add chili flakes or sriracha for a kick. This spicy twist wakes up your taste buds. - Adding Different Sauces: Try adding hoisin sauce, sweet chili sauce, or even peanut sauce. Each brings its own flavor that can change the dish completely. To keep your teriyaki chicken stir fry fresh, follow these tips: - Best Practices for Refrigeration: Place leftovers in an airtight container. Store in the fridge for up to 3 days. Allow the dish to cool before sealing the container to avoid moisture build-up. - Freezing Guidelines: If you want to freeze the stir fry, use a freezer-safe container. It can last for up to 3 months. Make sure to label the container with the date for easy tracking. To enjoy your teriyaki chicken stir fry again, reheating is key: - Methods for Even Heating: You can use a microwave or stovetop. If using a microwave, heat in short bursts, stirring often. If on the stovetop, add a splash of water to keep it moist and heat over medium-low. - Keeping Vegetables Crisp: To maintain the crunch, avoid overcooking. Heat just until warm. If you notice the veggies softening, reduce heating time. This helps retain their fresh taste and texture. You can serve this stir fry with steamed rice or noodles. Both options soak up the sauce well. You can also add a side of fresh salad or miso soup for a complete meal. To make this dish ahead, cook everything as normal but stop before adding the sauce. Cool the stir fry and store it in the fridge. When ready to eat, reheat it and add the sauce. Yes, you can! If you don't have chicken thighs, use chicken breasts. You can swap bell peppers for any other veggies like snap peas or zucchini. Honey can be replaced with maple syrup if needed. To keep chicken tender, do not overcook it. Cook until it's just no longer pink. Using thighs instead of breasts also adds moisture and flavor. A meat thermometer helps ensure it reaches 165°F (75°C). If you want a thicker sauce without cornstarch, try simmering the sauce longer. This reduces it and makes it thicker. You can also use arrowroot powder or pureed vegetables as thickening agents. In this blog post, we explored how to create delicious teriyaki chicken stir fry. We covered important ingredients, step-by-step cooking methods, and helpful tips. You can modify this dish with various proteins or vegetables for your taste. Remember to store leftovers properly for later enjoyment. This dish is easy to make and perfect for any meal. Get ready to enjoy your tasty stir fry and impress your loved ones!

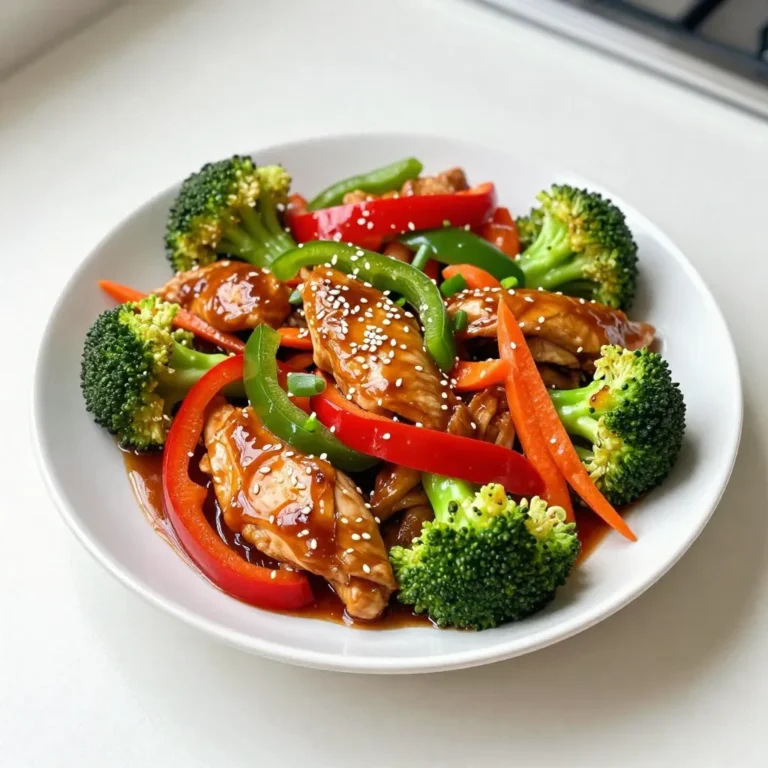
Teriyaki Chicken Stir Fry Flavorful Dinner Delight

- 2 ¾ cups all-purpose flour - 1 teaspoon baking soda - ½ teaspoon salt - 1 tablespoon ground cinnamon - 1 teaspoon ground ginger - ½ teaspoon ground cardamom - ½ teaspoon ground cloves - 1 cup unsalted butter, softened - 1 ½ cups granulated sugar, divided - 2 large eggs - 1 teaspoon pure vanilla extract - ¼ cup granulated sugar (for rolling) - 2 teaspoons ground cinnamon (for rolling) To make these spiced chai snickerdoodles, you need to gather some essential ingredients. Here’s what you will need: - All-purpose flour gives the cookies their structure. - Baking soda helps them rise and become soft. - Salt enhances the flavors. - Ground cinnamon, ginger, cardamom, and cloves bring the chai flavor. - Unsalted butter makes the cookies rich and creamy. - Granulated sugar sweetens the dough and forms a lovely crust. - Eggs add moisture and help bind the mixture. - Vanilla extract adds a warm, sweet flavor. - Cinnamon and sugar for rolling gives the cookies their signature coating. These ingredients work together to create a cookie that is soft, flavorful, and truly delightful. Making sure you have fresh spices will enhance your cookie’s taste. Enjoy the process of mixing these items to create a warm, inviting treat! {{ingredient_image_2}} - Preheat oven to 350°F (175°C). - Line baking sheets with parchment paper. First, you want to get that oven nice and hot. Preheating it helps your cookies bake evenly. While the oven warms up, grab your baking sheets. Lining them with parchment paper stops the cookies from sticking. This way, you can enjoy them without any mess. - Whisk together flour, baking soda, salt, and spices. Next, take a medium bowl and mix your dry ingredients. You'll need all-purpose flour, baking soda, salt, ground cinnamon, ground ginger, cardamom, and cloves. Whisk them together until the blend looks even. This step adds flavor and helps the cookies rise. - Cream unsalted butter with 1 ½ cups of sugar until fluffy. Now, grab a large bowl and your mixer. Add the softened unsalted butter and 1 ½ cups of sugar. Mix them for about 2-3 minutes. You want it to look light and fluffy. This step is key for a soft cookie texture. - Gradually add eggs and vanilla extract to the mixture. Once your butter and sugar look great, it’s time for the eggs. Add them one at a time, mixing well after each. Then, pour in 1 teaspoon of vanilla extract. This will give your cookies a lovely flavor. Keep mixing until everything is smooth. - Blend dry mixture into wet mixture until just combined. Now, take your dry mix and slowly add it to the wet mix. Stir gently until it’s just combined. Be careful not to overmix. This helps keep your cookies soft and chewy. - Roll dough balls in cinnamon-sugar mixture. - Bake for 10-12 minutes. In a small bowl, mix ¼ cup of sugar with 2 teaspoons of cinnamon. This is your cookie coating. Scoop about 1 tablespoon of dough and roll it into a ball. Coat the ball in the cinnamon-sugar mix. Place the coated balls on the baking sheets, leaving space for them to spread. Now, bake your cookies for 10-12 minutes. They are ready when the edges are set and tops are slightly cracked. Let them cool for a few minutes before moving them to a wire rack. Enjoy the sweet aroma filling your kitchen! - Avoid overmixing the dough. Mixing too much can lead to tough cookies. - Use room temperature ingredients. This helps the dough mix well and rise properly. - Adjust spice levels to your taste. Want more heat? Add more ginger or cinnamon. - Experiment with additional flavors like nutmeg or allspice. These can add depth to the chai flavor. - Serve cookies with chai tea. The warmth of the tea pairs well with the spices. - Stack cookies on a rustic platter. This makes for a cozy and inviting display. Pro Tips Chill the Dough: For thicker cookies, chill the dough for at least 30 minutes before baking. This helps prevent spreading and ensures a chewier texture. Experiment with Spices: Feel free to adjust the spice levels according to your preference. Adding a pinch of nutmeg or allspice can give the cookies a unique twist! Check for Doneness: Keep an eye on the cookies during the last few minutes of baking. They should be lightly golden on the edges but still soft in the center. Store Properly: To maintain freshness, store the cookies in an airtight container at room temperature. They will stay delicious for up to a week! {{image_4}} You can make these cookies gluten-free. Just substitute the all-purpose flour with a gluten-free flour blend. This swap works well and keeps the cookie's texture. Make sure your blend has a binding agent like xanthan gum for the best results. Want a vegan version? You can easily adapt the recipe. Replace the eggs with flax eggs. To make flax eggs, mix one tablespoon of ground flaxseed with three tablespoons of water. Let it sit for five minutes until it thickens. Also, use vegan butter in place of the unsalted butter. This way, you keep the rich flavor without using animal products. You can add fun flavors to your cookies. Adding lemon zest gives a nice citrus twist. Just mix in one teaspoon of fresh lemon zest with the dry ingredients. You can also incorporate nuts like pecans or walnuts. Chop them finely and add about half a cup to the dough. This adds a lovely crunch and flavor. To keep your spiced chai snickerdoodles fresh, store them in an airtight container. This helps keep them soft and tasty. You can keep them at room temperature for a few days. If you want them to last longer, refrigerate the cookies. Just make sure to let them warm up a bit before enjoying. If you want to freeze unbaked cookie dough, scoop the dough into balls. Place them on a baking sheet and freeze until solid. After that, transfer the dough balls to a freezer bag. This way, you can bake fresh cookies anytime you want! For baked cookies, let them cool completely. Then, place them in a freezer bag or container. They can stay in the freezer for up to three months. When you're ready to eat, simply thaw them at room temperature or warm them in the oven. Enjoy the taste of fresh cookies again! Yes, you can use brown sugar instead of granulated sugar. Brown sugar adds moisture and a slight caramel flavor. It can make your cookies softer and chewier. If you want a crispier texture, stick with granulated sugar. Mixing both sugars can also give a nice balance of flavor and texture. To make chewier cookies, try these tips: - Reduce the baking time by a minute or two. - Use more brown sugar than granulated sugar. - Add an extra egg yolk for added moisture. - Chill the dough for at least 30 minutes before baking. This helps the cookies spread less and stay chewy. To reheat snickerdoodles, use these steps: - For the oven: Preheat it to 300°F (150°C). Place cookies on a baking sheet for about 5-7 minutes. - For the microwave: Heat one cookie at a time for about 10-15 seconds. This keeps them soft and warm without drying out. Enjoy your fresh, warm cookies! You now have all the steps to make delicious snickerdoodles. Start with the right ingredients and follow the simple instructions. Remember to keep an eye on texture and tweak spices to fit your taste. If you want to try new flavors or need gluten-free options, there are easy swaps. Store your cookies well to keep them fresh and delicious. Making snickerdoodles can be fun and rewarding. I hope you enjoy baking these treats as much as I do. Happy baking!

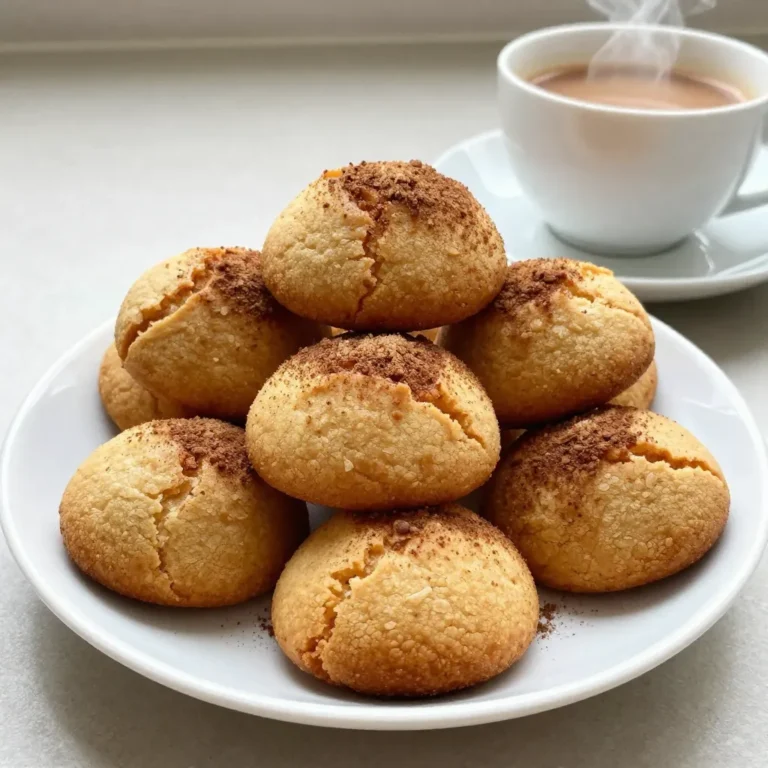
Spiced Chai Snickerdoodles Irresistible Cookie Delight

- 2 ripe avocados - 1 cup cherry tomatoes - 1 cup fresh mozzarella balls - 1/4 cup fresh basil leaves - 2 tablespoons balsamic glaze - 1 tablespoon extra virgin olive oil - Sea salt and freshly ground black pepper To make Caprese stuffed avocados, you need fresh, tasty ingredients. Each ingredient adds flavor and texture. First, choose two ripe avocados. They should feel slightly soft when you squeeze them gently. The avocado is the star of this dish. Next, select one cup of cherry tomatoes. Halve them for easy mixing. They bring sweetness and color. You also need one cup of fresh mozzarella balls. These little bites add creaminess and are fun to eat. Halve them to match the tomatoes. Then, grab a handful of fresh basil leaves. You will need a quarter cup, chopped. Basil gives a fragrant touch. For dressing, use two tablespoons of balsamic glaze. Drizzle it for a tangy flavor. You can also add more for garnish later. Use one tablespoon of extra virgin olive oil. This will help blend the flavors and add richness. Finally, season with sea salt and freshly ground black pepper. These simple spices enhance all the tastes. Gather these ingredients to create a bright, fresh meal. The combination is simple but makes a big impact! {{ingredient_image_2}} Start by slicing each avocado in half. Carefully remove the pit from each half. If you want more filling space, scoop out a bit of the avocado flesh. Keep that flesh for another recipe or enjoy it as a snack. The avocado’s creamy texture will blend perfectly with the Caprese mix. In a medium bowl, combine the halved cherry tomatoes and mozzarella balls. Add the chopped basil leaves. This brings a fresh and fragrant flavor to the dish. Drizzle extra virgin olive oil and balsamic glaze over the mixture. Toss it gently to coat everything well. Be careful not to mash the mozzarella. Taste the mix and sprinkle in a pinch of sea salt and black pepper. Using a spoon, fill each avocado half with the Caprese mixture. Pack it down slightly for a nice look. Arrange the filled avocados on a colorful serving platter. Drizzle some extra balsamic glaze over each half for added taste and a pop of color. You can garnish with more basil if you like. Serve these stuffed avocados at room temperature. Each bite is a fresh burst of summer flavors. The creamy avocado pairs well with the tangy tomatoes and mozzarella. Enjoy this dish as a light meal or a fun appetizer with friends! Choose avocados that feel slightly soft when you press them. A ripe avocado will yield to gentle pressure. Look for a dark green skin that is free from large dents or blemishes. If they are too hard, leave them at room temperature for a few days. You can speed up the ripening by putting them in a paper bag with a banana. To serve the stuffed avocados, use a bright platter. Place each half with the filling facing up. This shows off the colors of the tomatoes and basil. Drizzle some extra balsamic glaze on top for a glossy look. Sprinkle some coarse sea salt around the platter for a nice touch. Garnish with fresh basil leaves to add a pop of color. Taste your filling before stuffing the avocados. If it needs a bit more flavor, add more sea salt or pepper. You can also add a touch more balsamic glaze for sweetness. If you like herbs, try adding a pinch of oregano or thyme. Each bite should be fresh and tasty, so adjust as needed. Pro Tips Choose Ripe Avocados: Ensure your avocados are perfectly ripe for the best flavor and creaminess. They should yield slightly when gently squeezed. Customize Your Filling: Feel free to add other ingredients like diced red onion, olives, or even a sprinkle of chili flakes for an extra kick! Serve Fresh: For optimal taste, serve the stuffed avocados immediately after preparation. The avocados can brown quickly, so enjoy right away! Perfect Balsamic Glaze: To enhance the dish, consider making your balsamic glaze by simmering balsamic vinegar until it thickens, adding a rich flavor. {{image_4}} You can easily make Caprese stuffed avocados vegan. Just swap out the mozzarella for a plant-based cheese. Many brands offer tasty vegan options that melt well. For gluten-free diets, this recipe is already safe. Just ensure all your sauces and dressings are gluten-free. Want to kick up the flavor? Add some pesto to the filling. It brings a rich taste that pairs well with the fresh ingredients. You can also sprinkle nuts on top for crunch. Pine nuts or walnuts add a nice texture and flavor. Feel free to change up the cheese. Try feta for a tangy kick or goat cheese for creaminess. You can also add different veggies. Chopped bell peppers or cucumbers can add a fresh crunch. Don't be afraid to mix and match until you find your favorite combo! To store leftovers, place the stuffed avocados in an airtight container. This helps keep them fresh. If you can, cover the top with plastic wrap to limit air exposure. It's best to eat them within one day to enjoy the flavors. To keep avocados fresh, store them whole at room temperature if they are not ripe yet. Once ripe, put them in the fridge. If you cut an avocado, squeeze a bit of lemon juice on the flesh. This slows browning. Wrap the avocado tightly in plastic wrap to seal in freshness. Prepared ingredients can last for a few days. Cherry tomatoes can stay fresh for about five days in the fridge. Fresh mozzarella lasts about a week. Basil is best used within three days for full flavor. Balsamic glaze can keep for months if stored properly. Yes, you can prepare the filling ahead of time. Store it in the fridge for up to two days. However, I recommend stuffing the avocados just before serving. The avocado can brown quickly after cutting. To slow browning, brush the avocado flesh with lemon juice. If you can't find mozzarella, try using burrata or feta cheese. Both have a creamy texture and add great flavor. You can also use vegan cheese for a dairy-free option. Just make sure it melts well or has a nice texture for stuffing. Look for ripe avocados that are slightly soft to the touch. They should yield gently when pressed. Avoid any that feel overly mushy or have dark spots. Ripe avocados are key for a creamy filling that pairs well with the fresh ingredients. - Are Caprese Stuffed Avocados a healthy option? Yes, they are a healthy choice! Avocados provide healthy fats, while tomatoes and basil add vitamins and antioxidants. This dish is low in carbs and packed with nutrients. Enjoy it as a light lunch or appetizer that’s both fresh and filling. Caprese stuffed avocados are a tasty, fresh dish that shines. We covered easy steps to prepare this meal, from selecting ripe avocados to serving tips. Remember to adjust the seasoning to suit your taste. Feel free to explore variations to suit different diets or ingredient preferences. Proper storage will help keep leftovers fresh longer. Enjoy making this simple yet delicious dish anytime you want a healthy option!

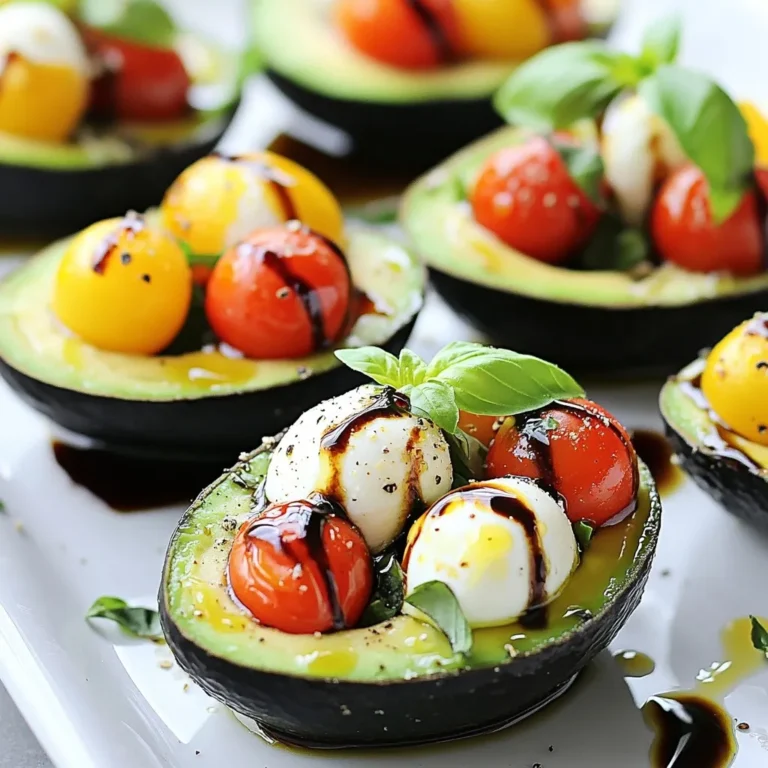
Caprese Stuffed Avocados Delightful and Fresh Meal

- 1 pound boneless, skinless chicken thighs, cut into bite-sized pieces - 1 cup all-purpose flour - 1/2 cup cornstarch - 2 large eggs, beaten - Vegetable oil, for frying - 1/2 teaspoon baking powder - 1/2 teaspoon salt - 1/4 teaspoon black pepper - 1/4 cup honey - 2 tablespoons soy sauce - 1 tablespoon rice vinegar - 2 tablespoons sesame seeds - 2 green onions, sliced (for garnish) These ingredients come together to create a dish that is both tasty and simple. You need chicken thighs for juiciness and flavor. The flour and cornstarch mix helps create that lovely crunch we crave. The eggs act like glue, helping the dry mix stick to the chicken. For spices, baking powder gives extra lift, while salt and black pepper enhance the taste. The glaze is a sweet and tangy mix of honey, soy sauce, and rice vinegar. Finally, sesame seeds add a nutty crunch, and green onions bring a fresh touch. Each ingredient plays a key role in making this dish stand out. Choosing fresh and high-quality items will make your meal even better. {{ingredient_image_2}} To start, you need to mix the dry ingredients. In a large bowl, whisk together: - 1 cup all-purpose flour - 1/2 cup cornstarch - 1/2 teaspoon baking powder - 1/2 teaspoon salt - 1/4 teaspoon black pepper Mix these well. This blend adds a great crunch to the chicken. Next, let's coat the chicken. You will dip each piece of chicken into: - 2 large eggs, beaten Let any extra egg drip off. Then, coat the chicken with your dry mixture. Make sure every piece is fully covered. This step is key for crispiness! Now, it’s time to fry. Heat about 1-2 inches of vegetable oil in a deep skillet over medium-high heat. Aim for 350°F (175°C). Carefully add the chicken pieces in batches. Don't overcrowd the pan. Fry them for 5-7 minutes. Look for a golden brown color. Use a slotted spoon to remove the chicken. Place it on a paper towel-lined plate to drain excess oil. While the chicken is frying, prepare the honey glaze. In a saucepan, combine: - 1/4 cup honey - 2 tablespoons soy sauce - 1 tablespoon rice vinegar Cook over medium heat. Stir continuously and bring it to a gentle simmer for about 3 minutes. The glaze will thicken slightly. Once your glaze is ready, add the fried chicken to the saucepan. Toss the chicken well. Make sure every piece gets that sweet honey glaze. Finally, add some finishing touches. Sprinkle 2 tablespoons of sesame seeds over the glazed chicken. Toss gently to distribute the seeds. Let the chicken sit for a minute. This allows the glaze to set. Then, serve hot, garnished with sliced green onions. Enjoy your crispy honey sesame chicken! To get the best crispy honey sesame chicken, follow these tips. First, ensure your oil is hot enough. Heat the oil to about 350°F. If it’s too cool, the chicken will soak up oil and become soggy. Use a thermometer to check the oil temperature. Next, coat each piece of chicken well. Dip it in egg first, then cover it with the flour and cornstarch mix. This double coating helps create a great crunch. Fry the chicken in batches. Overcrowding the pan lowers the oil’s temperature and makes it hard to fry evenly. For frying, vegetable oil is your best bet. It has a high smoke point, which is perfect for frying. You can also use canola or peanut oil. These oils have a light flavor that won’t overpower your chicken. Always keep an eye on the oil temperature. If it gets too hot, it can burn the chicken. If it’s too low, it can make the chicken greasy. The right balance is key for perfect frying. If you want a healthier option, try baking or air-frying the chicken. For baking, preheat your oven to 400°F. Place the coated chicken on a baking sheet lined with parchment paper. Bake for about 20-25 minutes, flipping halfway through. For air-frying, set your air fryer to 375°F. Cook the chicken in a single layer for about 12-15 minutes, shaking the basket halfway through. Both methods will give you crispy chicken without deep frying. Pro Tips Choose the Right Chicken: Using boneless, skinless chicken thighs instead of breasts ensures a juicier and more flavorful dish, as thighs have a higher fat content. Double Dredge for Extra Crispiness: For an even crunchier coating, consider dipping the chicken back into the egg and then into the flour-cornstarch mixture a second time before frying. Monitor Oil Temperature: Using a thermometer to keep the oil at 350°F (175°C) is crucial. If the oil is too hot, the chicken will burn; if it's too cool, the chicken will absorb excess oil. Let the Glaze Cool Slightly: Allow the glaze to cool for a minute after cooking before adding it to the chicken. This will help it adhere better and create a thicker coating. {{image_4}} You can add heat to your crispy honey sesame chicken in many ways. One option is to mix chili flakes into the dry mixture. This adds a nice kick to the coating. Another choice is to stir in Sriracha or chili paste into the honey glaze. This will give your dish a sweet and spicy twist. If you love heat, try using spicy honey instead of regular honey. To make a vegetarian version, use tofu or seitan. For tofu, press it to remove extra moisture, then cut it into bite-sized pieces. Coat and fry the tofu just like the chicken. If you choose seitan, slice it into pieces and follow the same steps. Both options will give you a tasty, meat-free meal. Pair your crispy honey sesame chicken with great sides. Steamed rice is a classic choice. You can also serve it with sautéed vegetables for color and nutrition. A fresh salad can balance the meal, too. Try adding some pickled cucumbers for a crunchy contrast. This adds flavor and makes the dish pop on the plate. To keep your crispy honey sesame chicken fresh, let it cool first. Place the chicken in an airtight container. You can store it in the fridge for up to three days. If you want to keep it longer, freeze it instead. Use freezer bags or containers. Make sure to remove as much air as possible before sealing. To reheat the chicken and keep it crispy, use the oven. Preheat your oven to 375°F (190°C). Place the chicken on a baking sheet. Bake for about 10-15 minutes. This method helps to restore the crunch. You can also use an air fryer. Set it to 350°F (175°C) and heat for about 5-8 minutes. Crispy honey sesame chicken lasts about three days in the fridge. If you freeze it, it can last up to three months. Always label your containers with the date. This way, you know when it’s time to eat or toss it. Enjoy your tasty leftovers! The best oil for frying chicken is vegetable oil. It has a high smoke point, which means it can get hot without burning. You can also use canola oil or peanut oil. These oils are good because they won’t change the flavor of the chicken. Yes, you can make this dish gluten-free. Substitute all-purpose flour with gluten-free flour. Look for cornstarch that is labeled gluten-free as well. This will keep the dish tasty without any gluten. To keep the chicken crispy, you should drain it well after frying. Place it on a paper towel to absorb extra oil. Serve it right after coating with glaze. This way, it stays crunchy and delicious! Yes, you can use chicken breast instead of thighs. Just remember that chicken breasts can dry out quicker. Make sure you don’t cook them too long. Thighs are juicier, but breasts work well too! This blog covered all steps for making honey sesame chicken. You learned about key ingredients and made a tasty glaze. We also shared tips for a perfect, crispy finish. Different cooking methods and fun variations could fit your taste. Good storage and reheating methods help keep it fresh. Now, you can make this dish confidently and impress your friends and family. Enjoy your cooking journey!

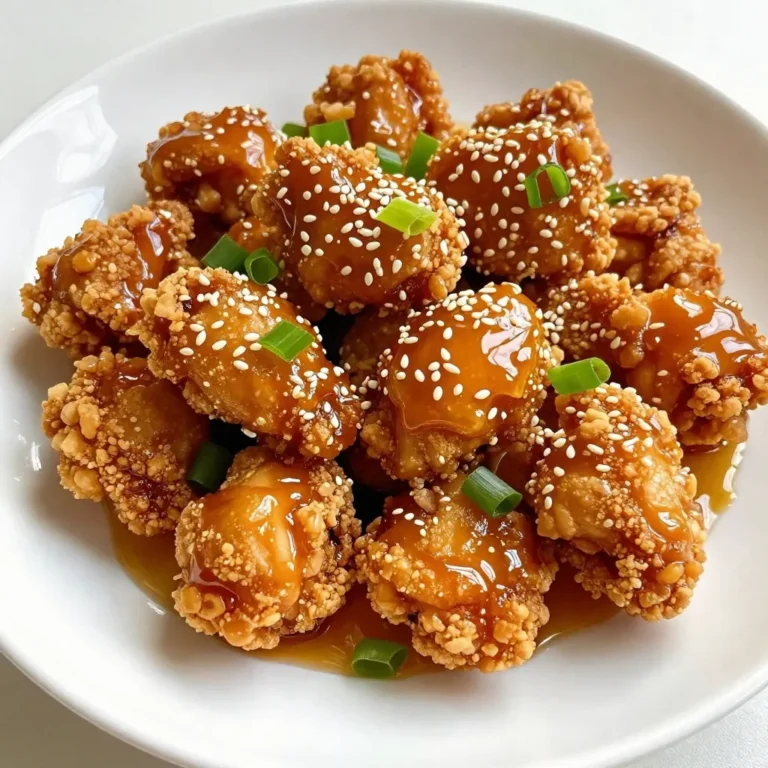
Crispy Honey Sesame Chicken Flavorful and Simple Meal

To make delicious pistachio cranberry wreath cookies, gather these ingredients: - 1 cup unsalted butter, softened to room temperature - 1 cup powdered sugar - 1 teaspoon pure vanilla extract - 2 ½ cups all-purpose flour - 1 teaspoon baking powder - ½ teaspoon salt - ½ cup pistachios, finely chopped - ½ cup dried cranberries, chopped into small pieces - 1 egg yolk (for egg wash) - Additional chopped pistachios and cranberries for garnish These ingredients create a festive treat that is both tasty and visually appealing. The butter gives the cookies a rich flavor. Powdered sugar adds sweetness and a lovely texture. The vanilla extract brings warmth to the cookies. The flour, baking powder, and salt work together to create the perfect dough. Pistachios and cranberries add crunch and tartness, making each bite special. When you mix these ingredients, remember to keep everything at room temperature. This step helps the butter blend well, creating a fluffy texture. Chopping the pistachios and cranberries into small pieces allows for even distribution in the dough. Each cookie will have a nice balance of flavors. Once you have your ingredients ready, you can start crafting these delightful wreath cookies. It’s a fun and festive way to celebrate the season! {{ingredient_image_2}} - Preheat your oven to 350°F (175°C). - Line two baking sheets with parchment paper. To make the dough, start with creaming. In a large bowl, mix the softened butter and powdered sugar. Use an electric mixer to make it fluffy. This should take about 3-5 minutes. Next, add 1 teaspoon of pure vanilla extract. Mix until everything blends well. Now, take another bowl. In it, whisk together 2 ½ cups of all-purpose flour, 1 teaspoon of baking powder, and ½ teaspoon of salt. Gradually add this dry mix to the wet ingredients. Stir gently until just combined. Be careful not to over-mix. Now comes the fun part! Gently fold in ½ cup of finely chopped pistachios and ½ cup of dried cranberries. Make sure they spread evenly in the dough. Lightly flour a clean surface. Take about 2 tablespoons of dough and roll it into a rope shape. It should be about 6 inches long. Form this rope into a circle, sealing the ends to create a wreath shape. Place the wreath cookies on the lined baking sheets. Leave at least 2 inches between each cookie. This helps them not stick together. For a nice finish, brush the tops with an egg yolk. This gives them a shiny look after baking. Sprinkle additional chopped pistachios and cranberries on top for extra charm. Bake the cookies for 12-15 minutes. Look for lightly golden edges but soft centers. Once done, let the cookies cool on the baking sheet for about 5 minutes. After that, transfer them to a wire rack to cool completely. To get the best texture, do not over-mix your dough. Over-mixing can lead to tough cookies. Mix just until you see no dry flour. This keeps the centers soft and the edges lightly golden. To ensure this, watch the baking time closely. Bake the cookies for 12-15 minutes. The edges should be golden, while the centers stay soft. You can add more flavor to your cookies with simple swaps. Try adding orange zest for a bright twist. You might also use almond extract instead of vanilla for a nutty taste. If you want more texture, consider including shredded coconut or white chocolate chips. These small changes can boost the overall flavor. For a festive look, arrange your wreath cookies on a colorful platter. Intermingle them with fresh cranberries and sprigs of rosemary. This creates a beautiful holiday display. You can also dust the cookies with powdered sugar for a snowy effect. Adding a few edible glitter pieces can make them sparkle. Pro Tips Chill the Dough: Refrigerate the dough for 30 minutes before shaping the wreaths to make it easier to handle and to help the cookies maintain their shape during baking. Use Fresh Ingredients: Opt for fresh pistachios and cranberries for better flavor and texture. Dried cranberries should be plump and moist for the best results. Even Baking: Rotate your baking sheets halfway through the baking time to ensure even browning and prevent any hot spots in your oven from affecting the cookies. Creative Variations: Experiment with different nuts like walnuts or almonds, or add white chocolate chips for a delightful twist on these festive wreath cookies. {{image_4}} If you want to make these cookies nut-free, try sunflower seeds. They add a nice crunch. You can also use pumpkin seeds for a fun twist. If you want to swap out the dried cranberries, consider using raisins or chopped apricots. Both add sweetness and chewiness. Wreath cookies are fun, but you can try other shapes too. You could make stars or hearts. Use the same dough and just form it differently. For special events, adjust the wreath size. Smaller wreaths work great for parties, while larger ones can be a centerpiece. To make your cookies even more festive, add spices like cinnamon or nutmeg. These spices give a warm flavor. You can also try colorful toppings to match the season. Red and green sprinkles work well for Christmas. For other holidays, use colors that fit the theme. This makes your cookies stand out on any table. To keep your pistachio cranberry wreath cookies fresh, use an airtight container. A metal tin or plastic container works well. Store them at room temperature, away from direct sunlight. This keeps the cookies soft and tasty. Adding a slice of bread in the container can help maintain moisture. If you want to freeze the cookies, first let them cool completely. Place them in a single layer on a baking sheet. Freeze them for about an hour. After that, transfer the cookies to a freezer-safe bag or container. They can stay frozen for up to three months without losing flavor. When you are ready to enjoy your frozen cookies, take them out and let them sit at room temperature. This usually takes about 30 minutes. For a warm treat, place them in the oven at a low heat for a few minutes. Serve them with a hot drink for a cozy snack! To stop cookies from spreading, chill the dough for 30 minutes. This helps firm it up. Also, use parchment paper on your baking sheets. Make sure not to over-mix the dough. Over-mixing can lead to a thinner cookie. When you shape the wreaths, keep them thick. A thicker dough holds its shape better. Yes, you can make these cookies ahead. First, prepare the dough and shape the wreaths. Then, wrap them tightly in plastic wrap. You can store them in the fridge for up to three days. When ready to bake, take them out and let them sit for 10 minutes. Bake as directed. You can also freeze the shaped dough for up to two months. Just thaw it overnight in the fridge before baking. Decorate these cookies with a simple icing. Mix powdered sugar with a little milk to create a glaze. Drizzle it on top after baking. You can also sprinkle more chopped pistachios and cranberries for color. For a festive touch, add edible glitter or silver sprinkles. Arrange the cookies on a colorful platter. Adding fresh cranberries and rosemary sprigs makes a lovely display. Yes, you have gluten-free options! Use gluten-free all-purpose flour in place of regular flour. Make sure it has xanthan gum, as this helps with texture. The other ingredients are naturally gluten-free. Always check labels to ensure everything is safe. Enjoy the same great taste without the gluten! These pistachio cranberry wreath cookies are sure to impress. We explored easy steps, key ingredients, and tips for the best results. Remember, perfect texture comes from mixing just right. Feel free to customize these treats with different flavors and shapes. Store them properly to keep them fresh. Enjoy baking and sharing these festive cookies with friends and family. You’ll create delightful memories with each bite.

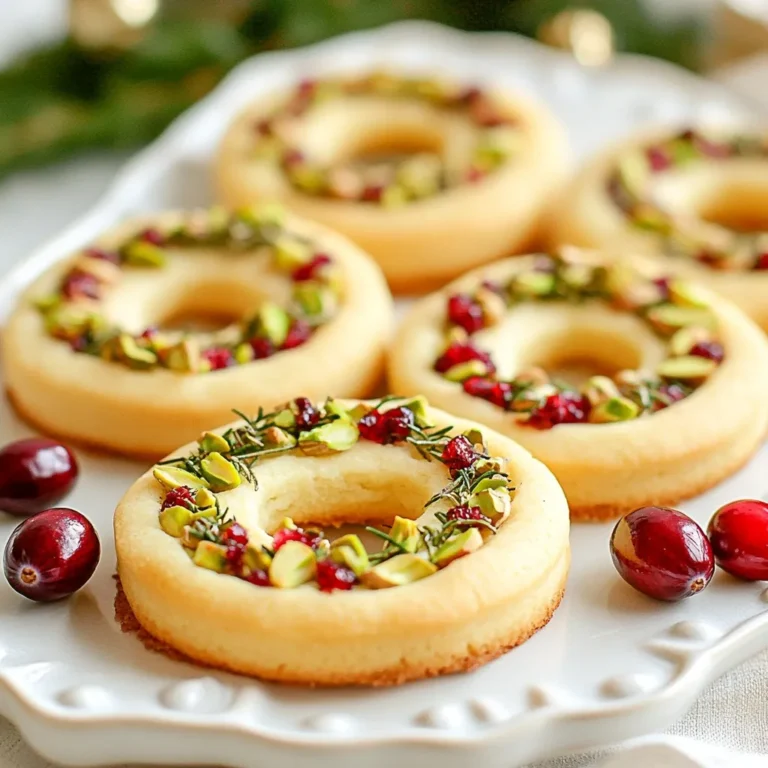
Pistachio Cranberry Wreath Cookies Festive Treats Delight

- 4 boneless, skinless chicken breasts - 1 tablespoon olive oil - 1 teaspoon garlic powder - 1 teaspoon onion powder - 1 teaspoon Italian seasoning - Salt and black pepper, to taste - 1 cup sun-dried tomatoes, roughly chopped - 1 cup heavy cream or dairy-free substitute (coconut cream) - 1 cup grated Parmesan cheese - 2 cups fresh spinach, roughly chopped - Fresh basil leaves for garnish Gathering the right ingredients is key to making Marry Me Chicken. Start with the chicken. I use four boneless, skinless chicken breasts. They cook evenly and stay juicy. Next, you'll need olive oil for searing the chicken. A tablespoon is enough to get that nice golden crust. The spices are where the flavor starts. I use garlic powder, onion powder, and Italian seasoning. Each adds depth to the dish. Don't forget salt and black pepper. They help balance the flavors. For a burst of color and taste, add sun-dried tomatoes. Chopping one cup gives you a sweet, tangy punch. Cream makes this dish rich. I prefer heavy cream, but you can use coconut cream for a dairy-free option. One cup will create a velvety sauce. Parmesan cheese is a must. One cup adds a salty, nutty flavor that pairs well with the cream. Lastly, fresh spinach brightens up the dish. Two cups, roughly chopped, make it colorful and healthy. Top it off with fresh basil leaves for a lovely finish. They add freshness and aroma to your plate. Now you’re ready to make a meal that tastes as good as it sounds! {{ingredient_image_2}} Start by preheating your oven to 375°F (190°C). This step is key to cooking the chicken evenly. While the oven heats, season both sides of the chicken breasts. Use garlic powder, onion powder, Italian seasoning, salt, and black pepper. Make sure to rub the spices well for a full flavor. Next, grab a large oven-safe skillet. Heat the olive oil over medium-high heat until it shimmers. Carefully add the seasoned chicken breasts to the skillet. Sear each side for 5-7 minutes until they turn golden brown. This step locks in the juices and adds a nice crust. Once browned, place the chicken on a plate to rest. In the same skillet, add the chopped sun-dried tomatoes. Sauté them for about 2 minutes. This will help bring out their rich taste. Then, pour in the heavy cream. Stir gently until it simmers but does not boil. Gradually mix in the grated Parmesan cheese. Keep stirring until it melts. The sauce will become creamy and smooth. Finally, add the chopped spinach, stirring until it wilts and turns bright green. Return the seared chicken to the skillet. Make sure to spoon some of the sauce over each piece. Carefully move the skillet to the preheated oven. Bake for 20-25 minutes. Check that the chicken reaches an internal temperature of 165°F (75°C). Once done, take the skillet out and let it cool for a few minutes. Garnish with fresh basil leaves before serving. Enjoy the rich flavors and creamy goodness of this dish! To sear chicken well, use a hot skillet. I like to warm the olive oil until it shimmers. Season the chicken with garlic powder, onion powder, Italian seasoning, salt, and black pepper. This adds flavor. Sear each side for 5-7 minutes until golden brown. Don't overcrowd the pan. This helps keep the heat high and the chicken crispy. For a thicker sauce, add more Parmesan cheese. If your sauce is too thick, add a splash of chicken broth or milk. Stir it in slowly until you reach your desired consistency. Remember, the sauce should coat the chicken without being runny. To serve, place the chicken on a plate and drizzle with sauce. Add fresh basil leaves on top for color. This makes the dish look great. Serve with creamy garlic mashed potatoes or a green salad. This adds balance and makes your meal complete. Pro Tips Use Fresh Ingredients: Always opt for fresh spinach and high-quality sun-dried tomatoes to enhance the flavor of the dish. Perfectly Sear the Chicken: Ensure your skillet is hot before adding the chicken to achieve a beautiful golden crust. Adjust the Creaminess: For a lighter sauce, add more broth or a splash of white wine instead of using only heavy cream. Serve with Style: Pair the dish with crusty bread or over a bed of pasta to soak up the delicious sauce. {{image_4}} You can change the spinach and cheese in Marry Me Chicken to fit your taste. Try kale or Swiss chard instead of spinach. Both add a nice flavor and color. For cheese, goat cheese or feta gives a tangy taste. You can even leave out cheese if you want a lighter dish. If you're looking for a dairy-free option, swap heavy cream for coconut cream. This change keeps the dish creamy while adding a subtle coconut flavor. Use nutritional yeast instead of Parmesan for a cheesy taste without dairy. You can also add a bit of lemon juice for extra brightness. Feel free to add other veggies to the dish. Zucchini, bell peppers, or mushrooms work great. Just chop them small so they cook well. Sauté them with the sun-dried tomatoes for extra flavor. You can mix and match based on what you have at home. This dish can become your own creation! To store your leftover Marry Me Chicken, let it cool first. Place the chicken and sauce in an airtight container. Make sure to cover it well. Store it in the fridge for up to three days. This keeps the flavors fresh and tasty. Reheat your Marry Me Chicken in the oven for the best results. Preheat your oven to 350°F (175°C). Place the chicken in an oven-safe dish. Cover it with foil to keep it moist. Heat for about 15-20 minutes. You can also use a microwave. Heat on medium power for 2-3 minutes, checking often. You can freeze Marry Me Chicken for later. First, let it cool completely. Then, place it in a freezer-safe container. Make sure to label it with the date. It can last up to three months in the freezer. To thaw, move it to the fridge overnight before reheating. Marry Me Chicken is a creamy chicken dish that warms the heart. It uses chicken breasts, sun-dried tomatoes, and a rich cream sauce. This dish is famous for its delicious flavor and tender chicken. Many say it’s so good, it might even lead to a proposal! Yes, you can use chicken thighs instead of breasts. Thighs have more fat, making them juicy and flavorful. Just ensure they cook fully to 165°F (75°C). The cooking time may change slightly, so check for doneness. To make Marry Me Chicken gluten-free, stick to gluten-free ingredients. Use gluten-free flour or skip flour altogether. Ensure your chicken broth and seasonings are gluten-free. This way, everyone can enjoy this tasty dish! Marry Me Chicken pairs well with many sides. Here are some great options: - Creamy garlic mashed potatoes - Simple green salad - Steamed asparagus - Roasted vegetables - Garlic bread These sides enhance the meal and balance the rich chicken flavor. Cooking chicken in the oven takes about 20-25 minutes at 375°F (190°C). Always check the internal temperature to ensure it reaches 165°F (75°C). This ensures the chicken is safe to eat and juicy. You learned how to make Marry Me Chicken and why it’s so loved. With just a handful of ingredients and some easy steps, you can whip up this dish. Remember to choose your favorite cheese or veggies for your own twist. Proper storage and reheating help keep leftovers fresh. Enjoy sharing this meal with loved ones. A great dish like this brings joy and smiles to your table, making any occasion special. Happy cooking!

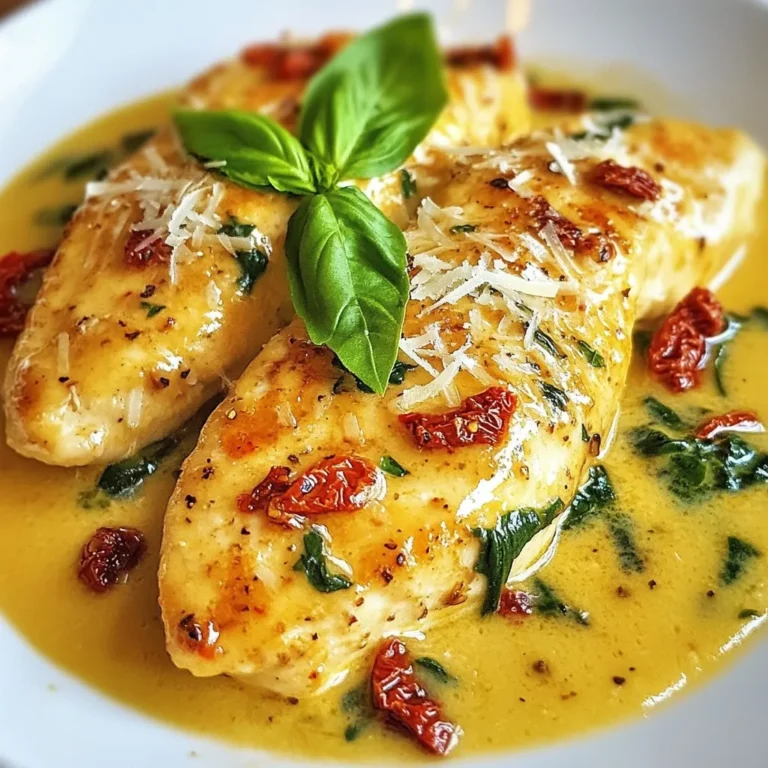
Marry Me Chicken Flavorful Creamy Dinner Recipe

To make your Christmas cookies, you'll need: - 2 cups all-purpose flour - 1 cup unsalted butter, softened to room temperature - 1 cup powdered sugar - 1 large egg - 1 teaspoon pure vanilla extract - 1 teaspoon almond extract - 1 teaspoon baking powder - 1/4 teaspoon fine salt These basic ingredients create a rich, soft dough that bakes into tasty cookies. The butter gives them a nice texture. The egg helps bind everything together. Vanilla and almond extracts add delicious flavors. You can get creative with toppings and decorations. Consider adding: - 1/2 cup colorful sprinkles (for decoration) - 1/2 cup semi-sweet chocolate chips (optional) - 1/2 cup crushed peppermint candies (for topping) - Royal icing (for decorative finishing - optional) Sprinkles and candy canes make these cookies festive. Chocolate chips add richness, while royal icing allows you to pipe fun designs. To make your baking easier, have these tools ready: - Electric mixer - Mixing bowls - Cookie cutters - Rolling pin - Baking sheets - Parchment paper - Spatula - Wire racks These tools help you mix, shape, and bake your cookies. A good electric mixer saves time and effort when creaming butter and sugar. {{ingredient_image_2}} Start by preheating your oven to 350°F (175°C). This sets the stage for baking. Next, line your baking sheets with parchment paper. This keeps the cookies from sticking. In a large bowl, cream together 1 cup of softened butter and 1 cup of powdered sugar. Use an electric mixer on medium speed. Mix until it’s light and fluffy, which takes about 3 to 5 minutes. Now, add 1 large egg along with 1 teaspoon of pure vanilla extract and 1 teaspoon of almond extract. Mix again until everything is well blended. In another bowl, whisk together 2 cups of all-purpose flour, 1 teaspoon of baking powder, and 1/4 teaspoon of fine salt. Slowly add this dry mix to the butter mixture. Mix on low speed until it forms a dough. If you want a twist, fold in 1/2 cup of semi-sweet chocolate chips. Divide the dough into two equal pieces. Flatten each piece into a disk and wrap them in plastic wrap. Chill these in the fridge for about 30 minutes. This helps the cookies keep their shape. After chilling, take one disk and place it on a lightly floured surface. Roll it out to about 1/4 inch thick. Use cookie cutters to cut out fun shapes like stars and Christmas trees. Place the cut-out cookies on the lined baking sheets. Give them space to spread while baking. To make them festive, sprinkle colorful sprinkles and crushed peppermint candies on top. Bake your cookies in the preheated oven for 8 to 10 minutes. Watch them closely. You want the edges to turn golden brown. Once done, let the cookies cool on the baking sheets for about 5 minutes. Then, use a spatula to transfer them to wire racks. Let them cool completely there. If you like, decorate the cooled cookies with royal icing for an extra touch. Pipe designs or cover them fully for a beautiful finish. To get the best cookie texture, use room temperature butter. Cold butter makes cookies hard. Cream the butter and sugar well. This step adds air, making your cookies lighter. After mixing, chill the dough for 30 minutes. Chilling helps prevent spreading while baking. Roll the dough to about 1/4 inch thick. This thickness ensures even baking and a nice bite. For a fun festive look, use colorful sprinkles and crushed peppermint. Add them right before baking. You can also use royal icing after cooling. Pipe simple designs or cover the cookie entirely. Try using different colors to create patterns. For an extra touch, use themed cookie cutters for holiday shapes. Arrange the cookies in a box with parchment paper for a beautiful gift. One common mistake is not measuring flour correctly. Too much flour can make cookies dry. Always spoon flour into your measuring cup and level it off. Another mistake is skipping chilling the dough. This step is key for perfect cookies. Lastly, avoid opening the oven too soon. This can cause cookies to bake unevenly. Keep an eye on them instead. Pro Tips Chill the Dough: Make sure to chill the dough for at least 30 minutes. This helps prevent the cookies from spreading too much while baking, ensuring they maintain their festive shapes. Use Quality Extracts: Opt for pure vanilla and almond extracts instead of imitation ones. The flavor difference is noticeable and will elevate the taste of your cookies. Experiment with Toppings: Feel free to get creative with your toppings! Try using different types of sprinkles or even drizzle melted chocolate on top for a unique twist. Store Properly: To keep your cookies fresh after baking, store them in an airtight container. You can also separate layers with parchment paper to avoid sticking. {{image_4}} You can easily switch up flavors in your cookies. Try adding spices like cinnamon or nutmeg for warmth. For a tangy twist, use lemon or orange zest. If you love chocolate, mix in cocoa powder for rich chocolate cookies. You can also use flavored extracts, like coconut or mint, to make unique treats. These small changes can make a big difference in taste. While classic shapes are fun, you can get creative! Use different cookie cutters to make fun shapes. Think of snowflakes, reindeer, or even gingerbread men. For a rustic touch, roll the dough into balls or logs. Slice them into rounds for a simple yet charming look. You can also make thumbprint cookies by pressing your thumb into the dough and filling it with jam. How you package your cookies can add to the fun. Choose colorful boxes or tins that match the holiday spirit. Layer the cookies with parchment paper to keep them fresh. You can use ribbon or twine to tie the box shut. Add a personal note or a holiday card for a special touch. This makes your homemade treats even more thoughtful and memorable. To keep your cookies fresh, store them in an airtight container. Use layers of parchment paper to separate different types. This method prevents the flavors from mixing. Avoid metal containers, as they can change the taste over time. Keep your cookies in a cool, dry place, away from direct sunlight. For longer freshness, add a slice of bread to the container. The bread absorbs moisture and helps keep the cookies soft. Change the bread slice every few days. You can also wrap cookies individually in plastic wrap. This keeps them fresh for a longer time while maintaining their shape. Freezing is a great way to enjoy cookies later. Start by cooling them completely. Place cookies in a single layer on a baking sheet. Freeze them for about an hour. Once frozen, transfer the cookies to a freezer bag. Remove as much air as possible before sealing. They can last up to three months in the freezer. To eat, let them thaw at room temperature for a few minutes. To create a DIY Christmas cookie box, start with a sturdy box. You can use a simple cardboard box or a decorative tin. Line the inside with parchment paper. This keeps the cookies fresh and adds a nice touch. Next, layer your baked cookies inside. You can separate different types with more parchment paper. Finish by tying a colorful ribbon around the box for a festive look. You can find pre-made Christmas cookie boxes at many stores. Look in craft stores, gift shops, or online retailers. Some grocery stores also carry them during the holiday season. Check for boxes that are sturdy and festive. This way, your cookies will look great and stay fresh. When decorating cookie boxes, think about a theme. Use holiday colors like red, green, and gold. Add stickers, stamps, or drawings to the box. You can also use ribbons and bows for extra flair. Don't forget to include a tag with a sweet message. This adds a personal touch and makes the gift special. Yes, you can freeze the cookies before decorating. After baking, let the cookies cool completely. Then, layer them in an airtight container with parchment paper between each layer. Seal the container tightly and place it in the freezer. When you're ready to decorate, thaw the cookies at room temperature. Baked cookies can last about one week at room temperature. Store them in an airtight container to keep them fresh. If you want them to last longer, freeze them. Frozen cookies can stay good for up to three months. Just remember to thaw them before serving or decorating. This article covered the key ingredients and steps to create tasty Christmas cookies. I shared tips for perfect texture and fun decorating ideas. You learned how to explore flavor variations and unique shapes for your cookies. Plus, we discussed storage tips to keep cookies fresh. With these insights, you can bake and share delightful treats with ease. Enjoy your baking and let your creativity shine!

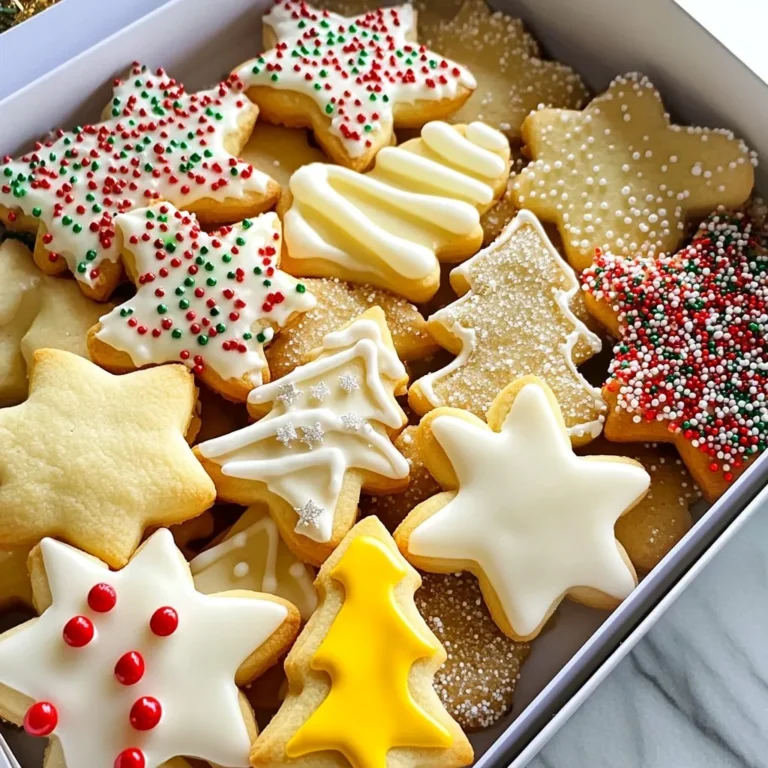
Christmas Cookie Box Simple and Tasty Treat Ideas

PREV 1 2 3 4 … 47 NEXT
meal plan mapper

explore

DessertsDinnerAppetizersDrinks

Our Policies

  • Cookie Policy
  • Copyright Policy
  • Disclaimer
  • GDPR Policy
  • Terms Of Use
Back to Top
  • About
  • Contact Us
  • Privacy Policy
© 2025 meal plan mapper