FREE DINNER EBOOK! Get your copy!
  • Cookie Policy
  • GDPR Policy
  • Disclaimer
  • Terms Of Use
  • Visit my other site: Fun Cookie Recipes
meal plan mapper
  • Home
  • Dinner
  • Desserts
  • Drinks
  • Appetizers
  • Contact
  • About
  • Privacy Policy
  • Home
  • Dinner
  • Desserts
  • Drinks
  • Appetizers
  • Contact
  • About
  • Privacy Policy
  • Cookie Policy
  • GDPR Policy
  • Disclaimer
  • Terms Of Use
Visit my other site: Fun Cookie Recipes

HOME / CATEGORIES /

Latest

- 2 ¾ cups all-purpose flour - 1 teaspoon baking powder - 1 teaspoon baking soda - ½ teaspoon salt - 2 teaspoons ground cinnamon - ½ teaspoon ground nutmeg These dry ingredients form the base of your cookies. First, the all-purpose flour gives structure. Baking powder and baking soda help the cookies rise. Salt enhances flavor, while cinnamon and nutmeg add that warm, holiday taste. - 1 cup unsalted butter, softened - 1 ½ cups granulated sugar - 2 large eggs - 1 teaspoon pure vanilla extract - ½ cup eggnog The wet ingredients bring moisture and flavor. Softened butter makes cookies rich and tender. Granulated sugar sweetens and helps with texture. Eggs bind everything together. Pure vanilla adds depth, and eggnog gives those festive notes we all love. - Granulated sugar - ½ cup powdered sugar for rolling The coating is key for that classic snickerdoodle look. Rolling the cookies in sugar adds sweetness. The powdered sugar gives a lovely finish, making them look even more festive. {{ingredient_image_2}} To start, preheat your oven to 350°F (175°C). This temperature helps the cookies bake evenly. Next, prepare two baking sheets by lining them with parchment paper. This step makes it easy to remove the cookies later. Now, let’s mix the dry ingredients. In a medium bowl, whisk together: - 2 ¾ cups all-purpose flour - 1 teaspoon baking powder - 1 teaspoon baking soda - ½ teaspoon salt - 2 teaspoons ground cinnamon - ½ teaspoon ground nutmeg Make sure these ingredients are well combined. Set this mixture aside for later use. In a large bowl, cream together 1 cup of softened unsalted butter and 1 ½ cups of granulated sugar. Use an electric mixer for about 3 minutes until the mix is light and fluffy. Now, it’s time to add the eggs. Add 2 large eggs one at a time, mixing well after each. Then, mix in 1 teaspoon of pure vanilla extract and ½ cup of eggnog. Keep mixing until the batter is smooth. Next, combine the dry and wet ingredients. Gradually add the dry mixture into the wet mix. Stir gently until the dough forms. Be careful not to overmix, as this can change your cookie texture. Now, shape the cookies. Use a cookie scoop or a tablespoon to drop rounded balls of dough onto the prepared baking sheets. Make sure to space them about 2 inches apart to allow for spreading. For the final touch, roll each cookie dough ball in a mix of ½ cup powdered sugar and a pinch of ground cinnamon. This gives your cookies a sweet, festive coating. Bake the cookies in your preheated oven for 10-12 minutes. Look for lightly golden edges and centers that are just set. Once they’re done, let the cookies cool on the baking sheets for about 5 minutes. After that, carefully transfer them to wire racks to cool completely. To get that soft and chewy cookie, follow these tips when mixing your dough: - Do cream the butter and sugar well. This helps add air, making your cookies light. - Do add the eggs one at a time. This ensures even mixing and smooth dough. - Don’t overmix after adding the dry ingredients. This can make your cookies tough. - Do let your dough rest for a few minutes. Resting helps the flour hydrate, leading to better texture. Eggnog Snickerdoodles are great on their own, but you can boost the flavor: - Add more spices! Consider a pinch of ground cloves or allspice for warmth. - Use flavored extracts. A splash of almond extract can give a nice twist. - Try mixing in some finely chopped nuts. Walnuts or pecans can add a delightful crunch. How you present your cookies can make a big difference: - Stack cookies on a festive platter. This gives a lovely holiday feel. - Sprinkle a little cinnamon on top for an extra touch. - Drizzle a simple glaze made from powdered sugar and eggnog over cooled cookies. It adds a sweet finish and looks pretty. Pro Tips Chill the Dough: For thicker cookies, refrigerate the dough for at least 30 minutes before baking. This helps prevent them from spreading too much in the oven. Use Fresh Spices: For the best flavor, use freshly ground cinnamon and nutmeg. They can significantly enhance the taste of your cookies. Check for Doneness: To avoid overbaking, watch the cookies closely during the last few minutes. They should be lightly golden at the edges but still soft in the center. Store Properly: Keep your cookies in an airtight container at room temperature for up to one week to maintain their softness and flavor. {{image_4}} To make these Eggnog Snickerdoodle Cookies gluten-free, use a blend of gluten-free flour. I recommend using a 1:1 gluten-free flour mix. These blends often include rice flour, tapioca starch, and potato starch. They work well in cookies and keep the texture nice. To create a vegan version, replace the eggs with flaxseed meal. Mix 1 tablespoon of flaxseed with 2.5 tablespoons of water for each egg. This will help bind the dough. For the butter, you can use coconut oil or vegan butter. Both options ensure the cookies remain soft and tasty. Want to add a twist? Try adding chocolate chips or dried fruits like cranberries or raisins. These additions bring new flavors to the cookies. You can also experiment with different spices, like ginger or cardamom, for extra warmth. Each variant provides a fun spin on your classic holiday treat. To keep your Eggnog Snickerdoodle Cookies fresh, store them at room temperature. Use an airtight container. This helps keep the cookies soft and tasty. Place parchment paper between layers to prevent sticking. They stay good for about a week. If you want to save cookies for later, freezing works great. First, let them cool completely. Then, wrap each cookie in plastic wrap. Place the wrapped cookies in a freezer bag. This prevents freezer burn. They can last up to three months in the freezer. Stale cookies can still be enjoyable. To bring back freshness, place them in an airtight container with a slice of bread. The moisture from the bread helps soften the cookies. You can also warm them in the oven for a few minutes. This makes them taste fresh again. Look for a few clear signs to know if your cookies are ready. First, check the edges. They should be lightly golden brown. Next, the centers should look just set. They might still feel soft to the touch, but don’t worry; they will firm up as they cool. Finally, a light crack on top can also show that they are done. These signs will help you bake perfect eggnog snickerdoodle cookies. Yes, you can make the dough ahead of time. This is a great way to save time on baking day. After mixing your dough, wrap it tightly in plastic wrap. You can keep it in the fridge for up to three days. If you want to store it longer, freeze the dough instead. Just make sure to wrap it well to prevent freezer burn. When you're ready to bake, let it thaw in the fridge overnight. If you can't find eggnog, don’t worry. You can make easy swaps. Mix one cup of milk or cream with a tablespoon of vanilla extract and a pinch of nutmeg. This will give you a similar flavor. You can also use almond milk or coconut milk with spices for a dairy-free option. These alternatives work well in the recipe and keep the festive spirit alive. You've learned about the key ingredients and steps to bake delicious cookies. We covered how to mix dry and wet ingredients, shape the dough, and bake to perfection. I shared tips for the best texture and flavor enhancements. Variations allow you to customize recipes, and proper storage keeps your cookies fresh. Baking cookies can be simple and fun. You’ll impress everyone with your baking skills and creativity. Enjoy your cookie journey and keep experimenting!

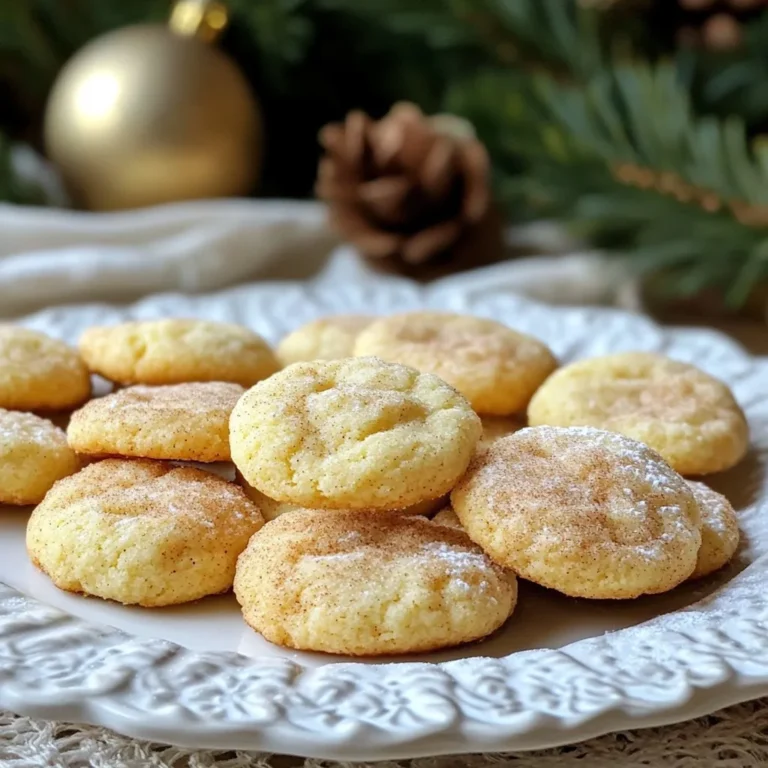
Eggnog Snickerdoodle Cookies Festive Holiday Treat

- 1 cup dried white beans (cannellini or navy), soaked overnight - 1 tablespoon olive oil - 1 medium onion, finely diced - 2 cloves garlic, minced - 1 medium carrot, peeled and diced - 1 celery stalk, diced - 2 medium potatoes, peeled and diced into ½-inch cubes - 4 cups vegetable broth (or chicken broth) - 1 cup cooked Italian sausage, sliced (or plant-based sausage) - 1 cup heavy cream or coconut cream - Salt and black pepper to taste - 1 teaspoon smoked paprika - ½ teaspoon dried thyme - 2 cups fresh spinach, roughly chopped - Fresh parsley, chopped for garnish - A pinch of red pepper flakes for heat - Fresh lemon juice for brightness - Other vegetables like bell peppers or zucchini - Calories: Approximately 400 - Protein: 18g - Carbohydrates: 45g - Fat: 18g - Fiber: 10g - Sodium: Varies with broth choice This soup is not just filling; it’s also packed with nutrition. You can easily adjust the ingredients based on what you have. The optional ingredients keep it interesting. Adding red pepper flakes can give it a nice kick. A splash of lemon juice brightens the flavor. Enjoy experimenting! {{ingredient_image_2}} First, soak your dried beans overnight. This makes them soft and ready to cook. Drain the beans after soaking. Rinse them under cold water to remove extra starch. This step helps keep the soup creamy. Set the beans aside while you prepare the rest of the soup. Grab a large pot and heat one tablespoon of olive oil on medium heat. Once hot, add the diced onion, minced garlic, diced carrot, and diced celery. Sauté these together for about 5 to 7 minutes. Stir occasionally until the veggies soften and smell great. This mix forms the base of your soup, adding depth and flavor. Next, add the diced potatoes and the rinsed beans to the pot. Mix everything well and let it cook for 3 minutes. Now, pour in four cups of vegetable broth or chicken broth for more flavor. Stir in one teaspoon of smoked paprika and half a teaspoon of dried thyme. Season with salt and pepper. Increase the heat until it boils. Once boiling, lower the heat and let it simmer uncovered for 30 to 40 minutes. You want the beans to become tender and creamy. After the beans soften, stir in one cup of sliced cooked sausage and one cup of heavy cream or coconut cream. Let it simmer for another 10 minutes. This step blends all the flavors perfectly. Finally, fold in two cups of chopped spinach and cook for another 2 to 3 minutes until it wilts. Taste your soup and adjust seasoning if needed. To make your soup burst with flavor, use fresh herbs. Fresh parsley adds a bright touch. Smoked paprika gives the soup warmth and depth. Thyme adds an earthy taste. You can also try adding a pinch of red pepper flakes for heat. Always taste your soup as you cook. Adjust seasonings to fit your taste. If your soup is too thick, add more broth or water. Stir well to mix. For a creamier texture, blend a portion of the soup. Use an immersion blender for a quick mix. You can also add more cream if you like it rich. Remember, it's easier to thin a thick soup than to thicken a thin one. Serve your soup in deep, rustic bowls. This gives a cozy feel. Drizzle quality olive oil on top for shine. A sprinkle of cracked black pepper adds taste and looks great. For extra flair, add some fresh parsley. Pair the soup with crusty bread. This helps soak up every creamy bite, making it a complete meal. Pro Tips Soak Your Beans: Soaking your beans overnight not only reduces cooking time but also enhances their digestibility. Flavor Depth: For a richer flavor, consider browning the sausage in the pot before adding the vegetables. Adjust Consistency: If the soup is too thick, add more broth or water until the desired consistency is achieved. Fresh Herbs: Add fresh herbs like basil or dill at the end of cooking for a burst of color and flavor. {{image_4}} You can easily make this soup vegetarian or vegan. Just swap the sausage for plant-based sausage. This change keeps the flavor rich and satisfying. For a creamy texture, use coconut cream instead of heavy cream. It adds a nice sweetness. Also, ensure your broth is vegetable-based. This keeps it fully plant-friendly. The type of sausage you use can change the soup's flavor. Italian sausage adds a lovely spice. If you prefer a milder taste, use chicken sausage. You can also try smoked sausage for a deeper flavor. Each choice brings a unique twist. Feel free to mix and match to find your favorite combination. Seasonal vegetables can make this soup even better. In fall, try adding butternut squash for sweetness. In spring, fresh asparagus adds a nice crunch. You can toss in kale or Swiss chard too. These greens boost nutrition and color. Just chop them up and add them during the last few minutes of cooking. This way, they stay bright and vibrant. Store leftover creamy bean soup in an airtight container. Place the soup in the fridge within two hours of cooking. It will stay fresh for about three to four days. Make sure to let it cool before sealing the container. This helps keep the texture smooth. You can freeze this soup for later enjoyment. Use a freezer-safe container or a heavy-duty freezer bag. Leave some space at the top, as the soup will expand when frozen. It is best to freeze it within two days of cooking. The soup can last up to three months in the freezer. To reheat, thaw the soup in the fridge overnight if frozen. Heat it gently on the stove over low heat. Stir often to prevent sticking. If the soup is too thick, add a splash of broth or water. You can also reheat it in the microwave. Use a microwave-safe bowl and cover it to avoid splatters. Heat in short bursts, stirring in between, until hot. Yes, you can use canned beans. Canned beans save time and are easy to use. Just rinse them well before adding to the soup. You can skip the soaking step. Use two cans of beans for this recipe. This will still give you a creamy texture and rich flavor. To add spice, consider using red pepper flakes or diced jalapeños. You can also mix in a dash of hot sauce. Start with a small amount, then taste as you go. If you like heat, add more until it's just right for you. This will enhance the flavor without overpowering the soup. This soup pairs well with crusty bread or a fresh salad. You can also serve it with grilled cheese sandwiches for a cozy meal. Try a sprinkle of fresh herbs on top to add color and flavor. Enjoy this comforting meal with family or friends for a warm gathering. This blog post covered how to make a delicious creamy bean soup. I talked about the main and optional ingredients, plus the nutrition facts. You learned step-by-step how to prepare the beans, sauté veggies, and simmer the soup. I shared tips for flavor, texture, and presentation. There are variations for vegetarians and different sausages, so you can customize your dish. Lastly, I gave storage and reheating advice to enjoy it later. Remember, cooking can be fun. Experiment and make this soup your own!

Creamy Bean Soup with Sausage Nourishing Comfort Meal

To make these tasty teriyaki chicken meatballs, you need a few key items: - 1 lb ground chicken - 2 green onions, finely chopped - 1/4 cup breadcrumbs - 1 large egg - 2 cloves garlic, minced - 1 tablespoon fresh ginger, grated These ingredients create a moist and flavorful base for your meatballs. Next, you need the right flavors to make your meatballs pop. Here's what to include: - 1/4 cup low-sodium soy sauce - 2 tablespoons honey - 1 tablespoon sesame oil - 1 tablespoon rice vinegar - 1 tablespoon cornstarch mixed with 2 tablespoons water (slurry) These seasonings add sweetness and depth to the dish. The soy sauce gives it that classic umami taste. To finish your dish, consider these garnishes: - Sesame seeds, for garnish - Fresh cilantro, for garnish These add a nice crunch and bright flavor. You can also serve the meatballs on a bed of rice and top with extra green onions for a complete meal. {{ingredient_image_2}} To start, grab a big mixing bowl. Add 1 pound of ground chicken to the bowl. Next, toss in 2 finely chopped green onions, 1/4 cup of breadcrumbs, and 1 large egg. Then, add 2 minced garlic cloves and 1 tablespoon of grated fresh ginger. Use your hands or a spatula to mix everything well. Make sure all the ingredients blend together nicely. This mixture forms the base of your meatballs. Now, it’s time to shape the meatballs. With clean hands, take a small amount of the mixture and roll it into a ball. Aim for about 1 inch in size. Place the shaped meatballs on a plate or baking sheet. Once you've shaped all the meatballs, heat a non-stick skillet over medium heat. Add the meatballs in batches to avoid crowding. Cook them for about 5 to 6 minutes. Turn them gently with tongs or a spatula until they are golden brown and cooked through. While the meatballs cook, let’s make the teriyaki sauce. In a separate bowl, whisk together 1/4 cup of low-sodium soy sauce, 2 tablespoons of honey, 1 tablespoon of sesame oil, and 1 tablespoon of rice vinegar. Mix until the sauce is smooth. Once the meatballs are ready, pour the sauce over them in the skillet. Turn up the heat a little to bring it to a gentle simmer. Then, mix in a cornstarch slurry made from 1 tablespoon of cornstarch and 2 tablespoons of water. Stir the sauce for 2-3 minutes until it thickens. The sauce should coat the meatballs nicely. After that, serve your meatballs hot and enjoy! To make the best teriyaki chicken meatballs, start with good ground chicken. Fresh chicken keeps the meatballs moist. Mix the ingredients gently. Over-mixing can make them tough. Shape the meatballs to about one inch. This size cooks evenly. Use a small scoop for uniformity. Keep your hands wet to prevent sticking. Cook the meatballs in batches. This ensures they brown nicely. Don't overcrowd the pan. Give them space to sear and develop flavor. For a glossy sauce, use a cornstarch slurry. Mix one tablespoon of cornstarch with two tablespoons of water. Stir it into the sauce as it simmers. This will thicken it quickly. Whisk the teriyaki sauce well before adding it to the pan. This helps combine the flavors. If the sauce is too thick, add a little water. If it’s too thin, let it simmer longer. I like to serve meatballs on a bed of fluffy rice. The rice absorbs the sauce well. Drizzle extra teriyaki sauce on top for flavor. Garnish with sesame seeds and fresh cilantro. This adds a nice crunch and color. You can also add sliced green onions for a fresh touch. A lime wedge on the side gives a zesty kick. Enjoy your flavorful meal! Pro Tips Use Fresh Ingredients: Fresh garlic and ginger will elevate the flavor of your meatballs significantly. Avoid using pre-minced versions for the best taste. Check for Doneness: Ensure the meatballs are fully cooked by using a meat thermometer; chicken should reach an internal temperature of 165°F (75°C). Adjust Sauce Thickness: If you prefer a thinner sauce, reduce the amount of cornstarch in the slurry or add a little water to achieve your desired consistency. Experiment with Flavors: Feel free to add other ingredients like crushed red pepper flakes for heat or pineapple juice for sweetness to the teriyaki sauce for a unique twist. {{image_4}} You can switch up the ground chicken for other proteins. Ground turkey works well. It has a similar texture and flavor. You can also try ground beef or pork. If you prefer plant-based options, use lentils or chickpeas. These choices make a tasty vegetarian meatball. The teriyaki sauce can be personalized too. For a spicy kick, add sriracha or crushed red pepper. If you want a sweeter sauce, increase the honey. You can also add pineapple juice for a fruity twist. Try using coconut aminos instead of soy sauce for a gluten-free option. Serve your meatballs with different sides to mix things up. Steamed broccoli and brown rice create a healthy meal. You could also pair them with quinoa or cauliflower rice for a low-carb option. For a fun twist, serve them in a lettuce wrap. This makes for a light and crunchy bite. To keep your teriyaki chicken meatballs fresh, store them in an airtight container. Let the meatballs cool to room temperature before packing them. This helps prevent moisture build-up, which can make them soggy. You can keep them in the fridge for up to three days. If you plan to enjoy them later, it’s best to separate the meatballs from the sauce. This keeps the meatballs from getting too soft. When you're ready to eat your leftovers, reheating is easy. You can use a microwave or a skillet. For the microwave, place the meatballs on a plate, cover them with a damp paper towel, and heat for about 1-2 minutes. For a skillet, add a splash of water or more teriyaki sauce over medium heat. Stir gently until they are warm. Remember to check that the meatballs are hot throughout before serving. If you want to store your teriyaki chicken meatballs for a longer time, freezing is a great option. Place the cooled meatballs in a single layer on a baking sheet and freeze for about an hour. This prevents them from sticking together. After they are firm, transfer them to a freezer-safe bag or container. They can last for up to three months in the freezer. When you're ready to eat, thaw them in the fridge overnight before reheating. You can use ground turkey or pork as a substitute. Both have great flavor and work well. If you prefer a meat-free option, try ground tofu or a plant-based meat. These alternatives keep the dish tasty and satisfying. Yes, you can prepare the meatballs ahead. Shape them and store them in the fridge for up to a day. You can also freeze them for longer storage. Just thaw them before cooking. The teriyaki sauce can also be made in advance. Store it in the fridge until you are ready to use it. Cook the meatballs for about 5-6 minutes in a skillet. Make sure they are golden brown outside. The meatballs should reach an internal temperature of 165°F. Use a meat thermometer to check. This ensures they are safe to eat and juicy inside. In this post, we covered how to make tasty teriyaki chicken meatballs. We discussed the key ingredients, from meat and seasonings to garnishes. You learned how to mix, shape, and cook the meatballs and create the sauce. I shared helpful cooking tips and variations for unique flavors. Lastly, we addressed storage and answered common questions. These meatballs are delicious and easy to make. Try them out today!

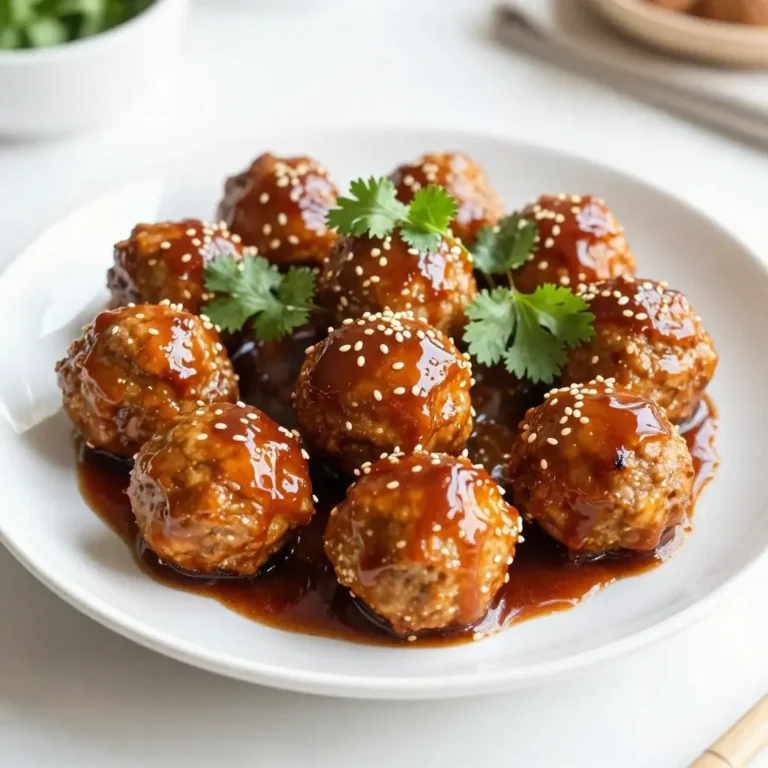
Savory Teriyaki Chicken Meatballs Easy Recipe Guide

- 1 package of refrigerated pizza dough - 1 cup pizza sauce - 2 cups shredded mozzarella cheese - 1 cup sliced pepperoni - 1 teaspoon dried oregano - 1 teaspoon garlic powder - 1 tablespoon olive oil - Fresh basil leaves for garnish (optional) Gathering the right ingredients is key to making delicious pepperoni pizza pinwheels. Start with a package of refrigerated pizza dough. This dough is easy to handle and saves time. Next, grab one cup of pizza sauce for that classic flavor. You will need two cups of shredded mozzarella cheese. This cheese melts beautifully and gives the pinwheels that gooey texture we all love. Sliced pepperoni is a must, and you will need one cup of it. For added flavor, use one teaspoon of dried oregano and one teaspoon of garlic powder. These spices enhance the taste of your pinwheels. You’ll also need one tablespoon of olive oil. This will help create a golden crust as the pinwheels bake. If you want to add a fresh touch, consider using fresh basil leaves for garnish. They add a nice pop of color and flavor. Make sure you have everything ready before starting. This way, you can enjoy a smooth cooking process. {{ingredient_image_2}} - Preheat the oven: Start by preheating your oven to 400°F (200°C). This step ensures your pinwheels cook evenly. - Roll out the dough: On a floured surface, roll out the pizza dough into a rectangle. Aim for about ¼ inch thick for the best pinwheel shape. - Spread the sauce: Use a spatula or spoon to spread the pizza sauce over the dough. Leave a ½ inch border around the edges to prevent overflow. - Add the cheese: Sprinkle the shredded mozzarella cheese evenly over the sauce. Make sure to cover all areas for that cheesy goodness. - Layer the pepperoni: Place the sliced pepperoni on top of the cheese. Spread it out well to pack in the flavor in each bite. - Season the filling: Sprinkle dried oregano and garlic powder over the cheese and pepperoni. This will add a lovely herby taste. - Roll up the dough: Starting from one long edge, tightly roll the dough into a log shape. Keep all the fillings secure inside as you roll. - Slice the pinwheels: Use a sharp knife or pizza cutter to slice the log into 1-inch thick pinwheels. This size is perfect for snacking or dipping. - Arrange for baking: Place the pinwheels cut side up on a lined baking sheet. Space them apart to give them room to expand while baking. - Brush with olive oil: Lightly coat the tops of the pinwheels with olive oil using a pastry brush. This helps them turn golden brown in the oven. - Bake until golden brown: Bake the pinwheels in the oven for 15-20 minutes. Watch them closely until they are golden and the cheese is bubbly. - Cool and garnish: After baking, take the pinwheels out and let them cool for a few minutes. If desired, add fresh basil leaves for a pop of color and flavor. - Ensure the right thickness: Roll the dough to about ¼ inch thick. This thickness helps the pinwheels hold their shape. Too thin, and they may tear. - Avoid overfilling: Use just enough sauce, cheese, and pepperoni. If you add too much, it can spill out when you roll. - Suggested spices: Try adding red pepper flakes for a spicy kick. A sprinkle of Italian seasoning can also add depth of flavor. - Cheese variations: Mix mozzarella with provolone or cheddar for a richer taste. You can even use a spicy cheese for extra flavor. - Dipping sauces: Serve with extra pizza sauce, ranch dressing, or garlic butter for dipping. These add a fun twist to each bite. - Presentation tips: Arrange pinwheels on a colorful platter. Garnish with fresh basil leaves for a pop of color and flavor. This makes the dish more inviting! Pro Tips Use Room Temperature Dough: Allow the refrigerated pizza dough to sit at room temperature for about 10-15 minutes before rolling it out. This makes it easier to handle and roll without tearing. Experiment with Fillings: Feel free to customize your pinwheels with additional toppings like bell peppers, mushrooms, or olives. Just be sure to keep the moisture content in check to avoid sogginess. Perfect Slices: Use a sharp knife or pizza cutter to slice the pinwheels. A clean cut helps keep the filling intact and showcases the beautiful layers when served. Serve with Dipping Sauce: Enhance the flavor experience by serving your pinwheels with extra pizza sauce or marinara for dipping. It adds a delightful touch that everyone will love! {{image_4}} You can easily make these pinwheels meat-free. Use veggies like bell peppers, mushrooms, or spinach. They add great flavor and texture. For cheese, try using a blend of mozzarella and ricotta for creaminess. You could also swap in vegan cheese for a dairy-free option. If you love meat, add more! Include diced ham, cooked bacon, or even sliced sausage. These additions pack the pinwheels with flavor. Just layer them on top of the cheese before you roll the dough. You can change the sauce to create new tastes. Try pesto, barbecue sauce, or even Alfredo for a twist. Adding vegetables like olives or jalapeños can also enhance the flavor profile. Mix and match to find your favorite combination! To store leftovers, let the pinwheels cool completely. Place them in an airtight container. Keep them in the fridge for up to 3 days. If you want to keep them fresh, avoid stacking them too tightly. This helps keep the texture nice. You can freeze pinwheels before or after baking. If you freeze them before baking, slice the log into pinwheels and place them on a baking sheet. Freeze them for about one hour. Once frozen, transfer to a freezer bag. If you freeze after baking, let them cool, then wrap them tightly in foil or plastic wrap. They can last up to 2 months in the freezer. For the best taste, reheat pinwheels in the oven. Preheat your oven to 350°F (175°C). Place the pinwheels on a baking sheet and heat for about 10-15 minutes. This keeps them crispy. You can also use the microwave, but they may become soft. If you use the microwave, heat in short bursts. Enjoy your tasty pinwheels warm! How long do they take to bake? They take about 15-20 minutes to bake. Keep an eye on them. You want them golden brown and bubbly. Can I use homemade pizza dough? Yes, you can use homemade pizza dough. Just roll it out to the right thickness. This will help the pinwheels hold together. What can I substitute for pizza sauce? You can use marinara sauce or pesto instead of pizza sauce. Both add great flavor. Try a white sauce for a creamy twist. How do I make them ahead of time? You can prepare the pinwheels a day before. Just roll, slice, and store them in the fridge. Bake them fresh when you're ready to serve. Can I air fry pepperoni pizza pinwheels? Absolutely! Air frying makes them crispy. Set the air fryer to 375°F and cook for about 10-12 minutes. Check for golden brown color. You learned how to make tasty pepperoni pizza pinwheels. We covered the ingredients, preparation, and final steps. I shared helpful tips and variations you can try. Store your leftovers correctly to enjoy later. With these simple steps, you can impress your family and friends. Try different flavors and toppings to make these pinwheels your own. Enjoy your cooking adventure and have fun with this easy recipe!

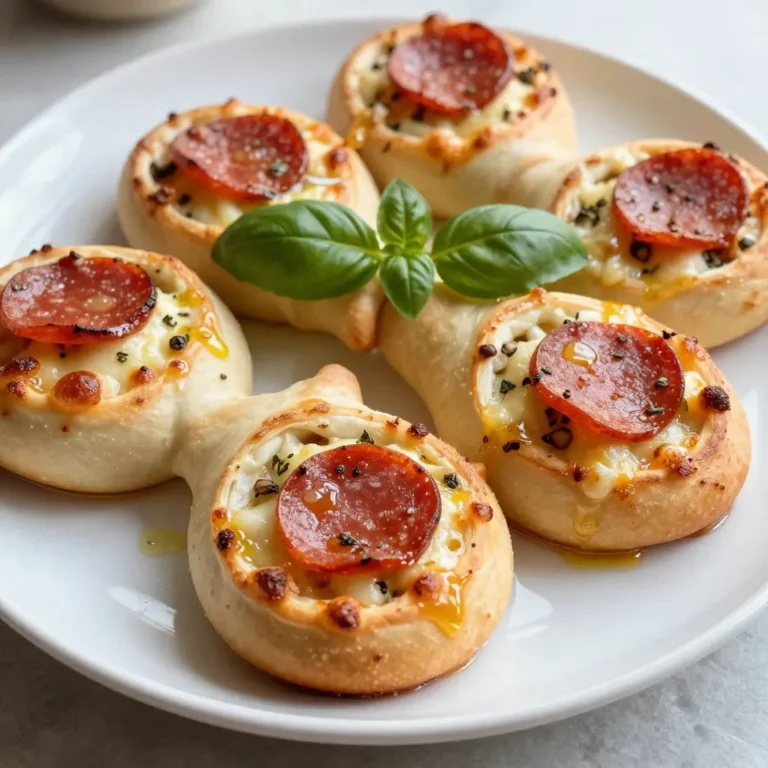
Pepperoni Pizza Pinwheels Tasty and Easy Recipe

- 1 cup all-purpose flour - 2 tablespoons granulated sugar - 1 teaspoon baking powder - 1/2 teaspoon baking soda - 1/4 teaspoon salt - 1 cup buttermilk - 1 large egg These are the core elements that create the base of your churro pancakes. All-purpose flour gives structure, while baking powder and soda help them rise. Buttermilk adds moisture and a slight tang, and the egg binds everything together. - 2 tablespoons unsalted butter, melted - 1 tablespoon vanilla extract - 1 teaspoon ground cinnamon (for pancake batter) Butter brings richness, and vanilla gives a sweet aroma. Ground cinnamon adds that special churro flavor, making each bite taste like a treat from a fair. - Chocolate sauce (for drizzling) - Additional cinnamon sugar (for garnishing) Chocolate sauce adds a sweet touch, and extra cinnamon sugar takes your pancakes to the next level. You can use these to customize your pancakes for a fun, indulgent breakfast. {{ingredient_image_2}} 1. In a large bowl, combine these dry ingredients: - 1 cup all-purpose flour - 2 tablespoons granulated sugar - 1 teaspoon baking powder - 1/2 teaspoon baking soda - 1/4 teaspoon salt - 1 teaspoon ground cinnamon Whisk them well until there are no lumps. 2. In another bowl, mix the wet ingredients: - 1 cup buttermilk - 1 large egg - 2 tablespoons melted unsalted butter - 1 tablespoon vanilla extract Beat until smooth and uniform. 3. Gradually pour the wet mixture into the dry ingredients. Stir gently with a spatula. It's okay if the batter is slightly lumpy; don’t overmix. 1. Preheat a non-stick skillet or griddle over medium heat. Grease it lightly with butter or cooking spray. 2. For each pancake, pour about 1/4 cup of batter onto the skillet. Cook until small bubbles form, about 2-3 minutes. 3. Flip the pancakes carefully and cook for another 2-3 minutes until they turn golden-brown. 1. Prepare the churro-inspired coating. In a shallow dish, mix together: - 1/4 cup granulated sugar - 2 teaspoons ground cinnamon Stir until well combined. 2. Once pancakes are done, coat them in the cinnamon-sugar mixture. Make sure to cover both sides. 3. Serve the pancakes warm. You can drizzle chocolate sauce on top if you want a special touch. Enjoy! To make perfect pancakes, avoid overmixing the batter. Mix until just combined. It is okay if the batter is a bit lumpy. Overmixing can make pancakes tough. For a golden-brown color, cook them on medium heat. Watch for small bubbles on the surface. Flip them when you see these bubbles forming. Cook for another 2-3 minutes until golden. The right cinnamon-sugar ratio is key for churro flavor. Use 1/4 cup of sugar and 2 teaspoons of cinnamon for coating. This mix gives the right balance of sweetness and spice. Time your coating right. Coat each pancake while they’re warm. This helps the sugar stick better. Serve your churro pancakes with flair. Stack them high on a plate for an elegant look. Drizzle with chocolate sauce for a rich touch. You can also sprinkle extra cinnamon sugar on top. Fresh fruit like strawberries or bananas adds color and taste. Pro Tips Use Fresh Ingredients: Ensure your baking powder and baking soda are fresh for the best rise and fluffiness in your pancakes. Don’t Overmix: Mix the batter just until combined to keep the pancakes light and fluffy. A few lumps are okay! Adjust the Heat: If your pancakes are browning too quickly, lower the heat slightly. Cooking them too fast can result in raw centers. Serve Immediately: For the best experience, serve these pancakes right after coating them in cinnamon sugar for optimal warmth and crunch. {{image_4}} You can make these churro pancakes fit your needs. For a dairy-free option, use almond milk or oat milk instead of buttermilk. You can also swap the egg with a flaxseed mixture. Mix 1 tablespoon of ground flaxseed with 2.5 tablespoons of water. Let it sit for five minutes to thicken. If you need a gluten-free version, try using a gluten-free flour blend. Many blends work well in pancakes. Just make sure it has xanthan gum for the right texture. To jazz up your churro pancakes, add chocolate chips or nuts. Chocolate chips melt and create gooey pockets of goodness. Walnuts or pecans add a nice crunch. For seasonal fun, think about pumpkin spice in the fall. Mix in pumpkin puree and a bit of nutmeg for a cozy twist. You can even add a dash of orange zest for a fresh flavor. You can enjoy these pancakes as a dessert, too! Stack them high, and serve them with whipped cream or ice cream. Drizzle with chocolate sauce for extra sweetness. For a fancy touch, try different toppings. Use fresh berries, caramel sauce, or a sprinkle of toasted coconut. Each option adds a new layer of taste and makes your plate look stunning. To store leftover pancakes, first let them cool completely. Place them in a single layer on a plate. Cover the plate with plastic wrap or foil. You can also use an airtight container. This will help keep them fresh in the fridge. For long-term storage, freezing is a great option. Stack pancakes with parchment paper between each layer. This will prevent them from sticking together. Then, place the stack in a freezer-safe bag. Squeeze out as much air as possible before sealing. The best way to reheat pancakes is in the toaster or microwave. If using the toaster, pop them in for a few minutes. They will get warm and slightly crisp. For the microwave, place pancakes on a plate. Heat them for about 20 seconds or until warm. To maintain their texture, don’t overheat. Pancakes can get tough if heated too long. Check them often while reheating. In the fridge, pancakes last about 3 to 4 days. If you freeze them, they can last up to 2 months. Just remember to check for freezer burn. Signs of spoilage include a sour smell or a change in color. If they look or smell off, it’s best to toss them. Enjoy your churro pancakes while they are fresh! Spanish churro pancakes are a fun twist on traditional pancakes. They blend soft, fluffy pancake texture with the sweet, warm flavors of churros. You use simple ingredients like flour, sugar, baking powder, and cinnamon. The batter is light and airy. When cooked, you coat the pancakes in a mix of sugar and cinnamon. This adds a delightful crunch and sweetness. You might also drizzle them with chocolate sauce for extra flavor. Yes, you can make these pancakes ahead of time! Prepare a big batch and store them in the fridge. To reheat, place them in a toaster or microwave. If using the microwave, heat for about 20-30 seconds. For the toaster, toast until warm. This keeps them soft and tasty. Enjoy them later with friends or family! You can use whole wheat flour, but the pancakes will be denser. Whole wheat gives a nuttier flavor. This change may also make them less fluffy. If you want, mix whole wheat and all-purpose flour for a balance. Start with half of each. This way, you can enjoy the benefits of both types of flour while keeping the texture light and flavorful. In this blog post, I covered how to make Spanish churro pancakes from scratch. We looked at essential and optional ingredients, step-by-step instructions, and handy tips. Remember, mixing too much can ruin your pancakes. You can customize them with various flavors, and they store well for later. As you explore this recipe, have fun experimenting with ingredients and presentation. Enjoy the delicious results, whether for breakfast or dessert!

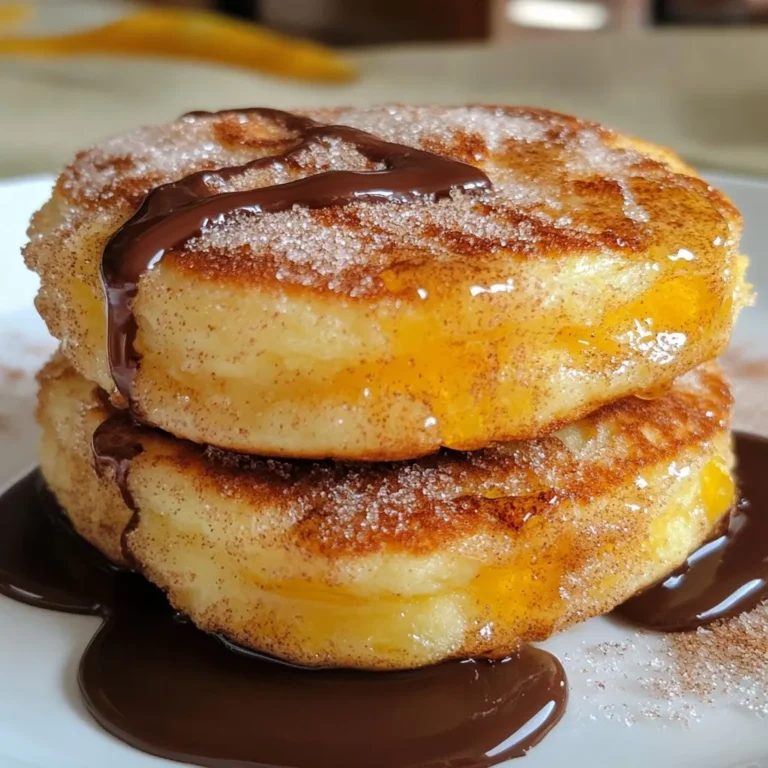
Spanish Churro Pancakes Delightful and Easy Recipe

- 1 cup graham cracker crumbs - 8 oz cream cheese - 1 cup fresh strawberries - 1 cup crushed cornflakes - 1/4 cup granulated sugar - 1/2 teaspoon ground cinnamon - Fresh mint leaves - Honey or chocolate sauce To make Strawberry Crunch Cheesecake Tacos, you need key ingredients that bring great flavor. The graham cracker crumbs form the base, giving a sweet crunch. The cream cheese is crucial for the creamy filling. It adds richness and depth. Next, fresh strawberries are vital. They add a sweet, fruity flavor. You will enjoy their brightness in every bite. For the crunch, you will use crushed cornflakes. They add a delightful crunch and contrast to the creamy filling. Granulated sugar sweetens the crunch, while ground cinnamon adds a warm spice note. You can also add fresh mint leaves for a pop of color and aroma. A drizzle of honey or chocolate sauce can enhance sweetness and visual appeal. These ingredients work together to create a fun and tasty dessert. Each one plays an important role in the final dish. {{ingredient_image_2}} - In a bowl, mix 1 cup of graham cracker crumbs, 1 cup of crushed cornflakes, 1/4 cup of granulated sugar, and 1/2 teaspoon of ground cinnamon. This gives the shells flavor and crunch. - Pour in 1/2 cup of melted unsalted butter. Use a fork or your hands to mix until it looks like damp sand. This texture helps the shells hold together. - Preheat your oven to 350°F (175°C). You can use taco shell molds or turn a muffin tin upside down. - Press the crumb mixture into the taco shapes, making sure they are compact. This ensures they do not fall apart when baked. - Place the molded taco shells on a baking tray. Bake them for 10-12 minutes, or until they turn golden brown. - After baking, let them cool completely on a wire rack. This helps them crisp up nicely. - In a large bowl, beat 8 oz of softened cream cheese with an electric mixer. Mix until smooth and creamy. - Gradually add 1/2 cup of powdered sugar and 1 teaspoon of vanilla extract. Keep mixing until it is fluffy and well blended. - In a separate bowl, whisk 1 cup of heavy whipping cream until stiff peaks form. This makes the filling light. - Gently fold the whipped cream into the cream cheese mixture with a spatula. Be careful not to deflate the whipped cream. - Once the taco shells are cool, carefully remove them from the molds. - Spoon the cheesecake filling into the taco shells, filling them generously. This is where the fun really begins! - Layer sliced strawberries on top of each filled taco. This adds a fresh taste and color. - For a crunchy topping, sprinkle finely diced strawberries over each taco. It makes each bite delightful. - Finish each taco with a sprig of fresh mint. This adds a nice touch and a lovely scent. - Now, you have a stunning dessert ready to impress! - Place the tacos in the fridge for at least 30 minutes. This helps the filling firm up. Enjoy your Strawberry Crunch Cheesecake Tacos! To make the perfect crunch shells, you need the right texture. Mix the graham cracker crumbs, crushed cornflakes, granulated sugar, and ground cinnamon well. The mixture should feel like damp sand. When you add melted butter, it should hold together firmly. If it crumbles, add a bit more butter. For molding, you can use a taco shell mold or flip a muffin tin upside down. Press the crumb mixture into the shapes. Make sure they are compact so they won’t fall apart when baked. This step is key for great crunch shells. For the cheesecake filling, you want it light and airy. Start with softened cream cheese. Beat it until smooth. This helps create a fluffy texture. Gradually mix in powdered sugar and vanilla extract until it’s creamy. Whip the heavy cream in a separate bowl until stiff peaks form. Then, gently fold this cream into the cream cheese mixture. This step helps keep the filling light. You can also try different flavors like lemon or chocolate to change things up. When serving your tacos, presentation matters. Arrange them on a nice platter for a fun look. You can drizzle honey or chocolate sauce on top for extra sweetness. Pair these tacos with fresh fruit or a scoop of vanilla ice cream. The mix of flavors makes for a delightful dessert experience. Enjoy! Pro Tips Choose Ripe Strawberries: For the best flavor, select strawberries that are bright red and slightly firm. Avoid those with green or white patches for a sweeter taste. Cool Completely: Ensure your taco shells cool completely before filling them. This prevents the filling from melting and maintains the shape of the tacos. Experiment with Flavors: Feel free to mix in other fruits like blueberries or raspberries for a delightful twist on the classic strawberry crunch. Presentation Matters: For an eye-catching presentation, use a contrasting colored plate and arrange the tacos in a fan shape for added visual appeal. {{image_4}} You can switch up the fruits in this recipe. Try blueberries or peaches for a fun twist. These fruits can bring new flavors and colors to your tacos. If you love chocolate, drizzle some over your tacos. Caramel sauce also adds a sweet touch. Choose what you like best to make it your own. If you need a gluten-free option, use gluten-free graham cracker crumbs. This simple swap keeps the taste but makes it safe for all. For a vegan version, use vegan cream cheese and coconut cream. These options still give you that creamy texture. You can enjoy this dessert no matter your diet! To keep your Strawberry Crunch Cheesecake Tacos fresh, refrigeration is key. Store any leftover tacos in an airtight container in the fridge. They will stay good for up to three days. If you want to save them for later, freezing is an option. However, freeze the taco shells and filling separately to keep the texture. Wrap the shells in plastic wrap. Store the cheesecake filling in a container. They can last for up to three months in the freezer. To keep your tacos tasting great, always store the shells and filling apart. This prevents the shells from getting soggy. Use a container that seals tightly for the filling. A glass or plastic container works well. For the shells, place them in a separate container. If you stack them, use parchment paper between layers. This way, they stay crisp and ready for your next taco treat. You can store Strawberry Crunch Cheesecake Tacos in the fridge for about three days. For best quality, keep them in an airtight container. The tacos may soften if stored too long, but they will still taste good. Yes, you can make the taco shells ahead of time. Prepare them a day before serving. Just keep them in an airtight container at room temperature. This way, they stay crisp and ready for your cheesecake filling. If you need a cream cheese substitute, use Greek yogurt or mascarpone cheese. They provide a similar texture but with a different flavor. You can also try silken tofu for a vegan option. Blend it well to ensure a smooth filling. You’ve learned how to make Strawberry Crunch Cheesecake Tacos from scratch. We covered all the key steps, from mixing the ingredients to assembling your delicious tacos. Remember to adjust flavors for your taste and try different fruits. Store wisely to keep your tacos fresh longer. These sweet treats can impress anyone at your next gathering. Enjoy the process, and share your creations with friends and family. Happy cooking!

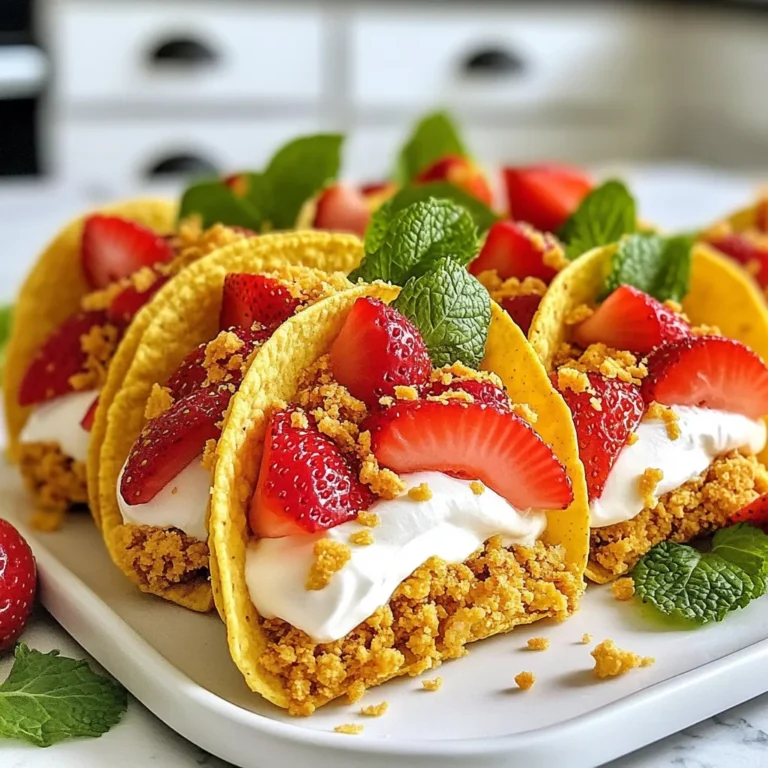
Strawberry Crunch Cheesecake Tacos Simple Dessert Dish

- 1 cup unsalted butter, softened - 3/4 cup powdered sugar, sifted - 2 cups all-purpose flour, spooned and leveled - 1/2 teaspoon fine sea salt - 1/2 cup dried cranberries, chopped - 1/2 cup pistachios, shelled and chopped - 1 teaspoon pure vanilla extract - Optional: Zest of 1 orange Gathering the right ingredients is key to making tasty cranberry pistachio shortbread cookies. Start with unsalted butter. It should be soft. This helps create a smooth dough. Next, use powdered sugar instead of granulated sugar. It gives a nice, sweet touch without being too grainy. You will need all-purpose flour, which helps create the cookie structure. The fine sea salt balances the sweetness and enhances flavors. Dried cranberries add a tart burst, while chopped pistachios give a nice crunch. Vanilla extract provides warmth and depth. If you want an extra zing, add the zest of one orange. It’s not necessary, but it makes the cookies even more special. You can find all these ingredients in most grocery stores. Having them ready will make your baking experience smooth and fun! {{ingredient_image_2}} - Preheat oven to 350°F (175°C). - Line baking sheet with parchment paper. - Cream butter and powdered sugar until fluffy. - Add vanilla extract and optional orange zest. - Combine flour and salt; fold in cranberries and pistachios. - Shape into a log and refrigerate for 30 minutes. - Slice dough into rounds and space on baking sheet. - Bake for 12-15 minutes until golden edges. - Cool on the baking sheet for 5 minutes before transferring. These steps create a tasty treat. Each method helps build flavor and texture. Enjoy your baking! Chilling the dough is key. It helps the cookies hold their shape. If you skip this step, your cookies may spread too much. Wrap your dough log well and chill for at least 30 minutes. This makes a big difference in texture. Avoid overmixing the dough. Once you add the flour, mix just enough. Stop as soon as the dough comes together. Overmixing can make cookies tough. You want a soft, crumbly texture that melts in your mouth. Dusting with powdered sugar adds a nice touch. It makes the cookies look fancy and inviting. After cooling, sprinkle a light layer on top. It enhances the color and gives a sweet taste. Garnish your cookies with whole pistachios and cranberries. This adds color and texture. You can place them on a decorative plate. It makes a beautiful display for parties or gifts. To check for doneness, look for light golden edges. The center may still look a bit soft. This is normal, as they will firm up while cooling. Keep an eye on them towards the end to avoid burning. If your oven runs hot or cool, adjust the baking time. You may need to check the cookies a minute or two earlier or later. Every oven is different, so trust your instincts! Pro Tips Chill the Dough: Chilling the dough not only helps in shaping but also prevents the cookies from spreading too much while baking, ensuring a perfect texture. Use Fresh Ingredients: For the best flavor, make sure to use fresh cranberries and pistachios. Stale nuts can negatively affect the taste of your cookies. Watch the Baking Time: Ovens can vary, so keep an eye on your cookies during the last few minutes of baking to avoid overbaking and ensure they are just golden around the edges. Experiment with Flavors: Feel free to swap out the dried cranberries for other dried fruits like cherries or apricots, or try different nuts to customize the flavor of your cookies. {{image_4}} You can customize these cookies with different nuts or dried fruits. Try walnuts, almonds, or pecans instead of pistachios. For fruits, you might enjoy apricots or cherries. Each choice adds a new twist to the flavor. Adding spices like cinnamon or nutmeg can also enhance the taste. Just a pinch can make a big difference. These spices bring warmth and depth, perfect for cozy gatherings. If you need gluten-free cookies, use almond flour or coconut flour. Both options work well, but you may need to adjust the amount. Always check the texture as you mix. For vegan options, try using coconut oil or a plant-based butter. These substitutes will keep the cookies rich and tasty without dairy. They help you enjoy the same delightful flavor. Glazing cookies can add a lovely shine. A simple mix of powdered sugar and water works well. Drizzle it over the cooled cookies for a sweet finish. You can also use chocolate drizzle to make them extra special. Melt dark or white chocolate, then drizzle it on top. This adds both beauty and a rich flavor that pairs perfectly with cranberries and pistachios. To keep your cranberry pistachio shortbread cookies fresh, use an airtight container. This helps prevent the cookies from drying out. Place a piece of parchment paper between layers to avoid sticking. Store cookies at room temperature away from heat and light. They can stay fresh for up to a week. If you want to keep them longer, consider freezing. To freeze unbaked logs, wrap the dough log tightly in plastic wrap. Place it in a freezer bag and label it. You can store the logs for up to three months. When you are ready to bake, just slice the log directly from the freezer. Bake for an extra minute or two. To freeze baked cookies, let them cool completely. Layer them in an airtight container with parchment paper between each layer. They can last up to three months in the freezer. When you want to enjoy them, thaw the cookies at room temperature. If you prefer warm cookies, pop them in the oven for a few minutes. This brings back their delightful texture. You can easily adjust the sugar in this recipe. If you want the cookies less sweet, reduce the powdered sugar to half a cup. You can also add a pinch of salt to balance the flavors. If you prefer sweeter cookies, add one to two extra tablespoons of powdered sugar. Remember, small changes can make a big difference. You can use fresh cranberries, but they will change the cookie's taste and texture. Fresh cranberries are tart, so you might want to add more sugar. Chop them finely and reduce the amount of flour slightly to keep the dough from getting too wet. These cookies can last up to a week when stored properly. Keep them in an airtight container at room temperature. If you want them to last longer, you can refrigerate them for about two weeks. Just make sure they are well-wrapped to avoid drying out. Yes, these cookies can be made ahead of time. You can prepare the dough and shape it into a log. Wrap it well and store it in the fridge for up to a week. You can also freeze the unbaked log for up to three months. Just thaw it in the fridge before slicing and baking. By following this guide, you can create delicious cookies with ease. Start with quality ingredients like butter, flour, and nuts. Remember to chill your dough for the best texture. You can make fun variations by swapping nuts or adding spices. For fresh cookies, store them correctly in airtight containers. If you want to make ahead, freezing works too. With these tips, you’ll impress everyone with your baking skills. Enjoy your cookie-making adventure, and let your creativity shine!

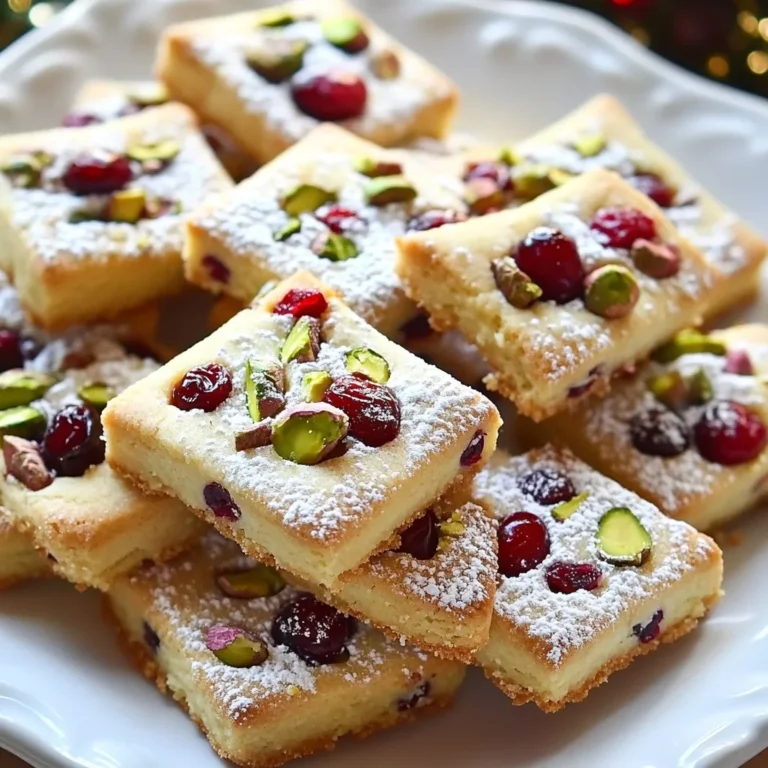
Cranberry Pistachio Shortbread Cookies Delight Recipe

- 4 cups apple cider - 1 cup dried hibiscus flowers - 1 medium orange, thinly sliced - 1 medium apple, thinly sliced - 2 cinnamon sticks - 4 whole cloves - 1 tablespoon honey (or more, to taste) - 2 cups water Hibiscus is a flower that packs a punch of flavor. It has a tart taste, similar to cranberries. This flower is not just tasty; it also has many health benefits. Hibiscus tea can help lower blood pressure and improve heart health. It is rich in antioxidants, which fight free radicals in the body. These antioxidants can help keep your skin healthy and glowing. Plus, hibiscus can boost your immune system. This makes it a great addition to your autumn cider. You can change some ingredients to match the season. For a cozy winter drink, add fresh ginger for warmth. In spring, try fresh berries to give it a fruity twist. Summer could call for fresh mint leaves, which add a refreshing taste. Each season offers a chance to switch things up and enjoy new flavors. Choose fruits and spices that reflect what’s fresh and in season. This will make your Autumn Hibiscus Cider unique every time you make it! {{ingredient_image_2}} 1. Place the dried hibiscus flowers and water in a large pot. Bring to a boil over medium-high heat. 2. Reduce heat to low and let it simmer for 10 minutes. This helps extract deep hibiscus flavors. 3. Use a fine mesh strainer to strain the tea into a pitcher. Discard the solids. 4. Return the pot to the stove. Pour in the hibiscus tea and apple cider. 5. Add the sliced orange and apple, cinnamon sticks, and whole cloves. Mix well. 6. Bring the mixture to a gentle simmer over low heat for 20 minutes. This allows the flavors to blend. 7. Taste the cider and stir in honey. Adjust sweetness as needed. 8. Remove from heat and let it cool for a few minutes. This enhances flavor. 9. For a smoother texture, strain the cider again before serving. Pour into mugs or heatproof glasses. - Simmering is key. It helps the flavors develop fully. - Straining ensures a smooth drink free of solids. - Adjusting sweetness at the end keeps the flavors balanced. - A large pot for boiling and simmering. - A fine mesh strainer for easy straining. - A pitcher to hold the finished cider. - Heatproof mugs or glasses for serving. To make your Autumn Hibiscus Cider even better, layer flavors. Add a pinch of nutmeg for warmth. You can also use fresh ginger slices for a spicy kick. Try adding a splash of vanilla extract. This adds depth to the cider. One mistake is boiling the hibiscus too long. This can make your cider bitter. Another error is not tasting as you go. Adjust the sweetness with honey, but add it slowly. Lastly, don’t skip the cooling step. This helps the flavors blend beautifully. Serve your cider hot in clear mugs. This way, everyone can see the bright colors. Garnish with a slice of orange or apple. A cinnamon stick makes a lovely stirrer. You can also create a cozy vibe with soft blankets and warm lighting. Enjoy your drink with friends or family around a fire. Pro Tips Fresh Ingredients: Always use fresh, high-quality apple cider for the best flavor. Avoid overly processed options that may contain preservatives. Adjusting Sweetness: Start with 1 tablespoon of honey, then taste the cider. You can always add more honey, but it's hard to fix a cider that's too sweet. Hibiscus Variations: Experiment with different dried flowers, such as chamomile or rose hips, for unique flavor profiles in your cider. Serving Suggestions: For an extra festive touch, serve the cider with a splash of rum or bourbon for a delightful adult version. {{image_4}} You can easily turn Autumn Hibiscus Cider into a fun adult drink. Add a splash of rum or vodka for a kick. Alternatively, mix in some sparkling wine for a bubbly treat. Each option enhances the flavors and adds a festive twist. Remember to adjust your honey based on the added sweetness of the alcohol. Enjoy responsibly! Feel free to play with different fruits in your cider. Pears or pomegranates pair nicely with hibiscus. You can also add cranberries for a tart flavor. Each fruit brings its own taste and color. Try mixing and matching to find your favorite blend. The goal is to create a cider that excites your taste buds. Autumn Hibiscus Cider is great hot or cold. Serve it warm for chilly nights; it warms you up from the inside. Just simmer until heated through before pouring. For a cool treat, chill the cider in the fridge. Serve it over ice with a garnish of fresh fruit. Both ways are refreshing, so enjoy as you like! To store leftover cider, let it cool to room temperature. Pour the cider into an airtight container. This helps keep the flavors fresh. You can use glass jars or plastic bottles. Seal the container tightly and place it in the fridge. It will stay fresh for up to five days. Each ingredient has a different shelf life. Dried hibiscus flowers can last 1-2 years when stored in a cool, dark place. Apple cider usually stays good for about a week after opening. Fresh fruits like oranges and apples last about a week in the fridge. Honey can last indefinitely if kept sealed. To reheat the cider, pour it into a pot over low heat. Stir gently as it warms. Avoid boiling to keep flavors intact. You can also microwave the cider in a heatproof mug for about 1-2 minutes. Just make sure to check the temperature before sipping. Enjoy it warm for the best fall experience! Hibiscus is packed with good stuff for your body. It can help lower blood pressure. This flower also has antioxidants that fight free radicals. These antioxidants can help keep your skin healthy and glowing. Hibiscus tea may support heart health as well. Some studies even show it can help with weight loss. It is a great way to enjoy a tasty drink while boosting your health. Yes, you can use fresh hibiscus flowers! However, you need more fresh flowers than dried ones. Fresh hibiscus has a lighter flavor. You may need to adjust your honey or spices to get the taste just right. It's best to taste as you go. This way, you can find the perfect balance for your drink. You can buy Autumn Hibiscus Cider at many stores. Check local grocery stores, especially in the fall. Some places sell it at farmer's markets too. If you want a quick option, look online. There are many websites that offer ready-made hibiscus cider. You can also find the ingredients to make it yourself! This article covered the main points of making Autumn Hibiscus Cider. We explored the ingredients, their benefits, and how to prepare them. You learned important cooking tips and tricks for great flavor. Plus, we shared fun variations for your cider and how to store it properly. Don't forget to try different fruit combos and serving methods. Enjoy this drink warm or cold, and savor its health perks. With all these insights, you can create a delicious cider for any season. Now, go ahead and impress your friends with your new skills!

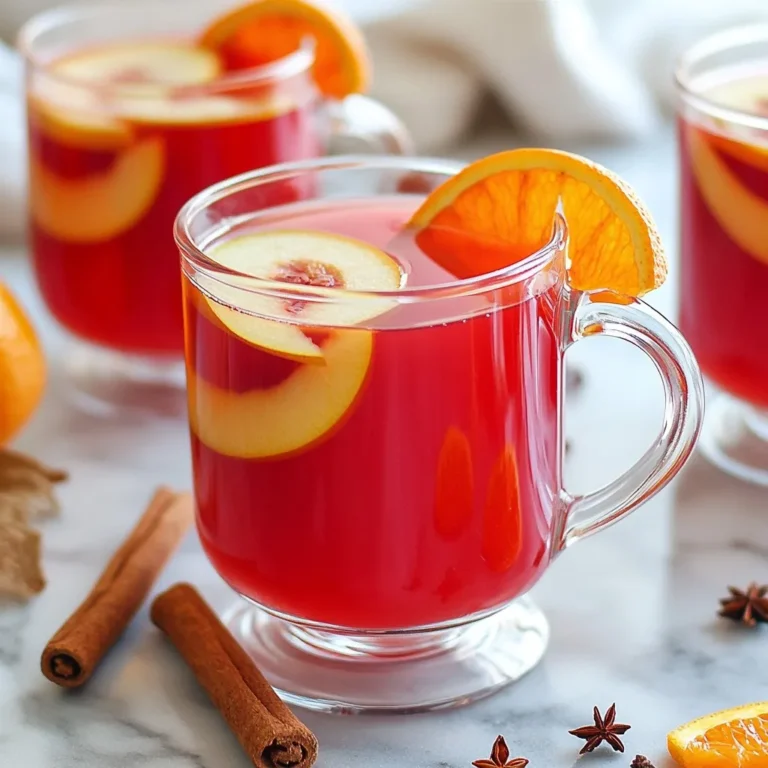
Autumn Hibiscus Cider Refreshing Fall Drink Recipe

- 2 cups cooked chicken, shredded - 1/2 cup buffalo sauce - 1/4 cup cream cheese, softened - 1/4 cup ranch dressing - 1/2 cup shredded cheddar cheese - 12 slider buns - 1/2 cup celery, finely diced - Fresh parsley, chopped, for garnish - Sliced pickles - Calories: Approximately 200 per slider - Protein: About 15 grams per slider - Fat: Roughly 10 grams per slider - Carbohydrates: Approximately 18 grams per slider These sliders pack a flavorful punch! The shredded chicken mixed with buffalo sauce makes a tasty base. Cream cheese and ranch add creaminess, while cheddar cheese gives a nice melt. With the diced celery, you get a crunch that brightens up the rich flavors. If you like tang, consider adding sliced pickles. They bring a zesty kick! Each slider is around 200 calories, making them a fun choice for parties. With protein and flavor, they satisfy both hunger and taste buds. Feel free to mix and match toppings or dips to make these sliders your own! {{ingredient_image_2}} To start, gather your ingredients. In a big bowl, add 2 cups of shredded chicken. Pour in 1/2 cup of buffalo sauce. Stir well, so all the chicken gets coated in that spicy goodness. Next, add 1/4 cup of softened cream cheese and 1/4 cup of ranch dressing. Use a spatula to mix everything until it looks smooth. This step makes it creamy and delicious. Now, gently fold in 1/2 cup of shredded cheddar cheese and 1/2 cup of finely diced celery. This adds flavor and crunch to your sliders. Now, let’s build our sliders! Preheat your oven to 350°F (175°C) so it’s ready for baking. Take the slider buns and slice them in half. Place the bottom halves in a baking dish. This forms a nice base for the filling. Spoon the buffalo chicken mixture generously onto each bun. Make sure to put enough on each one so they are tasty. If you like, you can add sliced pickles on top for some zing. Finally, place the top halves of the buns over the filling. Cover your baking dish tightly with aluminum foil. Bake in the preheated oven for 15 minutes. This helps the sliders heat through and soak up all the flavors. After 15 minutes, carefully remove the foil. Put the dish back in the oven for an extra 5 minutes. This will crisp up the tops and make them golden brown. Once done, take them out and sprinkle fresh chopped parsley on top. This adds a nice pop of color and taste. You can easily adjust the heat of your buffalo chicken sliders. Start with less buffalo sauce if you want a milder taste. Add more sauce as you mix it in. You can also use a milder sauce or blend in some honey. This gives you sweetness and cuts the heat. For the best presentation, arrange your sliders on a nice platter. Keep them warm by covering them with a cloth. Serve them right after baking for that fresh taste. Let guests build their sliders by offering extra ranch and celery sticks. This adds fun and flavor to every bite. Pair your sliders with tasty sides. Crunchy celery and carrots work great for dipping. You can also serve extra ranch dressing in small bowls. For a tangy twist, add sliced pickles on the side. These choices make your party spread even more exciting! Pro Tips Adjust the Heat: If you prefer a milder flavor, reduce the amount of buffalo sauce or mix in a little honey to balance the heat. Make Ahead: Prepare the buffalo chicken mixture a day in advance and store it in the refrigerator. Just assemble and bake when you're ready to serve! Cheese Variations: Experiment with different cheeses like pepper jack for a spicy kick or mozzarella for a milder, gooey texture. Serving Suggestions: Serve with extra ranch dressing and celery sticks for dipping, or pair with carrot sticks for a crunchy contrast! {{image_4}} You can make Buffalo chicken sliders healthier. Swap the regular cream cheese for low-fat cream cheese. This change cuts calories and fat. You could also use Greek yogurt instead of ranch dressing. Greek yogurt adds creaminess while boosting protein. For a veggie twist, try using shredded jackfruit or cauliflower instead of chicken. These options are great for a lighter meal. Cheese can change the flavor of your sliders. While cheddar cheese is classic, you can try pepper jack for more spice. Monterey Jack adds a mild creaminess. For a tangy kick, use blue cheese crumbles. You can mix different cheeses to find your favorite combination. The bun you choose can change your sliders. Slider buns are great, but consider using whole grain or gluten-free buns for a healthier option. You can also use lettuce leaves for a low-carb version. It adds crunch and freshness. For a fun twist, try mini pretzel buns. They give a salty bite that pairs well with the spicy chicken. To keep your buffalo chicken sliders fresh, store them in an airtight container. Make sure to separate the sliders if they are stacked. This step helps prevent sogginess. Keep them in the fridge for up to three days. If you notice any strong smells or changes in texture, it’s best to discard them. When reheating leftover sliders, you want to keep them tasty. Preheat your oven to 350°F (175°C). Place the sliders on a baking sheet. Cover them with foil to avoid drying out. Heat for about 10-15 minutes. Check that they are warmed through. You can also microwave a single slider for 30-60 seconds if you're in a hurry. If you want to save the sliders for later, freezing is a great option. Wrap each slider tightly in plastic wrap. Then, place them in a freezer bag or container. This method helps keep them fresh. They can last up to three months in the freezer. When you are ready to eat, thaw them in the fridge overnight before reheating. Buffalo chicken sliders are small sandwiches filled with spicy shredded chicken. They mix cooked chicken with buffalo sauce, cream cheese, ranch dressing, and cheese. The sliders sit on soft buns, making them perfect for parties or game days. The taste is a spicy, tangy, and creamy delight that everyone loves. Yes, you can make buffalo chicken sliders ahead of time. Prepare the chicken mixture and store it in the fridge. You can also assemble the sliders and keep them covered in the fridge. Just bake them right before serving. This way, you'll save time and still enjoy warm, tasty sliders. If you need a cream cheese substitute, try sour cream or Greek yogurt. These options add creaminess and a tangy flavor. You can also use softened goat cheese for a unique taste. Just pick what you like best to keep the flavor rich and smooth. Buffalo chicken sliders are a tasty treat perfect for any gathering. We covered key ingredients, detailed a step-by-step guide, and explored helpful tips. You can mix and match flavors and customize them to your liking. Remember to store leftovers well to enjoy later. These sliders are easy to make and fun to share. With this knowledge, you can whip up a delicious dish that everyone will love. Enjoy your cooking adventure!

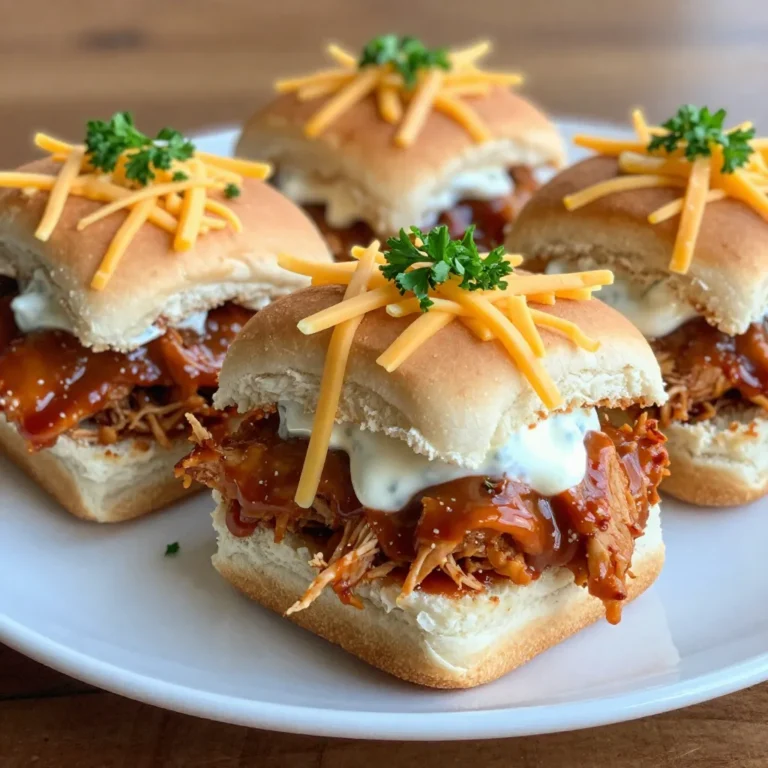
Buffalo Chicken Sliders Tasty and Easy Party Treat

- 1 cup raw cashews, soaked - 3 cups cooked pasta (penne or fettuccine) - 1 cup unsweetened almond milk - 1 tablespoon nutritional yeast - 2 tablespoons olive oil - 2 garlic cloves, minced - 1 tablespoon fresh lemon juice - 1/2 teaspoon salt - 1/4 teaspoon black pepper - 1/4 teaspoon nutmeg (optional) - Fresh parsley, for garnish To make this creamy and flavorful dish, gathering the right ingredients is key. Start with raw cashews. Soak them in water for at least four hours. This softens them for blending and helps create a smooth sauce. Next, choose your pasta. I love using penne or fettuccine for this dish. Cook it according to the package instructions, ensuring it is al dente. Then, grab unsweetened almond milk. This plant-based milk adds creaminess without making the dish too heavy. Nutritional yeast adds a cheesy flavor, so don't skip it. For the sauce, you'll need garlic, olive oil, fresh lemon juice, salt, and pepper. Garlic gives the dish a nice aroma and taste. Fresh lemon juice brightens the flavor, while salt and pepper balance everything. If you want an extra hint of warmth, add nutmeg. Lastly, have fresh parsley on hand. It adds color and a fresh note when you serve the dish. With these ingredients, you're ready to create a delicious vegan meal! {{ingredient_image_2}} - Soak 1 cup of raw cashews in water for at least 4 hours. This softens them and makes blending easy. - After soaking, drain and rinse the cashews under cold water to remove excess starch. This helps create a smoother sauce. - In a high-speed blender, add the soaked cashews, 1 cup of unsweetened almond milk, 1 tablespoon of nutritional yeast, 1 tablespoon of fresh lemon juice, 1/2 teaspoon of salt, and 1/4 teaspoon of black pepper. - Blend on high speed until the mixture is smooth and creamy. If the sauce is too thick, add a splash of almond milk to reach your desired consistency. - In a large skillet, heat 2 tablespoons of olive oil over medium heat. - Add 2 minced garlic cloves and sauté for 1-2 minutes. Stir often to keep the garlic fragrant without browning it. - Carefully pour the creamy cashew sauce into the skillet with the sautéed garlic. Stir well to mix the flavors. - Let it simmer for about 4-5 minutes, stirring occasionally to prevent sticking. This thickens the sauce a bit. - Add 3 cups of cooked pasta to the skillet with the sauce. Toss gently but thoroughly to coat the pasta evenly. - Taste the mixture and adjust the seasoning. You can add more salt or black pepper to suit your taste. - Serve the pasta hot, garnished with finely chopped fresh parsley for added color and flavor. To get that great creaminess, soak your cashews for at least four hours. This helps them blend smoothly. When you blend, start on low speed, then increase to high. This creates a silky texture. If your sauce feels too thick, add a splash of almond milk. Mix until it reaches your desired creaminess. To elevate the flavor of your sauce, consider adding fresh herbs. Basil or thyme can add depth. You might also try a pinch of cayenne for heat. When serving, sprinkle more nutritional yeast on top. Fresh parsley adds color and freshness. You can also use lemon zest for an extra zing. Getting kids involved in cooking can be fun! They can help soak and rinse the cashews. Let them measure out the almond milk and nutritional yeast. Always supervise them when using the blender. Teach them about kitchen safety, like using hot pads for the skillet. Make it a team effort and enjoy the experience together! Pro Tips Soak Cashews Properly: Make sure to soak the cashews for at least 4 hours or overnight for a creamier texture. This allows them to blend more smoothly into the sauce. Adjust Consistency: If your sauce is too thick, gradually add more almond milk until you reach your desired creaminess. It's all about personal preference! Fresh Garlic Flavor: Be cautious not to burn the garlic while sautéing. Cook it just until fragrant to maintain a fresh and vibrant flavor in your dish. Garnish for Presentation: Fresh parsley not only adds color but also a burst of fresh flavor. Consider adding a squeeze of lemon juice over the top before serving for an extra zing! {{image_4}} If you want to make this dish gluten-free, choose gluten-free pasta. You can use rice pasta or chickpea pasta. These types work well and keep the flavor great. Brands like Barilla or Banza offer tasty options. Always check labels to ensure they are gluten-free. Adding vegetables can make this dish even better. Try spinach, broccoli, or cherry tomatoes. They add color and nutrients. For protein, consider tofu or chickpeas. They soak up the sauce and make the meal filling. You can pan-fry the tofu for a nice texture. You can change this recipe with the seasons. In spring, add asparagus or peas. In summer, use zucchini or bell peppers. In fall, try roasted butternut squash. During winter, kale or Brussels sprouts work well. Swap ingredients based on what you find fresh. This keeps your meals exciting and fun. To store leftovers, let the pasta cool to room temperature. Then, place it in an airtight container. I recommend using glass containers or BPA-free plastic. These keep the pasta fresh and tasty. Make sure to eat the leftovers within three days for the best flavor. You can freeze the cashew sauce for later use. Just pour it into a freezer-safe container. Leave some space at the top, as it will expand when frozen. To thaw, place it in the fridge overnight. When ready to use, reheat it on the stove over low heat. Add a splash of almond milk to get it creamy again. In the fridge, the pasta lasts for about three days. If you notice any off smells or mold, it’s time to toss it. Freshness is key for great taste, so always check before you eat. To make this dish, start by soaking cashews in water for at least four hours. Drain and rinse them well. Blend the soaked cashews with almond milk, nutritional yeast, lemon juice, salt, black pepper, and nutmeg until smooth. In a skillet, heat olive oil and sauté minced garlic. Pour in the cashew sauce and let it simmer. Finally, add cooked pasta and toss everything together. Yes, you can use other nuts. Almonds or macadamia nuts work well too. Each nut brings a different flavor. Almonds add a light nuttiness, while macadamias give a rich taste. Just remember to soak them like cashews for a creamy sauce. Yes, this recipe can be gluten-free. Use gluten-free pasta, such as lentil or chickpea pasta. Always check the packaging to ensure it is certified gluten-free. This way, you can enjoy the creamy pasta without worry. To spice things up, add red pepper flakes or a dash of hot sauce. You can also mix in some chopped jalapeños for a fresh kick. Adjust the amount based on your heat preference. Enjoy experimenting with different spices to find your favorite balance! This blog post covered how to make a tasty vegan cashew Alfredo pasta. We looked at ingredients, step-by-step instructions, tips, variations, and storage info. You learned how to soak cashews, blend a creamy sauce, and combine everything with pasta. Feel free to get creative with flavor and texture. Don't hesitate to try different spices or add veggies. With a bit of practice, you can make this dish a family favorite. Enjoy your cooking adventure!

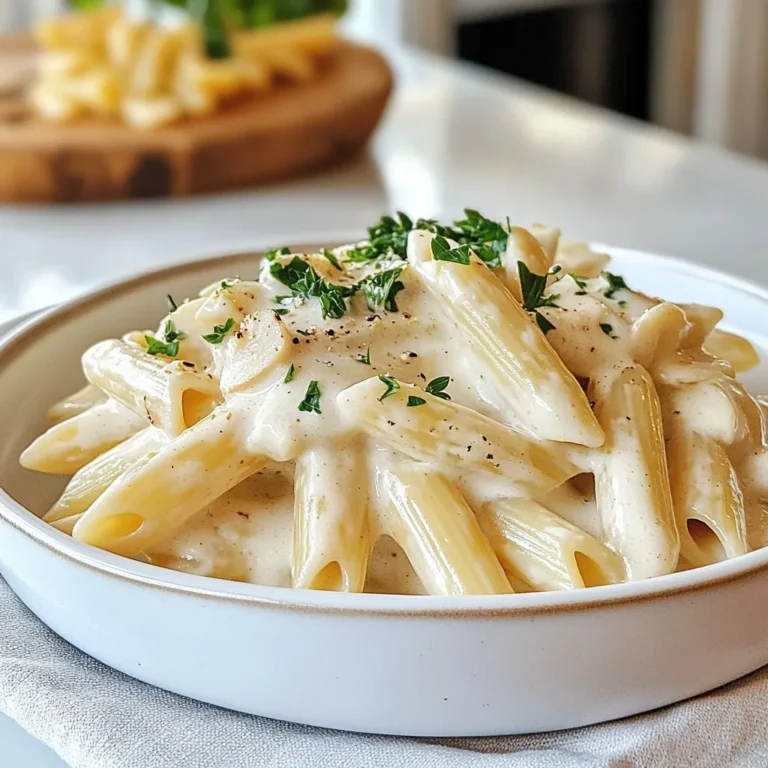
Vegan Cashew Alfredo Pasta Creamy and Flavorful Dish

PREV 1 … 39 40 41 … 47 NEXT
meal plan mapper

explore

DessertsDinnerAppetizersDrinks

Our Policies

  • Cookie Policy
  • Copyright Policy
  • Disclaimer
  • GDPR Policy
  • Terms Of Use
Back to Top
  • About
  • Contact Us
  • Privacy Policy
© 2025 meal plan mapper