FREE DINNER EBOOK! Get your copy!
  • Cookie Policy
  • GDPR Policy
  • Disclaimer
  • Terms Of Use
  • Visit my other site: Fun Cookie Recipes
meal plan mapper
  • Home
  • Dinner
  • Desserts
  • Drinks
  • Appetizers
  • Contact
  • About
  • Privacy Policy
  • Home
  • Dinner
  • Desserts
  • Drinks
  • Appetizers
  • Contact
  • About
  • Privacy Policy
  • Cookie Policy
  • GDPR Policy
  • Disclaimer
  • Terms Of Use
Visit my other site: Fun Cookie Recipes

HOME / CATEGORIES /

Latest

- 2 cups Cap’n Crunch cereal - 4 large eggs - 1 cup milk - 1 teaspoon vanilla extract - 1 teaspoon ground cinnamon - 1 tablespoon sugar - 1 loaf of thick-cut bread (such as Texas toast or brioche) For the main part of this recipe, you need Cap’n Crunch cereal. It gives the sticks their fun crunch. You will also need large eggs and milk to create the batter. The eggs help bind everything together. The milk adds creaminess. You also want some vanilla extract for flavor, ground cinnamon for warmth, and sugar for a hint of sweetness. Lastly, choose thick-cut bread, like Texas toast or brioche, for the best texture. - Butter for frying - Maple syrup for serving When it comes to frying your sticks, a bit of butter makes all the difference. It adds flavor and helps achieve that golden brown color. For serving, pure maple syrup is a must. It complements the sweetness of the French toast sticks perfectly. You can also add fresh berries or whipped cream to make your dish even more delightful. {{ingredient_image_2}} Preparing the cereal To start, grab a large resealable bag. Pour in the 2 cups of Cap’n Crunch cereal. Crush the cereal using a rolling pin or your fingers. Aim for coarse crumbs, not too fine or chunky. Set this aside for later. Whisking the batter Next, take a medium bowl and crack 4 large eggs into it. Add 1 cup of milk, 1 teaspoon of vanilla extract, 1 teaspoon of ground cinnamon, and 1 tablespoon of sugar. Use a whisk to mix everything together. Blend until you have a smooth batter. Cutting the bread Now, take your loaf of thick-cut bread. Use a serrated knife to slice it into thick strips, about 1 to 1.5 inches wide. You should get around 8 to 10 sticks from your loaf. Coating and frying the sticks Dip each bread stick into the egg mixture. Make sure to coat it well. Let any extra egg mixture drip off. Then, roll the stick in the crushed Cap’n Crunch cereal. Ensure each side is evenly coated for a nice, crispy texture. Frying the sticks Heat a large skillet or griddle over medium heat. Add 1 tablespoon of butter and let it melt. Place several coated French toast sticks in the skillet, leaving space between them. Fry for about 2-3 minutes on each side until golden brown and crispy. Repeat the cooking process If the skillet gets too brown, wipe it down with a paper towel. Add more butter as needed. Keep frying the rest of the sticks in batches until all are cooked. Serving suggestions Once your French toast sticks are ready, plate them while they are warm. Drizzle with pure maple syrup for added sweetness. For a lovely presentation, stack the sticks on a plate and dust them lightly with powdered sugar. You can also add fresh berries or a dollop of whipped cream for extra flair. To get the best texture on your French toast sticks, focus on the coating. Crush the Cap’n Crunch cereal into coarse crumbs. This helps achieve a crunchy layer. If it's too fine, it will not give that nice crunch. When cooking, keep the heat at medium. Too high and the outside will burn. Too low and the sticks won’t crisp up. Fry them for about 2-3 minutes per side. Look for a golden brown color to know they are ready. For a fun twist, add fresh fruits like berries or banana slices on the side. They add color and flavor to your dish. A dollop of whipped cream can make it even more special. To make your French toast sticks look fancy, dust them lightly with powdered sugar. This gives a nice touch. Serve them warm with maple syrup in a small bowl for dipping. This makes each bite a sweet treat! Pro Tips Crushing the Cereal: Ensure the Cap’n Crunch is crushed to a coarse crumb for optimal coating; this will provide the perfect crunch without overwhelming the bread. Egg Mixture Consistency: Whisk the egg mixture thoroughly to avoid any clumps of egg; a smooth mixture will coat the bread evenly for a better texture. Frying Temperature: Maintain a consistent medium heat while frying to prevent the outside from burning before the inside is fully cooked; adjust the heat as needed. Serving Suggestions: Serve your French toast sticks immediately after frying for the best crispiness, and consider adding fun toppings like sprinkles or chocolate chips for a festive touch! {{image_4}} You can make Cap’n Crunch French Toast Sticks even more fun. Try adding new spices. A pinch of nutmeg or allspice can change the flavor. You can also mix in some cocoa powder for a chocolate twist. If you love a fruity touch, add orange zest to the egg mixture. Using alternative cereals is also a great idea. You can swap Cap’n Crunch with Fruity Pebbles or Cinnamon Toast Crunch. Each option offers a new flavor and texture. Experiment with your favorite cereals to find your best match. If you need a gluten-free option, choose gluten-free bread. Look for brands that fit your needs. You can still use Cap’n Crunch, as it is gluten-free, or try a gluten-free cereal. For a dairy-free version, use almond or oat milk instead of regular milk. You can also replace eggs with flaxseed meal. Mix one tablespoon of flax with three tablespoons of water. Let it sit for five minutes to thicken. This swap works well in the recipe and keeps it tasty. - Refrigeration tips: Store leftover French toast sticks in an airtight container in the fridge. They will stay fresh for up to three days. Make sure they cool completely before sealing to avoid sogginess. - Freezing instructions: To freeze, place the sticks in a single layer on a baking sheet. Freeze for about an hour. After they are frozen, transfer them to a freezer bag. They can last for up to two months. - Best methods for maintaining texture: To reheat, use an oven or toaster oven for the best results. Preheat the oven to 350°F (175°C). Place the sticks on a baking sheet and heat for about 10-15 minutes. This keeps them crispy and warm. Avoid the microwave, as it makes them soft. How long does it take to make Cap’n Crunch French Toast Sticks? It takes about 25 minutes to make these tasty French toast sticks. You spend 10 minutes prepping and 15 minutes cooking. This quick time makes them perfect for breakfast or a snack. Can I use stale bread for this recipe? Yes, you can use stale bread! Stale bread holds the egg mixture well. It also gives the sticks a nice texture. Just make sure it’s not moldy. Are there any other toppings that go well with these French toast sticks? Absolutely! You can try whipped cream, fresh berries, or chocolate syrup. Each adds a different flavor. You can mix and match to find your favorite toppings. You now know the key ingredients and steps to make delicious Cap’n Crunch French Toast Sticks. From choosing the right bread to perfecting your coating, this recipe is fun and easy. Don't forget to try different flavors and toppings to make it your own. Store any leftovers well, so you can enjoy them later. With these tips, you'll impress friends and family with your tasty treat. Dive in and create your own special version today!

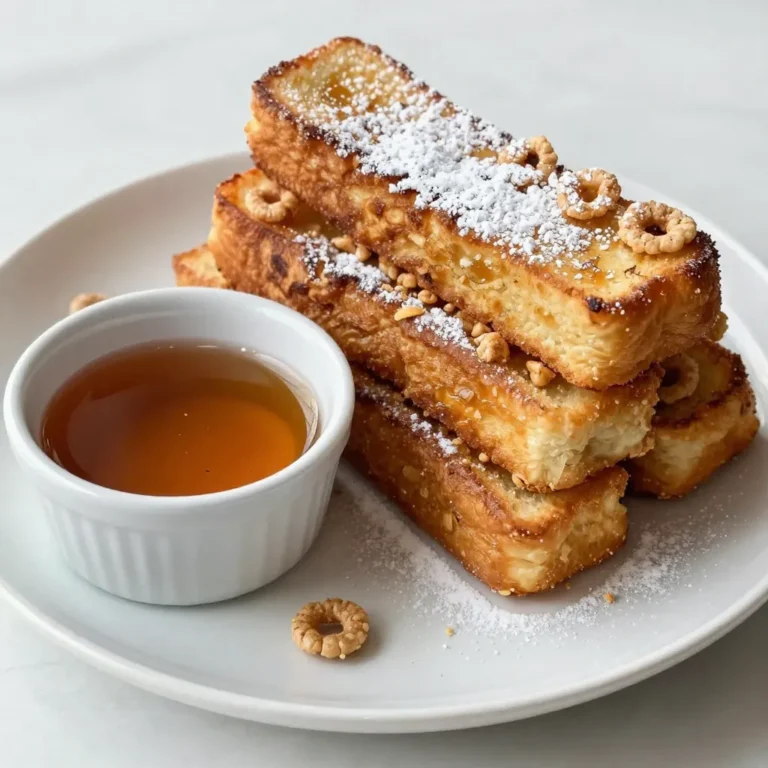
Cap’n Crunch French Toast Sticks Crunchy Delight Recipe

To make this tasty Pumpkin Cream Cold Brew, gather these ingredients: - 1 cup cold brew coffee - 1/2 cup milk of your choice (almond, oat, cow's milk, or any other preferred alternative) - 3 tablespoons pure pumpkin puree - 1 tablespoon pure maple syrup (adjust based on sweetness preference) - 1/2 teaspoon pure vanilla extract - 1/2 teaspoon pumpkin pie spice (plus extra for garnish) - Whipped cream (optional, for an indulgent topping) - Ice cubes You can swap the milk for any option you like. Almond or oat milk gives a nutty flavor. Cow's milk is creamy and rich. If you need a dairy-free choice, try coconut milk for a tropical twist. Each option changes the drink's taste a bit, but all are yummy! Garnishes add flair to your drink. Whipped cream is a classic choice for a rich touch. You can sprinkle extra pumpkin pie spice on top for a warm flavor. A cinnamon stick looks festive and gives a gentle spice. A slice of pumpkin on the rim adds a fun touch too! {{ingredient_image_2}} To start, take a medium bowl. Add 3 tablespoons of pure pumpkin puree. Next, pour in 1 tablespoon of pure maple syrup. You can adjust this if you want it sweeter. Then, add 1/2 teaspoon of pure vanilla extract. Finally, sprinkle in 1/2 teaspoon of pumpkin pie spice. Now, use a whisk to mix until smooth. Make sure there are no lumps. This creamy mix is what makes your drink special. Now, let’s prepare the cold brew. Grab a large glass and fill it with ice cubes. This will keep your drink nice and cold. Next, pour in 1 cup of cold brew coffee. Fill the glass almost to the top. After that, add 1/2 cup of milk of your choice. You can use almond, oat, or even cow's milk. Use a spoon or straw to stir gently. This helps blend the coffee and milk well. Now comes the fun part—layering your drink! Take the pumpkin cream mixture and scoop it on top of the cold brew. Use a spoon to make sure it floats on top. This looks great and tastes even better. If you like, you can add whipped cream on top for extra richness. Don’t forget to sprinkle a little pumpkin pie spice on the whipped cream. This adds flavor and makes your drink look pretty. Serve your drink right away and remind guests to stir gently before sipping! To get a smooth and rich texture, use a whisk. Mix the pumpkin puree, maple syrup, and vanilla well. This helps blend the flavors and creates a creamy base. Choose full-fat milk for a richer feel. If you want it lighter, almond or oat milk works great too. Layer the pumpkin cream carefully on top of the cold brew. This keeps it fluffy and lets it float beautifully. You can tweak the sweetness to fit your taste. Start with one tablespoon of maple syrup. If you like it sweeter, add more syrup a little at a time. Taste as you go! You can also try honey or agave syrup for a different twist. If you want less sugar, skip the syrup entirely. The pumpkin and spices add a lot of flavor! For a stunning look, use a clear glass. This shows off the layers. Add ice first, then cold brew, and finally the pumpkin cream. A dollop of whipped cream on top makes it fancy. Sprinkle extra pumpkin pie spice for flair. You can even add a cinnamon stick or a slice of pumpkin on the glass rim. This small touch adds charm and makes it more fun! Pro Tips Choose the Right Milk: Experiment with different milk alternatives to find your perfect flavor profile. Almond milk adds nuttiness, while oat milk offers creaminess. Adjust Sweetness: Customize the sweetness of your drink by varying the amount of maple syrup. Start with less and add more to taste. Layering Technique: For a beautiful layered effect, pour the pumpkin mixture slowly over the back of a spoon onto the cold brew to prevent them from mixing too quickly. Chill Your Glass: For an extra refreshing drink, chill your glass in the freezer for a few minutes before preparing your Pumpkin Spice Cream Cold Brew. {{image_4}} You can add fun flavors to your pumpkin cream cold brew. Here are some ideas: - Chocolate: Use a splash of chocolate syrup for a mocha twist. - Caramel: Drizzle caramel sauce on top for extra sweetness. - Coconut: Swap regular milk for coconut milk for a tropical vibe. - Hazelnut: Add hazelnut syrup for a nutty flavor boost. These additions can make your drink unique and tasty. Making a vegan version is simple. Just choose plant-based milk. Here are some great options: - Almond milk: Light and nutty, perfect for this drink. - Oat milk: Creamy and sweet, it blends well with pumpkin. - Soy milk: A good source of protein and rich texture. - Cashew milk: Super creamy and adds a nice flavor. These options keep the drink delicious while being dairy-free. Want it spicier? You can adjust the pumpkin pie spice. Start with half a teaspoon, then: - Increase it: Add more spice if you love heat. - Add cinnamon: A pinch of cinnamon can enhance warmth. - Use ginger: A dash of ground ginger adds a zesty kick. These adjustments can make your drink perfect for your taste buds. If you have pumpkin cream left over, store it in the fridge. Use an airtight container to keep it fresh. It can last for about 3 to 5 days. When you want to use it again, just give it a good stir. This helps mix any separation that may happen. If it looks or smells off, it's best to toss it. Cold brew coffee keeps well too. Store it in a sealed jar in the fridge. It stays fresh for about 1 to 2 weeks. Always use clean containers to avoid any bad flavors. When serving, pour over fresh ice for the best taste. If it's been in the fridge for a while, shake it to mix. Here’s a quick look at the shelf life for key ingredients: - Pure pumpkin puree: About 5 to 7 days in the fridge. - Milk (dairy or plant-based): Check the carton for the best-by date. - Pure maple syrup: Indefinite if stored in a cool, dark place. - Pumpkin pie spice: Keep it in a cool, dry place for up to 2 years. Always check for freshness before using ingredients. This ensures you enjoy the best flavors in your pumpkin cream cold brew! Cold brew uses coarsely ground coffee steeped in cold water for hours. This makes it less acidic and smoother than iced coffee. Iced coffee is brewed hot and cooled down. The key difference is the brewing method and taste. Cold brew is often richer and less bitter. Yes, you can prepare the pumpkin cream in advance. Just store it in the fridge. The cold brew can also be made ahead. Mix them just before serving to keep the layers nice. This way, you can enjoy it fresh anytime. You can add honey or agave nectar for natural sweetness. Another option is to use flavored milk, like vanilla or sweetened almond milk. You might also try adding more pumpkin puree for a richer taste without added sugar. Absolutely! Just multiply the ingredients by the number of servings you want. Use a big bowl for the pumpkin cream and a large pitcher for the cold brew. This way, you can serve friends or family easily. Enjoy sharing this tasty drink! This article covers how to make a delicious cold brew with pumpkin cream. You have learned about key ingredients, including milk options and garnishes. I shared how to mix and layer your drink for the best taste. You also discovered tips for a perfect creamy texture and adjustments for sweetness. In the end, this drink is easy to make and fun to customize. Enjoy crafting your perfect cold brew!

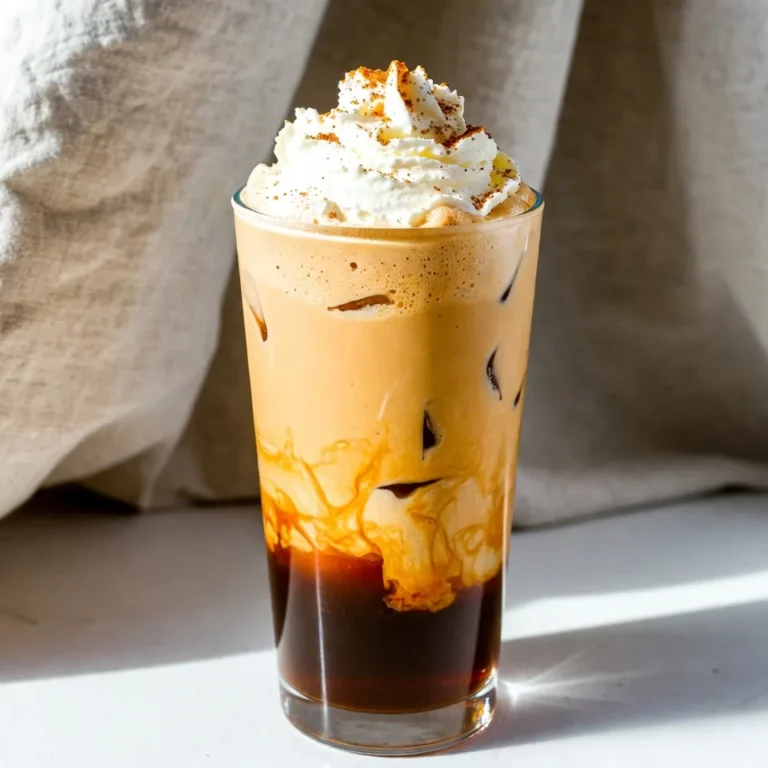
Pumpkin Cream Cold Brew Copycat Tasty and Easy Drink

- 8 rice paper wrappers - 1 cup red cabbage, thinly sliced - 1 cup carrots, julienned - 1 cup cucumber, julienned - 1 cup assorted bell peppers, thinly sliced (using a mix of colors) - 1 ripe avocado, sliced - 1 cup fresh mint leaves - 1 cup fresh cilantro leaves - ¼ cup sesame seeds (for garnish) - ½ cup almond butter - 2 tablespoons soy sauce - 1 tablespoon fresh lime juice - 1 tablespoon honey or agave syrup - Salt and pepper to taste The main ingredients for your Rainbow Veggie Spring Rolls are simple yet vibrant. You'll need rice paper wrappers to hold everything together. They are soft and light, perfect for wrapping. Next, grab your colorful veggies. I like to use red cabbage, carrots, and cucumber. The bell peppers add even more color. Choose a mix of red, yellow, and green for a beautiful look. Don't forget the avocado! It adds creaminess that everyone loves. Fresh herbs like mint and cilantro bring extra flavor. Finally, sprinkle sesame seeds on top for a nice crunch. For the dipping sauce, you need almond butter as the base. It gives a rich and nutty flavor. Add soy sauce, fresh lime juice, and honey or agave syrup to balance the taste. A pinch of salt and pepper enhances the mix. These ingredients come together to create a fresh and colorful snack. Enjoy making these spring rolls, and have fun with the vibrant colors! {{ingredient_image_2}} - Washing and slicing: Start by washing all your vegetables under cold water. Ensure they are clean and crisp. Slice the red cabbage into thin strips. Julienne the carrots and cucumber into long, thin pieces. Cut the bell peppers into thin slices. - Arranging for assembly: Next, arrange the sliced vegetables on a plate. This makes it easy to grab each one as you assemble your rolls. - Mixing ingredients: In a small bowl, combine almond butter, soy sauce, lime juice, and honey. Stir these together until smooth. - Allowing flavors to meld: Let the sauce sit for a few minutes. This will help the flavors blend well together. - Steps to soften wrappers: Fill a wide dish with warm water. Dip one rice paper wrapper into the water for about 10-15 seconds. You want it soft and pliable. - Tips for handling: Be gentle when lifting the wrapper from the water. It can tear easily if you rush. - Layering the filling: Once the rice paper is ready, place it on a flat surface. In the center, add a small handful of red cabbage, julienned carrots, cucumber, sliced bell peppers, avocado slices, and some mint and cilantro leaves. - Positioning the ingredients: Make sure to not overfill the wrapper. Leave some space at the edges for wrapping. - Folding techniques: Fold the sides of the rice paper over the filling. Tuck the vegetables in gently. - Ensuring a tight seal: Starting from the bottom, roll the wrapper away from you. Keep it tight to secure the filling inside. - Sprinkling sesame seeds: After wrapping all the spring rolls, sprinkle sesame seeds over them. This adds a nice crunch. - Plating suggestions: Arrange the spring rolls on a large platter. Serve them with the creamy almond dipping sauce on the side for a tasty treat. To make the best rainbow veggie spring rolls, you need fresh vegetables. Choose bright, crisp veggies. Look for vibrant colors and firm textures. Red cabbage should be deep purple, and carrots should be bright orange. For cucumbers, pick ones that feel heavy for their size. Bell peppers should be smooth and shiny. Store leftover veggies in a sealed bag in the fridge. This keeps them fresh longer. Use them within a few days for the best taste. Rolling rice paper takes some practice. To avoid tearing, soak the wrappers for just 10-15 seconds. If you soak them too long, they may break. Lay the wrapper flat on a clean surface. Add your fillings in the center but leave space on the edges. For tight rolls, fold the sides in first. Then, roll from the bottom. Keep everything snug as you roll. This technique helps hold the fillings in place and keeps your spring rolls intact. Dipping sauce makes your spring rolls even better. Try almond butter with soy sauce and lime juice. This mix adds creaminess and tang. You can also use sweet chili sauce for a spicy kick. Pair your spring rolls with a fresh salad or some fruit. A side of sliced mango or pineapple works well. These flavors balance the veggies and add a fun twist to your meal. Pro Tips Fresh Ingredients: Use fresh vegetables for the best flavor and crunch. The more vibrant and fresh your veggies, the more colorful and tasty your spring rolls will be! Perfectly Soaked Rice Paper: Make sure not to soak the rice paper too long; it should be pliable but not falling apart. A quick dip of 10-15 seconds is usually perfect. Customize Your Fillings: Feel free to add or substitute any vegetables you like. You can also include proteins such as shrimp, tofu, or chicken for a heartier option. Roll Tightly: Ensure your rolls are tightly wrapped to prevent them from falling apart during dipping and eating. Practice makes perfect! {{image_4}} You can change up your spring rolls by adding proteins. Tofu works really well. It absorbs flavors nicely. Shrimp is another tasty choice. Just cook it lightly before adding. You can also mix different vegetables. Try radishes, spinach, or even bean sprouts. The colors and textures will excite your taste buds. If you want to keep it vegan, use agave syrup instead of honey. You can also switch up the veggies. Sweet potatoes, zucchini, or even kale can add a fun twist. Experiment with what you have on hand. This way, you keep your spring rolls fresh and exciting every time. Think about flavors from around the world. Add Thai basil or lemongrass for a Southeast Asian twist. Try using pickled vegetables for a sharp flavor. For dipping sauces, mix soy sauce with sriracha for heat. Or combine peanut butter with coconut milk for a creamy dip. The options are endless, so get creative! To keep your spring rolls fresh, store them in the fridge. Place them in an airtight container. This helps to maintain their color and crunch. You can also layer them between damp paper towels. This prevents them from sticking together. Rainbow veggie spring rolls last about 2 to 3 days in the fridge. Look for signs of spoilage. If they feel slimy or smell off, it’s time to toss them. Fresh spring rolls should have a firm texture and bright colors. Enjoy them while they are still fresh for the best taste! Yes, you can make spring rolls in advance. I recommend making them no more than 1 day ahead. This keeps them fresh and tasty. Store your rolls in an airtight container. Place parchment paper between layers to prevent sticking. Keep them in the fridge until you are ready to eat. To soften rice paper wrappers, use warm water. Fill a shallow dish with warm water. Dip one wrapper for 10-15 seconds. It should feel soft and flexible. Be careful not to soak them too long. If they get too mushy, they will tear. You can use leftover veggies in many ways. Add them to salads or stir-fries. You can even blend them into smoothies for a healthy boost. Another idea is to make a veggie wrap or sandwich. Use whole grain bread or tortillas for a fun twist. This way, you enjoy every bit of your fresh ingredients! You can create delicious spring rolls using fresh ingredients. We looked at essential items, like rice paper and colorful veggies, along with a tasty dipping sauce. The step-by-step guide made assembling easy, from prepping veggies to rolling techniques. Remember to store leftovers properly to keep them fresh. Feel free to explore variations with proteins and global flavors. Now, with these tips, you can enjoy tasty, homemade spring rolls any time!

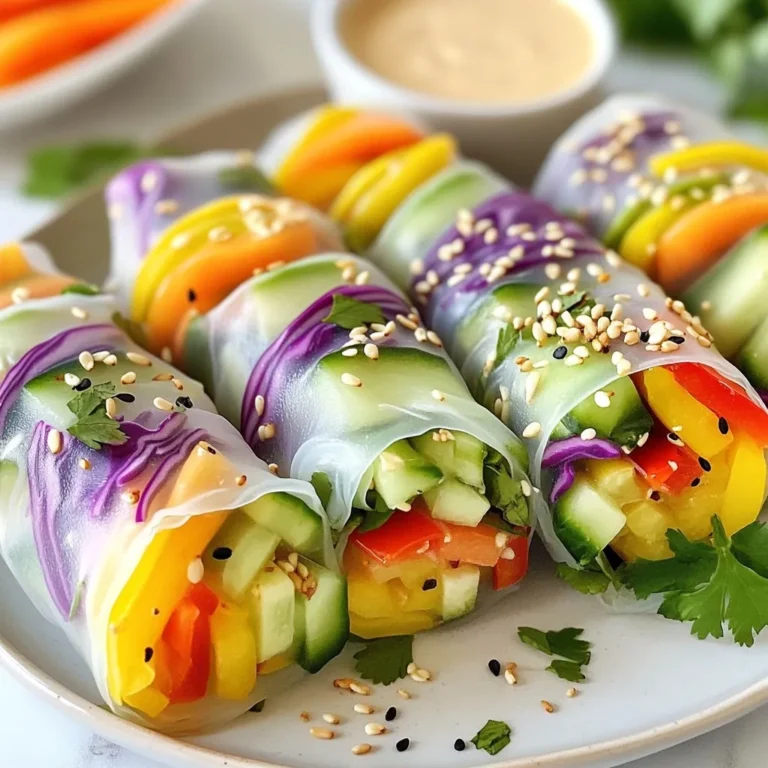
Rainbow Veggie Spring Rolls Fresh and Colorful Snack

- 2 boneless, skinless chicken breasts - 1 cup panko breadcrumbs - 1/2 cup all-purpose flour - 1 teaspoon salt - 1/2 teaspoon black pepper - 1 teaspoon garlic powder - 1 teaspoon paprika - 1/2 cup shredded cabbage - 1/4 cup sliced green onions - Tonkatsu sauce - Vegetable oil for frying - 1 cup cooked white rice - Prep time: 15 minutes - Total time: 30 minutes - Servings: 2 When I prepare my crispy chicken katsu bowls, I focus on quality and flavor. I start with two boneless, skinless chicken breasts. They cook evenly and stay tender. Panko breadcrumbs are key for that crunch. They give a light, crispy coat that makes each bite exciting. I also use all-purpose flour to help the breadcrumbs stick. Next, I add a simple mix of seasonings. I use one teaspoon of salt and a half teaspoon of black pepper for flavor. Garlic powder adds depth, while paprika brings a hint of warmth. For garnishes, I love a mix of textures. Shredded cabbage adds crunch, and sliced green onions bring a fresh bite. Finally, I drizzle tonkatsu sauce on top. It’s sweet and savory, tying the dish together beautifully. I make sure to have vegetable oil on hand for frying. It’s essential for achieving that perfect golden brown crust. I also prepare one cup of cooked white rice for serving. This simple grain balances the meal and makes it filling. Gather all these ingredients, and you're ready to create a delicious, impressive meal in just 30 minutes. {{ingredient_image_2}} To start, take each chicken breast and place it between two sheets of plastic wrap. Use a meat mallet or a rolling pin to pound the chicken. Aim for an even thickness of about 1/2 inch. This step helps the chicken cook evenly and stay tender. Next, set up your breading station. In a shallow dish, mix the all-purpose flour with salt, black pepper, garlic powder, and paprika. In a second dish, beat the eggs until mixed well. In the third dish, pour out the panko breadcrumbs, keeping them ready for coating. For each chicken breast, first coat it in the flour mixture. Make sure to shake off any excess flour. After that, dip the chicken into the beaten eggs. Let any extra egg drip off before moving on to the next step. Now, press the chicken into the panko breadcrumbs. Make sure to cover the whole surface for a good crunch later. In a large skillet, add enough vegetable oil to cover the bottom with about 1/4 inch depth. Heat the oil over medium heat until it shimmers slightly. Carefully place the breaded chicken breasts into the skillet. Fry each side for about 4-5 minutes. Look for a deep golden brown color and a crispy texture. Use a meat thermometer to check the internal temperature. It should reach 165°F (75°C) to ensure safety. After cooking, transfer the chicken to a plate lined with paper towels. This helps absorb extra oil. Let the chicken rest for a few minutes before slicing it into strips. To put together your bowls, take a scoop of warm cooked white rice and place it in each bowl. Layer the sliced chicken katsu on top. Add a handful of shredded cabbage for a nice crunch. Finally, garnish each bowl with sliced green onions and drizzle tonkatsu sauce over the chicken. Enjoy your delicious creation! To get that perfect crunch, use the right frying techniques. Heat your vegetable oil in a skillet until it shimmers. This means it’s hot enough. You want the oil at about 350°F (175°C). A good frying pan for this is a cast iron skillet. It holds heat well and gives even cooking. For a beautiful presentation, slice your chicken katsu into even strips. Make each cut with a sharp knife. This shows off the crispy coating and juicy meat. When plating, use vibrant bowls. Fill them with rice first, then layer the sliced chicken on top. Add a handful of shredded cabbage for crunch. Garnish with sliced green onions for color and flavor. While tonkatsu sauce is a classic, you can try other sauces too. A drizzle of spicy mayo or a homemade sesame sauce can really elevate your dish. For a complete meal, serve your katsu bowls with pickled vegetables or a side of miso soup. These additions add flavor and balance to your meal. Pro Tips Even Thickness is Key: Pounding the chicken to an even thickness ensures that it cooks uniformly, preventing dryness in some areas while others remain undercooked. Perfect Breading Technique: Make sure to press the panko breadcrumbs firmly onto the chicken to create a thick, crunchy layer. This will give your katsu that signature crispy texture. Oil Temperature Matters: Keep the oil at medium heat to avoid burning the breadcrumbs while ensuring the chicken cooks through. A thermometer can help you maintain the right temperature for frying. Rest Before Slicing: Allow the fried chicken to rest for a few minutes before slicing. This helps the juices redistribute, resulting in a juicier and more flavorful katsu. {{image_4}} You can swap chicken for other proteins. Pork is a popular choice. Simply use pork loin cutlets. They cook similarly to chicken. If you want a plant-based option, try tofu. Firm tofu works best for a nice texture. Just slice it into thick pieces and follow the same breading steps. You can enjoy a tasty vegetarian katsu bowl. Want to spice things up? Add different seasonings to your flour mix. Try cayenne pepper for heat or curry powder for a twist. Marinades can also boost flavor. Just soak the chicken or tofu for a few hours before cooking. You can also mix in a variety of vegetables. Try adding bell peppers, snap peas, or carrots for extra crunch and color. Switch up the grains in your bowl. Quinoa or brown rice add a nutty flavor. If you're feeling adventurous, try sushi rice for sweetness. You can change the toppings too. Instead of cabbage, use shredded carrots or radishes. Fresh herbs like cilantro or basil can add a burst of flavor. For garnishes, sesame seeds or sliced chili peppers provide a nice touch. To keep your chicken katsu bowls fresh, place leftovers in an airtight container. Make sure the chicken is cooled to room temperature first. Store the rice and chicken separately if possible. This way, both maintain their best taste and texture. For refrigeration, eat the leftovers within three days. If you want to keep them longer, freezing is a great option. Just pack the chicken katsu and rice in freezer-safe bags. Remove as much air as you can to prevent freezer burn. When reheating, you want to keep that crispy texture of the chicken. The best method is to use an oven. Preheat your oven to 375°F. Place the chicken on a baking sheet and heat for about 10-15 minutes. This helps make it crispy again. For the rice, microwave it in a bowl with a splash of water. Cover the bowl with a damp paper towel. Heat in short bursts, stirring in between until warm. Homemade chicken katsu bowls last about three days in the fridge. If frozen, they can last up to three months. Just make sure to label your containers with the date. This way, you’ll know when to eat them. Chicken katsu is a popular Japanese dish. It features breaded and fried chicken cutlets. The word "katsu" comes from "katsuretsu," meaning cutlet in Japanese. This dish has roots in Western-style cooking, as Japan adopted the idea of breading meat in the late 19th century. Today, you can find chicken katsu served in restaurants and homes worldwide. It is crispy, savory, and often served with a sweet tonkatsu sauce. You can make chicken katsu healthier by using a few simple swaps. Instead of frying, try baking the chicken. Coat the chicken in panko and bake it until crispy. You can also use whole wheat flour instead of all-purpose flour. This adds fiber and nutrients. Swap out vegetable oil for a lighter option, like olive oil or avocado oil. Finally, serve it with a side of steamed vegetables instead of rice for a balanced meal. Crispy chicken katsu bowls pair well with many sides. Consider serving them with a fresh salad or miso soup. Pickled vegetables also make a great side. For drinks, green tea or a light beer can complement the flavors. You could even add a small bowl of edamame for a fun snack. These sides help balance the meal and add extra flavor. Yes, you can make chicken katsu gluten-free with a few changes. Use gluten-free panko breadcrumbs instead of regular ones. You can also swap all-purpose flour for a gluten-free flour blend. Ensure that the tonkatsu sauce is gluten-free as well. Check the label for any hidden gluten ingredients. These swaps let everyone enjoy this tasty dish without worry. This blog post covered how to make delicious Chicken Katsu Bowls from start to finish. We explored key ingredients, like chicken, panko, and spices. I shared step-by-step instructions to ensure your chicken turns out crispy and tasty. In the end, remember to customize your bowls with various proteins and veggies, and store leftovers properly. Enjoy this meal with family or friends, and feel free to experiment! Your perfect Chicken Katsu Bowl awaits.

Crispy Chicken Katsu Bowls Flavorful and Easy Meal

- 8 oz elbow macaroni - 2 cups pepper jack cheese, shredded - 2 cups milk - 2 tablespoons unsalted butter - 2 tablespoons all-purpose flour - 1/2 teaspoon garlic powder - 1/2 teaspoon onion powder - 1/2 teaspoon smoked paprika - Salt and pepper to taste - 1/2 cup breadcrumbs - 2 tablespoons chopped fresh parsley The main ingredients for this dish include elbow macaroni and pepper jack cheese. The macaroni gives the dish its classic shape. The pepper jack cheese adds a spicy kick. You can also mix in sharp cheddar cheese for extra flavor. You need milk to make the sauce creamy. The unsalted butter and flour create a roux. This roux helps thicken your cheese sauce. Adding seasoning like garlic powder and onion powder boosts the overall taste. Smoked paprika adds a nice depth of flavor. For extra texture, consider adding breadcrumbs on top. They create a crunchy crust when baked. A sprinkle of fresh parsley adds color and freshness to your dish. Use these ingredients to make a hearty and flavorful Pepper Jack Mac and Cheese that will impress everyone! {{ingredient_image_2}} 1. Start by bringing a large pot of salted water to a boil. This is key to flavoring the pasta. 2. Once boiling, add 8 ounces of elbow macaroni. Cook it until it's al dente, which means it's firm but not hard. 3. After cooking, drain the pasta using a colander. Set it aside while you prepare the sauce. 1. In the same pot, melt 2 tablespoons of unsalted butter over medium heat. Keep an eye on it to prevent burning. 2. When the butter melts, sprinkle in 2 tablespoons of all-purpose flour. Whisk it for about 2 minutes, letting it bubble and turn light golden. 3. Gradually pour in 2 cups of milk while whisking. This helps to avoid lumps. Cook this for about 5-7 minutes until it thickens. 4. Reduce the heat to low. Add 2 cups of shredded pepper jack cheese and 1/2 cup of sharp cheddar cheese. Stir until all cheese melts smoothly. 5. Season the sauce with 1/2 teaspoon each of garlic powder, onion powder, smoked paprika, salt, and pepper. Mix well to blend the flavors. 1. Gently fold the cooked macaroni into the cheese sauce. Make sure each piece is well coated and covered in the cheesy goodness. 1. For a crispy finish, transfer the mac and cheese to a greased baking dish. 2. Evenly sprinkle 1/2 cup of breadcrumbs over the top. This adds a nice crunch. 3. Bake it in a preheated oven at 350°F for 15-20 minutes. Look for a golden and crispy top before taking it out. For this dish, I love using a blend of cheeses. Pepper jack cheese gives a nice kick. Sharp cheddar adds depth and creaminess. Mixing these cheeses creates a rich flavor. You can also try mozzarella for extra stretch! To enhance the creaminess, consider adding cream or sour cream. A splash of cream makes the sauce velvety. If you want a tangy note, sour cream works great too. To avoid lumps in your cheese sauce, whisk constantly as you add milk. This helps keep the sauce smooth. If lumps do form, use an immersion blender to fix them. Cooking the pasta to the right texture is key. You want it al dente, meaning firm but not hard. This keeps the pasta from getting mushy when mixed with the sauce. For presentation, serve the mac and cheese in colorful bowls. You can also use a baking dish for a rustic look. Add a sprinkle of parsley on top for a fresh touch. Pair this dish with a light salad or steamed veggies. The crunch of a salad balances the creaminess. You can also serve it with grilled chicken for a heartier meal. Pro Tips Use Fresh Ingredients: Freshly shredded cheese melts better and offers a creamier texture compared to pre-packaged shredded cheese, which often contains anti-caking agents. Adjust the Spice Level: If you prefer a milder dish, use less pepper jack cheese or mix in some mozzarella cheese to balance the heat. Experiment with Add-Ins: Consider adding cooked bacon, jalapeños, or sautéed vegetables for extra flavor and texture. Rest Before Serving: Allow the mac and cheese to sit for a few minutes after baking to help it set, making it easier to serve and enjoy. {{image_4}} You can spice up your Pepper Jack Mac and Cheese easily. Try adding jalapeños for heat. Slice them thin or dice them small. Mix them in with the pasta for a kick. You can also add hot sauce to the cheese sauce for more zing. Just a few drops can change the whole dish! If you want freshness, diced tomatoes are great too. They add color and a juicy bite. For a fun twist, try different toppings. Crushed crackers or potato chips add crunch. Sprinkle them on top before baking for a crispy layer. If you like meat, add bacon or sausage. Cook them first, then mix them in or sprinkle on top. Both options give your mac and cheese a hearty flavor. If you need gluten-free options, use gluten-free pasta. Many brands make great substitutes. Just cook them as you would regular pasta. For a vegan version, try plant-based cheese. Many brands now offer good-tasting vegan cheese. Make sure to check the package for melting quality. These adjustments let everyone enjoy this tasty dish! To store leftovers, let the mac and cheese cool down. Place it in an airtight container. This keeps it fresh and tasty. In the fridge, expect it to last about 3 to 5 days. Always check for any signs of spoilage before eating. For freezing, portion the mac and cheese into freezer-safe containers. Leave some space at the top, as it may expand. You can freeze it for up to 2 months. When ready to eat, thaw it in the fridge overnight. To reheat and keep the flavor, add a splash of milk. This helps revive the creaminess that may fade when freezing. You can reheat in the oven or microwave. For the oven, set it to 350°F (175°C). Bake for 15-20 minutes. Cover it with foil to keep it moist. In the microwave, heat in short bursts. Stir often, and add a bit of milk to keep it creamy. Always check the temperature before serving. Yes, you can use other cheeses. Try using Monterey Jack, Gouda, or even Fontina. Each cheese brings a unique flavor. For a twist, combine cheeses like mozzarella for creaminess. Mixing different cheeses can enhance the dish's richness and depth. Be sure to choose cheeses that melt well for the best results. To add more heat, try adding diced jalapeños or a few dashes of hot sauce. You can also sprinkle in some crushed red pepper flakes. These options boost the spice without overpowering the flavor. Adding chopped green chilies is another great choice. Each method allows you to control the heat level to your liking. This dish pairs well with many sides. A fresh green salad balances the creaminess nicely. Roasted vegetables or garlic bread also complement the mac and cheese. For protein, grilled chicken or shrimp adds a satisfying touch. You can even serve it with a light soup for a complete meal. This blog post covered how to make delicious pepper jack mac and cheese. We started with the main ingredients, then moved to step-by-step instructions. I shared tips for cooking, flavoring, and storing your dish. You can also explore fun variations and baking options. With this recipe, you can enjoy a creamy, cheesy meal that warms the heart. Get creative with flavors and toppings. Enjoy making this dish and sharing it with friends or family. Happy cooking!

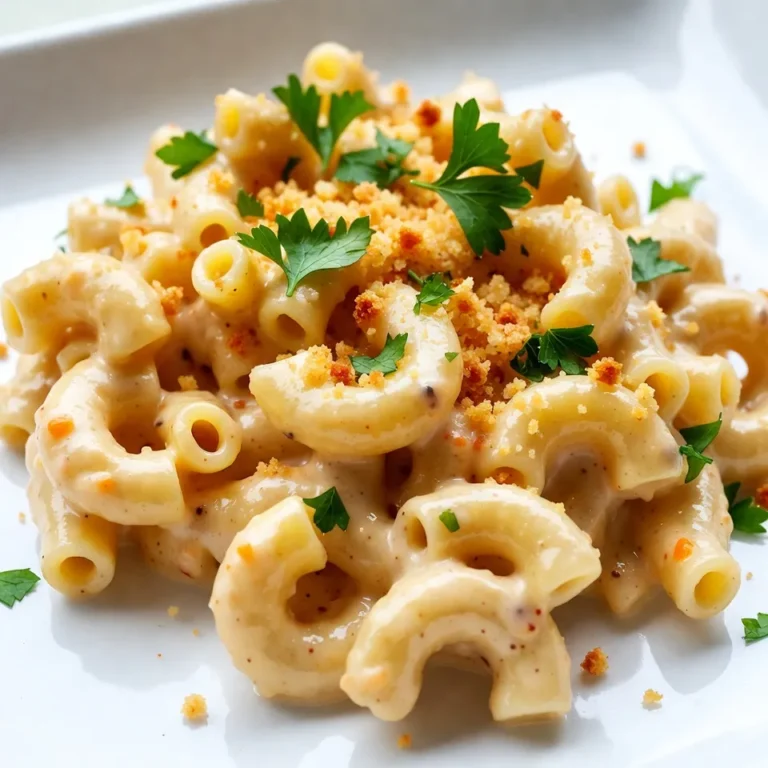
Pepper Jack Mac and Cheese Hearty and Flavorful Recipe

To make Coconut Curry Butternut Soup, you need these key ingredients: - 1 medium butternut squash, peeled and diced into 1-inch cubes - 1 can (400 ml) full-fat coconut milk - 1 medium onion, finely chopped - 2 cloves garlic, minced - 1 tablespoon fresh ginger, finely minced - 2 tablespoons red curry paste (adjust to taste) - 4 cups vegetable broth (homemade or store-bought) - 1 teaspoon ground turmeric - 1 teaspoon ground cumin - Salt and freshly ground black pepper to taste - 2 tablespoons extra-virgin olive oil - Fresh cilantro, chopped, and lime wedges for garnish You can add these optional ingredients to boost flavor: - A pinch of chili flakes for heat - Carrots or sweet potatoes for extra sweetness - A splash of soy sauce for depth - Fresh lime juice to brighten the taste This soup is vegan and gluten-free. The main ingredients are plant-based. The coconut milk gives it creaminess without dairy. Use gluten-free broth if needed. This makes the soup friendly for many diets. If you want protein, consider adding chickpeas. They mix well and keep it vegan. {{ingredient_image_2}} First, you need to get your ingredients ready. Grab a medium butternut squash. Peel it and cut it into 1-inch cubes. This helps the squash cook evenly. Next, chop one medium onion finely. Mince two cloves of garlic and one tablespoon of fresh ginger. These add a nice flavor. Measure two tablespoons of red curry paste. This paste gives the soup its rich taste. Finally, gather your spices: one teaspoon of ground turmeric and one teaspoon of ground cumin. Don’t forget the salt and black pepper for seasoning! Now, let’s cook! Grab a large pot and heat two tablespoons of extra-virgin olive oil over medium heat. Once the oil is hot, add the chopped onion. Sauté for about 3-4 minutes. You want the onion to be soft and translucent. Next, add the minced garlic and ginger. Cook for another 1-2 minutes. You’ll love the aroma that fills your kitchen. Then, stir in the red curry paste, turmeric, and cumin. Sauté for one more minute to awaken those spices. Now, it’s time to add your butternut squash. Pour in four cups of vegetable broth and bring the mix to a boil. Once boiling, lower the heat and cover the pot. Let it simmer for 20-25 minutes. Check if the squash is tender by piercing it with a fork. After the squash is tender, remove the pot from heat. Stir in the can of full-fat coconut milk. This gives the soup a creamy texture. Use an immersion blender to blend the soup until it's smooth. If you don’t have one, carefully transfer the soup to a regular blender in batches. Return it to the pot when done. Put the pot back on low heat. Season your soup with salt and black pepper to taste. Warm it through for a few minutes before serving. Enjoy your cozy and flavorful Coconut Curry Butternut Soup! When picking a butternut squash, look for one that feels heavy. The skin should be smooth and tan. Avoid any squash with soft spots or blemishes. A fresh squash will be firm and feel solid in your hands. If you can, select a squash that has a long neck. This part has more flesh and less seed, giving you more soup! The red curry paste in this soup can be adjusted to fit your taste. If you like it mild, start with one tablespoon. You can always add more later. For a spicier kick, use two tablespoons or even more! Just remember that the heat builds as it cooks. Taste the soup before serving to find your perfect spice level. If you have leftover soup, store it in an airtight container. It will stay fresh in the fridge for about three days. To reheat, simply warm it on the stove over low heat. Stir gently to keep it smooth. If the soup thickens too much, add a splash of vegetable broth or water. You can also freeze it for up to three months. Just let it cool before placing it in freezer-safe bags. Always label the bags with the date for easy tracking! Pro Tips Choose the Right Squash: Select a butternut squash that feels heavy for its size and has a smooth skin. This ensures maximum flavor and sweetness. Adjust the Spice Level: The red curry paste can vary in heat. Start with a smaller amount and add more to taste, allowing you to control the spice in your soup. Blend for Creaminess: For a super silky texture, make sure to blend the soup thoroughly. An immersion blender is ideal, but a regular blender works just as well in batches. Garnish Wisely: Fresh cilantro and a squeeze of lime not only enhance the presentation but also elevate the flavors, making each bite more refreshing. {{image_4}} You can add protein to your soup for extra nutrition. Chickpeas work great here. They add texture and a nice bite. Just drain and rinse a can of chickpeas before adding them to the pot. If you prefer chicken, use cooked, shredded chicken. Stir it in after blending the soup. Both options make the dish heartier and more filling. Feel free to mix in different spices or herbs. Try adding a pinch of cinnamon for warmth. Cardamom can bring a fragrant touch. You can also swap the red curry paste for green curry paste for a different flavor. Fresh herbs like basil or mint can add a fresh note. Just sprinkle them on top before serving. Some folks love a creamy soup, while others prefer it chunky. If you like it creamy, blend it all until smooth. For a chunkier version, blend just half of the soup. This keeps some squash pieces intact. Both styles taste amazing and fit different moods. Choose what you like best! Store your Coconut Curry Butternut Soup in airtight containers. Let it cool completely before sealing. Use glass or plastic containers that can handle both cold and heat. This keeps the soup fresh and prevents spills. To freeze the soup, pour it into freezer-safe bags or containers. Leave some space at the top for expansion. Seal tightly, label with the date, and freeze. For thawing, place the soup in the fridge overnight. Reheat it on the stove over low heat, stirring often. When stored in the fridge, your soup lasts about 4 to 5 days. If it smells sour or looks discolored, it’s time to toss it. Always trust your senses. If you see any mold, do not eat it. Yes, you can use other milks if needed. Almond milk or soy milk works well. However, these choices will change the soup's taste and creaminess. Coconut milk adds a rich flavor and smooth texture. If you skip coconut milk, consider adding a splash of lemon juice for brightness. You can enjoy this soup with many sides. Here are some great options: - Crusty bread: Perfect for dipping. - Rice: Steamed jasmine or brown rice adds heartiness. - Salad: A light green salad refreshes the meal. - Naan: This Indian bread complements the soup's spices. Any of these will make your meal feel complete and cozy. To adjust the spice level, you can change the red curry paste amount. For a spicier taste, add more paste. If you prefer a milder soup, reduce the paste. You can also add extra ingredients like lime juice or sugar to balance the heat. Tasting as you go helps you find the perfect flavor. This blog post explored how to make Coconut Curry Butternut Soup with key ingredients and helpful tips. You learned how to prepare, cook, and blend flavors for a delicious meal. I shared storage advice and common variations to fit your taste. In closing, perfect your soup by experimenting with spices and ingredients. Enjoy creating your own unique version!

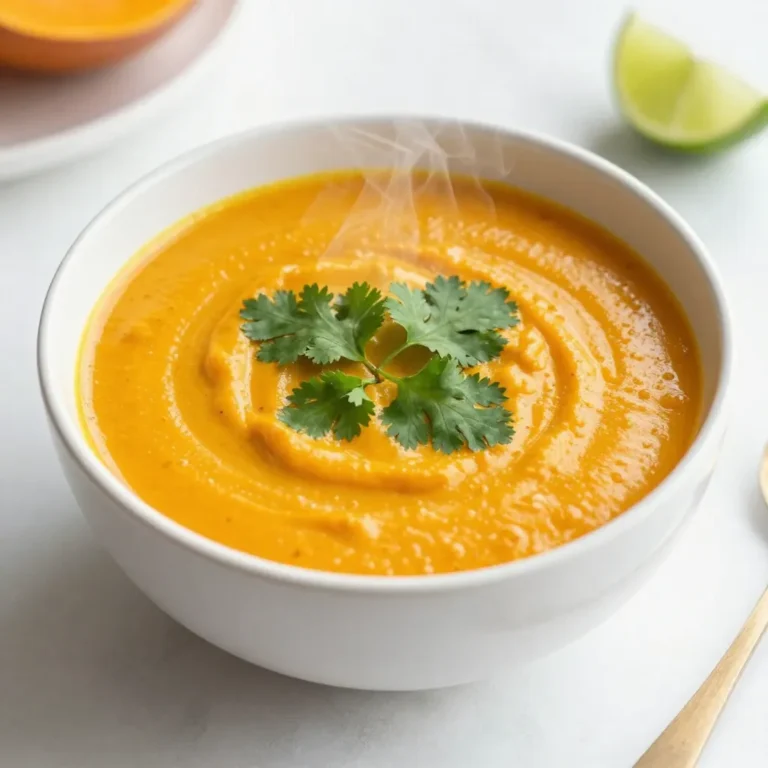
Coconut Curry Butternut Soup Flavorful and Cozy Meal

To make delicious chocolate covered cherry cookies, you need the following ingredients: - 1 cup all-purpose flour - 1/2 cup unsweetened cocoa powder - 1/4 teaspoon baking soda - 1/8 teaspoon salt - 1/2 cup unsalted butter, softened - 1/2 cup granulated sugar - 1/2 cup packed brown sugar - 1 large egg - 1 teaspoon vanilla extract - 1/2 cup dark chocolate chips - 1 cup maraschino cherries, drained - 1 cup semi-sweet chocolate chips (for coating) - 1 tablespoon coconut oil These ingredients create a rich, chocolatey base with a sweet cherry surprise. The cocoa powder adds depth and flavor. The maraschino cherries bring a juicy burst with every bite. Using both dark and semi-sweet chocolate ensures a perfect balance of sweetness. Each element plays its part, making these cookies a delightful treat. When choosing your ingredients, always go for high-quality products. This choice greatly affects the taste. For the best results, make sure the cherries are fully dried. This step helps prevent a soggy cookie. {{ingredient_image_2}} - Preheat oven to 350°F (175°C) - Line baking sheets with parchment paper First, I start by preheating my oven. This helps the cookies bake evenly. I line two baking sheets with parchment paper. This step stops the cookies from sticking. - Combine flour, cocoa powder, baking soda, and salt Next, I grab a medium bowl. I mix the all-purpose flour, cocoa powder, baking soda, and salt. I whisk these dry ingredients well. This mix will add flavor and structure to our cookies. - Cream together butter, granulated sugar, and brown sugar In a large bowl, I cream the softened butter with granulated sugar and brown sugar. I use an electric mixer for this. I mix until it is light and fluffy. This step adds air to the dough, making cookies soft. - Add egg and vanilla, followed by the dry mixture - Fold in dark chocolate chips Now, I add one large egg and vanilla extract to my butter-sugar mix. I beat everything until smooth. Then, I slowly add the dry mix into the wet mix. I use low speed to avoid making a mess. Finally, I fold in dark chocolate chips. This gives a rich chocolate flavor. - Portion dough on baking sheets - Press a maraschino cherry into each cookie I use a tablespoon to scoop the dough onto the baking sheets. I leave about 2 inches between each scoop. Then, I press a maraschino cherry into the center of each scoop. This creates a tasty surprise in each cookie. - Bake for 10-12 minutes - Cool on a wire rack Next, I place the baking sheets in the oven. I bake for 10 to 12 minutes. The edges should look set. Once done, I let the cookies cool on the sheets for five minutes. After that, I transfer them to a wire rack to cool completely. - Melt semi-sweet chocolate chips and coconut oil - Dip cookies in melted chocolate For the chocolate coating, I melt semi-sweet chocolate chips with coconut oil in the microwave. I heat them in 30-second bursts, stirring in between. Once melted, I dip each cooled cookie cherry side down into the chocolate. I let the excess chocolate drip off before placing them back on the parchment. To make the best chocolate covered cherry cookies, start by ensuring your cherries are thoroughly dried. This step helps avoid a soggy cookie. Next, pay close attention to baking time. Avoid overbaking to keep the cookies chewy. If they look set on the edges, they’re done. Using quality chocolate for dipping is key. Good chocolate adds rich flavor. You can also experiment with flavored extracts. Almond or cherry extracts can elevate the taste. Garnish your cookies with maraschino cherries for a pop of color. This adds charm and makes them look fancy. You can also drizzle melted chocolate over the cookies. This simple touch enhances their visual appeal and adds extra chocolatey goodness. Pro Tips Chill the Dough: For easier handling and less spreading, refrigerate the cookie dough for about 30 minutes before baking. Use Quality Chocolate: Opt for high-quality chocolate chips for both the cookie mix and coating to enhance the overall flavor. Dry the Cherries Well: Ensure the maraschino cherries are thoroughly dried to prevent excess moisture from affecting the cookie texture. Experiment with Toppings: Get creative with toppings! Try adding crushed nuts or sprinkles on top of the chocolate coating for extra texture and flavor. {{image_4}} You can switch up the cherries in your cookies. Use fresh or frozen cherries for a new spin. Fresh cherries add a bright flavor, while frozen ones are easy to find year-round. Just make sure to pit and dry them well. This step helps keep the cookie dough from getting too wet. Both options give you that sweet cherry burst in every bite. The chocolate coating can vary too! While semi-sweet chocolate is classic, try using white chocolate or dark chocolate. This change gives your cookies a different look and taste. White chocolate adds a creamy sweetness, while dark chocolate brings a rich, bold flavor. You can even mix them for a fun two-tone effect. Experiment and find your favorite! Want to make your cookies even better? Think about adding nuts or dried fruits. Chopped walnuts or pecans give a nice crunch. Dried cranberries or apricots can add a chewy texture and a hint of tartness. You can toss these into the dough during mixing. Each bite will be a delightful surprise! To keep your cookies fresh, store them in an airtight container. This helps them stay soft and tasty. I suggest you eat them within a week. If you store them properly, they can last up to 10 days. Freezing cookies is a great way to save them for later. First, let the cookies cool completely. Then, place them in a single layer on a baking sheet. Freeze them for about 1-2 hours. After that, transfer the cookies to a freezer-safe bag or container. They will keep well for up to three months. To thaw the cookies, take them out of the freezer. Leave them at room temperature for about 30 minutes. They will be soft and ready to enjoy! Yes, you can! If you want a gluten-free option, use almond flour or oat flour. Both work well in cookies. Just remember that these flours may change the texture a bit. Almond flour gives a nutty taste, while oat flour is light and soft. Look for the edges to be firm and set. The centers might still look a bit soft, but that’s okay. They will firm up as they cool. If the cookies start to crack on top, that’s a good sign too. Absolutely! You can make the dough and chill it in the fridge. Wrap it tightly in plastic wrap to keep it fresh. Chill it for up to 24 hours. When you are ready, just scoop and bake. This tip saves time on busy days! These cookies combine simple ingredients with tasty cherries and rich chocolate. You learned step-by-step instructions, storage tips, and fun variations. These small tricks can elevate your cookie game. Remember to dry your cherries well and use good chocolate for dipping. Chill your dough for more flavor, too! I hope you try these recipes and enjoy each bite of your creation. Happy baking!

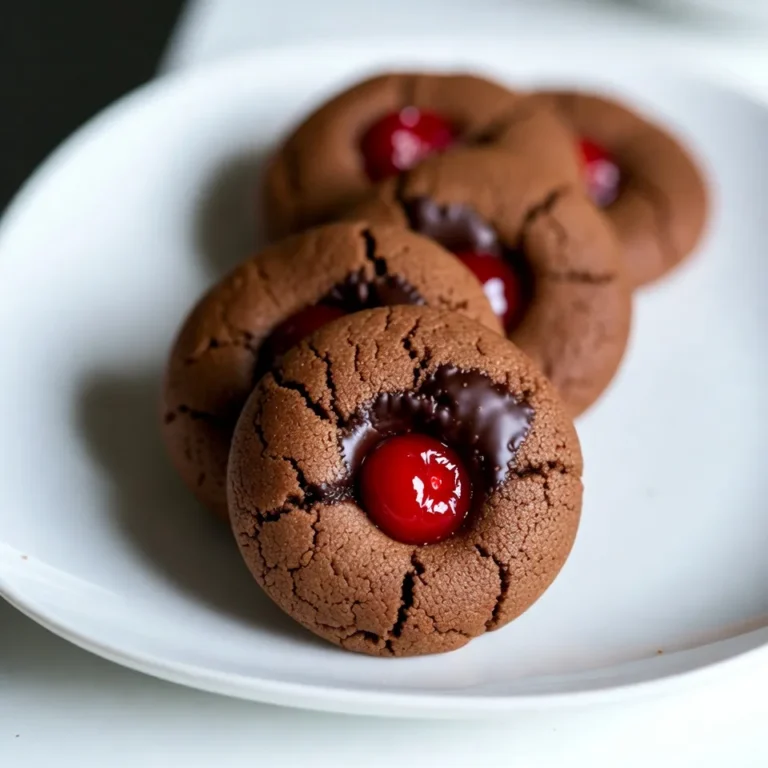
Chocolate Covered Cherry Cookies Delightful Treat

- Fresh jalapeños - Onion and garlic - Broth choices - Dairy ingredients - Spices and seasoning To create a tasty jalapeño popper soup, you need some simple yet flavorful ingredients. First, grab 4 fresh jalapeños. These peppers give the soup its signature kick. If you want less heat, remove the seeds. Next, use 1 medium onion and 3 cloves of garlic. The onion adds sweetness, while garlic brings depth. For the base, choose 4 cups of chicken or vegetable broth. This broth makes the soup rich and savory. Now, let’s talk dairy. You’ll need 1 cup of cream cheese and 1 cup of shredded sharp cheddar cheese. These ingredients create that creamy, dreamy texture. Don’t forget 1 cup of frozen corn kernels for a bit of sweetness and a delightful pop of color. For flavor, add 1 teaspoon of smoked paprika and 1 teaspoon of ground cumin. These spices boost the overall taste. Finally, season with salt and black pepper to your liking. You might also want 2 tablespoons of olive oil for sautéing, and fresh cilantro for a tasty garnish if you like. And there you have it! All the ingredients for a delicious jalapeño popper soup. Each one plays a role in making this dish a creamy delight. {{ingredient_image_2}} To start, I heat olive oil in a large pot over medium heat. Once it’s warm, I add the finely chopped onion. I sauté it for about five minutes until it becomes translucent. This step adds a nice sweetness to the soup. Next, I add minced garlic and diced jalapeños. I cook these together for two to three minutes. This helps release their lovely aroma and softens the jalapeños. You can adjust the amount of jalapeños for your spice level. Now, I carefully pour in four cups of chicken or vegetable broth. I raise the heat to bring the mix to a gentle simmer. Once it’s bubbling, I toss in one cup of frozen corn. Along with the corn, I add one teaspoon each of smoked paprika and ground cumin. I let the soup simmer for about ten minutes. This time allows the spices to really blend well with the broth. After simmering, I lower the heat and introduce one cup of softened cream cheese. I stir until it melts and blends into the soup, giving it a creamy texture. Next, I gradually mix in one cup of shredded sharp cheddar cheese. I keep stirring until it melts completely. Now, I taste the soup and add salt and black pepper to my liking. If I want a smoother soup, I take out the pot from heat and use an immersion blender. This step makes it silky, but you can keep it chunky if you prefer some texture. Finally, I ladle the soup into bowls and top it with crumbled tortilla chips. For an extra touch, I add some chopped fresh cilantro. This gives a burst of freshness and a pop of color. Enjoy the warm, flavorful soup! To control the heat in your jalapeño popper soup, you can use a simple seed removal method. The seeds and membranes inside jalapeños hold a lot of heat. If you want a milder flavor, just cut the jalapeños in half and scoop out the seeds. This little step makes a big difference! If you want even less heat, consider using the following alternatives: - Banana peppers: These are mild and add a nice flavor. - Poblano peppers: They are slightly spicy but much milder than jalapeños. - Bell peppers: Use these for a sweet, crunchy texture with no heat. For the best creaminess, you can choose between cream cheese and heavy cream. Cream cheese gives a rich and tangy taste. It melts well into the soup, making it smooth and creamy. Heavy cream offers a more luxurious texture but can feel heavier. To get a silky texture, consider using a blender. After cooking, blend the soup until smooth. An immersion blender works great for this. If you like some texture, you can blend just part of the soup. This way, you keep some chunks while still enjoying creaminess. Garnishing your jalapeño popper soup adds fun and flair. Here are some of the best toppings: - Crumbled tortilla chips: They add a nice crunch and flavor. - Shredded cheese: More sharp cheddar or even pepper jack can enhance the taste. - Sour cream: A dollop gives a cooling contrast to the heat. Consider using fresh herbs like cilantro. It adds brightness and a pop of color. Just sprinkle a little on top before serving for a fresh touch! Pro Tips Adjust the Heat: If you prefer a milder soup, be sure to remove the seeds and membranes from the jalapeños, as they contain most of the heat. Fresh Herbs for Flavor: Adding fresh cilantro not only enhances the soup's flavor but also adds a pop of color. Sprinkle it on just before serving. Make It Ahead: This soup can be made in advance and stored in the fridge for up to 3 days. Just reheat gently on the stove before serving. Texture Variations: For a creamier soup, blend it fully with an immersion blender. For a heartier option, leave some chunks of vegetables intact. {{image_4}} You can change the cheese for a different taste. Try gouda or pepper jack for extra flavor. Both melt well and add richness to the soup. For veggies, consider bell peppers or zucchini. These will add color and nutrition. You can even mix in some spinach for a fresh green touch. Want more heat? Add diced serrano or habanero peppers. These will kick up the spice. You can also sprinkle in cayenne or chili powder. Just a pinch can make a big difference. Adjust the spices slowly. Taste as you go to find your perfect level. For a vegan option, swap the cream cheese with cashew cream or coconut cream. Both give a creamy texture. Use vegetable broth instead of chicken broth. This keeps the flavors rich without meat. Check labels on store-bought broth to ensure it's vegan. These changes make the soup plant-based and delicious. To store leftovers, let the soup cool first. Then, pour it into an airtight container. This keeps it fresh and tasty. In the fridge, the soup lasts about 3 to 4 days. Make sure to label the container with the date. You can freeze this soup for later use. First, let it cool completely. Then, transfer it to a freezer-safe container or bag. Remove as much air as possible to prevent freezer burn. It stays good in the freezer for up to 3 months. When you want to eat it, thaw the soup in the fridge overnight. For a quicker method, you can place it in a bowl of cold water. To reheat, the best method is on the stove. Pour the soup into a pot and heat it over low to medium heat. Stir often to avoid sticking. You can also use a microwave, but use short intervals and stir in between. To keep the texture and flavor, add a splash of broth or cream while reheating. This helps restore creaminess, making every bite delightful. Jalapeño Popper Soup is a creamy, spicy dish inspired by jalapeño poppers. It blends fresh jalapeños, cream cheese, and cheddar cheese into a rich, comforting soup. The dish has a delightful kick from the jalapeños and a creamy texture from the cheese. You can enjoy it with crunchy tortilla chips on top. This soup is perfect for a cozy night or a fun gathering. Yes, you can make this soup ahead of time. To do this, follow these tips: - Cook the soup: Prepare the soup as usual, letting it cool after cooking. - Store it: Place the cooled soup in a sealed container. You can keep it in the fridge for up to 3 days. - Reheat: When you're ready to eat, warm it on the stove over low heat. Stir often to keep it creamy. To add more heat to your Jalapeño Popper Soup, consider these ingredients: - Add more jalapeños: Use extra diced jalapeños or leave some seeds in for added spice. - Spicy peppers: Mix in chopped serrano or habanero peppers for a kick. - Hot sauce: Drizzle some hot sauce into the soup before serving to boost the heat. These options let you customize the spice level to your liking. This blog post provides a tasty guide to making jalapeño popper soup. We covered key ingredients like fresh jalapeños, spices, and broth options. You learned step-by-step instructions for preparing the base, making the soup, and adding final touches. We shared tips to control spiciness and enhance creaminess through easy swaps. Plus, we explored variations to suit different diets. In summary, this soup is versatile and delicious. You can easily make it your own. Enjoy crafting a bowl that suits your taste!

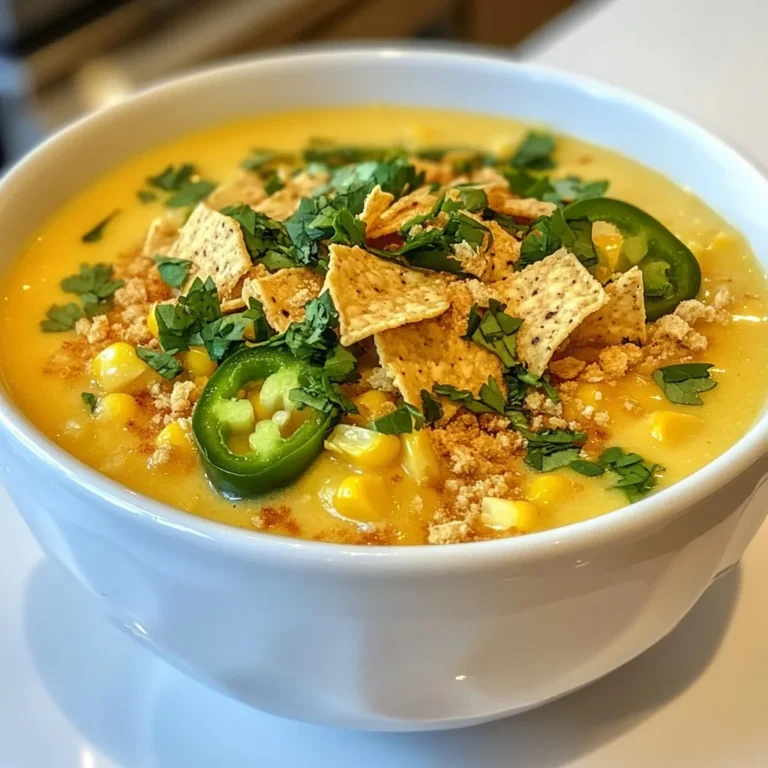
Jalapeño Popper Soup Flavorful and Creamy Delight

- 4 large whole wheat tortillas - 1 bell pepper, diced (choose your favorite color for vibrancy) - 1 medium zucchini, grated - 1 cup corn kernels (can use fresh or frozen) - 1 cup canned black beans, rinsed and drained - 1 cup shredded cheese (such as cheddar, Monterey Jack, or a blend) - 1 teaspoon ground cumin - 1 teaspoon smoked paprika - 1 tablespoon olive oil - Salt and pepper to taste - 1 ripe avocado, sliced (for serving) - Sour cream or Greek yogurt (for serving) - Fresh cilantro, chopped (for garnish) This recipe uses simple but tasty ingredients. Whole wheat tortillas give a nice base. Fresh veggies like bell pepper and zucchini add crunch and flavor. Corn adds sweetness, while black beans provide protein. Cheese melts beautifully and binds everything together. Ground cumin and smoked paprika bring warmth and depth. Olive oil helps sauté the veggies to perfection. Don't forget to add salt and pepper for balance. When serving, a ripe avocado, sour cream, and cilantro complete the dish. These toppings add freshness and extra flavor. {{ingredient_image_2}} 1. Heating the olive oil: Start by placing a large skillet over medium heat. Pour in one tablespoon of olive oil and let it warm until it shimmers. This step helps to enhance the flavor of your veggies. 2. Sautéing the bell pepper and zucchini: Add one diced bell pepper and one grated medium zucchini to the skillet. Stir them often for about five minutes. You want them soft but still colorful. This adds a nice texture to your quesadillas. 3. Combining corn, black beans, and spices: Next, stir in one cup of corn, one cup of rinsed black beans, one teaspoon of ground cumin, one teaspoon of smoked paprika, and some salt and pepper. Cook for another two to three minutes. Mixing these ingredients creates a robust flavor that makes your quesadillas pop. 1. Preparing the tortilla and cheese: After the veggie mixture cools a bit, wipe the skillet clean. Place one large whole wheat tortilla on the skillet. Sprinkle one half with a generous layer of cheese. You can choose cheddar, Monterey Jack, or a blend. 2. Adding the veggie filling: Spoon a good amount of the veggie mixture over the cheese. Make sure to cover it well, then fold the tortilla in half. This step ensures every bite is packed with flavor. 3. Cooking the quesadilla to achieve crispiness: Cook the folded quesadilla for three to four minutes on one side. Flip it gently and cook for another three to four minutes on the other side. You want it golden brown and crispy. This creates the perfect crunch. 1. Slicing and plating the quesadillas: Once cooked, remove the quesadilla from the skillet. Place it on a cutting board and slice it into wedges. This makes them easy to share. 2. Garnishing with cilantro and accompaniments: Arrange the wedges on a colorful platter. Sprinkle fresh chopped cilantro on top for a nice touch. 3. Serving with lime wedges for zest: Don’t forget to add lime wedges. A squeeze of lime juice brings out all the flavors and adds a refreshing twist. Enjoy your Loaded Veggie Quesadillas! - How to ensure tortillas stay crispy: Keep your skillet at medium heat. Avoid cooking too fast. If the heat is too high, the outside may burn before the cheese melts. - Tips for even cheese melting: Use shredded cheese for quicker melting. Spread it across the tortilla evenly. This helps every bite be cheesy and delicious. - Suggestions for veggie preparation: Dice the bell pepper small for even cooking. Grate the zucchini to blend well. This makes the filling mix easily and add more flavor. - Overfilling quesadillas: Keep the filling to a moderate amount. Too much can cause spills. You want a nice, neat fold, not a messy kitchen. - Cooking at the wrong temperature: If your skillet is too hot, your quesadilla can burn. If it’s too cold, it will be soggy. Test with a small piece first to find the right heat. - Skipping the seasoning step: Don’t forget to add salt and pepper. The spices make your veggies pop. A little cumin and smoked paprika add depth and warmth to your dish. Pro Tips Use Fresh Ingredients: For the best flavor, opt for fresh produce. Seasonal vegetables not only taste better but also add vibrant colors to your quesadillas. Experiment with Cheese: Try mixing different types of cheese for a unique flavor profile. A combination of cheddar and Monterey Jack offers a delicious melt and taste. Control the Heat: Adjust the cooking temperature to ensure the tortillas crisp up nicely without burning. Medium heat is ideal for achieving that perfect golden color. Make it a Meal: Serve your quesadillas with a side salad or some quinoa to turn this dish into a complete meal, enhancing both nutrition and satisfaction. {{image_4}} You can make loaded veggie quesadillas even more fun by changing the fillings. Here are some ideas: - Add spinach for a pop of green. - Use mushrooms for a meaty texture. - Try chicken for extra protein. - Tofu is a great plant-based option. - Swap out cheese for vegan cheese or goat cheese for a twist. Want to add some heat? You can easily adjust the spice level: - Toss in jalapeños for a spicy kick. - Use more or less smoked paprika to change the flavor. You can also change how you serve these quesadillas. Here are some fun options: - Cut them into small bites for a party appetizer. - Serve them with eggs for a tasty breakfast. These variations keep your loaded veggie quesadillas exciting and delicious! To store leftover quesadillas, first let them cool down. Place them in an airtight container. This keeps them fresh. You can store them in the fridge for up to three days. If you want to keep them longer, freezing is a great option. To freeze, wrap each quesadilla in plastic wrap. Then place them in a freezer bag. They will stay good for up to three months. When ready to eat, just thaw them in the fridge overnight. For the best taste, I recommend reheating quesadillas in a skillet. Heat over medium heat. This method helps keep them crispy. Cook each side for about three minutes. If you use a microwave, place a paper towel under the quesadilla. This helps absorb moisture. Avoid cooking them too long in the microwave. This can make them soggy and chewy. Always check your quesadilla to make sure it is hot all the way through before serving. Yes, you can make Loaded Veggie Quesadillas ahead of time. Prepare the veggie filling and let it cool. Store it in the fridge for up to three days. You can assemble and cook the quesadillas just before serving. This way, you enjoy them hot and crispy. You can serve many tasty sides with Loaded Veggie Quesadillas. Here are a few ideas: - Sliced avocado - Sour cream or Greek yogurt - Fresh cilantro for garnish - A side of salsa or pico de gallo - A simple green salad These sides enhance flavors and add freshness to your meal. To make Loaded Veggie Quesadillas gluten-free, choose gluten-free tortillas. Many brands offer good options made from corn or rice. The rest of the recipe stays the same. Just check that all other ingredients are gluten-free, especially canned goods. Enjoy your delicious quesadillas worry-free! In this blog post, we covered how to make delicious Loaded Veggie Quesadillas. First, we listed essential ingredients, from whole wheat tortillas to fresh vegetables. Then, I shared step-by-step instructions for preparing, assembling, and serving the quesadillas. I also noted tips to keep them crispy and common mistakes to avoid. Finally, we explored tasty variations and storage options. Enjoy these yummy quesadillas with your chosen toppings. With practice, you'll create perfect quesadillas every time!

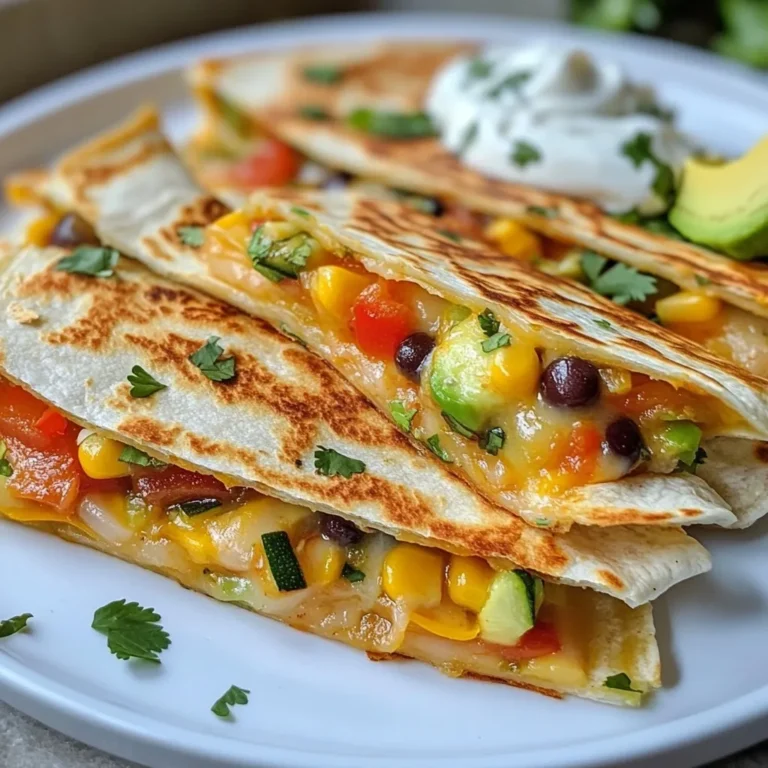
Loaded Veggie Quesadillas Flavorful and Healthy Delight

- 4 cups frozen corn kernels - 1 medium onion, finely diced - 2 cloves garlic, minced - 1 red bell pepper, diced - 1 can (14 oz) black beans, thoroughly rinsed and drained - 4 cups vegetable broth - 1 teaspoon chili powder - 1 teaspoon ground cumin - 1 teaspoon smoked paprika - 1/2 teaspoon cayenne pepper - Salt and freshly ground black pepper to taste In this soup, frozen corn kernels bring sweetness and texture. The onion, garlic, and bell pepper add depth and flavor. Black beans boost protein and heartiness. Vegetable broth ties everything together, making it rich and savory. Seasonings like chili powder and smoked paprika enhance the taste. I love adding cayenne pepper for a kick, but you can adjust it to your liking. - 1 cup heavy cream or coconut milk - Juice of 1 fresh lime - Fresh cilantro, chopped, for garnish - Crumbled queso fresco or feta cheese, for topping - Tortilla strips, for garnish Toppings make this soup shine. Heavy cream or coconut milk gives it a creamy finish. Fresh lime juice adds zing and brightness. I often sprinkle cilantro on top for freshness. Crumbled queso fresco or feta cheese adds a salty bite. Crunchy tortilla strips provide a nice texture contrast. Feel free to mix and match these toppings to suit your taste! {{ingredient_image_2}} Start by dicing your onion. Use a sharp knife for a clean cut. Next, mince the garlic cloves. Garlic adds a great flavor. Then, chop the red bell pepper into small pieces. For the black beans, open the can and rinse them under cold water. This step removes extra salt and helps the beans taste fresh. Drain them well and set aside. Now it's time to layer your ingredients in the crockpot. First, add the corn kernels. Then, put in the diced onion, minced garlic, and red bell pepper. Next, add the rinsed black beans. Pour the vegetable broth over everything to keep it moist. Sprinkle the chili powder, ground cumin, smoked paprika, and cayenne pepper on top. Season with salt and pepper. Give everything a good stir to mix the spices with the vegetables. Cover the crockpot with its lid. You can cook the soup on low for 6-8 hours or on high for 3-4 hours. The low setting makes the flavors mix well, while high cooks it faster. After cooking, grab your immersion blender. Blend the soup until it reaches your desired thickness. For a chunky texture, blend only half. This keeps some bits whole for a nice bite. Next, stir in the heavy cream or coconut milk along with the fresh lime juice. Mix well and let the soup simmer on low for another 15-20 minutes. This step warms it up and blends the flavors even more. To adjust the spice level, use cayenne pepper wisely. Start with half a teaspoon. If you like more heat, you can add more later. This keeps the soup tasty without overwhelming your palate. For cooking times, check your crockpot. If you cook on low, aim for 6-8 hours. For high, 3-4 hours works well. Always check for doneness. You want the veggies tender but not mushy. Try adding extra seasonings for more zest. A dash of lime zest adds freshness. You might also add a pinch of onion powder or garlic powder for depth. Want to pack in more nutrition? Add veggies like zucchini or spinach. You can also stir in cooked chicken or shrimp for protein. This makes the soup heartier and more filling. Presentation matters! Ladle the soup into bowls. Top each bowl with chopped cilantro, crumbled cheese, and tortilla strips. This adds color and crunch. Pair your soup with sides like crusty bread or a simple salad. These sides balance the creamy soup and offer a lovely contrast. Enjoy every bite! Pro Tips Fresh Ingredients: For the best flavor, use fresh vegetables whenever possible instead of frozen, especially the bell peppers. Spice Adjustment: If you prefer a milder soup, reduce the amount of cayenne pepper or omit it entirely. Blending Technique: For a creamier texture, blend the entire soup; for a chunkier texture, blend only half and leave the rest as is. Serving Suggestions: Add a dollop of sour cream or Greek yogurt for creaminess, and serve with crusty bread for a complete meal. {{image_4}} You can make this soup vegan by using coconut milk instead of heavy cream. Coconut milk gives a creamy texture and adds a subtle sweetness. This swap keeps the soup rich without dairy. If you need it gluten-free, double check your vegetable broth. Most brands are safe, but it’s good to look. If you want to change things up, you can swap corn with other veggies. Try diced zucchini or chopped spinach for a fresh twist. You can also use different beans. Pinto or kidney beans work well too. If you want more protein, add shredded chicken or cooked quinoa for heartiness. To give your soup a Mexican flair, add traditional ingredients like diced tomatoes or poblano peppers. These add depth and flavor. You can also play with spices. Use fresh cilantro or a pinch of oregano for an authentic touch. Adjust the cayenne for heat, making it as spicy as you like. After cooking, let the soup cool for about 30 minutes. This helps keep your containers safe. Use airtight containers to store the soup. Glass jars or BPA-free plastic containers work well. These keep flavors fresh and prevent spills. You can freeze this soup for later. First, make sure it cools completely. Then, pour it into freezer-safe bags or containers. Remove as much air as possible to prevent freezer burn. The soup lasts in the freezer for up to three months. When you're ready to eat, thaw it overnight in the fridge. Reheat the soup gently for best taste. Use a microwave or stovetop. For the microwave, place the soup in a bowl. Heat in short bursts, stirring in between. This helps it heat evenly. On the stovetop, pour the soup into a pot and heat over low to medium heat. Stir often to avoid sticking. Make sure it’s hot throughout before serving. Can I use fresh corn instead of frozen? Yes, you can use fresh corn. Just cut it off the cob, and add it to the pot. Fresh corn adds a nice crunch and sweet flavor. How do I make it spicier? Add more cayenne pepper or a diced jalapeño. You can also use hot sauce for extra heat. Taste as you go to find your perfect level of spice. Is this dish gluten-free? Yes, this soup is gluten-free. All the ingredients, like corn and beans, do not contain gluten. Can I make it dairy-free? Yes, substitute heavy cream with coconut milk. This keeps it creamy while being dairy-free. What should I do if the soup is too thick? If the soup is too thick, add more vegetable broth. Stir it in slowly until you reach your desired consistency. How to store leftovers? Let the soup cool before storing. Use an airtight container and keep it in the fridge for up to five days. You can also freeze it for later use. This recipe combines simple ingredients to create a tasty soup. We explored the main ingredients, cooking steps, and various tips. You can customize it to match your taste and diet. Remember to store any leftovers properly for future enjoyment. This soup is not only delicious but also easy to make, making it perfect for everyone. Enjoy experimenting with your unique twists! Enjoy your flavorful creation, and share it with your loved ones.

Crockpot Mexican Street Corn Soup Flavorful and Easy

PREV 1 … 43 44 45 … 47 NEXT
meal plan mapper

explore

DessertsDinnerAppetizersDrinks

Our Policies

  • Cookie Policy
  • Copyright Policy
  • Disclaimer
  • GDPR Policy
  • Terms Of Use
Back to Top
  • About
  • Contact Us
  • Privacy Policy
© 2025 meal plan mapper