FREE DINNER EBOOK! Get your copy!
  • Cookie Policy
  • GDPR Policy
  • Disclaimer
  • Terms Of Use
  • Visit my other site: Fun Cookie Recipes
meal plan mapper
  • Home
  • Dinner
  • Desserts
  • Drinks
  • Appetizers
  • Contact
  • About
  • Privacy Policy
  • Home
  • Dinner
  • Desserts
  • Drinks
  • Appetizers
  • Contact
  • About
  • Privacy Policy
  • Cookie Policy
  • GDPR Policy
  • Disclaimer
  • Terms Of Use
Visit my other site: Fun Cookie Recipes

HOME / CATEGORIES /

Latest

To make spicy avocado deviled eggs, gather these simple ingredients: - 6 large eggs - 1 ripe avocado, halved and pitted - 2 tablespoons creamy mayonnaise - 1 teaspoon Dijon mustard - 1 teaspoon fresh lime juice - 1 small jalapeño, finely chopped - Salt and freshly ground black pepper to taste - Smoked paprika for garnish - Fresh cilantro leaves for garnish These ingredients make a rich and creamy filling. The avocado adds a nice twist to this classic dish. The jalapeño gives it a spicy kick. Feel free to adjust the spice level based on your taste. The lime juice brightens the flavors and adds freshness. Using fresh cilantro as a garnish adds a lovely touch. This list ensures your deviled eggs will impress everyone! {{ingredient_image_2}} - Start by placing the eggs in a pot. Cover them with cold water by one inch. - Bring the water to a rolling boil on medium heat. - Once boiling, cover the pot and take it off the heat. Let the eggs sit for 12 minutes. - While the eggs cook, prepare an ice bath. Fill a bowl with cold water and ice. - After 12 minutes, move the eggs to the ice bath. Cool them for 5-10 minutes. - Once cool, tap each egg on a hard surface to crack the shell. Peel them under running water for ease. - Cut the peeled eggs in half lengthwise and pop out the yolks into a bowl. - Add the ripe avocado, creamy mayonnaise, Dijon mustard, lime juice, and jalapeño to the yolks. - Mash everything together with a fork until smooth and well-blended. - Use a spoon or piping bag to fill each egg white half with the mixture. - Create a lovely mound for a nice look. - Lightly dust the eggs with smoked paprika for color. - Top each with a fresh cilantro leaf for garnish. - Use fresh eggs. Fresh eggs peel better and have a nice texture. - An ice bath is key. It stops cooking and helps with easy peeling. - Adjust the jalapeño. If you want more heat, keep some seeds in. - Serve on a bright platter. This makes the deviled eggs stand out. - Add lime wedges. They add color and a zesty touch to your spread. Pro Tips Use Fresh Ingredients: Always opt for the freshest avocados and eggs for the best flavor and texture in your deviled eggs. Customize the Heat: Adjust the amount of jalapeño according to your spice tolerance. You can also experiment with different peppers for varied flavors. Perfect Peeling: Peeling eggs under running water can help remove the shell more easily, especially if your eggs are very fresh. Make Ahead: These deviled eggs can be prepared a few hours in advance. Just keep them covered in the fridge until serving to maintain freshness. {{image_4}} You can change up the taste of your deviled eggs easily. Adding herbs or spices makes a big difference. For example, try fresh dill or chives for a bright flavor. You can also mix in a little garlic powder or smoked paprika for depth. If you have dietary needs, substitute the mayonnaise with Greek yogurt. This swap reduces fat and adds protein. You can also use hummus for a creamy, vegan option. Don't be afraid to experiment with flavors that you love! The toppings can really elevate your deviled eggs. You can add crispy bacon bits for a savory crunch. Another great option is fresh chives, which add a mild onion note. For something fun and colorful, try pickled jalapeños or diced bell peppers. When it comes to presentation, think outside the box! Use a cupcake stand or a colorful platter. You can even create a themed display for holidays or parties. Your guests will be impressed by the creativity and taste! To keep your spicy avocado deviled eggs fresh, store them in the fridge. Place them in an airtight container. Cover each egg with plastic wrap if you want extra protection. This helps avoid drying out. They stay fresh for about 2 days. After that, they may lose flavor and texture. Deviled eggs are best served cold. If you have leftovers, just enjoy them straight from the fridge. You can also bring them to room temperature before serving. Avoid reheating them in the microwave, as it can make them tough. Freezing deviled eggs is not recommended. The texture changes and the flavors may not taste right. Enjoy your delicious deviled eggs fresh! To hard boil eggs, place them in a pot. Cover them with cold water by one inch. Heat the pot on medium until the water boils. As soon as it boils, cover the pot and take it off the heat. Let the eggs sit in the hot water for 12 minutes. This way, you do not overcook them. To avoid green yolks, cool the eggs quickly. After the time is up, put them in an ice bath. This stops the cooking process. The green color comes from overcooking, so timing and cooling are key. Yes, you can make deviled eggs ahead of time. You can boil and peel the eggs a day before. Store the peeled eggs in cold water in the fridge. This keeps them fresh and easy to use. For the filling, mix the yolks with the other ingredients. Cover the mixture and keep it in the fridge. Fill the egg whites just before serving to keep them fresh and tasty. If you want to skip mayonnaise, try using Greek yogurt. It gives a nice creaminess and adds protein. Another option is sour cream, which adds a tangy flavor. You can also use mashed avocado for a richer taste. Each of these options gives a different flavor but keeps the texture creamy. Experiment with what you like best! You learned how to make tasty deviled eggs using simple steps and fresh ingredients. We covered cooking, filling, and serving ideas. Remember to adjust spice levels to fit your taste. Don't forget to try different flavors and toppings to make your eggs unique. Storing leftovers properly keeps them fresh for later. Enjoy creating these fun treats for any gathering!

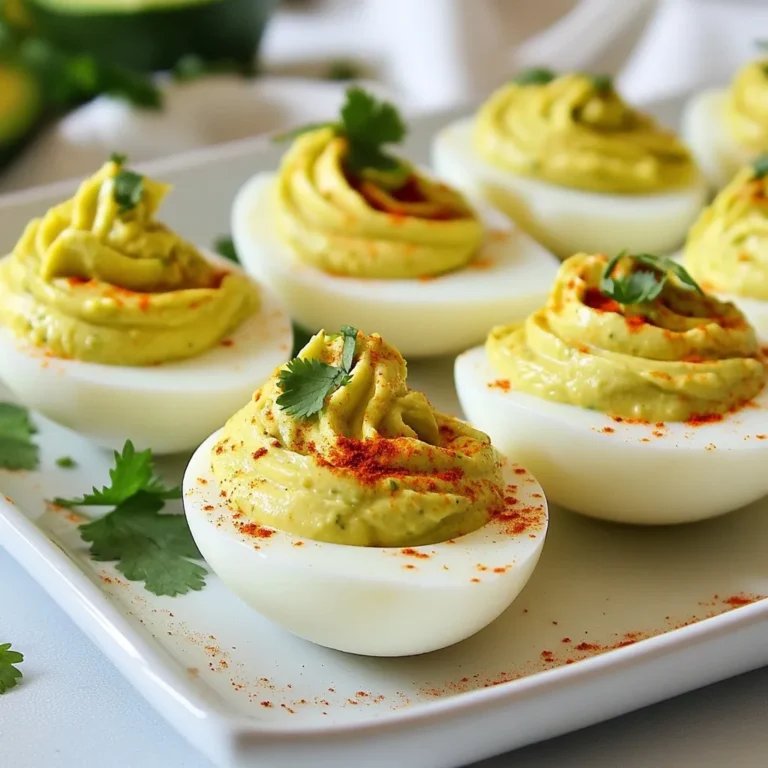
Classic Deviled Eggs Tasty and Easy Recipe Guide

To make Christmas Crack Saltine Toffee, you need these main ingredients: - 1 sleeve of saltine crackers - 1 cup unsalted butter (2 sticks) - 1 cup packed brown sugar - 2 cups semi-sweet chocolate chips - 1 cup chopped nuts (pecans or almonds) - Sea salt for sprinkling These simple ingredients come together to create a sweet and salty treat. The saltine crackers form a crispy base, while the butter and brown sugar make the rich toffee. The chocolate chips add a creamy layer, and the nuts give a nice crunch. You can tailor your Christmas Crack to fit your tastes. Here are some options: - Different types of chocolate (dark or white) - Various nuts (walnuts, hazelnuts, or no nuts) - Sprinkles or edible glitter for a festive look Feel free to get creative! Adding different chocolates or nuts can change the flavor and texture of your treat. If you have dietary needs, you can make swaps. Here are some ideas: - Use dairy-free butter for a vegan version. - Replace chocolate chips with dairy-free ones if needed. - Opt for gluten-free crackers to make it gluten-free. These substitutions will help you enjoy Christmas Crack while meeting your dietary needs. Always check labels to ensure that the substitutes fit your requirements. {{ingredient_image_2}} Start by preheating your oven to 400°F (200°C). This step is key for getting that nice crunch. While it heats, grab a large baking sheet. Line it with aluminum foil. This makes cleanup easy. Lightly spray the foil with cooking spray. This helps the toffee come off smoothly later. Next, take your sleeve of saltine crackers. Lay them out in a single layer on the foil. Make sure they cover the entire surface. Avoid overlapping them. This even layer will soak up the toffee well, giving you that perfect bite. Now it’s time to make the toffee. In a medium saucepan, add one cup of unsalted butter and one cup of packed brown sugar. Put the pan on medium heat. Stir often to keep it from sticking. Watch closely as it melts and bubbles. Once it starts boiling, let it cook for three minutes without stirring. This is where the magic happens. You want it to reach that rich toffee texture. After cooking, take the pan off the heat. Carefully pour the hot toffee over the saltine crackers. Use a spatula to spread it evenly. Make sure every cracker gets coated. Then, place the baking sheet in the oven. Bake it for five to seven minutes. Keep an eye on it. You want it bubbly and golden, but not burnt. Once it’s ready, take the baking sheet out. Immediately sprinkle two cups of semi-sweet chocolate chips over the hot toffee layer. Let them sit for about two to three minutes. This softens them. Then, gently spread the melted chocolate with a spatula for a smooth layer. Next, sprinkle one cup of chopped nuts over the chocolate. Press them down a bit to make sure they stick. For that sweet and salty taste, sprinkle a light dusting of sea salt on top. Now, let the toffee cool at room temperature for thirty minutes. After that, put it in the fridge for another thirty minutes. This helps it harden fully. Finally, once it’s set, break the Christmas Crack into bite-sized pieces. You can serve it right away or store it in an airtight container to keep it fresh. Enjoy this tasty holiday treat! To make great toffee, start with fresh ingredients. Use unsalted butter for a clean taste. Saltine crackers provide a nice crunch. Be sure to spread the toffee quickly over the crackers. If you wait too long, it will harden. Use a heavy saucepan for even heat. Stir the toffee often to avoid burning. Once it bubbles, let it cook for three minutes. This step is key for a rich flavor. Always watch the oven closely. One common mistake is not coating all crackers. This leads to some dry bites. Ensure all are covered in toffee. Another mistake is not using enough chocolate. Two cups may seem like a lot, but it makes a big difference. Letting the chocolate sit too long can cause it to harden. After removing the pan from the oven, sprinkle the chocolate right away. This ensures it melts perfectly. To get an even chocolate layer, use semi-sweet chips. After sprinkling, let them melt for 2–3 minutes. This softens them for easy spreading. Use a spatula to spread the chocolate evenly. For a thicker layer, add more chocolate chips. Sprinkle the nuts while the chocolate is still warm. Press them lightly to make sure they stick. This adds extra crunch and flavor. With these tips, your Christmas Crack will be a hit! Pro Tips Use Quality Chocolate: Opt for high-quality semi-sweet chocolate chips for a richer flavor that melts beautifully over the toffee. Watch the Baking Time: Keep a close eye on the baking process; the toffee can quickly go from perfectly bubbly to burnt if left too long. Cool Completely: Allow the toffee to cool at room temperature first before refrigerating to prevent condensation that can make it sticky. Experiment with Toppings: Feel free to customize the nuts or add festive toppings like crushed candy canes or sprinkles for a holiday twist! {{image_4}} You can swap semi-sweet chocolate for dark or white chocolate. Dark chocolate gives a rich taste that pairs well with the salty crackers. White chocolate adds a sweet touch and looks stunning. You can even mix chocolates for a fun flavor twist. Just remember to melt them slowly to keep a smooth texture. If you want to change up the nuts, try using walnuts, peanuts, or even no nuts at all. Each nut brings a unique taste and crunch. If someone has nut allergies, just skip them. You can also add seeds like pumpkin or sunflower for a different crunch. Get creative with mix-ins! Try adding crushed candy canes or sprinkles for a festive look. You can also drizzle extra chocolate on top for extra flair. For a hint of spice, sprinkle cinnamon or nutmeg. These little touches make your Christmas Crack even more special. To keep your Christmas Crack fresh, store it in an airtight container. This keeps out air and moisture. You can use a glass jar or a plastic container. Make sure to layer parchment paper between the pieces. This prevents them from sticking together. Always keep the container in a cool, dry place. Avoid direct sunlight, as it can melt the chocolate. When stored properly, Christmas Crack lasts about one to two weeks. The chocolate may soften over time, but the taste remains great. If you notice any changes in texture or smell, it may be time to toss it. I recommend enjoying it within the first week for the best taste. If you want to keep Christmas Crack longer, freezing is a great option. Place it in an airtight container or a freezer bag. Be sure to remove excess air to prevent freezer burn. It can stay fresh in the freezer for up to three months. When you're ready to enjoy it, take it out and let it thaw at room temperature. The chocolate will regain its smooth texture, and you can savor your holiday treat! Christmas Crack is a sweet treat made from saltine crackers, butter, and chocolate. It is loved for its crunchy texture and sweet-salty flavor. The toffee layer is rich and buttery, while the chocolate adds creaminess. It is quick to make, which makes it a hit during the busy holiday season. Everyone loves sharing this treat, and it always disappears fast at parties. Yes, you can make Christmas Crack ahead of time. It stays fresh for several days if stored correctly. Just let it cool completely, then place it in an airtight container. This way, you can enjoy it during the festive season without stress. It also makes a great gift for friends or family. Absolutely! If you have nut allergies or preferences, you can skip the nuts. The recipe still tastes great without them. Feel free to add other toppings like crushed peppermint or sprinkles for extra flair. The base of saltines, toffee, and chocolate will still shine through. To cut the toffee without crumbling, wait until it is completely cooled and hardened. Use a sharp knife to score the top lightly before cutting. This will help guide your cuts. If it seems stubborn, warm the knife slightly to ease through. This way, you will get neat pieces without a mess. You now know how to make Christmas Crack with its key ingredients, easy steps, and tips. This sweet treat is customizable with nut options and toppings. Remember to store it right for the best taste. You can even prepare it ahead of time. In the end, enjoy making this fun recipe. You can share it with friends and family. They will love this delightful snack. Happy baking!

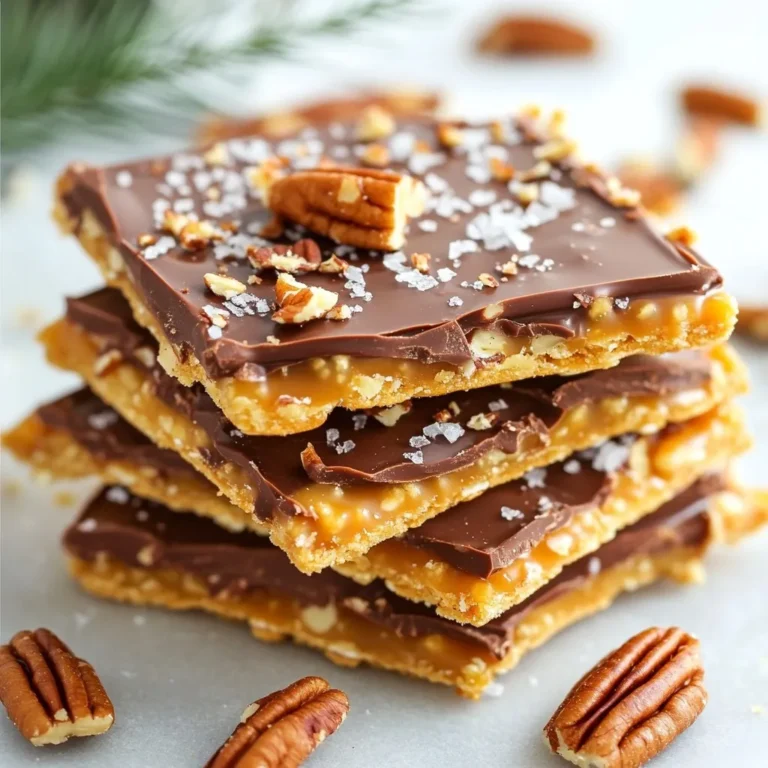
Christmas Crack Saltine Toffee Irresistible Holiday Treat

- 1 pound Brussels sprouts, trimmed and halved - 2 tablespoons extra virgin olive oil - 3 tablespoons pure honey - 2 cloves garlic, finely minced - 1 tablespoon soy sauce - Sea salt and freshly cracked black pepper, to taste - 1/4 teaspoon crushed red pepper flakes (optional) - Toasted sesame seeds for garnish - Fresh parsley, finely chopped for garnish The main ingredients are simple but full of flavor. Brussels sprouts are the star of the dish. They are packed with nutrients and have a slight bitterness that balances well with honey. The olive oil helps them crisp up nicely in the air fryer. Honey adds sweetness, while garlic brings a savory punch. Soy sauce adds depth to the flavor. This mix makes the sprouts irresistible. For seasoning, use sea salt and black pepper to enhance the taste. If you like some heat, add red pepper flakes. The toasted sesame seeds and fresh parsley are great for garnish. They add color and a crunchy texture, making the dish look beautiful. These ingredients come together to create a dish that is both healthy and tasty. You’ll love how easy it is to make. 1. Preheat the Air Fryer: Start by setting your air fryer to 375°F (190°C). Let it preheat for about 5 minutes. This step is key for a crispy finish. 2. Prepare the Brussels Sprouts: Take 1 pound of Brussels sprouts and trim them. Cut them in half and place them in a mixing bowl. Add 2 tablespoons of extra virgin olive oil, sea salt, and black pepper. Toss until they are well coated. 1. Whisk the Sauce: In a small bowl, combine 3 tablespoons of honey, 2 cloves of minced garlic, 1 tablespoon of soy sauce, and 1/4 teaspoon of crushed red pepper flakes. Mix until everything is blended well. This sauce gives a sweet and savory glaze. 1. Air Fry the Sprouts: Place the seasoned Brussels sprouts in the air fryer basket. Arrange them in a single layer for even cooking. Cook for 10 minutes, shaking the basket halfway through. 2. Add the Sauce: Carefully take the basket out after 10 minutes. Drizzle the honey garlic sauce over the Brussels sprouts. Toss them gently to coat them evenly. 3. Cook Again for Crispiness: Put the sprouts back in the air fryer. Cook for another 5 minutes, or until they turn golden brown and crispy on the edges. 4. Garnish and Present: Move the Brussels sprouts to a serving dish. Sprinkle toasted sesame seeds and chopped fresh parsley on top for color and texture. Enjoy them warm for the best taste! - Preheat the air fryer to 375°F (190°C) for five minutes. This step makes the sprouts crispy. - Don’t overcrowd the basket. Give each sprout space to cook evenly. - You can swap honey for maple syrup for a different taste. - Add fresh ginger to the sauce for a zesty kick. - Adjust the spice level by adding more or less crushed red pepper flakes. - If you want a sweeter sauce, add more honey or maple syrup. {{image_4}} You can make this dish fit your needs. To make it gluten-free, use tamari instead of soy sauce. It tastes great and keeps the flavor strong. For a vegan option, just swap out the honey with maple syrup. This change still gives you that sweet taste while keeping it plant-based. Feel free to get creative! You can add nuts like walnuts or pecans for a crunchy twist. You can also try mixing in other vegetables, such as carrots or bell peppers. They will roast nicely in the air fryer. For added flavor, you can sprinkle fresh herbs like thyme or rosemary. A bit of lemon zest or juice also brightens up the dish. These small changes can make your Brussels sprouts even more special. To keep your Brussels sprouts fresh, store them in an airtight container. Place them in the fridge within two hours of cooking. This helps keep them crisp and tasty. They can last up to three days in the fridge. For best results, avoid stacking them too high. This keeps them from getting squished and soggy. When it's time to enjoy leftovers, the air fryer works best. Set your air fryer to 350°F (175°C). Reheat the Brussels sprouts for about 5-7 minutes. This keeps them crispy and warm. You can also use the oven. Preheat it to 375°F (190°C) and bake for 10-15 minutes. Check them often to prevent overcooking. Enjoy your delicious sprouts again! Yes, you can skip the honey. Try maple syrup or agave instead. Both add sweetness. You can use carrots, broccoli, or cauliflower. These veggies cook well and taste great. Brussels sprouts are done when they are golden brown and crispy on the edges. A fork should pierce them easily. Yes, you can freeze them. First, let them cool completely. Then, place them in an airtight bag. This blog post covered a delicious air-fried Brussels sprouts recipe. We outlined key ingredients, prep steps, cooking methods, and tips to improve flavor. You can even adjust the recipe for dietary needs. In conclusion, air frying Brussels sprouts is an easy way to enjoy this veggie. With the right ingredients and techniques, you’ll create a tasty dish. I hope you try this recipe and enjoy all its tasty variations. Happy cooking!

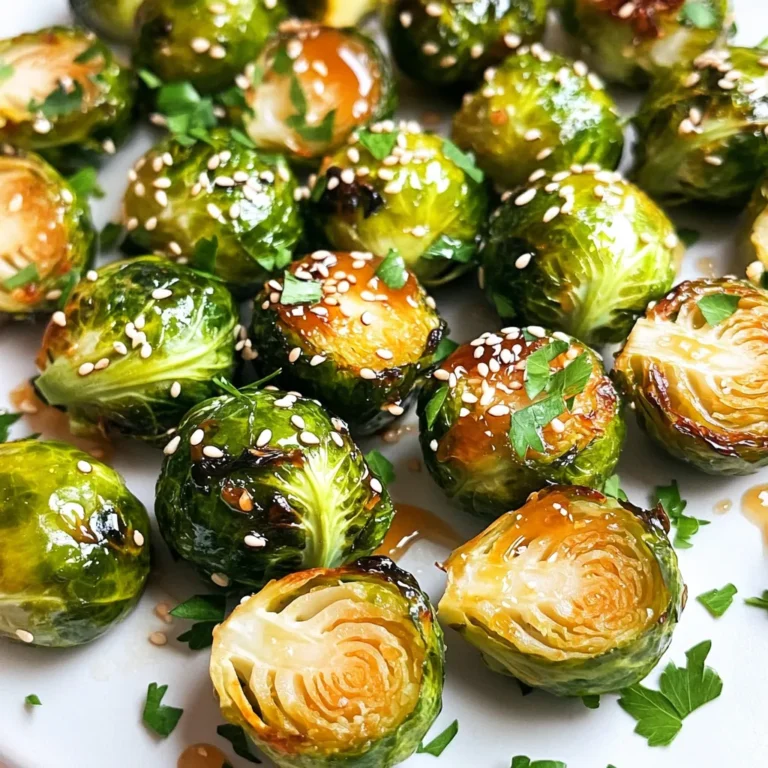
Air Fryer Honey Garlic Brussels Sprouts Delight

Here’s what you need for Sheet-Pan Sweet and Sour Chicken with Pineapple: - 1 pound boneless, skinless chicken thighs, cut into bite-sized pieces - 1 cup pineapple chunks (fresh or canned) - 1 large bell pepper, chopped into bite-sized pieces - 1 medium red onion, cut into wedges - 2 cloves garlic, minced - 1 tablespoon fresh ginger, grated - 1/4 cup soy sauce (low sodium is a great choice) - 1/4 cup apple cider vinegar - 1/3 cup honey - 1 tablespoon cornstarch mixed with 2 tablespoons water (this is your slurry) - 2 tablespoons vegetable oil - 1 teaspoon sesame oil - Sesame seeds for garnish - Fresh cilantro for garnish - Cooked white rice for serving Gather these ingredients to make a delicious meal. Each component adds flavor and texture. The chicken gives protein, while the pineapple adds sweetness. The bell pepper and onion add crunch and color. With the right mix, you create a delightful dish that is hard to resist. - Start your oven at 400°F (200°C). - Line your baking sheet with parchment paper. This helps with easy cleanup. - In a mixing bowl, combine soy sauce, apple cider vinegar, honey, minced garlic, grated ginger, and sesame oil. - Whisk these ingredients together until the mixture is smooth. This marinade packs flavor. - Take your chicken thighs and cut them into bite-sized pieces. - Coat the chicken pieces in half of the marinade. - Let them marinate for at least 15 minutes. This step makes the chicken juicy. - In another bowl, combine pineapple chunks, chopped bell pepper, and red onion. - Pour the remaining marinade over the vegetables. Toss everything gently until coated. - Distribute the marinated chicken on one side of the baking sheet. - On the other side, carefully arrange the marinated vegetables and pineapple. This keeps them separate while cooking. - Put the sheet pan in the preheated oven. - Bake for 20-25 minutes. Stir halfway through for even cooking. - When there are 5 minutes left, drizzle the cornstarch slurry over everything. This thickens the sauce. - After baking, take the sheet pan out of the oven. - Let it rest for a few minutes before serving. - Plate the sweet and sour chicken over cooked white rice. - Garnish with sesame seeds and fresh cilantro for a nice touch. Enjoy the tropical flavors! - Marinate the chicken for at least 15 minutes. This time helps the chicken soak up flavors. - Make sure each piece is evenly coated. This ensures all the chicken tastes great. - Stir the vegetables halfway through cooking. This helps them cook evenly and brown nicely. - Keep an eye on the chicken cooking times. It should reach an internal temperature of 165°F. - Serve the dish in deep bowls for a nice look. Arrange the chicken and veggies over the rice. - Add sesame seeds and fresh cilantro on top. This adds color and a pop of flavor. {{image_4}} You can switch the chicken for tofu or shrimp. - Tofu: Use firm tofu. Cut it into cubes. Bake for about 25-30 minutes. This gives it a nice crisp. - Shrimp: Use peeled and deveined shrimp. They cook faster. Bake for just 10-15 minutes. Watch them closely to avoid overcooking. These options keep the dish tasty. Feel free to add different veggies. Zucchini and broccoli work great. - Zucchini: Slice it into rounds. It cooks quickly and adds a nice texture. - Broccoli: Cut it into small florets. It adds a crunchy bite. Changing the veggies can alter the flavor too. For a sweeter taste, use carrots. For a spicy kick, jalapeños are a great choice. You can easily tweak the sauce for more flavor. - Sweetness: If you love it sweeter, add more honey. For less sweetness, cut back on honey. - Spice: Add red pepper flakes for heat. - Vinegars: Try rice vinegar for a milder taste. You can also use balsamic for a richer flavor. These adjustments let you make the dish your own. You can store leftover sheet-pan sweet and sour chicken in the fridge for up to four days. For best results, place it in an airtight container. This keeps the chicken juicy and the veggies fresh. Make sure to let the dish cool down before sealing it. Yes, you can freeze this dish! It’s a great way to save extra servings. To freeze, let it cool completely. Then, place it in a freezer-safe container or a zip-top bag. Squeeze out as much air as possible to avoid freezer burn. You can freeze it for up to three months. To reheat, let it thaw in the fridge overnight. This helps keep the texture nice. For reheating, the oven works best. Preheat your oven to 350°F (175°C). Place the chicken and veggies on a baking sheet and cover with foil. Heat for about 15-20 minutes. This method helps keep the chicken tender. You can also use the microwave. Just cover the dish with a microwave-safe lid. Heat in short bursts, stirring in between to ensure even warming. Enjoy your tasty leftovers! Yes, you can use chicken breast. Chicken thighs offer a richer flavor and juiciness. They stay tender during cooking. Breast meat is leaner and can dry out. If you use breasts, watch the cooking time closely. Aim for 20 minutes to keep them moist. Yes, you can prep this dish in advance. Marinate the chicken the night before for better flavor. Chop the veggies and store them separately. You can also cook the dish a day ahead. Just reheat it in the oven or microwave. This saves time on busy nights. I recommend white rice for a classic pairing. Jasmine rice adds a nice aroma. Brown rice is a healthy option with more fiber. If you want something different, try coconut rice. It complements the tropical flavors well. This recipe is not gluten-free due to soy sauce. You can use tamari or coconut aminos as substitutes. Both are gluten-free and will still add great flavor. Check labels to ensure all ingredients meet your needs. Enjoy a delicious meal without the gluten! In this post, we covered a delicious recipe featuring chicken, pineapple, and colorful veggies. You learned how to marinate the chicken and bake everything to perfection. Don’t forget to try out variations and storage tips to make meals easier. Cooking can be fun and creative, so feel free to explore flavors that excite you. Enjoy your tasty dish with rice and garnishes for a wonderful finish!

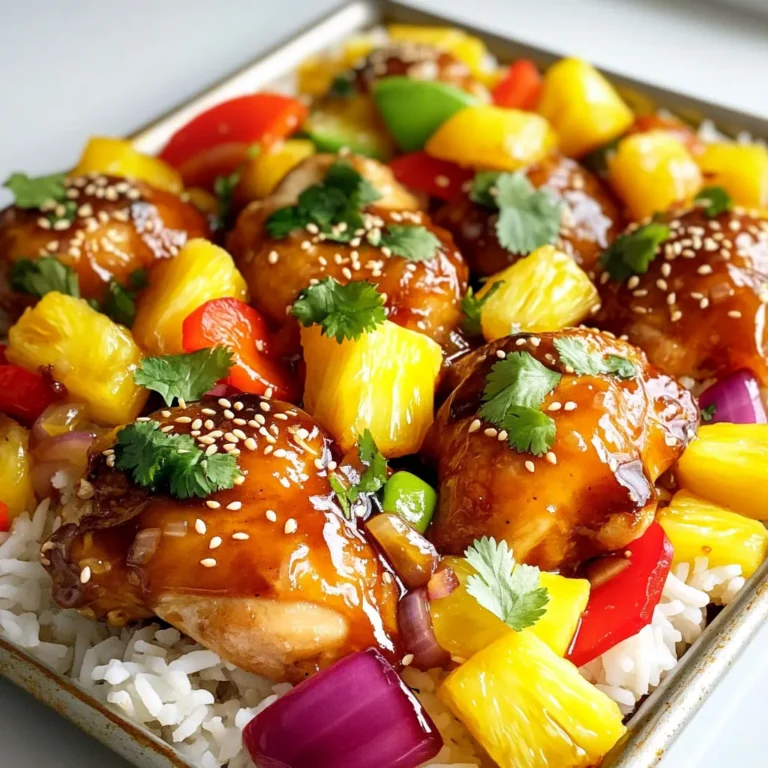
Sheet-Pan Sweet and Sour Chicken with Pineapple Delight

- 1 pound boneless, skinless chicken breasts, cut into bite-sized pieces - 2 tablespoons cornstarch - 2 tablespoons vegetable oil - 1 red bell pepper, diced - 1 green bell pepper, diced - 1 medium onion, chopped - 3 cloves garlic, minced - 1-inch piece fresh ginger, minced - 1/2 cup unsalted peanuts - 2 tablespoons soy sauce - 1 tablespoon rice vinegar - 2 tablespoons hoisin sauce - 1 tablespoon chili paste (adjust based on your spice preference) - 2 green onions, thinly sliced (for garnish) - Salt and pepper to taste For my Kung Pao Chicken, I use some basic items. These staples help build flavor. You will need: - Cornstarch to coat the chicken, making it crispy. - Vegetable oil for stir-frying, which helps prevent sticking. - Soy sauce adds saltiness and depth to the dish. - Rice vinegar gives a nice tangy kick. - Hoisin sauce brings sweetness and richness to the mix. Garnishes make my Kung Pao Chicken look great! Here are some ideas: - Sliced green onions add a fresh crunch. - Extra peanuts give a nice texture and nutty flavor. - A sprinkle of sesame seeds can add a lovely finish. These ingredients create a tasty, colorful dish that beats takeout any day! First, take 1 pound of boneless, skinless chicken breasts. Cut them into bite-sized pieces. In a mixing bowl, add the chicken and 2 tablespoons of cornstarch. Sprinkle in some salt and pepper. Toss everything together until the chicken is well coated. This step helps the chicken become crispy and golden when you cook it. Next, heat 1 tablespoon of vegetable oil in a large skillet or wok. Turn the heat to medium-high. Once the oil is hot, add the coated chicken. Stir-fry it for about 5 to 7 minutes. You want the chicken to turn golden brown and be fully cooked. When done, take the chicken out and place it on a plate to keep warm. In the same skillet, add another tablespoon of oil. Now, toss in the chopped onion, diced red bell pepper, and green bell pepper. Stir-fry these veggies for 3 to 4 minutes. You want them to soften a bit but still look bright and colorful. Then, add 3 cloves of minced garlic and 1 inch of minced ginger. Stir for one more minute until you smell their wonderful aroma. Now, let’s make the sauce. In a small bowl, whisk together 2 tablespoons of soy sauce, 1 tablespoon of rice vinegar, 2 tablespoons of hoisin sauce, and 1 tablespoon of chili paste. Pour this tasty sauce over your sautéed vegetables. Mix well to coat everything evenly. Return the cooked chicken to the skillet with the vegetables. Gently toss everything together. Make sure the chicken mixes well with the sauce. Then add 1/2 cup of unsalted peanuts and stir until everything is heated through, about 1 to 2 minutes. Let the dish cook for an extra 2 to 3 minutes. This will help the sauce thicken and the flavors blend together. Finally, take the skillet off the heat and garnish with thinly sliced green onions. This adds a fresh touch to your Kung Pao Chicken. Enjoy! To get crispy chicken, coat it well with cornstarch. This coating locks in moisture. When you stir-fry, use high heat. This helps the chicken brown nicely. Don't overcrowd the pan; cook in batches if needed. This ensures each piece cooks evenly and gets that golden finish. Kung Pao Chicken can be mild or spicy, based on your taste. Start with one tablespoon of chili paste. You can always add more later. If you want less heat, skip the paste or use less. Also, serve with rice to balance the spice. This way, everyone can enjoy the dish at their own heat level. For a richer flavor, use fresh garlic and ginger. They make a big difference. Don't skip the hoisin sauce; it adds depth and sweetness. You can also sprinkle in some sesame oil at the end for extra flavor. Try adding a dash of rice wine for a nice touch. Each of these tips will create a dish that tastes just right and feels authentic. {{image_4}} You can easily make a vegetarian version of Kung Pao. Replace the chicken with firm tofu. Cut the tofu into bite-sized cubes and press it to remove extra moisture. Toss the tofu in cornstarch just like the chicken. Cook it until golden brown. This keeps the dish crispy and tasty. You can also add more vegetables, like mushrooms or zucchini, to enhance the flavor and texture. If you want to switch from chicken, try shrimp or beef. Use one pound of shrimp, peeled and deveined. Cook it just like the chicken. Shrimp cooks quickly, so keep an eye on it. For beef, use flank steak, sliced thinly against the grain. This method ensures tenderness. Both options will still deliver that classic Kung Pao taste. Adjust the sauces to fit your taste. For a sweeter dish, increase the hoisin sauce. If you like more heat, add extra chili paste or fresh red chilies. You can also experiment with different nuts. Cashews or almonds can replace peanuts for a new twist. Don't forget to add fresh herbs like cilantro for a burst of flavor! To store Kung Pao Chicken, wait until it cools. Place it in an airtight container. This keeps your dish fresh and tasty. Make sure to eat the leftovers within three days. If you want to keep it longer, freezing is a great option. To reheat Kung Pao Chicken, use a skillet for best results. Heat it over medium heat. Stir often to ensure even heating. You can also microwave it. Use a microwave-safe dish and cover it loosely. Heat for 1-2 minutes or until hot. Freezing this dish is simple. Place the cooled Kung Pao Chicken in a freezer bag. Squeeze out excess air before sealing. It can last up to three months in the freezer. When you’re ready to eat, thaw it in the fridge overnight. Reheat it thoroughly before serving. The best chicken for Kung Pao Chicken is boneless, skinless chicken breasts. They stay juicy and tender when cooked. You can also use chicken thighs for more flavor. Cut the chicken into bite-sized pieces so they cook quickly and evenly. This technique helps create a nice texture in the final dish. Yes, you can make Kung Pao Chicken ahead of time. It's great for meal prep! Cook the chicken and vegetables as directed. Let them cool, then store in an airtight container in the fridge. When you're ready to eat, just reheat it in a pan. You may want to add a splash of water or soy sauce to keep it moist. Kung Pao Chicken can be spicy, but you control the heat. The chili paste adds a kick, but you can adjust it to your taste. If you prefer a milder dish, use less chili paste. For extra heat, add more or toss in some fresh chilies. Enjoy finding your perfect spice level! You now have all the tools to make great Kung Pao Chicken. We've covered key ingredients, step-by-step cooking, and storage tips. You can adjust the spice for your taste and explore fun variations. Remember, practice makes perfect. Don't hesitate to tweak the recipe. Enjoy making this dish and sharing it with family or friends. Happy cooking!

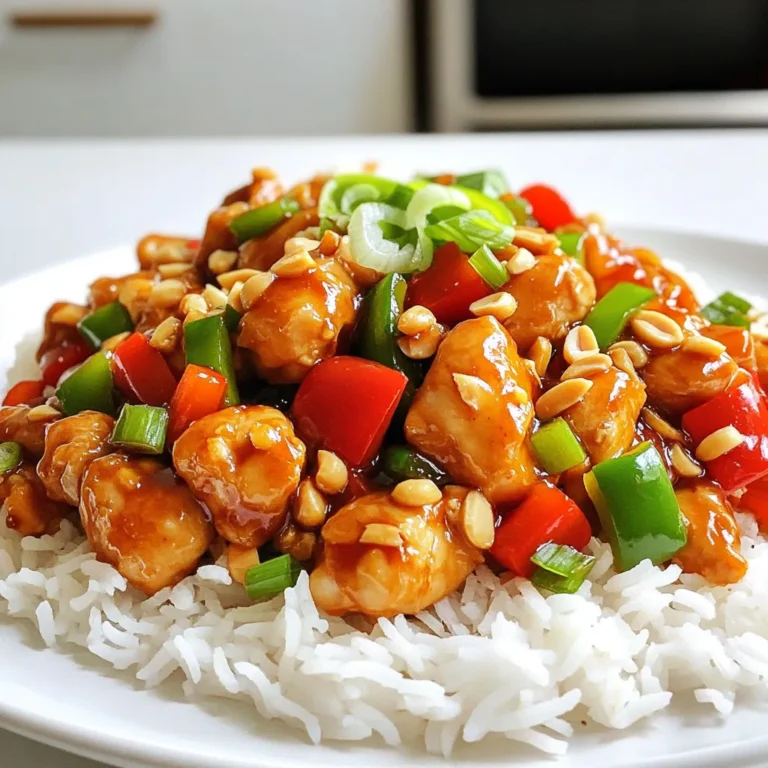
Better Than Takeout Kung Pao Chicken Simple Recipe

- 4 salmon fillets (approximately 6 oz each) - 2 medium zucchinis, sliced into half-moons - 1 cup cherry tomatoes, halved - 3 tablespoons extra-virgin olive oil - Juice of 2 fresh lemons - Zest of 1 lemon - 2 tablespoons fresh dill, finely chopped (or 1 tablespoon dried dill) - 2 cloves garlic, minced - Sea salt and freshly cracked black pepper, to taste - 1 cup cooked quinoa - Handful of fresh arugula or baby spinach for serving (optional) When I make Lemon Dill Salmon Bowls, I love how fresh and simple the ingredients are. Salmon is packed with protein and omega-3 fatty acids, making it a healthy choice. The zucchinis add a nice crunch, while cherry tomatoes bring sweetness and color. For the marinade, I combine olive oil, lemon juice, and dill. This blend gives the dish a zesty and bright flavor. I always use fresh lemons because they make a big difference. The garlic adds a punch that rounds out the taste perfectly. When I serve this dish, I like to add quinoa for a filling base. It’s fluffy and complements the salmon well. Finally, a handful of arugula or spinach adds a fresh touch and a pop of color. This dish is not just tasty; it's also a feast for the eyes. 1. First, preheat your oven to 400°F (200°C). This helps the salmon cook evenly. 2. Line a large baking sheet with parchment paper. This makes cleanup simple later. 3. In a medium bowl, whisk together the marinade. Combine 3 tablespoons of olive oil, the juice of 2 lemons, the zest of 1 lemon, 2 minced garlic cloves, and 2 tablespoons of chopped dill. Add sea salt and black pepper to taste. This zesty mix will bring out the best flavors in your dish. 1. Place the salmon fillets in the center of the baking sheet. 2. Surround the fillets with sliced zucchinis and halved cherry tomatoes. Spread everything out. This allows each piece to cook properly. 1. Drizzle half of the lemon-dill marinade over the fish and veggies. Make sure everything gets a nice coating. 2. Place the baking sheet in your preheated oven. Bake for 15 to 20 minutes. The salmon is done when it flakes easily with a fork and the veggies are tender and golden. 3. While the salmon cooks, reheat your cooked quinoa according to the package instructions. You want it warm and fluffy for the bowls. How to tell when salmon is done To check if salmon is done, look for a few signs. The fish should change from translucent to opaque. When you gently press it with a fork, it should flake easily. The internal temperature should reach 145°F (63°C). A meat thermometer can help ensure it's cooked properly. Tips for flaky texture For a flaky texture, use fresh salmon. Avoid overcooking it, as this can dry it out. Let the salmon rest for a few minutes after baking. This allows the juices to settle, giving you a moist bite. Ensuring even cooking Cut the vegetables into uniform sizes. This helps them cook evenly. Spread them out on the baking sheet. Overcrowding can lead to steaming instead of roasting. Alternative vegetable options If you want to switch it up, try asparagus or bell peppers. Broccoli or green beans also work well. These alternatives add different flavors and textures. Adjusting flavors to taste Feel free to tweak the marinade. If you like it zestier, add more lemon juice or zest. For extra flavor, mix in some mustard or honey. Suggested add-ins for extra zest Add red pepper flakes for heat or capers for brininess. Fresh herbs like parsley or basil can also enhance the taste. Mix and match to find your favorite combination! {{image_4}} You can switch up the fish in this recipe. Try trout, tilapia, or a firm white fish. Each one brings a unique flavor. If you want a non-fish option, consider chicken or tofu. Both options work well with the lemon-dill sauce. For the grain, you can swap quinoa with rice or couscous. Brown rice gives a nutty taste. Couscous offers a fluffy texture that complements the salmon. Feel free to use what you have on hand. To make your dish pop, add more spices or herbs. A pinch of paprika gives a nice kick. You can also mix in fresh parsley or chives for extra flavor. If you're a fan of heat, try adding red pepper flakes. For a citrus twist, use lime or orange juice instead of lemon. Each option brings a bright, fresh taste. You could even try a mix of citrus juices for a zesty surprise. Pair your salmon bowls with different sides for variety. A simple green salad adds crunch. Roasted sweet potatoes or steamed broccoli also work well. Each side enhances the flavor of the salmon. When assembling your bowls, think outside the box. Layer the quinoa, then add the salmon. Top with roasted veggies and a handful of fresh greens. Drizzle extra lemon-dill sauce on top for a burst of flavor. You can also use avocado slices for creaminess. To store your lemon dill salmon bowls, let them cool first. Place the salmon, veggies, and quinoa in airtight containers. This helps keep them fresh and tasty. You can store them in the fridge for up to three days. After that, the flavor and texture may change. When it's time to enjoy your leftovers, use the oven or microwave. For the oven, set it to 350°F (175°C). Place the salmon and veggies on a baking sheet. Heat for about 10-15 minutes. This keeps them moist and avoids drying out. If using a microwave, cover the bowl with a damp paper towel. Heat for 1-2 minutes. This method helps keep the salmon juicy. Yes, you can freeze salmon bowls! Wrap each portion tightly in plastic wrap and then foil. This protects them from freezer burn. They can last up to three months. When ready to eat, thaw them overnight in the fridge. Reheat using the oven or microwave as mentioned before. This way, you maintain the flavor and texture of your meal. The ideal cooking time for salmon at 400°F is 15 to 20 minutes. This time allows the salmon to cook evenly. It should flake easily with a fork when done. The vegetables around the salmon will also become tender. Always check the thickest part of the salmon for doneness. Yes, you can use frozen salmon fillets. Just add a few extra minutes to your cooking time. Make sure to check the salmon for doneness as it cooks. If you want, thaw the fillets overnight in the fridge for even cooking. However, cooking from frozen is easy and saves time. If you don't have fresh dill, use dried dill instead. You can use one tablespoon of dried dill for every two tablespoons of fresh dill. Other good options include parsley or tarragon for a different flavor. Each herb brings a unique taste that can enhance your dish. This dish combines healthy salmon, veggies, and a tasty marinade. You learned how to prepare it step-by-step, with tips to ensure perfect cooking. Don’t forget the fun variations and storage ideas to keep meals fresh. Whether for a quick dinner or meal prep, this recipe works well. Enjoy your tasty, nutritious salmon bowl, and feel free to share with friends!

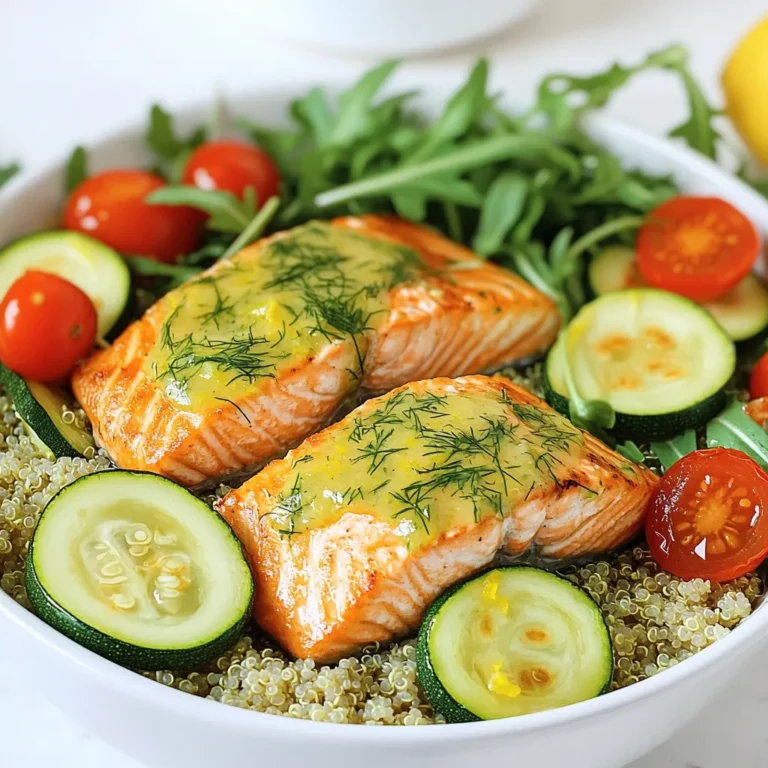
Lemon Dill Salmon Bowls Sheet Pan Fresh and Simple

- 1 can refrigerated crescent roll dough - 2 medium apples, peeled, cored, and diced into small pieces - 1/4 cup packed brown sugar - 1 teaspoon ground cinnamon - 1 tablespoon fresh lemon juice - 1 tablespoon unsalted butter, melted - 1 egg, beaten (for egg wash) - Optional: powdered sugar for dusting To make these apple pie crescent bites, gather the above ingredients. Each part adds flavor and texture. The apples give sweetness, while the brown sugar adds depth. Cinnamon brings warmth, and lemon juice brightens the mix. You can swap some ingredients if needed. For apples, use any type you like. Granny Smith or Fuji work well. Instead of brown sugar, white sugar or coconut sugar can work. Use nutmeg if you lack cinnamon. For a vegan option, replace butter with coconut oil. When it comes to crescent roll dough, I recommend Pillsbury. It’s easy to find and bakes up well. For apples, look for organic varieties for better taste. For brown sugar, I trust Domino. Their sugar is rich and flavorful. Choose large eggs from a trusted brand for your egg wash, ensuring a golden finish. {{ingredient_image_2}} First, you need to preheat your oven to 375°F (190°C). This step is key for crisp and golden bites. While your oven heats up, take a baking sheet and line it with parchment paper. This will help keep the bites from sticking. Next, let’s make the apple filling. In a medium bowl, combine the diced apples with brown sugar, cinnamon, and lemon juice. Mix them well. You want all the apple pieces coated in sweetness and spice. This filling adds a warm flavor to your crescent bites. Now, it’s time to work with the crescent roll dough. Open the can and unroll it on a clean surface. You will see the dough is in triangles. Follow the package instructions to separate each triangle carefully. This dough will hold your tasty filling. Take a spoonful of the apple mixture and place it at the wide end of each triangle. Be careful not to overfill; you want to keep the filling inside. Starting from the wide end, roll each triangle towards the narrow end. Pinch the ends to seal the filling inside. This step is important to keep everything together. Arrange the rolled bites on the prepared baking sheet, leaving space between them. Brush the tops with melted butter, then apply the beaten egg wash. This will give them a golden finish. Place the baking sheet in the oven and bake for 12-15 minutes. Keep an eye on them; you want them puffed up and golden brown. Once done, let them cool for a few minutes. If you like, dust them with powdered sugar for a sweet touch. Enjoy your delicious apple pie crescent bites! To get perfectly baked bites, follow a few key steps. First, preheat your oven to 375°F (190°C). This ensures even cooking. Second, use parchment paper on your baking sheet. This keeps the bites from sticking. Finally, watch the baking time closely. Bake for 12-15 minutes until golden brown. A good rule is to look for puffed-up bites that are nicely browned. No one likes soggy bottoms on their bites. To prevent this, you can take a few simple steps. Make sure to drain any excess liquid from the apple filling. This keeps the dough dry. Also, avoid overfilling each crescent roll. A spoonful of filling is just right. Lastly, baking on parchment paper allows for better air flow under the bites, keeping them crisp. If you want to skip butter in your egg wash, there are great alternatives. You can use milk for a lighter glaze. Simply brush a little milk on top before baking. Another option is using olive oil. This gives a nice flavor and golden color. For a vegan choice, try a mixture of almond milk and maple syrup. These options still help create that shiny, appealing finish you want. Pro Tips Use Tart Apples: For a balance of sweetness and tartness, opt for Granny Smith apples or a mix of sweet and tart apples to enhance the flavor of the filling. Chill the Dough: Keep the crescent roll dough chilled until you’re ready to use it. This helps maintain its flaky texture while baking. Experiment with Spices: Feel free to add a pinch of nutmeg or allspice to the apple mixture for an extra layer of flavor that complements the cinnamon. Storage Tips: Store any leftovers in an airtight container in the fridge for up to 3 days. Reheat in the oven for a few minutes to restore their crispiness. {{image_4}} You can change the filling to suit your taste. Try using pears instead of apples. You can also mix in some berries for a fruity twist. Adding nuts gives great crunch. Walnuts or pecans work well here. If you want a chocolate touch, use chocolate chips. Each choice adds a unique flavor to your bites. If you need a gluten-free option, use gluten-free crescent roll dough. Many brands offer tasty alternatives. Check the package for baking instructions. You can still enjoy these bites without the gluten. The filling stays the same, so you won’t lose any flavor. Finish your bites with yummy toppings. A drizzle of caramel sauce adds sweetness. You can also sprinkle some cinnamon sugar on top before baking. For a fresh look, add a light dusting of powdered sugar after baking. These small touches make your bites even more delightful. After enjoying your apple pie crescent bites, store any leftovers in an airtight container. This helps keep them fresh. Place the bites in the fridge for up to three days. If you want to keep them longer, freezing is the best option. To freeze your crescent bites, allow them to cool completely. Then, wrap each bite in plastic wrap. Place the wrapped bites into a freezer-safe bag. Label the bag with a date. Frozen bites can last for up to three months. When you're ready to eat, just thaw them in the fridge overnight. To reheat your crescent bites, preheat your oven to 350°F (175°C). Place the bites on a baking sheet. Heat for about 10 minutes, or until warm. You can also use a microwave. For the microwave, heat for 20-30 seconds. Enjoy them warm for the best taste! Yes, you can use canned apple pie filling. It makes the process faster. Just scoop some into the crescent dough and roll them up. This can save time if you are in a hurry. However, fresh apples give a better taste and texture. You will know they are done when they are golden brown. Look for a puffed-up shape, too. They usually take about 12-15 minutes in the oven. Keep an eye on them during the last few minutes. Yes, you can prepare the apple filling and dough ahead of time. Store the filling in the fridge for up to a day. You can also roll the bites and cover them. Just bake them when you are ready to serve. This makes it easy for parties. Serve these bites warm for the best taste. You can dust them with powdered sugar for a sweet touch. Pair them with vanilla ice cream or whipped cream. For a fun twist, add a drizzle of caramel sauce on top. They look great on a rustic board or colorful plate. You now have all the steps to make delicious crescent bites. We covered the needed ingredients, gave you easy substitutions, and suggested brands. The step-by-step guide helps you prepare the filling, dough, and bake these treats to perfection. We also shared tips to keep your bites from being soggy and offered variations for extra fun. Store them well, and you'll have tasty treats for days. With these methods, your baking will impress everyone. Enjoy making your crescent bites!

Apple Pie Crescent Bites Tasty and Simple Treat

- 8 oz. penne pasta - 1 tablespoon olive oil - 2 cups corn kernels (fresh or frozen) - 1 red bell pepper, diced - 1 jalapeño, minced (optional for spice) - 3 cloves garlic, minced - 1 teaspoon smoked paprika - 1 teaspoon chili powder - 4 cups vegetable broth - 1 cup Cotija cheese, crumbled - 1/4 cup fresh cilantro, chopped - Salt and pepper to taste - Juice of 1 lime - Lime wedges for serving Using fresh ingredients makes a big difference. Fresh corn adds sweetness and crunch. Choose firm, bright red bell peppers. They should feel heavy for their size. If you can, buy fresh cilantro with vibrant green leaves. For spices, use good quality smoked paprika and chili powder. They bring out the best flavors in this dish. You can modify this dish to fit your needs. If you prefer gluten-free, swap penne pasta for gluten-free penne. For a vegan dish, leave out the Cotija cheese or use vegan cheese. You can also add other veggies like zucchini or cherry tomatoes for more color and flavor. If you want extra protein, try adding black beans or shredded chicken. Start by pouring olive oil into a large pot. Heat it over medium heat until it shimmers. Next, add the corn kernels, diced red bell pepper, and minced jalapeño if you want some heat. Sauté these for about 5 minutes. Stir them often until the veggies are soft and smell great. Now, it’s time to boost the flavor. Add minced garlic, smoked paprika, and chili powder to the pot. Keep cooking for another minute. This step releases the spices' rich aromas. Your kitchen will smell amazing! Next, stir in the penne pasta. Make sure it mixes well with the veggies. Pour in the vegetable broth and crank up the heat until it boils. Once it’s boiling, lower the heat and cover the pot. Let it simmer for 12 to 15 minutes. Stir occasionally to prevent sticking. After the pasta cooks, take the pot off the heat. Gently fold in crumbled Cotija cheese, chopped cilantro, and lime juice. Season with salt and pepper to taste. Let it rest for a minute. This helps the cheese melt and flavors blend. When making Street Corn One-Pot Pasta, avoid overcooking the pasta. This can lead to mushy noodles. Always check for doneness a minute or two before the time is up. Another mistake is not stirring often enough. Stirring helps keep the pasta from sticking. Finally, remember to season well. Taste as you go and adjust salt and pepper to enhance flavor. To cook pasta perfectly, use a large pot with plenty of vegetable broth. This ensures even cooking and flavor. Bring the mixture to a rolling boil before adding the pasta. Once boiling, reduce the heat and cover the pot. This keeps the steam in, helping the pasta cook evenly. Stir every few minutes to avoid sticking. Cook until al dente, which means firm to the bite. Presentation makes your dish look inviting. Serve the pasta in deep bowls for a cozy feel. Top each bowl with extra Cotija cheese for a creamy touch. Sprinkle chopped cilantro on top for a pop of color. Add lime wedges on the side to brighten the dish. This not only enhances the look but also allows guests to add a fresh squeeze of lime. Enjoy the beauty and flavor of your dish! {{image_4}} If you want a vegetarian twist, you can easily switch a few ingredients. Keep the corn, bell pepper, and spices. Use vegetable broth for depth. Add more veggies like zucchini or mushrooms for extra flavor. You can also use a blend of different cheeses. This keeps it creamy and rich. For those who love spice, ramp it up! Start with the jalapeño. You can also add more chili powder. Try adding crushed red pepper flakes for a kick. If you want it extra hot, add diced fresh chili peppers. Just remember to taste as you go! You can get creative with your pasta. Try black beans or chickpeas for protein. Adding diced tomatoes gives it a nice acidity. You can also sprinkle in some corn chips on top for crunch. Fresh avocado slices make a rich, creamy addition. Don’t be afraid to mix and match! To keep your Street Corn One-Pot Pasta fresh, store leftovers in an airtight container. Make sure the pasta is cool before sealing the container. This helps stop moisture buildup, which can make the pasta soggy. You can keep it in the fridge for up to three days. When you reheat your pasta, add a splash of vegetable broth or water. This helps bring back moisture and flavor. Heat it gently on the stove over low heat. Stir often to avoid burning. You can also use the microwave. Just cover it with a damp paper towel to keep it moist. You can freeze this dish if you want to save some for later. Use a freezer-safe container or bag. Make sure to remove as much air as possible to prevent freezer burn. This pasta will last up to three months in the freezer. When you’re ready to eat, thaw it in the fridge overnight before reheating. Yes, you can use any pasta shape you like. Penne works well, but you can try fusilli, farfalle, or even spaghetti. Just keep in mind that cook times may change. Thinner pasta cooks faster, while thicker shapes take longer. Always check the package for the right cooking time. To make your dish creamier, add more Cotija cheese or stir in some cream or sour cream. You can also use cream cheese for a rich taste. Mix it in just before serving for that smooth texture. Yes, you can easily make this dish gluten-free. Use gluten-free pasta instead of regular penne. Just make sure to follow the cooking instructions on the gluten-free pasta package. Cooking times may vary, so watch it closely. - How to adjust cook times for different pasta shapes: - Thin pasta: Cook for about 2-4 minutes less than the package suggests. - Thick pasta: Cook for about 2-4 minutes longer than the package suggests. - Always taste a piece to check for doneness. - Recommended toppings for added flavor: - Extra Cotija cheese for richness. - Chopped green onions for a fresh bite. - A dollop of sour cream for creaminess. - Crushed tortilla chips for a nice crunch. - Fresh lime juice for a burst of citrus. This blog post covered essential ingredients, step-by-step cooking, and tasty variations for your dish. I shared tips to avoid common mistakes and optimize flavor. Remember, ingredient quality counts. A few simple swaps can personalize any meal. Store leftovers smartly to maintain their taste. You can even freeze portions for later. Use this guide to create the perfect dish every time. Embrace your creativity and enjoy delicious results!

Street Corn One-Pot Pasta Tasty and Simple Dish

- 1 ¾ cups all-purpose flour - 1 teaspoon baking powder - ¼ teaspoon salt - ½ cup unsalted butter, softened - ¾ cup granulated sugar - 2 large eggs - 1 teaspoon pure vanilla extract - ½ cup dried cranberries, chopped - ½ cup unsalted pistachios, chopped - Zest of 1 medium orange When making cranberry pistachio biscotti, you need simple but tasty ingredients. Each one plays a role in creating that crunchy treat you love. First, all-purpose flour forms the base. It gives the biscotti structure. Baking powder helps it rise, while salt brings out flavor. Unsalted butter adds richness and moisture, making the biscotti tender. Granulated sugar sweetens the dough. The two large eggs bind all the ingredients together. Pure vanilla extract adds a lovely aroma that makes each bite more enjoyable. Chopped dried cranberries provide tartness. They balance well with the sweet dough. Chopped pistachios add a nice crunch and a bright green color. Finally, the zest of one orange gives a hint of citrus that brightens the taste. These ingredients make the biscotti special. You can mix and match, but this combination creates a classic treat. - Preheat your oven to 350°F (175°C). - Line a large baking sheet with parchment paper. - In a medium bowl, whisk together: - 1 ¾ cups all-purpose flour - 1 teaspoon baking powder - ¼ teaspoon salt - In a large bowl, cream together: - ½ cup unsalted butter, softened - ¾ cup granulated sugar - Mix until light and fluffy, about 3-4 minutes. - Add 2 large eggs to the butter-sugar mix, one at a time. - Stir in 1 teaspoon pure vanilla extract and the zest of 1 medium orange. - Gradually mix in the flour mixture until just combined. - Gently fold in: - ½ cup dried cranberries, chopped - ½ cup unsalted pistachios, chopped - Divide the dough into two equal parts. Shape each into a log, about 14 inches long and 2 inches wide. - Place the logs on the prepared baking sheet with space between them. - Bake for 25-30 minutes until golden brown. - Let the logs cool on the baking sheet for 10 minutes. - Reduce the oven temperature to 325°F (160°C). - Transfer the logs to a cutting board. Slice diagonally into ½ inch thick pieces. - Arrange slices cut-side down on the baking sheet. Bake for 10-15 minutes until crisp and golden. - Cool completely on a wire rack before serving. - Ensuring even baking: To get a nice, even bake, make sure your oven is preheated. Use an oven thermometer to check the temperature. Place the biscotti logs in the center of the oven. This helps them bake evenly. - How to use a serrated knife: A serrated knife is your best friend for slicing biscotti. It cuts through the crunchy texture without crushing it. Use a gentle sawing motion to slice the logs into pieces. This keeps them looking nice and neat. - Adding spices like cinnamon or nutmeg: These spices can warm up your biscotti. Just add a teaspoon of cinnamon or nutmeg to the dry mix. The spices blend well with the cranberries and pistachios. - Substituting different nuts: If you want to change things up, try using different nuts. Almonds or walnuts work great too. Just chop them roughly and mix them in with the cranberries. Each nut adds its own flavor and crunch. - Creative ways to serve biscotti: Serve these tasty treats on a colorful platter. You can stack them high or lay them out flat. Pair them with a cup of tea or coffee. It makes for a lovely snack or dessert. - Packaging for gifts or parties: For a charming gift, place biscotti in a decorative tin or glass jar. Tie it with a bright ribbon. This makes a great present for friends or family. They will love the thought you put into it! {{image_4}} You can have fun with different flavors in your biscotti. Try adding chocolate chips and almonds for a sweet twist. The chocolate melts slightly and adds a rich taste. Almonds give a nice crunch and nutty flavor. Another option is using apricots and walnuts. The apricots bring a fruity note, while walnuts add a hearty texture. These combinations make your biscotti unique and exciting. If you need a gluten-free version, it’s easy to swap some ingredients. Use 1 ¾ cups of gluten-free flour instead of all-purpose flour. You can also add 1 teaspoon of xanthan gum to help bind everything together. Mix the dry ingredients as usual. The texture will be a bit different, but they will still taste great. Biscotti can match the seasons too. For a holiday treat, add spices like cinnamon and nutmeg. This makes your biscotti warm and cozy. In spring, add lemon zest for a fresh and bright flavor. The citrus will lift your spirits and is perfect for sunny days. Each season brings a chance to try something new and delicious. To keep your cranberry pistachio biscotti fresh, store them in an airtight container. This helps seal in their crunch and flavor. A glass jar or plastic container works well. Place parchment paper between layers to prevent sticking. Store the biscotti at room temperature, away from direct sunlight. They can stay fresh for up to two weeks. You can freeze both uncooked and baked biscotti. For uncooked biscotti, shape the logs and wrap them tightly in plastic wrap. Then, place them in a freezer bag. They can last up to three months in the freezer. When ready to bake, thaw the logs in the fridge overnight and bake as directed. For baked biscotti, let them cool completely. Then, wrap them tightly in plastic wrap and place them in a freezer bag. To thaw, simply leave them at room temperature for a few hours. If you like them warm, pop them back in the oven at 325°F (160°C) for about five minutes. This will refresh their crispness. How long do biscotti last? Biscotti can last for up to two weeks when stored in an airtight container. They stay fresh and crunchy this way. Can I substitute the butter for oil? Yes, you can use oil instead of butter. However, this may change the taste and texture slightly. What other mix-ins can I use? You can add chocolate chips, almonds, or dried fruits. Get creative with your favorite flavors! Biscotti turned out too hard, what to do? If your biscotti is too hard, try lowering the oven temperature next time. Bake them a bit less to keep them tender. Why did my biscotti spread too much in the oven? Too much moisture can cause spreading. Ensure your dough isn’t too wet and follow the recipe for best results. What drinks pair well with biscotti? Biscotti pairs great with coffee, tea, or hot chocolate. Their crunch complements these drinks wonderfully. Can biscotti be used in desserts or other recipes? Yes! You can crumble biscotti on ice cream or use it as a base for a dessert parfait. In this blog post, we explored the key ingredients and steps to make delightful biscotti. You learned about mixing, baking, and even storing your treats. I shared tips for flavor variations and creative presentation ideas. Biscotti are not just tasty; they're fun to make and share. I hope you feel inspired to try your hand at baking. Enjoy experimenting with flavors and impressing your friends and family with your homemade biscotti!

Cranberry Pistachio Biscotti Tasty and Crunchy Treat

- 1 large head of cauliflower, cut into bite-sized florets - 1/2 cup cream cheese, softened to room temperature - 1/2 cup grated Parmesan cheese - 3 cloves garlic, finely minced - 1/4 cup unsalted butter, melted - Salt and freshly ground black pepper to taste - 1/4 teaspoon garlic powder (optional, for an extra kick) - Fresh parsley, finely chopped - Extra Parmesan cheese - Optional garnishes, like paprika for color To make creamy garlic parmesan mashed cauliflower, you need simple yet flavorful ingredients. Start with a large head of cauliflower. Cut it into small florets for even cooking. Cream cheese gives the dish its creamy base. Grated Parmesan adds a rich, cheesy flavor. Garlic is a must for that bold taste. Use fresh garlic cloves, finely minced, for the best flavor. Unsalted butter brings everything together, adding richness and warmth. You can adjust the seasoning with salt and black pepper. If you like a stronger garlic taste, add garlic powder. For garnishing, fresh parsley adds a pop of color. Extra Parmesan cheese on top enhances the dish's appeal. You can also sprinkle a little paprika for an added flair. This dish is not only tasty but also visually appealing, making it great for any meal. To start, fill a large pot with salted water. Bring it to a boil over high heat. Once boiling, add your cauliflower florets. Cook them for 8-10 minutes. You want them fork-tender. To check for doneness, pierce a piece with a knife. If it slides in easily, you are good to go. While the cauliflower cooks, grab a small skillet. Heat it over medium heat and add your melted butter. Once warm, stir in the minced garlic. Sauté for about 1-2 minutes. You want the garlic to be fragrant but not browned. Browned garlic can taste bitter. Once you drain your cauliflower, put it back in the pot. Pour in the sautéed garlic and melted butter. Next, add the cream cheese and grated Parmesan cheese. If you like, sprinkle in garlic powder for extra flavor. Season generously with salt and freshly cracked black pepper. Use a potato masher or an immersion blender to blend everything together. Keep mixing until it is smooth and creamy. Taste and adjust the seasoning if needed. Now it's time to serve your dish. Spoon the mashed cauliflower into a nice serving bowl. For a touch of elegance, sprinkle freshly chopped parsley on top. You can also add more grated Parmesan cheese for extra flavor. If you want, drizzle a bit of melted butter over it. This adds richness and looks great. Enjoy with your favorite protein for a full meal! To boost the taste of your mashed cauliflower, try adding more spices. Here are some ideas: - A pinch of cayenne pepper for heat. - A dash of smoked paprika for a smoky touch. - Fresh herbs like thyme or rosemary for a fragrant twist. If you're looking for cheese options, consider these: - Creamy goat cheese for a tangy flavor. - Cheddar cheese for a sharp bite. - A blend of mozzarella and Parmesan for a different twist. Use the right tools to mash your cauliflower. A potato masher works well, but an immersion blender gives a super smooth texture. Just be careful not to over-blend, or it can turn gluey. To achieve that creamy consistency, make sure to: - Use softened cream cheese. - Blend in melted butter while mashing. - Adjust the creaminess with a splash of milk or broth if needed. Prep your cauliflower ahead of time. Cut it into florets and store in the fridge. It stays fresh for a few days. Need a quick meal idea? Try these: - Serve the mashed cauliflower with grilled chicken. - Pair it with a simple salad for a light lunch. - Use it as a base for a savory bowl with veggies and protein. {{image_4}} You can make creamy garlic Parmesan mashed cauliflower even more exciting. Here are some low-carb options: - Using different vegetables: Try using broccoli or turnips. Both can create a similar creamy texture. - Keto-friendly options: Cauliflower is already low in carbs, but you can enhance it. Add cheese or cream for a richer flavor without extra carbs. If you want a dairy-free version, I have great news for you! Here are simple swaps: - Non-dairy cream cheese options: Use cashew-based or tofu cream cheese. They give a nice creamy feel without dairy. - Plant-based cheese suggestions: Nutritional yeast or vegan Parmesan can add cheesy flavor. They are tasty and keep the dish plant-based. You can change up the taste of mashed cauliflower easily. Here are some fun ideas: - Adding herbs or spices: Fresh herbs like thyme or rosemary can brighten up the dish. You can also add a pinch of red pepper flakes for some heat. - Incorporating other ingredients: Mix in sautéed onions or roasted garlic for extra depth. You can even add a splash of lemon juice for a refreshing twist. Store leftover creamy garlic Parmesan mashed cauliflower in an airtight container. It keeps well in the fridge for about 3-4 days. Make sure to let it cool before sealing. This keeps moisture from building up inside the container. To freeze mashed cauliflower, follow these steps: - Let the mashed cauliflower cool completely. - Spoon it into freezer-safe bags or containers. - Remove as much air as possible before sealing. - Label with the date for easy tracking. For reheating, take it out of the freezer and let it thaw overnight in the fridge. Reheat on the stovetop over low heat, stirring often, or in the microwave. Add a splash of cream or a little butter to revive its creamy texture. Creamy garlic Parmesan mashed cauliflower pairs nicely with grilled chicken, steak, or fish. It also works well as a side for roasted vegetables. For meal prep, consider portioning it into single servings. This makes it easy to grab for quick lunches or dinners during the week. Yes, you can use frozen cauliflower. It saves time and is easy to find. - Cooking Tips: - Thaw the cauliflower first for even cooking. - Cook it for 5-7 minutes in boiling water. - Check for fork-tenderness before mashing. To make it dairy-free, swap out dairy ingredients. - Dairy-Free Substitutions: - Use coconut cream instead of cream cheese. - Substitute nutritional yeast for Parmesan cheese. - Try vegan butter in place of regular butter. Mashed cauliflower has many health benefits. It is lower in carbs than potatoes. - Health Benefits: - It has fewer calories than traditional mashed potatoes. - Cauliflower is high in fiber and vitamins. - It supports digestion and boosts immunity. Yes, you can prepare this dish ahead of time. It’s great for busy nights. - Meal Prep Tips: - Make it a day early and store in the fridge. - Reheat in the microwave or on the stove. - Add a splash of milk to restore creaminess when reheating. This blog post shared a detailed guide on making creamy mashed cauliflower. We covered the main and additional ingredients, tips for cooking, and variations to fit your diet. I provided helpful storage guidelines and answered common questions to support your cooking journey. As you explore different flavors and techniques, enjoy discovering how versatile this dish can be. It’s a tasty, healthy alternative to traditional mashed potatoes that fits many diets. Enjoy trying out your own creations!

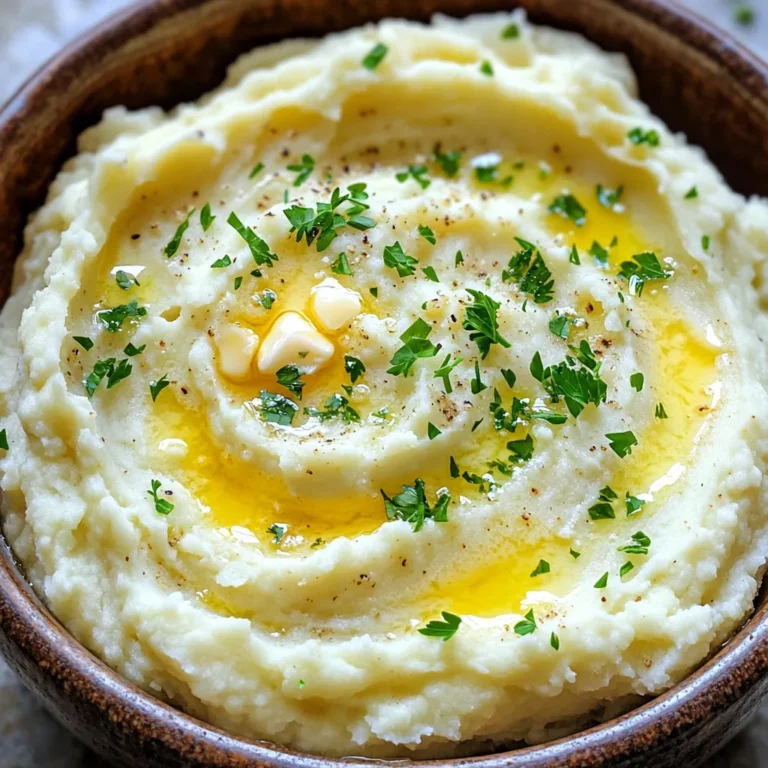
Creamy Garlic Parmesan Mashed Cauliflower Delight

PREV 1 … 7 8 9 … 47 NEXT
meal plan mapper

explore

DessertsDinnerAppetizersDrinks

Our Policies

  • Cookie Policy
  • Copyright Policy
  • Disclaimer
  • GDPR Policy
  • Terms Of Use
Back to Top
  • About
  • Contact Us
  • Privacy Policy
© 2025 meal plan mapper