Are you ready for a decadent twist on a classic dessert? Chocolate Dipped Cannoli Cones combine creamy filling with a sweet chocolate coating, making them a treat you can't resist. In this easy recipe, I'll guide you through every step. You'll whip up a delightful filling, dip the cones in melted chocolate, and add fun toppings. Let's dive in and create a dessert that will impress everyone!
Why I Love This Recipe
- Decadent Flavor: The combination of ricotta and mascarpone creates a rich and creamy filling, perfectly complemented by the semi-sweet chocolate dip.
- Visual Appeal: The colorful sprinkles or pistachios not only add texture but also make the cannoli cones a feast for the eyes, perfect for any occasion.
- Simple to Make: With just a few ingredients and straightforward steps, these cannoli cones are easy to prepare, even for novice bakers.
- Fun to Customize: Feel free to experiment with different fillings or toppings, making each batch unique and tailored to your taste.
Ingredients
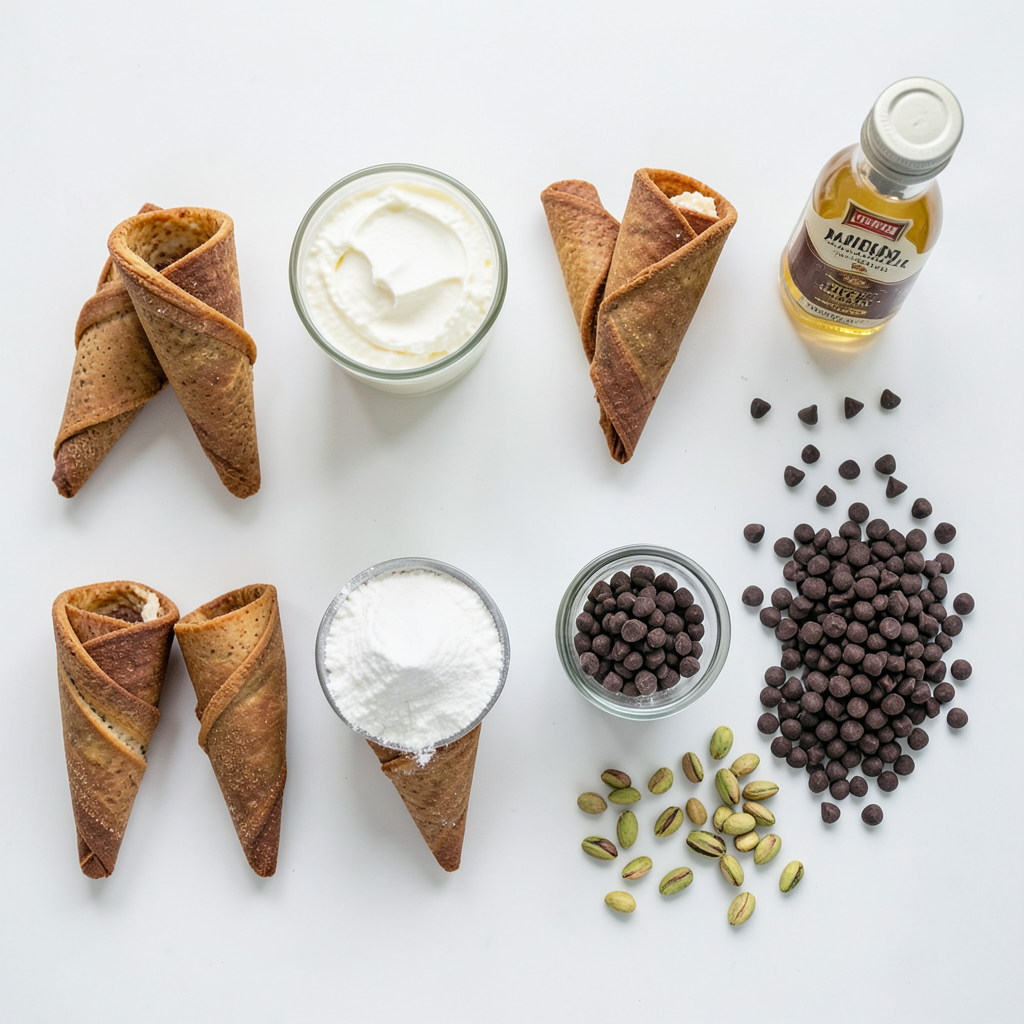
List of Required Ingredients
- Cannoli cones (store-bought or homemade)
- 1 cup ricotta cheese
- 1 cup mascarpone cheese
- 1/2 cup powdered sugar
- 1 teaspoon vanilla extract
- 1/2 cup mini chocolate chips
- 1 cup semi-sweet chocolate chips
- 1 tablespoon coconut oil (or vegetable shortening)
- Optional garnishes (chopped pistachios or colorful sprinkles)
Gather these ingredients before you start. The rich flavors of ricotta and mascarpone create a creamy filling. The mini chocolate chips add a sweet surprise. Using both types of chocolate elevates the dessert. You can use store-bought or homemade cones, depending on your time or skill level. Adding coconut oil helps the chocolate melt smoothly. Optional garnishes like pistachios and sprinkles make your dessert pop. They add color and crunch, making each bite even more fun. So, make sure to have everything ready to create these delicious treats!
Step-by-Step Instructions
Preparing the Filling
To start, grab a large bowl. Add 1 cup of ricotta cheese and 1 cup of mascarpone cheese. These cheeses create a rich, creamy base. Next, sprinkle in 1/2 cup of powdered sugar and pour in 1 teaspoon of vanilla extract. Mix these ingredients until smooth. I like to use an electric mixer for quick results. The filling should be creamy without lumps.
Incorporating Chocolate Chips
Now, let’s add some fun! Fold in 1/2 cup of mini chocolate chips. Gently mix them into the creamy filling. This step is key for a sweet surprise in every bite. Make sure the chocolate chips are evenly spread throughout the filling.
Filling the Cannoli Cones
It's time for the cones! Take 8 cannoli cones, either store-bought or homemade. Use a piping bag fitted with a large round tip or a small spoon. Start filling each cone with the cheese mixture. Fill them generously, letting some filling peak out at the top. This gives a nice look and invites everyone to taste.
Melting the Chocolate
Next, we’ll melt the chocolate. In a microwave-safe bowl, combine 1 cup of semi-sweet chocolate chips with 1 tablespoon of coconut oil. The oil helps the chocolate stay smooth. Microwave this in 30-second intervals. Stir well after each interval until the chocolate is fully melted.
Dipping the Cones
Now for the fun part! Carefully dip the top edge of each filled cone into the melted chocolate. Let any extra chocolate drip back into the bowl. This technique ensures an even coat. You want a beautiful chocolate edge on each cone.
Garnishing the Cannoli
Before the chocolate sets, add some flair! Sprinkle chopped pistachios or colorful sprinkles onto the chocolate-dipped edge. This adds a nice crunch and a pop of color to each cone.
Cooling and Serving
Stand each dipped cannoli cone upright in a glass or tall container. This helps the chocolate harden nicely. Let them cool for about 20-30 minutes until the chocolate is firm to the touch. For a lovely presentation, arrange the cones on a decorative platter. You can drizzle some melted chocolate on top for a stunning effect. Now, enjoy your chocolate dipped cannoli cones!
Tips & Tricks
Achieving the Perfect Filling Consistency
Mix your ricotta and mascarpone well. This step is key. Lumps can ruin your filling. Use an electric mixer or a strong spatula. Make sure the mixture is smooth and creamy. Add powdered sugar and vanilla slowly. This helps blend flavors evenly.
Chocolate Melting Tips
Melt your chocolate with care. Use a microwave-safe bowl for this. Start with 30 seconds in the microwave. Stir well after each interval. This keeps the chocolate smooth. If it gets too hot, it will seize. Mixing in coconut oil helps keep it silky.
Filling Techniques for Neat Cannoli
Filling your cones can be tricky. Use a piping bag for neatness. If you don’t have one, a small spoon works too. Fill them generously but avoid overfilling. Let some filling peek out for a nice look. This makes your cannoli cones more appealing.
Pro Tips
- Use Fresh Ingredients: Ensure your ricotta and mascarpone cheeses are fresh for the best flavor and texture in your filling.
- Chill Your Filling: For easier filling, chill the ricotta mixture for about 15 minutes before piping it into the cones.
- Customize Your Toppings: Experiment with different toppings like crushed nuts, sprinkles, or even shredded coconut to make your cannoli cones unique.
- Serve Immediately: For the best texture, serve the cones soon after dipping them in chocolate to prevent the cones from getting soggy.
Variations
Flavor Variations for the Filling
You can easily change the flavor of your filling. Adding citrus zest gives a bright taste. Lemon zest or orange zest works well. You can also use flavor extracts. Try almond or hazelnut for a unique twist. Just add a teaspoon or two to the mixture. This small change can make a big difference!
Chocolate Variations
While semi-sweet chocolate is classic, you have options. White chocolate adds a sweet and creamy flavor. Dark chocolate offers a richer taste. You can mix chocolates for a fun look. Just melt them as you would with semi-sweet. Choose the type that makes your heart happy!
Alternative Garnishes
Garnishing your cannoli can be fun and creative. Chopped nuts, like pistachios, add crunch. Coconut flakes bring a tropical feel. Edible glitter can make your dessert sparkle. Choose one or mix a few! These toppings not only enhance flavor but also look beautiful. Let your imagination run wild with garnishes!
Storage Info
How to Store Leftover Cannoli Cones
To keep your leftover cannoli cones fresh, store them in an airtight container. Place a layer of wax paper between each cone to avoid sticking. If you have not filled them yet, store the cones separately from the filling. This prevents sogginess.
Shelf Life
Filled and dipped cannoli cones taste best within two days. After that, the filling may become watery, and the cones may lose their crispness. If you store them correctly, they can last up to three days in the fridge.
Freezing Guidelines
You can freeze the cannoli cones for later enjoyment. Wrap each cone tightly in plastic wrap, then place them in a freezer bag. They can last up to two months in the freezer. When you’re ready to enjoy them, thaw them in the fridge overnight. Fill them just before serving for the best taste and texture.
FAQs
Can I use different cheese types for the filling?
Yes, you can! Other cheeses can add unique flavors.
- Cream Cheese: This gives a richer taste.
- Mascarpone Only: A creamier filling results.
- Ricotta Only: This keeps it light and fresh.
Each cheese changes the taste slightly, so feel free to experiment.
How can I make homemade cannoli cones?
Making your own cones is fun! Here’s a simple way:
- Ingredients: You need flour, sugar, eggs, and a bit of wine.
- Method:
1. Mix ingredients to form a dough.
2. Roll out thin circles.
3. Wrap around a cone mold and fry until golden.
Let them cool before filling them.
What is the best way to transport cannoli cones?
Transporting cannoli cones requires care.
- Use a Sturdy Container: A tall, narrow box works well.
- Separate Layers: Place parchment paper between layers.
- Keep Upright: Always stand them up to prevent crushing.
These tips help keep your cones safe and tasty.
Are there gluten-free options for cannoli cones?
Yes, gluten-free cones are possible!
- Almond Flour Cones: These add a nutty flavor.
- Rice Flour: This is light and crispy.
- Store-Bought Gluten-Free Cones: Many shops offer these now.
Check labels to ensure they meet your needs.
How can I enhance the chocolate flavor?
Deepening the chocolate taste is easy!
- Use Dark Chocolate: This gives a stronger taste.
- Add Cocoa Powder: Mix it into the filling.
- Chocolate Liqueur: A splash can boost flavor.
Try these ideas for a richer chocolate experience.
This guide covers all you need for perfect cannoli cones. You learned about the key ingredients, step-by-step instructions, and tips for success. Experiment with flavors and garnishes to make each batch your own. Remember to store leftovers wisely and consider variations for fun twists. Enjoy crafting these sweet treats! Your creativity will impress friends and family. Now, go share your delicious cannoli with everyone!