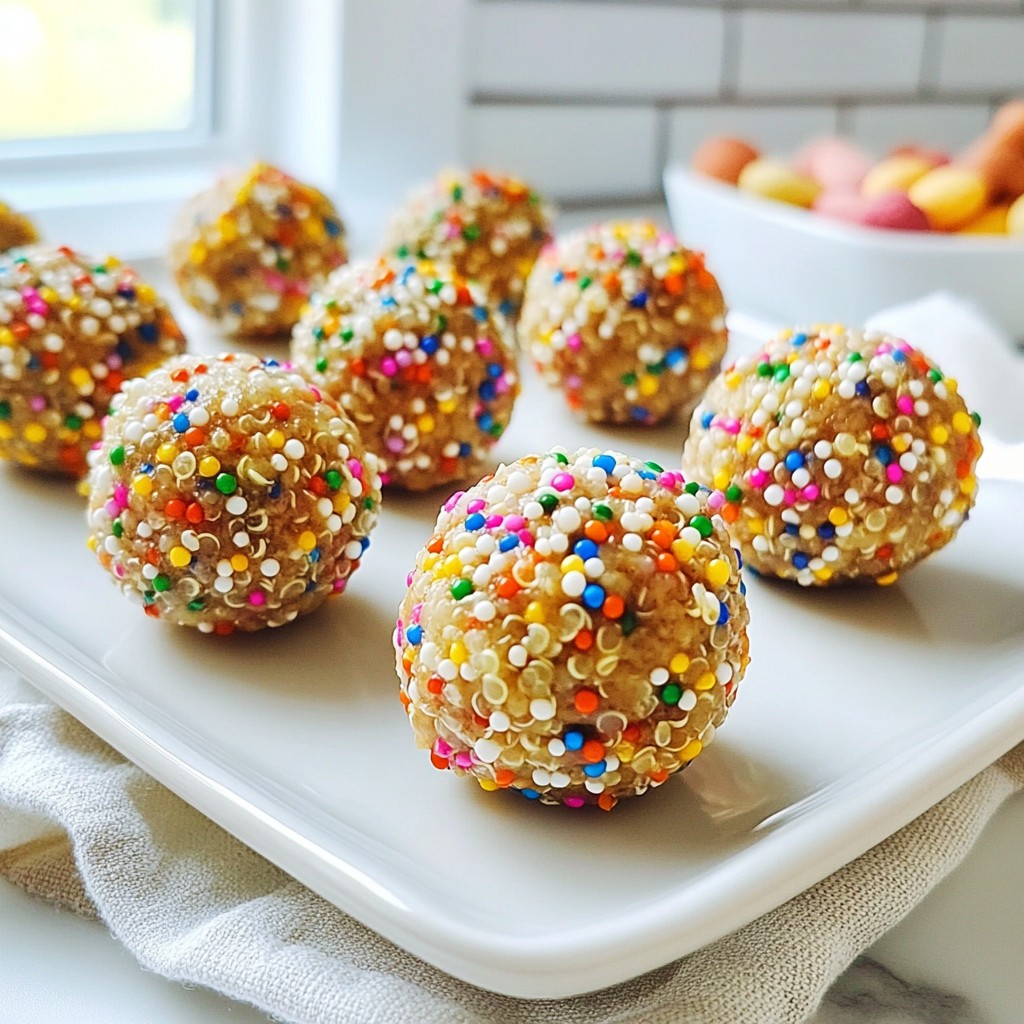
Looking for a tasty and healthy snack? You’re in the right place! I’ll show you how to make Chocolate Peanut Butter Protein Balls that are perfect for boosting your energy. Packed with oats, peanut butter, and chocolate goodness, these treats are easy to make and fun to customize. Whether you’re on the go or need a post-workout boost, you won't want to miss this simple recipe! Let's get started!
Why I Love This Recipe
- Quick and Easy: This recipe takes only 10 minutes to prepare, making it a perfect snack for those busy days.
- Nutritious Ingredients: With rolled oats, peanut butter, and protein powder, these bliss balls are packed with energy and nutrients.
- Customizable: You can easily modify the recipe by adding different mix-ins like nuts, seeds, or dried fruits.
- Delicious Flavor: The combination of chocolate and peanut butter creates a rich, indulgent taste that satisfies sweet cravings.
Ingredients
List of Ingredients
- 1 cup rolled oats
- 1/2 cup creamy natural peanut butter
- 1/4 cup honey or pure maple syrup
- 1/4 cup unsweetened cocoa powder
- 1/4 cup vanilla-flavored protein powder
- 1/4 cup mini chocolate chips
- 1 teaspoon pure vanilla extract
- A pinch of sea salt
Measurement Tips
To get the best results, use a dry measuring cup for oats and cocoa powder. Use a liquid measuring cup for honey or maple syrup. This ensures you measure accurately, which is key for the right texture. When measuring peanut butter, it helps to lightly coat the cup with a bit of oil. This will help the peanut butter slide out easily.
Ingredient Substitutions
You can easily swap some ingredients if you want to change the flavor. For a nut-free option, use sunflower seed butter instead of peanut butter. If you need a vegan recipe, replace honey with agave syrup or maple syrup. You can also use a different protein powder flavor, like chocolate or unflavored, to mix things up. If you like a crunch, add chopped nuts or seeds instead of mini chocolate chips.

Step-by-Step Instructions
Preparation Overview
Making chocolate peanut butter protein balls is easy. First, gather all your ingredients. You will need rolled oats, peanut butter, honey, cocoa powder, protein powder, chocolate chips, vanilla extract, and a pinch of salt. This snack takes about 10 minutes to prep and 30 minutes to chill.
Mixing the Dry Ingredients
Start by mixing the dry ingredients in a large bowl. Add 1 cup of rolled oats, 1/4 cup of cocoa powder, and 1/4 cup of vanilla protein powder. Stir these well. You want everything blended evenly. This step ensures that your protein balls have a nice texture and flavor.
Combining Wet Ingredients and Forming Balls
Next, add your wet ingredients. Spoon in 1/2 cup of creamy peanut butter, 1/4 cup of honey or maple syrup, and 1 teaspoon of vanilla extract. Add a pinch of sea salt for extra taste. Use a spatula to mix everything together. It will become sticky. Once mixed, fold in 1/4 cup of mini chocolate chips. This gives a sweet touch.
Now, take small amounts of the mixture and roll them into balls. Aim for about 1 inch in size. Keep rolling until you shape all the mixture into balls.
Chilling and Serving Recommendations
Place the protein balls on a parchment-lined baking sheet. Refrigerate them for at least 30 minutes. This helps them firm up, making them easier to eat. If you want, store them in an airtight container in the fridge. They will stay fresh for up to a week. Enjoy these tasty balls as a quick snack anytime!
Tips & Tricks
Best Practices for Rolling Protein Balls
When you roll the protein balls, keep your hands slightly damp. This helps the mixture stick together better. Aim for balls about 1 inch in diameter. If the mix is too sticky, add a bit more oats. If it’s too dry, a touch more peanut butter helps.
Enhancing Flavor and Texture
To boost flavor, try using crunchy peanut butter instead of creamy. This adds a nice texture. You can also swap cocoa powder for carob powder for a different taste. Adding a dash of cinnamon or a pinch of sea salt can make them even better. Feel free to mix in chopped nuts or seeds for added crunch.
Serving and Presentation Tips
For a fun display, put the protein balls in a cute jar or bowl. You can dust them with cocoa powder or sprinkle extra mini chocolate chips on top. This makes them look even more inviting. Serve them cold for a refreshing treat, or let them sit at room temperature for a softer bite.
Pro Tips
- Chill for Better Texture: Refrigerating the protein balls for at least 30 minutes enhances their texture and makes them easier to handle.
- Customize Your Sweetness: Feel free to adjust the amount of honey or maple syrup according to your taste preference for sweetness.
- Use Different Nut Butters: Experiment with other nut butters like almond or cashew for a unique flavor profile.
- Add Extra Mix-Ins: Consider incorporating seeds, dried fruits, or protein-packed nuts to enhance the nutritional value and taste.
Nutritional Information
Caloric Breakdown per Serving
Each ball has about 100 calories. This gives you energy without too many calories. Each batch makes 12 to 15 balls, making them a smart choice for snacks.
Health Benefits of Key Ingredients
- Rolled oats: They give you fiber and help with digestion.
- Peanut butter: It adds protein and healthy fats.
- Honey or maple syrup: They provide natural sweetness and quick energy.
- Cocoa powder: This adds antioxidants and rich flavor.
- Protein powder: It helps build and repair muscles.
- Mini chocolate chips: They are a fun treat but still pack some nutrients.
These ingredients work together to keep you full and satisfied.
Comparison to Store-Bought Snacks
Store-bought snacks often have added sugars and preservatives. Our protein balls use natural ingredients. They are healthier and taste better too. You can feel good about what you eat. Making these at home saves money and time. Plus, you know exactly what goes into them!
Variations
Flavor Alternatives
You can easily change the taste of your protein balls. Instead of creamy peanut butter, try almond butter. Almond butter gives a nutty twist. You could also swap the vanilla protein powder for chocolate or berry-flavored ones. This small change brings a fun flavor kick.
Add-In Ideas
Want to make your protein balls even better? Add nuts or seeds! Chopped almonds or walnuts add crunch. Sunflower seeds or chia seeds boost nutrition too. Dried fruits like raisins or cranberries bring a sweet surprise. Mix and match until you find your favorite combo.
Vegan and Gluten-Free Options
You can make these protein balls vegan and gluten-free. Use maple syrup instead of honey for a vegan choice. For gluten-free, choose oats marked gluten-free. This way, everyone can enjoy a tasty, healthy snack without worries.
FAQs
How long do chocolate peanut butter protein balls last?
These protein balls last up to one week in the fridge. The cool air keeps them fresh. Just make sure you store them in an airtight container.
Can I freeze chocolate peanut butter protein balls?
Yes, you can freeze these protein balls! They freeze well for up to three months. Just place them in a freezer-safe bag or container. When you want to eat them, let them thaw in the fridge overnight.
What is the best way to store these protein balls?
The best way is in an airtight container in the fridge. This keeps them fresh and tasty. You can also use a plastic wrap for individual balls. This way, you grab one easily!
Are these protein balls healthy?
Yes, these protein balls are quite healthy! They pack protein from peanut butter and protein powder. Rolled oats add fiber, which helps digestion. The cocoa powder provides antioxidants. It's a great snack choice for energy!
These chocolate peanut butter protein balls are easy to make and packed with good stuff. We covered ingredients, measurement tips, and how to mix and chill them. I shared tricks to enhance taste and ensure they look great. Plus, we explored variations and answered common questions.
These protein balls make a healthy snack. They can fuel your day in a tasty way. Enjoy making them your own!