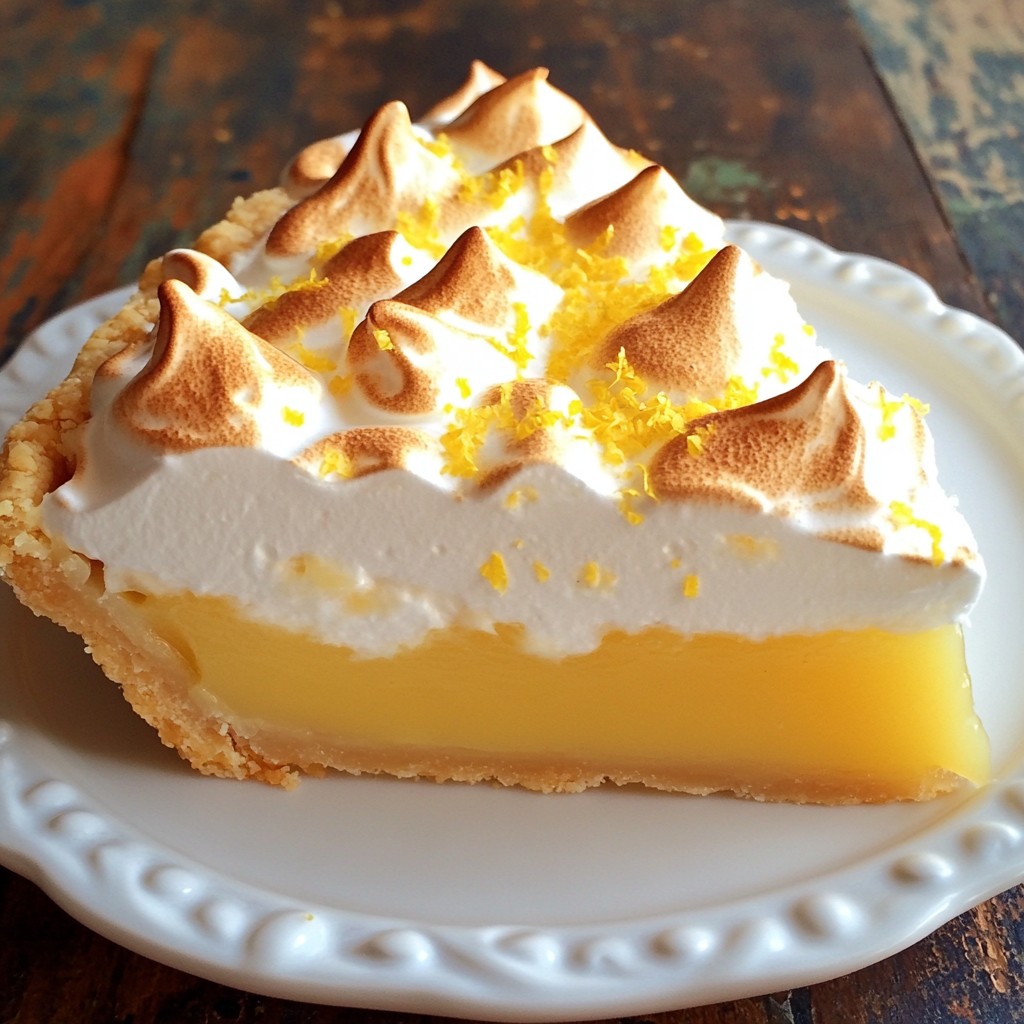
If you love a sweet, tangy treat, then you’ll adore this Classic Sweet Lemon Meringue Pie recipe! I’ll guide you through each step, from gathering your ingredients to creating the perfect flaky crust. You’ll learn expert tips to make your meringue light and fluffy. Get ready to impress your family and friends with this delightful dessert that balances sweetness and tartness flawlessly. Let’s dive in and bake something memorable!
Why I Love This Recipe
- Bright and Tangy Flavor: This pie bursts with refreshing lemon flavor, making it a perfect dessert for any occasion.
- Light and Fluffy Meringue: The meringue topping adds a delightful lightness and sweetness that perfectly complements the tart lemon filling.
- Quick and Easy Preparation: With a pre-made pie crust and simple steps, this recipe is quick to prepare, allowing more time to enjoy with loved ones.
- Always a Crowd-Pleaser: This pie is a classic favorite that never fails to impress guests at gatherings or family dinners.
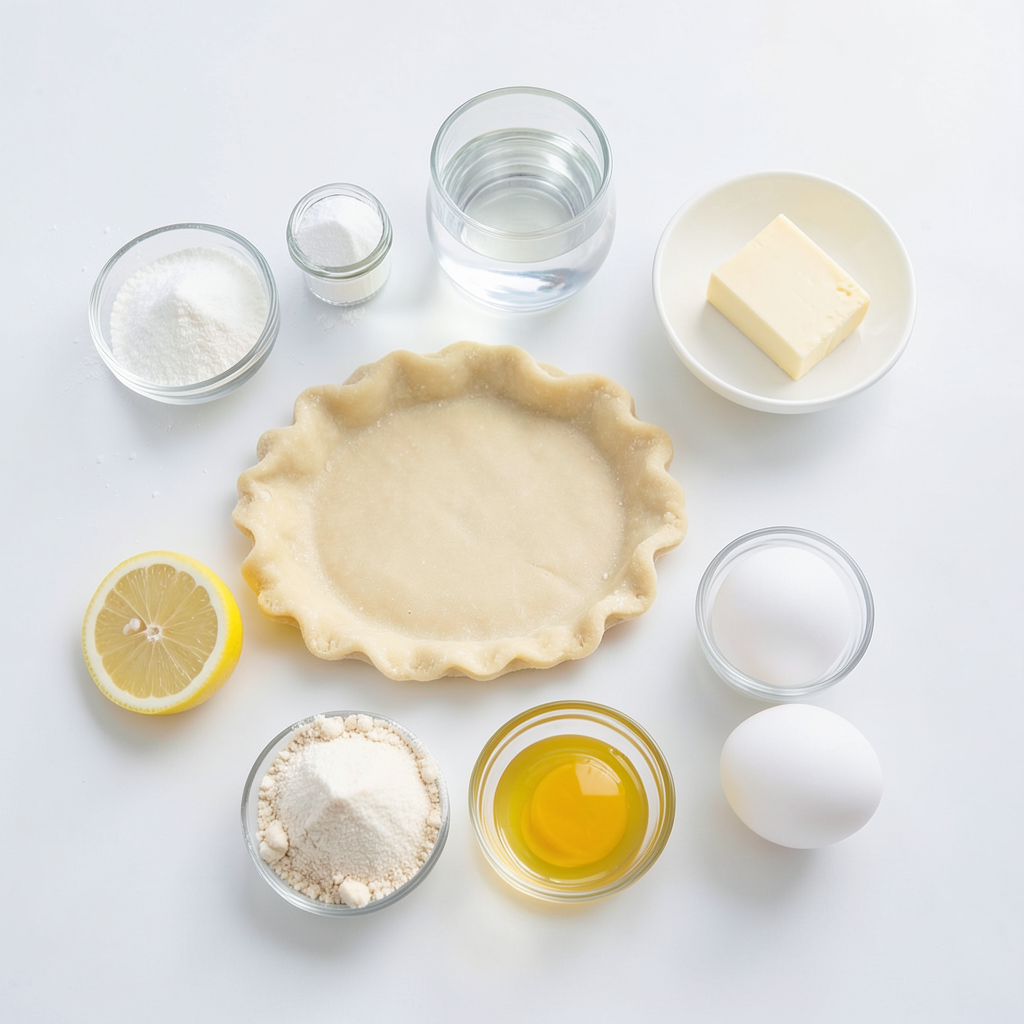
Ingredients
List of Ingredients for Classic Sweet Lemon Meringue Pie
- 1 pre-made pie crust
- 1 cup granulated sugar
- 2 tablespoons cornstarch
- 1/4 teaspoon salt
- 1 1/2 cups water
- 3 large egg yolks, beaten
- 1/4 cup fresh lemon juice (about 2 lemons)
- Zest of 1 lemon
- 2 tablespoons unsalted butter
- 3 large egg whites
- 1/2 teaspoon cream of tartar
- 1/2 cup powdered sugar
Measurement Details for Each Ingredient
- Pie Crust: One pre-made crust saves time. Use store-bought for ease.
- Granulated Sugar: One cup sweetens the filling well. Adjust if you prefer less sweetness.
- Cornstarch: Two tablespoons thicken the filling. This gives it the right texture.
- Salt: A pinch of salt balances the flavors. Just 1/4 teaspoon is enough.
- Water: One and a half cups helps dissolve the sugar and cornstarch.
- Egg Yolks: Three yolks add richness to the filling. Beat them well before use.
- Fresh Lemon Juice: A quarter cup from about two lemons gives a bright flavor.
- Lemon Zest: The zest of one lemon enhances the lemon taste. Use a fine grater.
- Unsalted Butter: Two tablespoons add creaminess. Make sure to melt it.
- Egg Whites: Three whites are needed for the meringue. They should be at room temp.
- Cream of Tartar: Half a teaspoon stabilizes the meringue and helps it hold shape.
- Powdered Sugar: Half a cup sweetens the meringue. Add it slowly while mixing.
Alternative Ingredients
- For a gluten-free option, try a gluten-free pie crust.
- Instead of granulated sugar, you can use coconut sugar for a different taste.
- If you are out of fresh lemons, bottled lemon juice works, but fresh is best.
- You can use a mix of lemon and lime juice for a zesty twist.
Step-by-Step Instructions
Preparing the Lemon Filling
To make the lemon filling, I start by gathering my ingredients. In a medium saucepan, I mix together the granulated sugar, cornstarch, and salt. Next, I slowly whisk in the water until it is smooth. I place the saucepan on medium heat and stir constantly. I watch closely as the mixture thickens and bubbles, which takes about 5-7 minutes. Once it bubbles, I take it off the heat.
I then temper the egg yolks to avoid cooking them. I add about 1/2 cup of the hot lemon mixture to the yolks and whisk. This step is key! After that, I pour the yolk mixture back into the saucepan. I stir in the fresh lemon juice, lemon zest, and butter. I mix until the butter melts and the filling is smooth. Finally, I pour this bright filling into my pre-made pie crust.
Creating the Meringue Topping
Now, let’s make the meringue. I grab a clean bowl and add the egg whites and cream of tartar. With a mixer set to medium speed, I beat the egg whites until soft peaks form. This takes a little time, but it’s worth it! I then slowly add in the powdered sugar. As I increase the speed, I watch for stiff peaks to form. The meringue should shine and feel thick.
Once ready, I carefully spread the meringue over the hot lemon filling. I make sure to cover the edges of the crust well. This helps prevent shrinking. Using a spatula, I create peaks and swirls on top. This gives the pie a lovely look.
Assembling and Baking the Pie
With everything ready, I place the pie in my preheated oven. I bake it for 10-12 minutes, just until the meringue turns a golden brown. It smells so good! After baking, I take the pie out and let it cool at room temperature for at least 1 hour. For the best taste, I refrigerate it for 2-3 hours before serving. It’s the perfect treat for any occasion!
Tips & Tricks
Achieving the Perfect Meringue Texture
To get the best meringue, start with clean bowls. Make sure no fat or yolk touches the egg whites. Beat the egg whites with cream of tartar until soft peaks form. This step helps stabilize the meringue. Slowly add powdered sugar while mixing. Keep mixing until you see stiff peaks. A shiny meringue means you did it right!
Balancing Sweetness and Tartness in the Filling
The filling needs both sweet and tart flavors. Use fresh lemon juice for that zing. The sugar adds sweetness but not too much. Taste the filling before you pour it into the crust. If it tastes too sweet, add more lemon juice. You want a bright flavor that pops!
Common Mistakes to Avoid
Avoid these common mistakes to make your pie perfect. First, don’t overcook the filling. It should thicken but not become too thick. Second, don’t skip the cooling time for the pie. It helps the flavors meld together. Lastly, cover the meringue edges well. This stops it from shrinking. Pay attention to these tips, and your pie will be a success!
Pro Tips
- Perfectly Tempered Eggs: Always temper your egg yolks with hot mixture gradually to prevent them from cooking. This ensures a smooth, creamy filling.
- Keep Meringue from Shrinking: Spread the meringue all the way to the edges of the pie crust. This helps prevent shrinking during baking.
- Golden Meringue Tips: Bake the pie until the meringue is beautifully golden brown. This not only enhances the flavor but also gives a lovely visual appeal.
- Chill for Best Texture: After cooling at room temperature, refrigerate the pie for a few hours. This helps the filling set properly and improves the overall texture.
Variations
Different Pie Crust Options (homemade vs. store-bought)
You can choose between homemade and store-bought pie crusts. Homemade crusts give you control over flavor and texture. They can taste fresh and buttery. It takes time but is worth the effort if you enjoy baking.
Store-bought crusts save time and are easy to use. They are handy for busy days. Just make sure to choose a quality brand for the best taste. Both options work well for lemon meringue pie.
Flavor Variations (using lime or orange)
You can change the flavor of your pie by using lime or orange. Lime gives a bright, zesty twist. It pairs well with the sweet meringue. Orange adds a sweeter, more floral note.
Simply replace the lemon juice and zest with lime or orange juice and zest in the recipe. This adds fun new flavors to your pie while keeping it fresh and exciting.
Mini Lemon Meringue Pies Recipe
Mini lemon meringue pies are a fun twist on the classic. They are perfect for parties or a sweet treat. Here’s how to make them:
1. Prepare the crust: Use a mini muffin tin. Press small rounds of pie crust into each cup.
2. Make the filling: Follow the lemon filling recipe but divide it among the mini crusts.
3. Whip the meringue: Make the meringue as usual and spread it over each mini pie.
4. Bake: Bake in the oven until golden brown, about 8-10 minutes.
These mini pies are cute and easy to share. Enjoy these delightful bites with family and friends!
Storage Info
How to Store Leftover Pie
After enjoying your lemon meringue pie, store any leftovers properly. Place slices in an airtight container. Make sure to keep it in the fridge. The pie stays fresh for about three days. Cover the top with plastic wrap to protect the meringue from drying out. This helps keep it soft and fluffy.
Freezing Instructions for Future Enjoyment
If you want to save the pie for later, freezing works great. First, let the pie cool completely at room temperature. Then, wrap it tightly in plastic wrap. After that, cover it with aluminum foil for added protection. You can freeze it for up to three months. When you're ready to enjoy it, thaw the pie in the fridge overnight.
Reheating Tips for Best Texture
To reheat your lemon meringue pie, avoid the microwave. It can make the meringue soggy. Instead, preheat your oven to 300°F (150°C). Place the pie on a baking sheet and cover it loosely with foil. Heat it for about 10-15 minutes. This warms the filling and keeps the meringue light and airy. Enjoy each slice as if it were fresh!
FAQs
What can I do if my meringue weeps?
If your meringue weeps, it means moisture escapes from it. This can happen if it is not baked long enough or if the meringue sits too long before baking. To fix it, you can try these steps:
- Make sure to spread the meringue over the hot lemon filling right away.
- Seal the edges well to prevent moisture from getting in.
- Bake the meringue until it is golden brown. This helps to dry it out.
If you follow these tips, your meringue should stay fluffy and not weep.
How to tell when the pie is done baking?
You can tell the pie is done when the meringue turns a lovely golden brown. This usually happens after about 10-12 minutes in the oven. Keep an eye on it to avoid burning. The meringue should also feel firm to the touch. A good way to check is to gently touch the top with a clean finger. If it holds its shape, it is ready.
Can I use bottled lemon juice instead of fresh?
While you can use bottled lemon juice, fresh juice tastes better. It has a bright flavor that makes the pie special. If you use bottled juice, choose one with no added sugars or preservatives. This will help keep the taste closer to fresh lemons. If you can, always go for fresh juice for the best results.
Making a classic sweet lemon meringue pie is fun and rewarding. We covered the key ingredients, step-by-step instructions, and tips for success. Remember to balance the sweet and tart flavors for the best taste. Don't forget about the tasty variations and how to store leftovers properly. With practice, you'll master this pie and impress everyone. Enjoy each slice knowing you made it yourself!