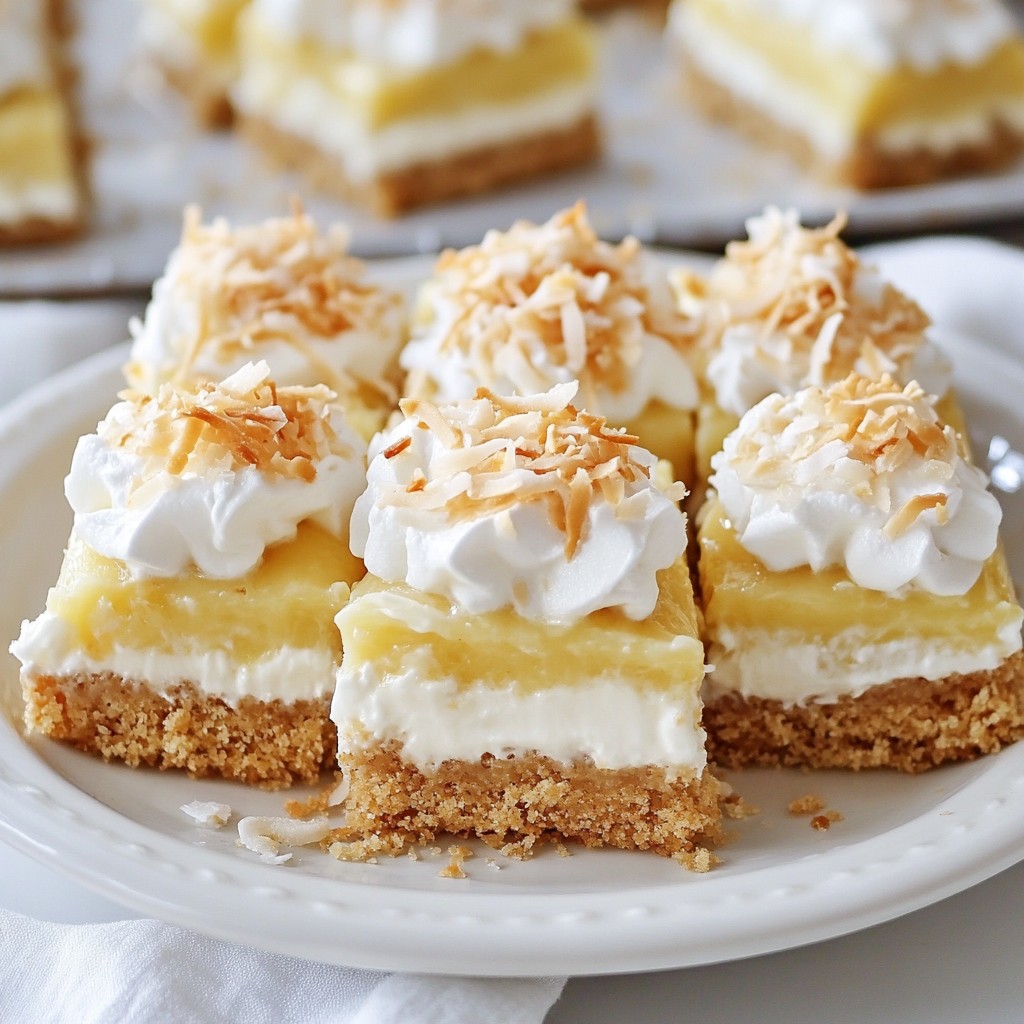
Are you ready to treat yourself to an easy and delicious dessert? Coconut Cream Pie Bars are simple to make and full of rich coconut flavor. With just a few key ingredients like graham cracker crumbs and sweetened condensed milk, you can whip up a delightful snack that impresses. Join me as I guide you step-by-step to create these scrumptious bars that are perfect for any occasion!
Why I Love This Recipe
- Delicious Flavor Combination: The blend of rich coconut and sweet condensed milk creates an irresistible flavor that transports you to a tropical paradise.
- Easy to Make: This recipe requires minimal effort with simple steps, making it perfect for both novice and experienced bakers.
- Perfect for Any Occasion: These bars are versatile enough to serve at parties, potlucks, or as a sweet treat just for yourself.
- Chilled to Perfection: After chilling, the texture becomes wonderfully firm yet creamy, making each bite a delightful experience.
Ingredients
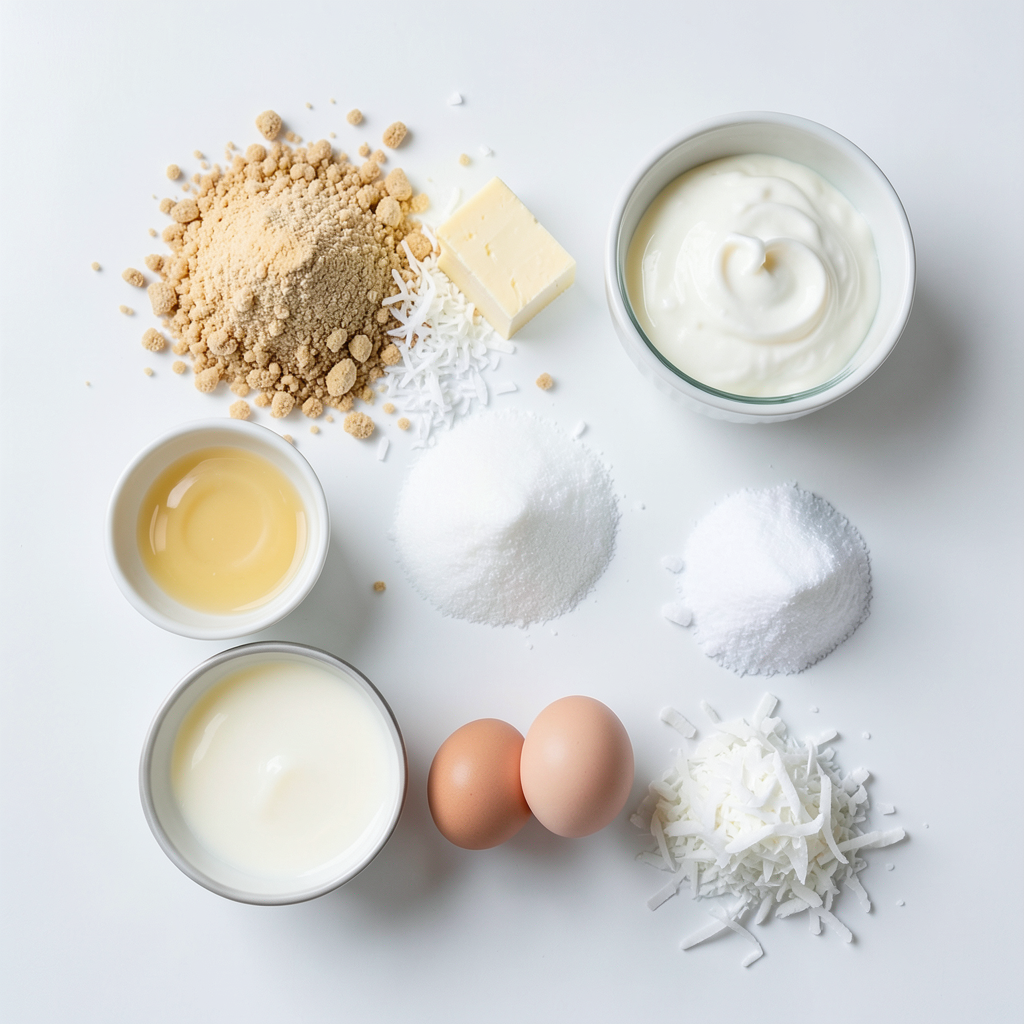
Main Ingredients
- 1 ½ cups graham cracker crumbs
- ½ cup unsweetened shredded coconut
- ⅓ cup granulated sugar
- ⅓ cup unsalted butter, melted
These main ingredients create a tasty crust. The graham cracker crumbs provide a sweet base with great texture. The unsweetened shredded coconut adds a delightful flavor. Sugar gives it a nice sweetness, while melted butter binds everything together.
Filling Ingredients
- 1 can (14 oz) sweetened condensed milk
- 1 cup coconut milk
- 3 large eggs
- 1 tablespoon cornstarch
- 1 teaspoon vanilla extract
- ½ teaspoon salt
The filling makes these bars special. Sweetened condensed milk brings creaminess and sweetness. Coconut milk adds a rich coconut flavor. Eggs help set the filling, while cornstarch thickens it. Vanilla extract enhances the taste, and salt balances the sweetness.
Toppings
- Whipped cream
- Extra shredded coconut for garnish
The toppings finish off these bars perfectly. Whipped cream adds lightness and creaminess. Extra shredded coconut gives a lovely crunch and an appealing look. These simple touches elevate your dessert to a whole new level.
Step-by-Step Instructions
Preparing the Crust
First, I preheat my oven to 350°F (175°C). This step is key for baking. Next, I grab a mixing bowl and add:
- 1 ½ cups graham cracker crumbs
- ½ cup unsweetened shredded coconut
- ⅓ cup granulated sugar
- ⅓ cup unsalted butter, melted
I mix these ingredients well until they feel like wet sand. Then, I press this mixture firmly into the bottom of a greased 9x9 inch baking dish. This creates a solid crust for my bars.
Baking the Crust
I place the crust in the preheated oven. I bake it for about 8-10 minutes. I watch for a light golden brown color. Once done, I take it out and let it cool for a few minutes.
Making the Filling
Now, it’s time for the filling. In a large mixing bowl, I whisk together:
- 1 can (14 oz) sweetened condensed milk
- 1 cup coconut milk
- 3 large eggs
- 1 tablespoon cornstarch
- 1 teaspoon vanilla extract
- ½ teaspoon salt
I mix until the filling is smooth and creamy. This blend gives the bars a rich taste.
Baking the Bars
Next, I carefully pour the filling over the cooled crust. I spread it evenly with a spatula. I return the dish to the oven and bake for 25-30 minutes. I know the bars are ready when the filling is set and looks slightly golden. After baking, I let the dish cool completely at room temperature.
Cooling and Serving the Bars
Once cooled, I place the bars in the refrigerator for at least 2 hours. This helps them firm up. After chilling, I slice the bars into squares with a sharp knife. When serving, I top each square with whipped cream and sprinkle extra shredded coconut on top. This adds a lovely finish to my delicious bars.
Tips & Tricks
Achieving the Perfect Crust
To get a nice, even crust, press the mixture down firmly. Use the flat bottom of a measuring cup to help smooth it out. If you don’t have graham cracker crumbs, you can use crushed cookies or even vanilla wafers. They add a fun twist to the flavor.
Ensuring a Smooth Filling
Mix the filling ingredients well. Use a whisk to break up any lumps. Be sure to mix until the filling looks creamy and smooth. If you see lumps, keep whisking. This step makes a big difference in the texture of the bars.
Serving Suggestions
These bars taste great with a cold drink. Try pairing them with iced tea, lemonade, or coconut water. You can also serve them with other desserts like fresh fruit or a scoop of vanilla ice cream. The sweet flavors blend nicely together, making every bite special.
Pro Tips
- Use Fresh Ingredients: Always opt for fresh coconut milk and high-quality eggs for the best flavor and texture in your bars.
- Perfectly Set Bars: Make sure to let the bars chill in the refrigerator for at least 2 hours to ensure they set properly and are easy to slice.
- Add a Flavor Twist: Consider adding a bit of lime zest to the filling for a refreshing citrus contrast that complements the coconut.
- Garnish Creatively: Experiment with different toppings like chocolate drizzle or toasted nuts to elevate the presentation and flavor of your bars.
Variations
Flavor Variations
You can make these coconut cream pie bars even more exciting! Add chocolate or caramel for a rich twist. Just melt some chocolate and drizzle it on top. For caramel, swirl it into the filling before baking. You can also mix in different nuts. Chopped pecans or almonds add a nice crunch.
Dietary Adjustments
If you want gluten-free bars, use gluten-free graham cracker crumbs. They work just as well in the crust. For vegan options, replace eggs with flax eggs. Use coconut cream instead of sweetened condensed milk. These swaps keep the bars tasty and friendly for everyone.
Alternative Toppings
Think outside the coconut! You can use fresh fruit like strawberries or mango slices. They add color and flavor. Flavored whipped creams are fun too. Try vanilla or chocolate whipped cream for a new taste. These toppings make your bars look and taste amazing!
Storage Info
Best Storage Practices
To keep your coconut cream pie bars fresh, always refrigerate them. Place the bars in an airtight container. This will prevent them from drying out and help keep their flavor strong.
Freezing Instructions
If you want to freeze the pie bars, wrap them tightly in plastic wrap. Then, place them in a freezer-safe container. When you're ready to enjoy them, take out the bars and let them thaw in the fridge overnight for the best taste.
Shelf Life
These coconut cream pie bars last up to five days in the fridge. If frozen, they can stay good for up to three months. Just remember to check for any changes in texture or flavor before serving after freezing.
FAQs
How do you prevent the bars from cracking?
To prevent cracks, bake at the right temperature. Ensure the oven is not too hot. Also, avoid overbaking. The filling should be set but still slightly jiggly in the center. After baking, cool them slowly. Rapid temperature changes can cause cracks.
Can I make these bars ahead of time?
Yes, you can make these bars ahead of time. They store well in the fridge. Just wrap them tightly with plastic wrap. They taste even better after chilling overnight. This lets the flavors meld together nicely.
What can I do if I don't have coconut milk?
If you lack coconut milk, use a milk substitute. Almond milk or soy milk works well. For a richer flavor, blend regular milk with a bit of coconut extract. This way, you still capture that coconut essence.
How do I know when the filling is set?
The filling is set when it is firm around the edges. The center should have a slight jiggle but not be runny. A golden hue on top also indicates doneness. Allow it to cool completely before slicing.
Are these bars suitable for special diets?
These bars can be adjusted for special diets. For gluten-free, use gluten-free graham crackers. For vegan, substitute eggs with flax eggs or a chia mixture. Use non-dairy options for the milk. Always check labels to ensure all ingredients fit your diet.
This blog post covered how to make delicious coconut bars. We explored the key ingredients, from the crust to the filling and toppings. I shared step-by-step instructions to help you along the way. You learned tips and tricks for the best texture and flavor. There are also ideas to customize your bars for different tastes and diets.
Try these bars at your next event, and enjoy the sweet success in baking!