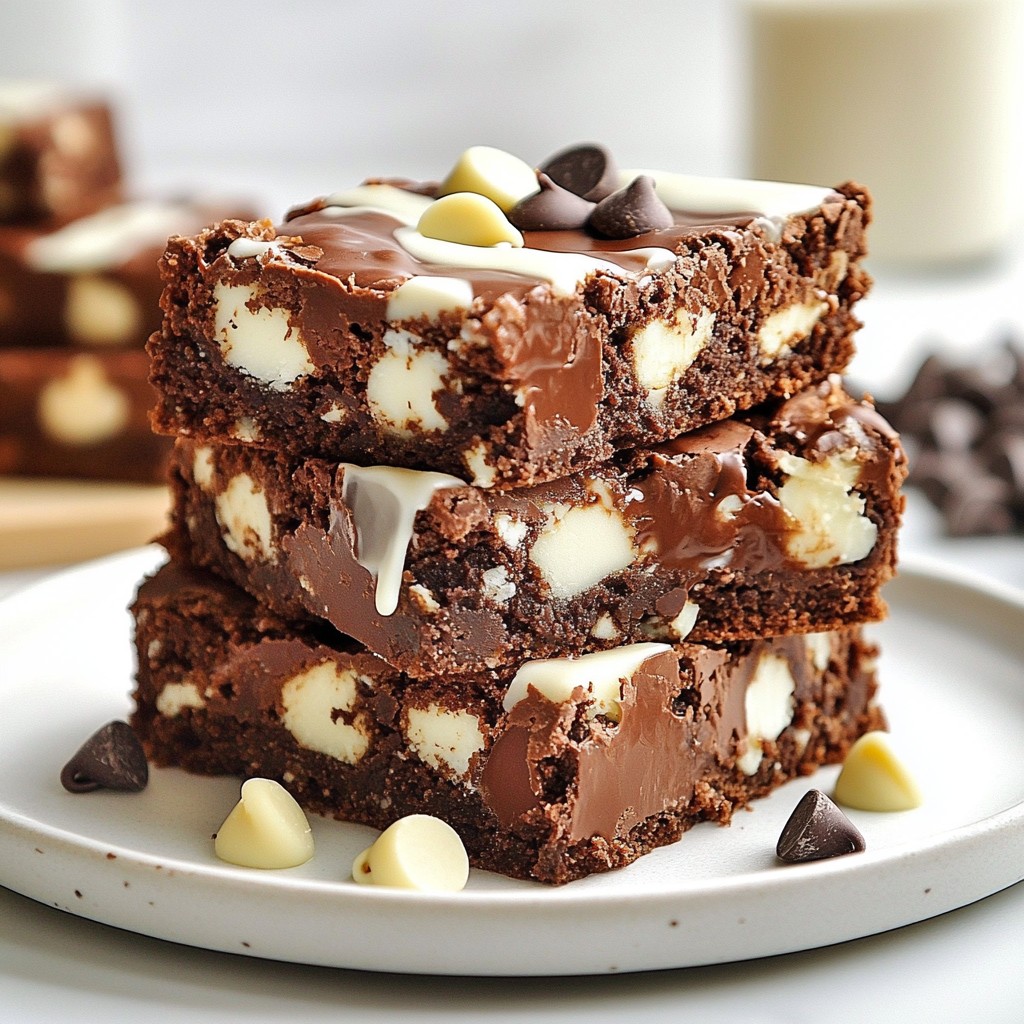
If you crave a rich, sweet treat, you’ll love these Fudgy Sweet Triple Chocolate Layer Bars. Picture three layers of pure chocolate bliss, each one more indulgent than the last. In this post, I’ll guide you through each step, from gathering simple ingredients to adding those delicious finishing touches. Whether you’re a baking novice or a seasoned pro, you’ll find tips and tricks to make this treat a star at your next gathering!
Why I Love This Recipe
- Decadent Chocolate Layers: This recipe features three different types of chocolate, ensuring a rich and indulgent flavor in every bite.
- Easy to Make: With simple ingredients and straightforward steps, even novice bakers can whip up these delicious bars with confidence.
- Perfect for Sharing: Cut them into squares and serve at parties or gatherings; these bars are always a hit among friends and family.
- Customizable Toppings: Options like whipped cream or chocolate drizzle make it easy to personalize each serving and elevate the presentation.
Ingredients
Key Ingredients for Fudgy Sweet Triple Chocolate Layer Bars
To make these tasty bars, you need a few key ingredients:
- 1 cup all-purpose flour
- 1/2 cup unsweetened cocoa powder
- 1 cup granulated sugar
- 1/2 cup packed brown sugar
- 1/2 teaspoon baking powder
- 1/4 teaspoon salt
- 1/2 cup unsalted butter, melted
- 2 large eggs
- 1 teaspoon vanilla extract
- 1 cup semi-sweet chocolate chips
- 1/2 cup white chocolate chips
- 1/2 cup milk chocolate chips
These ingredients blend together to create layers of rich chocolate flavor. The combination of different types of chocolate gives a deep taste while keeping the bars fudgy.
Substitutions and Tips for Ingredients
You can switch some ingredients if needed. Here are some ideas:
- Use almond flour instead of all-purpose flour for a gluten-free option.
- Swap coconut sugar for brown sugar for a healthier choice.
- If you're out of eggs, use 1/4 cup of unsweetened applesauce for each egg.
- You can use dark chocolate chips if you prefer a richer taste.
Make sure to measure your ingredients correctly. This helps ensure the bars turn out perfect.
Optional Toppings and Garnishes
To make these bars even more special, consider adding toppings:
- Drizzle melted milk chocolate on top for extra sweetness.
- Serve with a dollop of whipped cream for a creamy touch.
- Add fresh berries or chocolate shavings for a fancy look.
These little extras can take your dessert to a whole new level. Enjoy the fun of creating your own version!

Step-by-Step Instructions
Prepping Your Baking Pan
First, set your oven to 350°F (175°C). Grab an 8x8 inch baking pan. Lightly grease it. Then line the bottom and sides with parchment paper. Leave some edges hanging. This helps lift the bars out later.
Mixing Dry Ingredients
In a large bowl, add the following dry ingredients:
- 1 cup all-purpose flour
- 1/2 cup unsweetened cocoa powder
- 1 cup granulated sugar
- 1/2 cup packed brown sugar
- 1/2 teaspoon baking powder
- 1/4 teaspoon salt
Whisk these until smooth. Make sure no lumps remain. This creates the tasty base for your bars.
Combining Wet and Dry Ingredients
Next, pour in the melted butter. Add:
- 2 large eggs
- 1 teaspoon vanilla extract
Use a spatula or whisk to mix well. You want a smooth, thick batter. This brings all the flavors together.
Baking the Base Layer
Pour half of the batter into your prepared pan. Use the spatula to smooth it out. This is your base layer. Bake it for 15 minutes. The edges should look set.
Adding the Chocolate Layers
Take the pan out and sprinkle 1/2 cup white chocolate chips over the warm layer. Then pour in the rest of the batter. Smooth it out gently. This creates the top layer of your bars.
Finishing Touches and Cutting the Bars
Put the pan back in the oven for another 20 minutes. The bars are done when a toothpick comes out with a few moist crumbs. Let them cool completely in the pan. This helps them set.
Once cool, lift the bars out by the parchment edges. Place them on a cutting board. Cut them into squares. For an extra treat, drizzle melted milk chocolate on top or serve with whipped cream. Enjoy your delicious creation!
Tips & Tricks
Achieving the Perfect Fudgy Texture
To get that perfect fudgy texture, you need to pay attention to baking time. Overbaking will dry out your bars. Bake until the center is just set, with a few moist crumbs on your toothpick. This helps the bars stay rich and fudgy. Also, use room-temperature eggs. They blend better with the other ingredients, giving you a smooth batter.
Common Mistakes to Avoid
One common mistake is not measuring your ingredients correctly. Use dry measuring cups for flour and cocoa powder. Too much flour can make your bars dry. Another mistake is not letting the bars cool fully before cutting. If you cut them too soon, they may crumble. So, be patient! Lastly, don’t skip the parchment paper. It makes removing the bars easy.
Serving Suggestions for Maximum Enjoyment
For a delightful treat, serve your bars warm. Top them with whipped cream or a drizzle of melted chocolate. Fresh berries add a nice touch, too. You can use a cake stand for an elegant look. For extra flavor, try pairing them with vanilla ice cream. The warm chocolate with cold ice cream is simply divine. These bars truly shine when you serve them with love!
Pro Tips
- Use Room Temperature Ingredients: For the best texture, allow your butter and eggs to come to room temperature before mixing them into the batter. This helps create a smoother batter and ensures even mixing.
- Don't Overmix: Once you combine the wet and dry ingredients, mix just until incorporated. Overmixing can lead to tough bars rather than the desired fudgy texture.
- Check for Doneness: Keep an eye on the baking time, as ovens can vary. The bars are done when the center is set but still slightly moist. A toothpick should come out with a few moist crumbs, not wet batter.
- Storage Tips: Store leftover bars in an airtight container at room temperature for up to 3 days or in the refrigerator for up to a week. You can also freeze them for longer storage; just wrap them tightly in plastic wrap.
Variations
Different Chocolate Combinations
You can mix and match chocolates in these bars. Swap the semi-sweet chocolate chips for dark chocolate for a richer taste. Use extra white chocolate chips if you love that creamy flavor. You can also add mint chocolate chips for a fresh twist. Try different ratios of chips to change the flavor balance. Each combination adds a new layer of fun to your treat.
Gluten-Free Options
To make these bars gluten-free, use a gluten-free flour blend. Make sure the blend is designed for baking. You can also check that your cocoa powder is gluten-free. This way, everyone can enjoy the fudgy goodness. Stick to the same measurements in the recipe. The bars will still taste rich and delicious.
Vegan Alternatives
If you want to make these bars vegan, replace the eggs with flax eggs. Mix one tablespoon of ground flaxseed with three tablespoons of water for each egg. Use a vegan butter substitute to replace the unsalted butter. For the chocolate chips, select dairy-free options. These swaps will keep the bars rich and fudgy while being plant-based.
Storage Info
Best Practices for Storing Bars
To keep your Fudgy Sweet Triple Chocolate Layer Bars fresh, store them in an airtight container. This helps to maintain their rich flavor and soft texture. Place a piece of parchment paper between layers to avoid sticking. If you want to keep them even longer, consider wrapping them in plastic wrap before putting them in the container.
Freezing and Thawing Tips
These bars freeze well for up to three months. Cut them into squares first, then wrap each piece in plastic wrap. Place the wrapped bars in a freezer bag to prevent freezer burn. When you’re ready to enjoy them, take out the bars and let them thaw in the fridge overnight. You can also warm them in the microwave for a few seconds if you want that fresh-baked taste.
Shelf Life and Quality Maintenance
When stored properly, these bars stay fresh for about a week at room temperature. If you store them in the fridge, they can last up to two weeks. However, the colder air can slightly change their texture. Always check for any signs of spoilage, like changes in smell or appearance, before enjoying your tasty treat.
FAQs
How to reheat Fudgy Sweet Triple Chocolate Layer Bars?
To reheat these bars, preheat your oven to 300°F (150°C). Place the bars on a baking sheet. Cover them with foil to keep them moist. Heat for about 10 minutes. Check if they are warm enough. You can also use a microwave. Place a bar on a plate and heat for 10-15 seconds.
Can I make these bars ahead of time?
Yes, you can make these bars ahead of time. They stay fresh for a few days at room temperature. Store them in an airtight container. For longer storage, freeze them. Wrap each bar in plastic wrap and place them in a freezer bag. They can last up to three months in the freezer.
What can I serve with these chocolate bars?
These chocolate bars are great on their own. For a special treat, serve them with whipped cream. You can also drizzle melted chocolate on top. Fresh berries add a nice touch too. Ice cream pairs well for a decadent dessert.
In this post, we explored how to make fudgy sweet triple chocolate layer bars. We discussed key ingredients and possible substitutions. I shared step-by-step instructions for mixing, baking, and finishing these bars. Tips for achieving the perfect fudgy texture were provided. We also looked at variations like gluten-free and vegan options. Finally, I gave advice on storage and common questions. Enjoy these delicious bars, and let your baking skills shine!