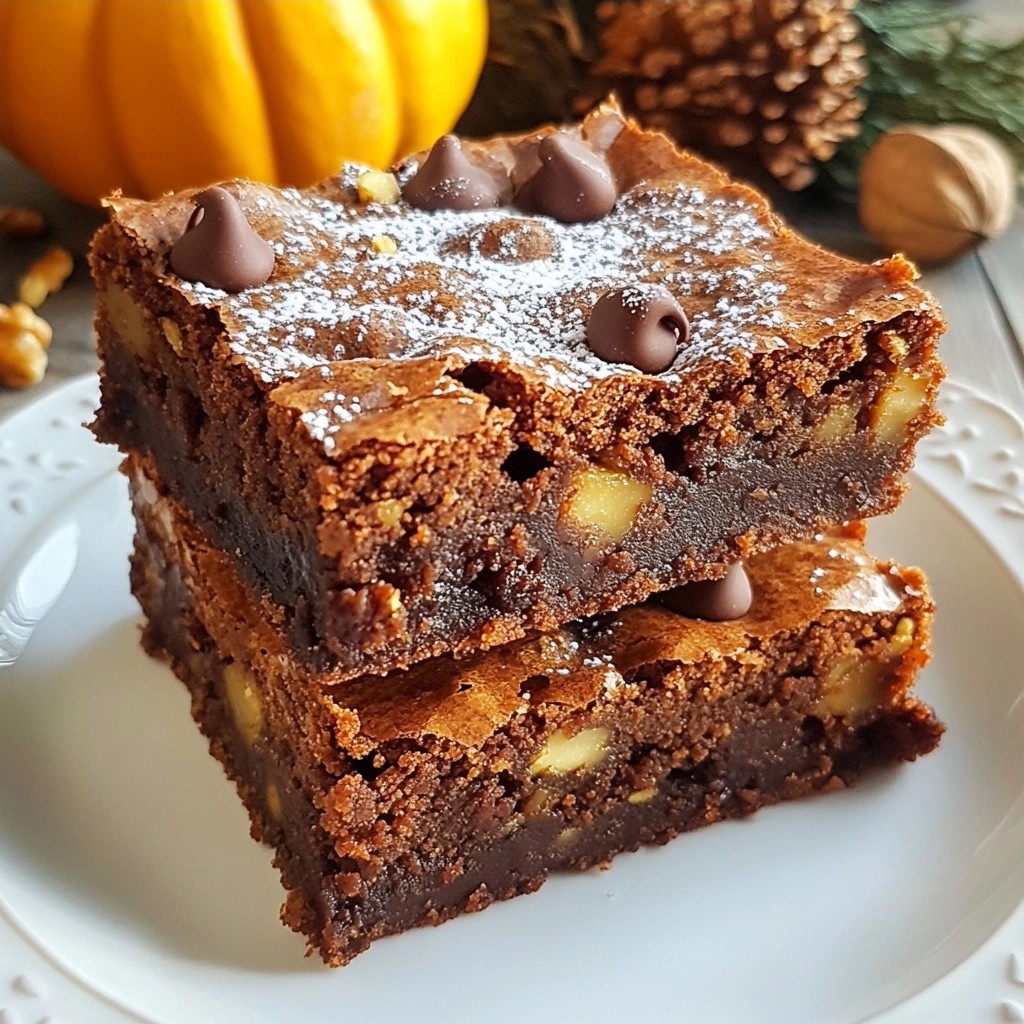
Get ready to delight your taste buds with my Gooey Sweet Pumpkin Spice Brownie Bars! These treats blend rich chocolate with warm spice, making them perfect for fall. Whether you're a baking newbie or a pro, you'll find this recipe easy and fun. In this post, I'll guide you through each step to ensure your brownie bars are nothing short of amazing. Let’s dive in and create something delicious together!
Why I Love This Recipe
- Deliciously Gooey: The combination of pumpkin puree and chocolate creates a rich, moist brownie that is simply irresistible.
- Perfect for Fall: This recipe captures the essence of autumn with warm spices like pumpkin pie spice, making it a seasonal favorite.
- Easy to Make: With straightforward steps and minimal ingredients, these brownie bars come together quickly, perfect for any occasion.
- Versatile Treat: Top with nuts or serve with ice cream for a delightful dessert that can be customized to your taste!
Ingredients
Key Ingredients for Gooey Sweet Pumpkin Spice Brownie Bars
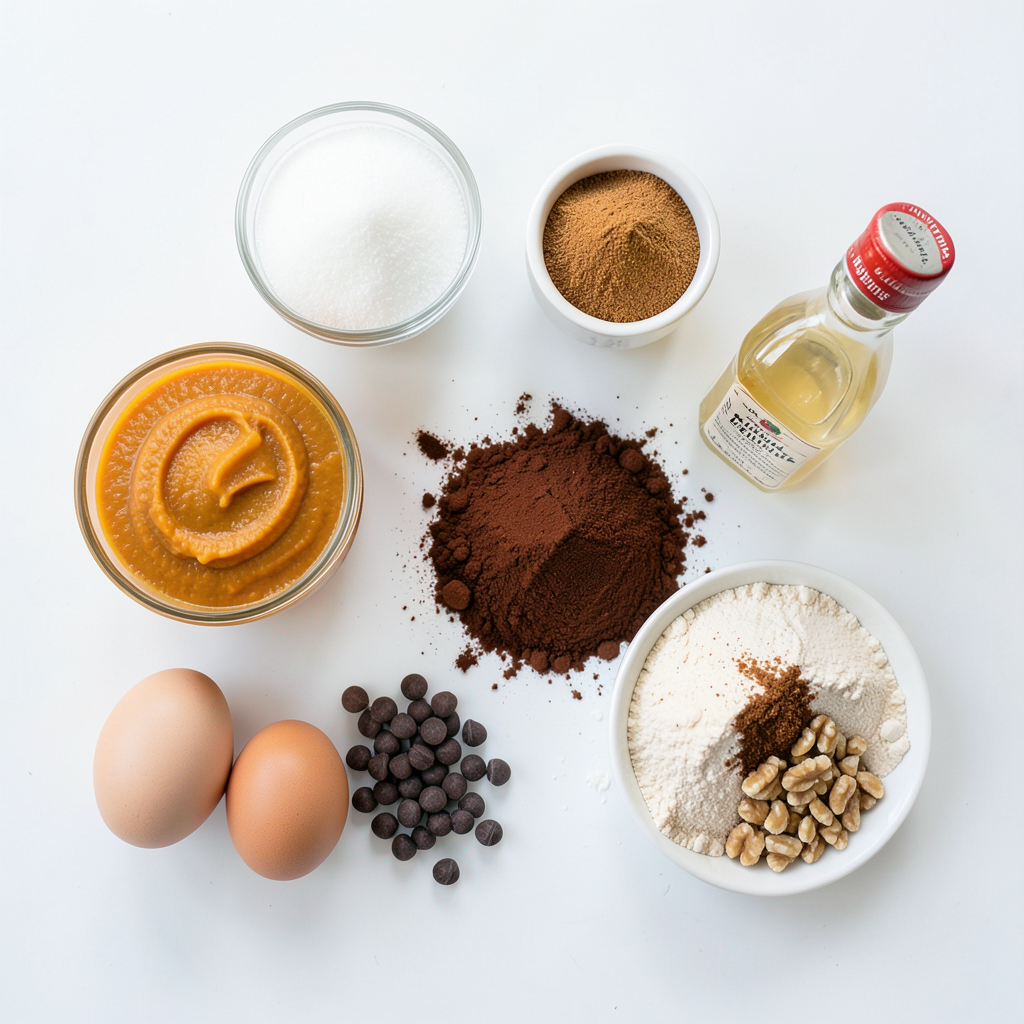
To make these delicious brownie bars, you need the following key ingredients:
- 1 cup pumpkin puree
- 1 cup granulated sugar
- 1/2 cup brown sugar, packed
- 3/4 cup unsalted butter, melted and slightly cooled
- 3 large eggs, at room temperature
- 1 teaspoon pure vanilla extract
- 1 cup all-purpose flour
- 1/2 cup cocoa powder, sifted
- 1 teaspoon baking powder
- 1 teaspoon pumpkin pie spice
- 1/2 teaspoon salt
These ingredients create the perfect blend of flavor and texture. Pumpkin puree adds moisture and richness. The sugars give sweetness. The butter makes everything creamy and rich.
Optional Add-ins (Chocolate Chips & Nuts)
You can make these brownie bars even better by adding in some treats.
- 1/2 cup chocolate chips (semi-sweet or dark)
- 1/4 cup chopped nuts (walnuts or pecans, optional)
Chocolate chips add a gooey texture. Nuts add a nice crunch. Both options bring extra flavor to your dessert.
Ingredient Substitutions
Sometimes you may not have everything on hand. Here are some easy swaps:
- Use light brown sugar instead of granulated sugar for more depth.
- Swap cocoa powder for dark cocoa for a richer flavor.
- If you want to go dairy-free, try coconut oil instead of butter.
- For a vegan option, replace eggs with flax eggs or applesauce.
These substitutions keep the recipe tasty and fun. Don’t hesitate to get creative!
Step-by-Step Instructions
Prepping Your Baking Pan
Start by preheating your oven to 350°F (175°C). Grease a 9x13 inch baking pan well. You can also use parchment paper. Leave some paper hanging over the edges. This helps you lift the brownies out later.
Mixing the Wet Ingredients
In a large bowl, mix the pumpkin puree, granulated sugar, and brown sugar. Add the melted butter while it's still warm. Blend everything until it's smooth and creamy. Use a whisk or a mixer. Make sure there are no lumps. This step makes the brownies rich.
Combining Dry Ingredients
In another bowl, whisk together the all-purpose flour, cocoa powder, baking powder, pumpkin pie spice, and salt. This mix adds flavor and lift. Sifting the cocoa powder makes it easier to blend. Combine them well to avoid clumps.
Creating the Brownie Batter
Gradually add the dry mix to the wet mixture. Use a spatula to fold it in gently. Stir just until you don’t see any dry flour. Don’t overmix; this keeps your brownies gooey. Next, fold in the chocolate chips and nuts, if you want. This adds extra texture.
Baking Instructions
Pour the brownie batter into your prepared pan. Spread it evenly with a spatula. Place it in the oven and bake for 25-30 minutes. Check with a toothpick. It should come out with a few moist crumbs. This means your brownies are perfectly gooey. After baking, cool them in the pan for 15 minutes. Lift them out using the parchment. Cut into squares or bars as you like. Enjoy your sweet treat!
Tips & Tricks
Achieving the Perfect Gooey Texture
To make your brownie bars gooey, follow these steps closely. First, do not overmix the batter. Mix until you can’t see dry flour. This keeps the brownies soft and moist. Second, bake them just right. Aim for 25 to 30 minutes. Check with a toothpick; it should have a few moist crumbs. If there's too much batter on the toothpick, they need more time. Remember, underbaking a little helps keep that gooey texture.
Cooling and Serving Suggestions
After baking, let the brownie bars cool in the pan for about 15 minutes. This helps them firm up a bit while staying gooey inside. Lift them out using the parchment paper. Cut them into squares or bars as you like. Serve warm for the best taste. You can also enjoy them at room temperature. Pair them with vanilla ice cream or a drizzle of caramel for a special touch.
Enhancing Flavor with Presentation Tips
Presentation makes a big difference! Serve your brownie bars on a rustic wooden platter. Lightly dust them with powdered sugar for a pretty look. You can also sprinkle a bit of pumpkin spice on top. This adds a nice touch and enhances the flavor. For a fun twist, add a scoop of warm vanilla ice cream on the side. Drizzle with caramel sauce to make it even more delicious.
Pro Tips
- Use Fresh Pumpkin Purée: For the best flavor, consider using homemade pumpkin purée instead of canned. It adds a fresher taste and enhances the overall experience.
- Don’t Overmix: When combining your wet and dry ingredients, mix just until combined. Overmixing can lead to dense brownies instead of the desired gooey texture.
- Check for Doneness: To ensure your brownies are perfectly gooey, check them a few minutes before the recommended baking time. A toothpick should come out with a few moist crumbs for the ideal consistency.
- Customize Your Toppings: Feel free to experiment with toppings! Try adding a sprinkle of sea salt, a drizzle of chocolate or caramel sauce, or even a dollop of whipped cream for a delightful twist.
Variations
Gluten-Free Options
You can make these brownie bars gluten-free easily. Use a gluten-free flour blend instead of all-purpose flour. Many blends work well, but look for one with a good balance of starches and proteins. This swap keeps the brownies soft and gooey.
Alternative Flavor Combinations
Want to change it up? Try adding peppermint extract for a minty twist. Just one teaspoon can add a refreshing taste. You can also stir in caramel sauce for a rich, sweet layer. Swirl it into the batter before baking for extra flavor.
Seasonal Variations
Make these bars fit any holiday! For Thanksgiving, add chopped pecans and top with whipped cream. For Christmas, mix in crushed candy canes for a fun, festive crunch. You can even drizzle some chocolate on top for a beautiful finish.
Storage Info
How to Store Leftover Brownie Bars
To keep your brownie bars fresh, store them in an airtight container. Place parchment paper between layers to prevent sticking. They stay good at room temperature for up to three days. If you want to keep them longer, refrigeration is a great option. This can extend their freshness for about a week.
Freezing Instructions
Freezing is a smart way to keep brownie bars for later. First, let them cool completely. Then, cut them into squares. Wrap each square tightly in plastic wrap. Place the wrapped pieces in a freezer-safe bag or container. They can last for up to three months in the freezer. When you want to enjoy them, simply thaw them in the fridge overnight.
Best Serving Timeframe for Freshness
For the best taste, eat the brownie bars within the first few days. They are most gooey and sweet right after baking. However, if you store them properly, they will still taste great for up to a week. Enjoy them warm with ice cream for a special treat!
FAQs
How to know when brownie bars are done baking?
To check if your brownie bars are done, insert a toothpick into the center. If it comes out with a few moist crumbs, they are ready. If batter clings, bake a bit longer. The texture should be soft and gooey, not dry. Keep an eye on the time; 25-30 minutes is key.
Can I use canned pumpkin instead of fresh?
Yes, you can use canned pumpkin! It saves time and still gives great taste. Make sure to choose pure pumpkin puree, not pumpkin pie filling. This keeps the flavors true and allows the spices to shine through in your brownie bars.
What can I substitute for eggs in this recipe?
If you need an egg substitute, use applesauce or mashed bananas. About 1/4 cup of either works well for each egg. You can also use flaxseed meal mixed with water. Mix one tablespoon of flaxseed meal with three tablespoons of water. Let it sit until it thickens.
How can I make these brownie bars more festive?
You can add festive touches by mixing in seasonal spices like nutmeg or cloves. Top with extra chocolate chips or nuts for crunch. Consider drizzling caramel sauce on top for a treat. Dust with powdered sugar or sprinkle pumpkin spice for a holiday feel.
What are the best ways to reheat brownie bars?
To reheat, place brownie bars on a plate and cover with a damp paper towel. Microwave for about 10-15 seconds. This keeps them moist. You can also warm them in an oven at 350°F for about 5-10 minutes. Enjoy them warm with a scoop of ice cream!
You now have all the tools to make gooey pumpkin spice brownie bars. We covered key ingredients, optional add-ins, and even substitutions. You learned how to mix, bake, and serve these tasty treats. Tips helped you achieve the perfect texture and flavor. With variations and storage advice, you'll keep your bars fresh and fun. Enjoy making these brownies at any time of the year! They’re sure to be a hit wherever you share them.