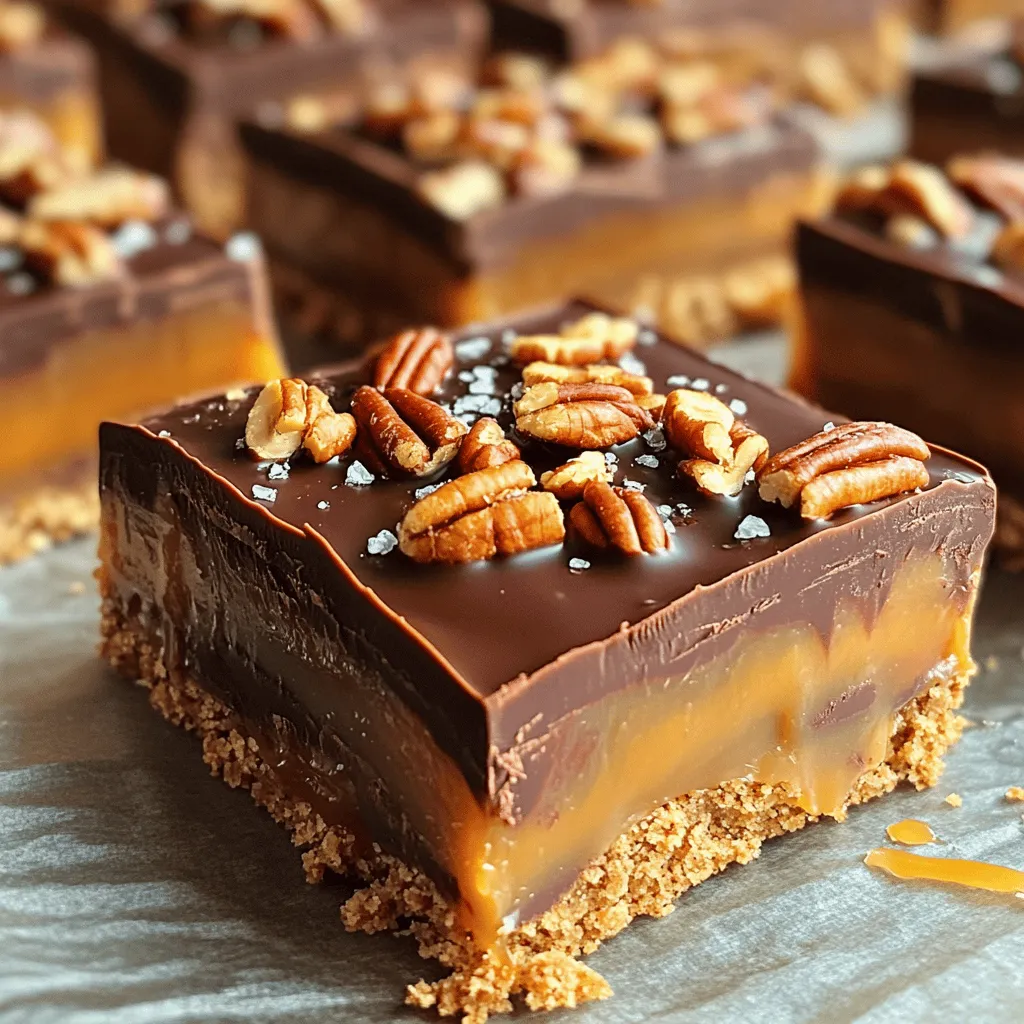
Looking for a sweet treat that’s simple to make? These No-Bake Caramel Pecan Turtle Bars are the perfect answer! With easy layers of chocolate, caramel, and pecans, you’ll impress your friends and family without turning on the oven. In this guide, I’ll share a complete list of ingredients, step-by-step instructions, and clever tips to help you create these delicious bars with ease. Let’s dive in!
Ingredients
Complete List of Ingredients
To make No-Bake Caramel Pecan Turtle Bars, gather the following ingredients:
– 1 ½ cups graham cracker crumbs
– ½ cup unsweetened cocoa powder
– ½ cup unsalted butter, melted
– 1 cup powdered sugar
– 1 cup semi-sweet chocolate chips
– 1 cup caramel sauce (store-bought or homemade)
– 1 cup pecans, roughly chopped
– ½ teaspoon sea salt
– ¼ teaspoon vanilla extract
These ingredients create a rich and tasty treat. The graham cracker crumbs form the base. Cocoa powder adds depth, while butter binds the crust. Chocolate chips give a creamy layer. Caramel and pecans complete the flavor profile.
Substitutions for Common Ingredients
If you need alternatives, here are some smart swaps:
– Use almond flour instead of graham cracker crumbs for a gluten-free option.
– Swap cocoa powder for carob powder if you want a caffeine-free choice.
– Use coconut oil instead of butter for a dairy-free version.
– Maple syrup can replace caramel sauce for a different sweet flavor.
These substitutions can help you adjust the recipe to your needs while keeping it delicious.
Optional Toppings and Mix-ins
Feel free to enhance your bars with these tasty options:
– A sprinkle of sea salt on top for extra flavor.
– Drizzle melted chocolate for a fancier look.
– Add a layer of dried fruit, like cranberries, for a sweet twist.
– Mix in some shredded coconut for added texture.
These optional toppings offer a chance to personalize your No-Bake Caramel Pecan Turtle Bars, making them even more fun!
Step-by-Step Instructions
Preparing the Base
Start by mixing the graham cracker crumbs, cocoa powder, and powdered sugar in a bowl. Make sure everything blends well. Then, pour in the melted butter. Mix until it feels like wet sand. This mixture will form the foundation of your bars.
Forming the Crust
Next, grab an 8×8 inch baking pan. Line it with parchment paper, letting it hang over the edges. This makes removal easy later. Press the crust mixture into the pan using your fingers or a measuring cup. Make it compact and even.
Adding the Chocolate Layer
Now it’s time for the chocolate! Melt the semi-sweet chocolate chips in a microwave-safe bowl. Heat in 30-second bursts, stirring each time until smooth. Pour the melted chocolate over the crust. Use a spatula to spread it evenly. Let it cool for about 10 minutes.
Preparing the Caramel and Pecans
While the chocolate cools, chop the pecans. Put them in a bowl. Add the caramel sauce, vanilla extract, and sea salt. Mix well until the pecans are coated in the caramel. This mixture will add great flavor and crunch.
Layering the Caramel
Once the chocolate has cooled, pour the caramel-pecan mix over it. Spread it evenly with a spatula. Make sure to cover all the chocolate. This is where the magic happens!
Chilling and Slicing
Cover the pan with plastic wrap or foil. Place it in the fridge for at least 3 hours. This helps the bars set and firm up. When ready, lift them out using the parchment paper. Slice them into squares or rectangles. Enjoy your delicious bars!
Tips & Tricks
How to Ensure Perfect Layers
To get nice layers, make sure each layer cools before adding the next. After you pour the chocolate, let it sit for ten minutes. This helps it set. When you spread the caramel-pecan mix, do it gently. Aim for even coverage. This way, every bite has rich flavors.
Storing Leftovers Properly
To keep the bars fresh, wrap them well. Use plastic wrap or foil. You can also place them in an airtight container. Keep them in the fridge. This helps the bars stay firm and tasty. They can last up to a week when stored correctly.
Avoiding Common Mistakes
One big mistake is rushing the chilling time. If you cut them too soon, they may fall apart. Always chill for at least three hours. Another issue is uneven layers. Press your crust firmly and spread chocolate and caramel evenly. This ensures a great texture in every bite.
Variations
Additions for Flavor Enhancement
You can make these bars even better with a few simple additions. Try adding a sprinkle of cinnamon or a dash of espresso powder to the chocolate layer. This will give a nice depth of flavor. You can also mix in some shredded coconut or mini marshmallows with the pecans for added texture and taste. These small changes can turn an already amazing treat into something special.
Alternative Nut Options
If you’re not a fan of pecans, don’t worry! You can swap them out for other nuts. Walnuts, almonds, or cashews can all work well in this recipe. Chop them up and use them just like you would with pecans. Each nut brings its own flavor, so feel free to experiment and find your favorite.
Gluten-Free Adjustments
Want to make these bars gluten-free? It’s easy! Just use gluten-free graham cracker crumbs instead of regular ones. Make sure all other ingredients are also certified gluten-free. This way, everyone can enjoy these delicious no-bake caramel pecan turtle bars without worry!
Storage Info
Best Practices for Storing Bars
To keep your No-Bake Caramel Pecan Turtle Bars fresh, store them in an airtight container. Make sure to separate layers with parchment paper to avoid sticking. If you have leftover bars, place them in the fridge. This keeps them firm and tasty.
Freezing Instructions
You can freeze these bars for later enjoyment. First, cut them into squares. Then, wrap each piece in plastic wrap. Place the wrapped bars in a freezer-safe bag or container. They will stay good for up to three months. When you want a treat, just thaw them in the fridge overnight.
Shelf Life of No-Bake Bars
These bars have a great shelf life. In the fridge, they last about a week. If stored properly in the freezer, they can last even longer. Always check for any signs of spoilage before eating. Enjoy your delicious treats without worry!
FAQs
Can I make these bars in advance?
Yes, you can make these bars a day or two ahead. Just store them in the fridge. They will stay fresh and tasty. If you cover them well, they won’t dry out. This makes them perfect for parties or special events.
What can I substitute for pecans?
If you don’t have pecans, try walnuts or almonds. Both nuts work well with the caramel and chocolate. You can also skip the nuts if you prefer a nut-free treat. Just keep in mind, the texture will change a bit.
Is there a way to make these bars healthier?
You can swap the graham cracker crumbs for whole grain crumbs. Use dark chocolate instead of semi-sweet for less sugar. You might also reduce the caramel sauce or use a sugar-free version. These changes help cut calories and add extra nutrients.
How do I cut no-bake bars cleanly?
To slice the bars neatly, use a sharp knife. Dip the knife in hot water, then wipe it dry. This helps make cleaner cuts. If the bars stick, run the knife under hot water again. This will help create perfect squares or rectangles.
Can I use a different chocolate type?
Absolutely! You can use milk chocolate or dark chocolate if you prefer. Each type will give a different taste. White chocolate is also an option, but it will change the flavor of the bars. Choose what you enjoy most!
You now have a complete guide for making no-bake bars. We covered ingredients, tips, and variations. You learned how to layer flavors, store leftovers, and avoid mistakes. Remember, you can customize with your favorite nuts or toppings. Enjoy being creative in the kitchen with these easy steps. I hope your no-bake bars turn out delicious and fun. Keep experimenting, and share your tasty results!