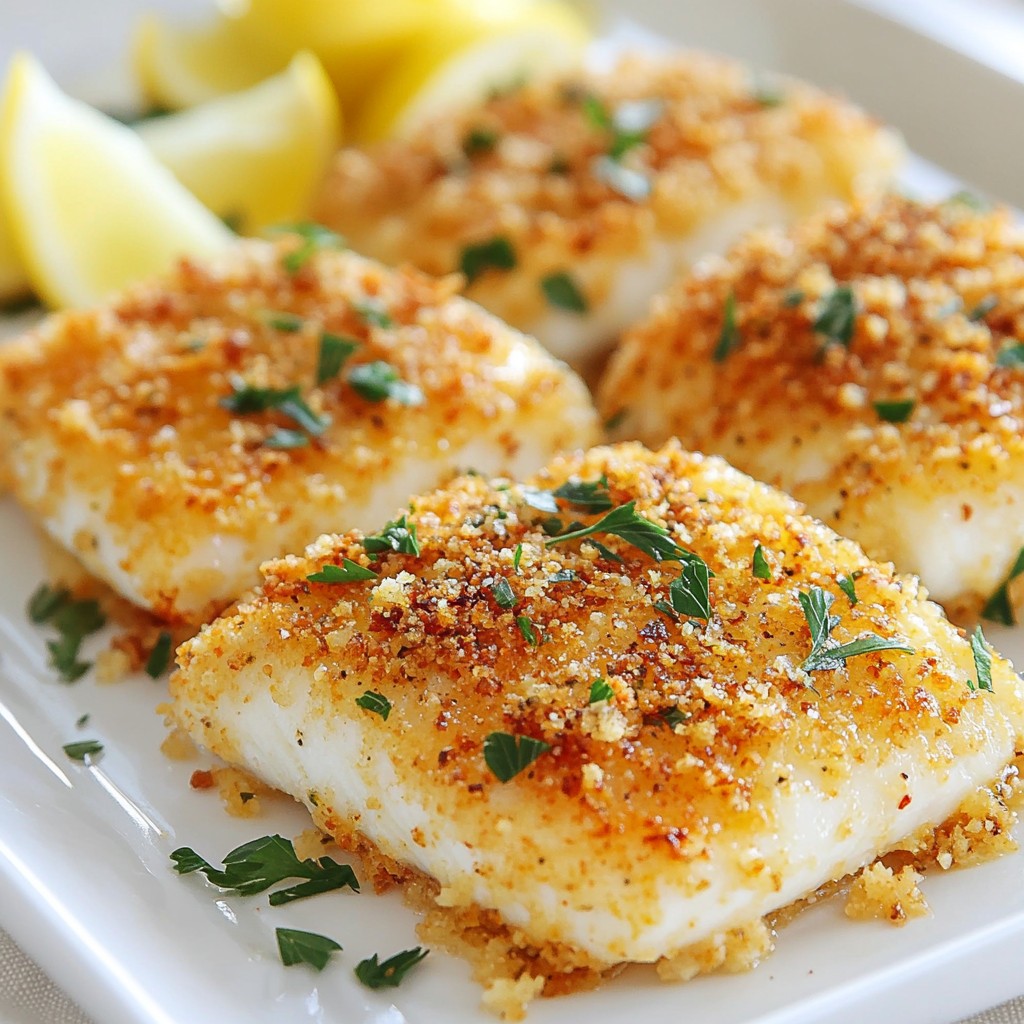
Are you ready to impress your family with a crispy and flavorful dish? My Parmesan Crusted Tilapia is simple to make and packed with amazing taste. This blog post will guide you through ingredient choices, cooking tips, and even flavor twists. Whether you're cooking for friends or just treating yourself, this recipe will become a favorite. Let’s dive into making this delicious meal together!
Why I Love This Recipe
- Delicious Flavor Combination: The blend of Parmesan, garlic, and smoked paprika creates a savory crust that enhances the mild taste of tilapia.
- Quick and Easy: This recipe can be prepared in just 30 minutes, making it perfect for busy weeknight dinners.
- Healthy Option: Tilapia is a lean source of protein, and the baking method keeps it light while still being satisfying.
- Beautiful Presentation: With a sprinkle of fresh parsley and colorful sides, this dish looks as good as it tastes!
Ingredients
List of Required Ingredients
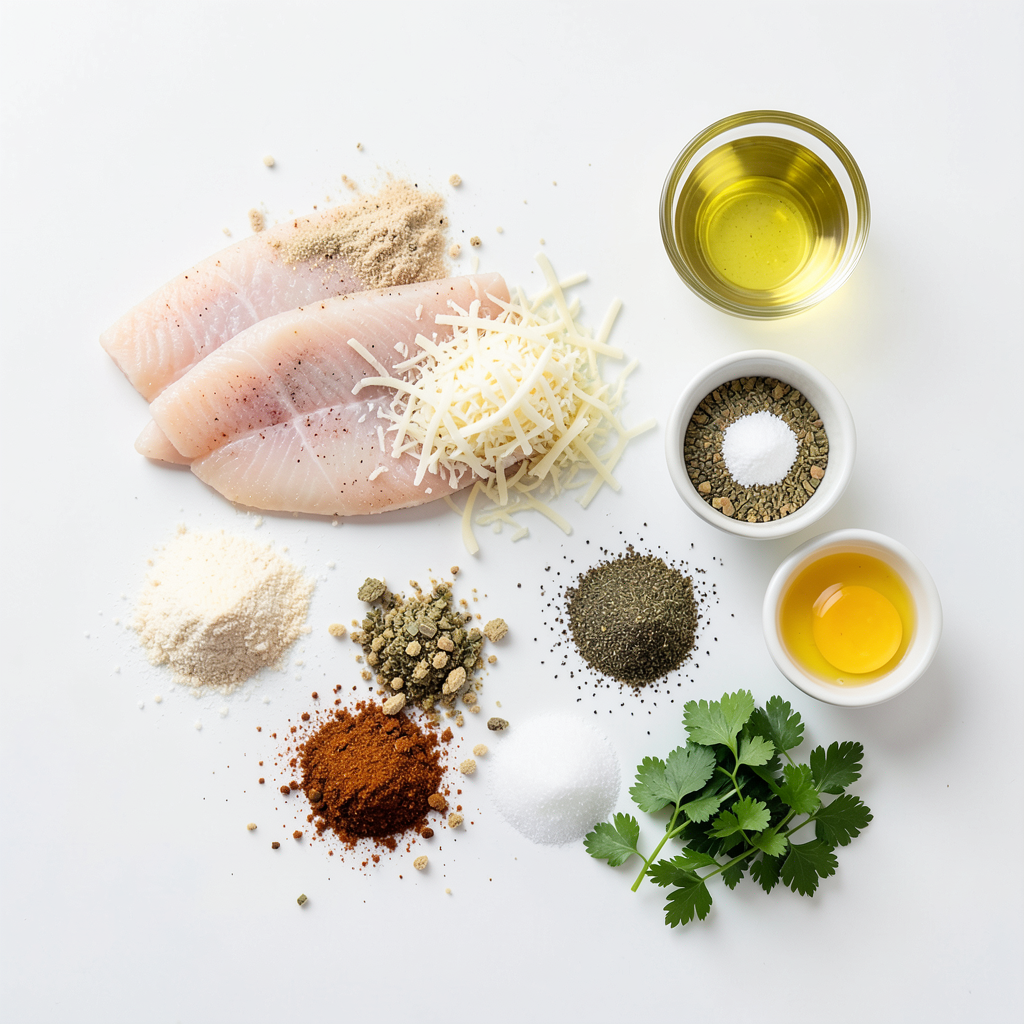
For Parmesan Crusted Tilapia, gather these items:
- 4 tilapia fillets
- 1 cup finely grated Parmesan cheese
- 1/2 cup seasoned breadcrumbs
- 1 teaspoon garlic powder
- 1 teaspoon dried oregano
- 1 teaspoon smoked paprika
- Salt and freshly ground pepper, to taste
- 2 large eggs, beaten well
- 1 tablespoon olive oil for frying
- Fresh parsley, chopped, for garnish
These ingredients create a crunchy and flavorful crust on the tilapia. The Parmesan cheese adds a rich taste that pairs well with the fish.
Substitutions and Alternatives
If you lack an ingredient, here are some swaps:
- Use any white fish if you can't find tilapia.
- Pecorino Romano cheese works as a substitute for Parmesan.
- For gluten-free options, choose gluten-free breadcrumbs.
- Dried thyme can replace oregano for a different herb flavor.
- You can skip smoked paprika if you prefer a milder taste.
These alternatives will still provide a delicious meal, keeping it simple and enjoyable.
Storage Suggestions for Fresh Ingredients
Keep your ingredients fresh with these tips:
- Store tilapia fillets in the coldest part of the fridge. Use them within one to two days.
- Grated Parmesan cheese lasts up to a week in the fridge. Keep it in an airtight container.
- Seasoned breadcrumbs should stay dry. Store them in a cool, dark place for best results.
- Fresh parsley can last up to a week in the fridge. Place it in water to keep it fresh.
By following these storage tips, you can maintain the quality of your ingredients. Enjoy cooking this tasty dish!
Step-by-Step Instructions
Preparation of Ingredients
First, gather your ingredients. You will need four tilapia fillets, one cup of finely grated Parmesan cheese, and half a cup of seasoned breadcrumbs. Also, have one teaspoon each of garlic powder, dried oregano, and smoked paprika ready. Don't forget salt and pepper to taste. You will use two large eggs and one tablespoon of olive oil for frying. Lastly, fresh parsley will add color to your dish.
Next, preheat your oven to 400°F (200°C). Line a baking sheet with parchment paper. This will help keep the fish from sticking.
Now, let’s make the breadcrumb mixture. In a shallow dish, combine the Parmesan cheese, seasoned breadcrumbs, garlic powder, oregano, smoked paprika, salt, and pepper. Mix this well. This mixture will give your tilapia a great flavor and texture.
Cooking Method: Skillet to Oven
Let’s move on to cooking. In another shallow dish, pour the beaten eggs. Make sure they are mixed well. This will help the coating stick to the fish.
Now take each tilapia fillet. Dip it into the eggs first. Make sure the fillet is fully coated. After that, dredge it in the Parmesan mixture. Press gently to help the coating stick.
Heat the olive oil in a large skillet over medium heat. When the oil is hot, carefully place the coated fillets in the skillet. Cook them for about three to four minutes on each side. You want them to turn golden brown and be fully cooked.
Once the fillets are browned, transfer them to your baking sheet. Place the baking sheet in the oven. Bake the tilapia for another 10 to 12 minutes. The fish should flake easily when done.
Tips for Ensuring a Crispy Crust
To ensure your tilapia has a crispy crust, here are some tips. First, make sure your oil is hot before adding the fish. This helps create a nice sear.
Do not overcrowd the skillet. Cook in batches if necessary. This allows each fillet to get enough heat.
Press the breadcrumb mixture onto the fish firmly. This helps the coating stick better during cooking.
Finally, baking after frying helps to finish cooking the fish and keeps it crispy. Let the tilapia rest for a few minutes after baking. Sprinkle some chopped parsley on top for a fresh touch. Enjoy your crispy and flavorful meal!
Tips & Tricks
Achieving the Perfect Crust
To get that ideal crust on your tilapia, start with dry fillets. Pat them with a paper towel to remove moisture. This step helps the coating stick. When you dip the fillets in the beaten eggs, ensure even coverage. Then, press firmly into the Parmesan mixture. This helps the crust cling during cooking. Fry them in hot oil for a crispy finish. Remember, medium heat is key; too high will burn the crust.
Flavor Enhancements
You can boost flavors easily. Add fresh herbs like thyme or basil to the Parmesan mix. This adds freshness without extra work. For a bit of zing, try adding lemon zest. It brightens the dish and pairs well with fish. If you like a kick, use more smoked paprika or add a dash of cayenne. This adds great warmth to your meal.
Serving Suggestions for Parmesan Crusted Tilapia
To serve, place the fillets on a platter. Add lemon wedges for squeezing over the fish. This adds a nice citrus touch. Pair with steamed veggies like broccoli or green beans for color. You can also serve it with a side of rice or quinoa. The grains soak up the flavors nicely. Don’t forget to sprinkle chopped parsley on top for a pop of color.
Pro Tips
- Choose Fresh Fish: Always select fresh tilapia fillets for the best flavor and texture. Look for fillets that are translucent and have a mild scent.
- Perfectly Preheat Your Skillet: Make sure the olive oil is hot enough before adding the fish to achieve a crispy crust. The oil should shimmer but not smoke.
- Resting Time Matters: Allow the cooked tilapia to rest for a few minutes after baking. This helps the juices redistribute, keeping the fish moist.
- Experiment with Seasonings: Feel free to customize the breadcrumb mixture with your favorite herbs and spices. Try adding lemon zest or crushed red pepper for an extra kick.
Variations
Using Different Fish Options
You can swap tilapia for other fish. Cod, haddock, or even catfish work well. Each fish brings its unique flavor. Cod has a mild taste, while haddock offers a slightly sweet note. Catfish adds a rich, creamy texture. Adjust cooking times based on the thickness of the fillets. Always check if the fish flakes easily to ensure it's cooked.
Gluten-Free Alternatives
If you need a gluten-free dish, choose gluten-free breadcrumbs. Many brands offer tasty options. You can also crush gluten-free crackers or use ground almonds. This keeps the crunch while fitting your diet. Just make sure to check labels for hidden gluten ingredients.
Flavor Twist with Herbs and Spices
Adding herbs and spices can elevate your tilapia. You might try fresh basil, thyme, or dill for a garden-fresh taste. For a kick, add cayenne pepper or crushed red pepper flakes. Lemon zest can brighten the flavor, too. Feel free to mix and match spices to find your perfect combination. Experimenting with flavors keeps your meals exciting and fresh.
Storage Info
How to Store Leftover Tilapia
To keep leftover tilapia fresh, you need to act quickly. Place the cooled fillets in an airtight container. If you don’t have one, wrap them tightly in plastic wrap or foil. Store them in the fridge for up to three days. Remember, the sooner you store it, the better it will taste when you reheat it.
Reheating Instructions
When you're ready to enjoy your leftover tilapia, reheating it right is key. The best way is to use an oven. Preheat it to 350°F (175°C). Place the tilapia on a baking sheet and cover it loosely with foil. Bake for about 10 minutes or until it’s warmed through. This method keeps the crust crispy and the fish moist. You can also use a skillet on low heat, but watch closely to avoid burning.
Freezing Tips for Longer Storage
If you want to store tilapia for a longer time, freezing is a great option. Make sure the fish is completely cool before freezing. Wrap each fillet tightly in plastic wrap, then place it in a freezer bag. Remove as much air as possible to prevent freezer burn. You can freeze it for up to three months. When you're ready to use it, thaw it overnight in the fridge before reheating. This keeps the fish juicy and full of flavor.
FAQs
What can I serve with Parmesan Crusted Tilapia?
You can serve Parmesan crusted tilapia with many sides. Fresh vegetables are a great choice. Try steamed broccoli or asparagus for a healthy touch. You could also add a side salad with mixed greens. A light lemon vinaigrette will brighten the meal. Mashed potatoes or rice work well too. They soak up flavors nicely. For a fun twist, serve it with a tangy coleslaw. This adds crunch and zest. You can even pair it with crusty bread for a hearty meal.
Can I make this recipe ahead of time?
Yes, you can prepare some parts of this recipe ahead. You can coat the tilapia fillets earlier in the day. Just keep them in the fridge until you are ready to cook. This saves time and still gives you a fresh meal. If you want, you can also bake them ahead. Simply reheat them in the oven before serving. This keeps the crust crispy. Just be careful not to overcook them again.
Is it necessary to bake the tilapia after frying?
Baking the tilapia after frying is not strictly necessary, but it helps. This step ensures the fish cooks through evenly. The skillet gives it a great crust, but baking adds warmth. It also helps the inside reach the right texture. If you like your fish very tender, this step is key. You can skip it if you're in a hurry, but baking adds a nice finish.
In this blog post, we explored the essential ingredients for Parmesan crusted tilapia and how to prepare them. I shared step-by-step instructions to cook it perfectly, ensuring a crispy crust. We also covered tips for flavor, storage, and variations using different fish. Remember, it’s all about making this dish work for you. Enjoy the cooking process, and feel free to get creative with your ingredients. With practice, you’ll master this tasty recipe and impress everyone at the table. Keep cooking and have fun!