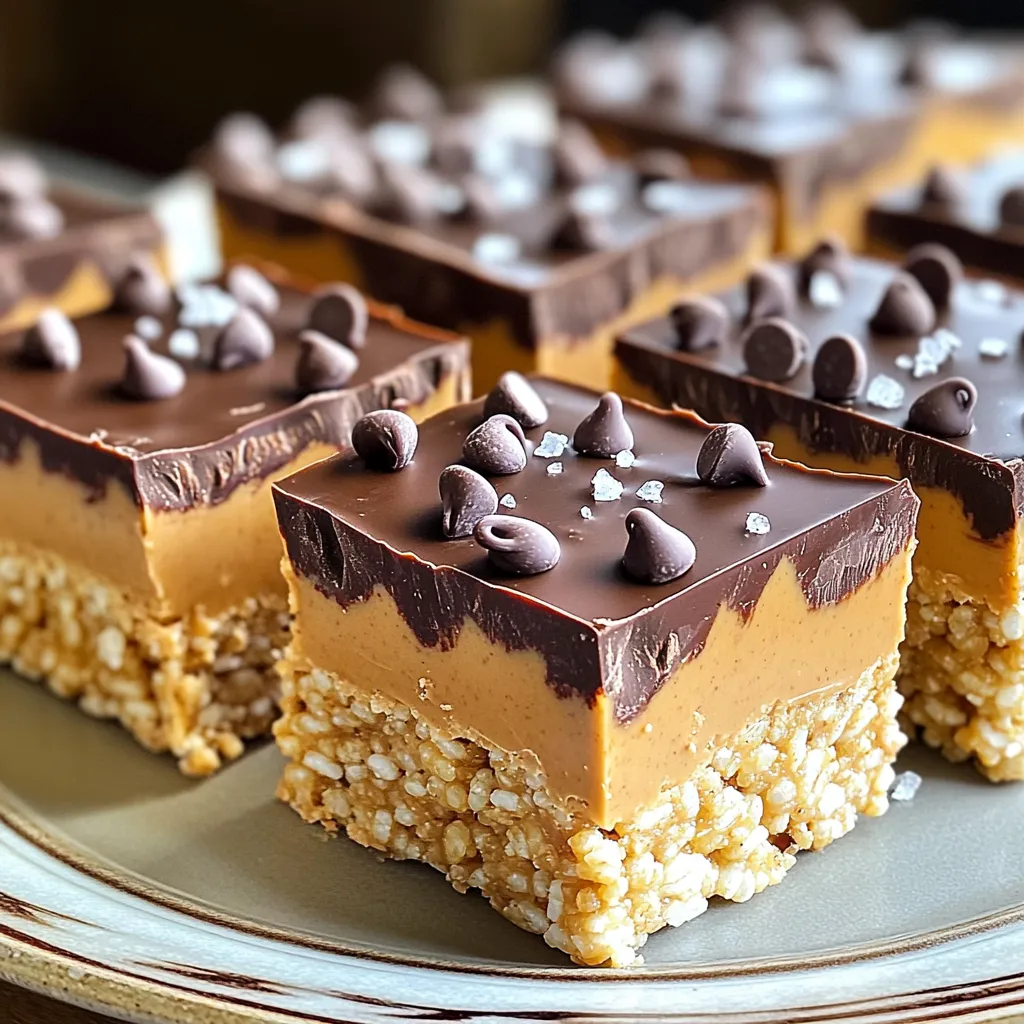
Craving a quick and tasty treat? These Peanut Butter Chocolate Rice Krispie Bars are the perfect no-bake solution! With just a few ingredients, you’ll whip up a sweet snack that’s both crunchy and creamy. Whether you’re a busy parent or a novice in the kitchen, this simple recipe will impress. Let’s dive into the ingredients and get started on this delicious adventure!
Ingredients
List of main ingredients
– 2 cups of Rice Krispies
– 1 cup of creamy peanut butter
– 1 cup of powdered sugar
– 1 teaspoon of pure vanilla extract
– 1 cup of milk chocolate chips
– ½ cup of mini chocolate chips (for topping)
– A pinch of sea salt
These six items form the heart of your Peanut Butter Chocolate Rice Krispie Bars. Each ingredient plays a key role in flavor and texture. The Rice Krispies add crunch. Creamy peanut butter offers richness. Powdered sugar brings sweetness. Vanilla extract enhances flavor. Milk chocolate chips provide smoothness, while mini chocolate chips are for a delightful topping.
Optional ingredients for variations
– Substitute with chunky peanut butter
– Add nuts or dried fruit for texture
Feel free to customize! If you like crunch, use chunky peanut butter. You can also mix in nuts or dried fruit for added texture. These options can make your bars even more exciting.
Equipment needed
– Mixing bowl
– Electric mixer or spatula
– 8×8 inch baking dish
– Microwave-safe bowl
Using the right tools makes cooking easier. A mixing bowl helps combine ingredients. An electric mixer or a spatula ensures a smooth mix. The 8×8 inch baking dish shapes the bars. Lastly, a microwave-safe bowl melts chocolate perfectly.
Step-by-Step Instructions
Preparing the peanut butter mixture
– In a large bowl, add 1 cup of creamy peanut butter.
– Sift in 1 cup of powdered sugar.
– Mix until smooth and creamy. This should take a few minutes.
Incorporating the Rice Krispies
– Next, fold in 1 teaspoon of pure vanilla extract.
– Now, add 2 cups of Rice Krispies.
– Ensure every piece is coated well with the peanut butter mix.
Assembling the bars
– Line an 8×8 inch baking dish with parchment paper.
– Leave some paper hanging over the edges for easy removal.
– Press the mixture firmly into the dish with a spatula.
Melting the chocolate
– Place 1 cup of milk chocolate chips in a microwave-safe bowl.
– Microwave in 30-second intervals, stirring after each.
– Stop when fully melted and smooth, usually about 1-2 minutes.
Final assembly
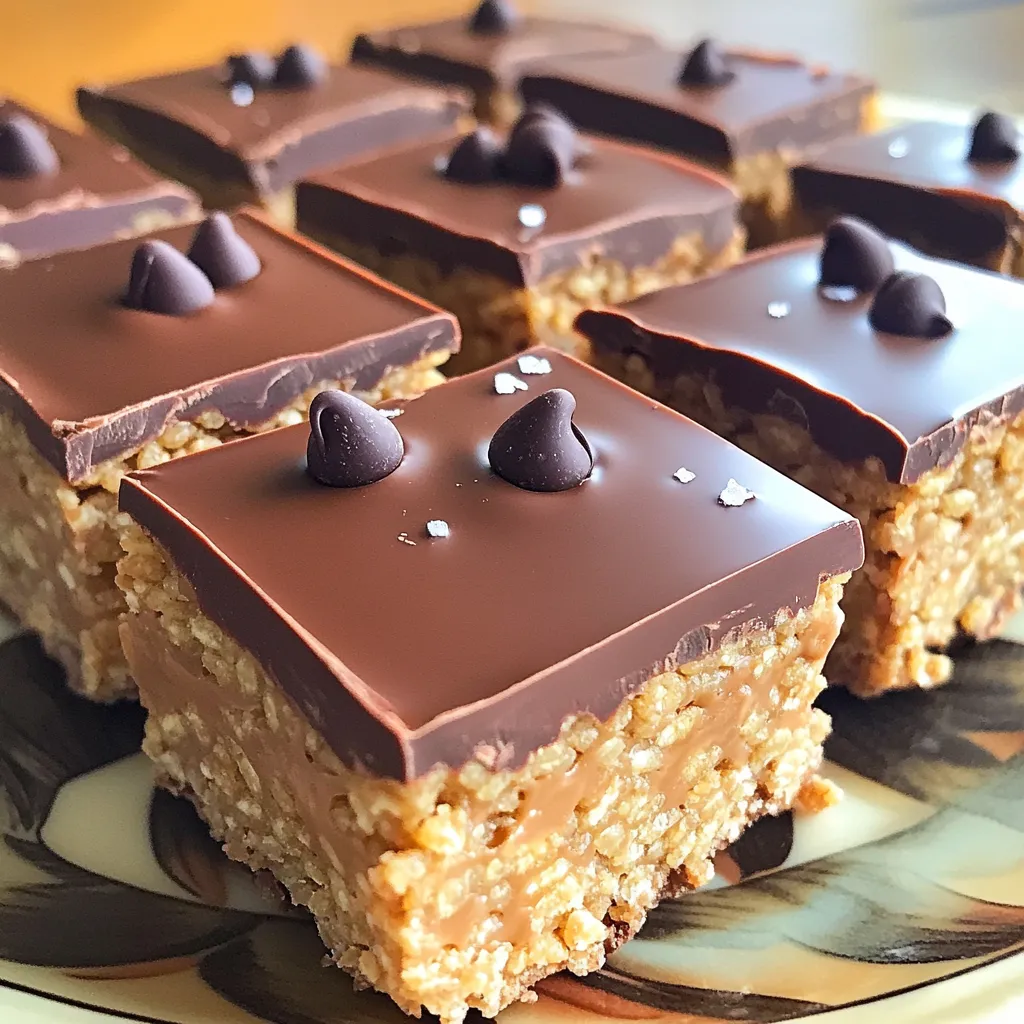
– Pour the melted chocolate over the Rice Krispies layer.
– Use a spatula to spread it evenly across the top.
– Sprinkle ½ cup of mini chocolate chips while the chocolate is warm.
– Add a pinch of sea salt to enhance the flavor.
Setting the bars
– Put the baking dish in the refrigerator for at least 30 minutes.
– Once set, lift the bars out using the parchment paper.
– Cut into squares and enjoy your delicious treat!
Tips & Tricks
Achieving the perfect texture
– Ensure all Rice Krispies are coated. This step is key for flavor.
– Press the mixture firmly to avoid crumbling. A strong base keeps bars together.
Melting chocolate safely
– Use low power settings in the microwave. This helps prevent burning.
– Stir frequently to prevent hot spots. Mix well after each interval for smooth chocolate.
Presentation ideas
– Drizzle melted chocolate on top for a fun look. It adds a nice touch.
– Serve with decorative garnishes like sprinkles or nuts. They make the bars pop!
Variations
Flavor enhancements
You can easily boost the flavor of your Peanut Butter Chocolate Rice Krispie Bars.
– Add a pinch of cinnamon for warmth. This spice brings a nice depth.
– Incorporate mini marshmallows for chewiness. They add a fun texture and sweetness.
Dietary substitutions
If you have dietary needs, there are great options.
– Use almond butter instead of peanut butter for nut allergies. It works well and tastes great.
– Substitute sugar-free options if needed. This way, everyone can enjoy the treat.
Different toppings
Changing the toppings can make your bars even better.
– Try white chocolate chips for a twist. They add a sweet contrast to the peanut butter.
– Top with crushed candies or sprinkles. This makes the bars festive and fun!
Storage Info
Best storage practices
To keep your Peanut Butter Chocolate Rice Krispie Bars fresh, store them in an airtight container. This helps keep moisture out and preserves their taste. It’s best to keep them in the refrigerator. The cool temperature will keep the chocolate firm and the bars tasty.
Shelf life
These bars last up to one week in the fridge. If you want to keep them longer, you can freeze them. Just wrap them tightly in plastic wrap before placing them in a freezer-safe bag. They can last for up to three months in the freezer.
Reusing leftover bars
If you have any bars left, don’t worry! You can break them up and crumble them on top of ice cream. This adds a nice crunch and flavor. You can also use the bars in dessert parfaits. Layer them with yogurt and fruit for a fun treat!
FAQs
Can I make these bars vegan?
Yes, you can make these bars vegan. Use a plant-based creamy peanut butter. For the chocolate, choose dairy-free chocolate chips. Replace powdered sugar with a vegan-friendly alternative, like coconut sugar. You can also use almond milk in place of regular milk.
How do I make them nut-free?
To make these bars nut-free, swap the peanut butter for sunflower seed butter. This option provides a similar taste and texture without nuts. You can also use soy nut butter or any other nut-free spread.
What can I use instead of Rice Krispies?
If you want to change the base cereal, try using crispy rice cereal. You can also use corn flakes or puffed rice. These options will give you a similar crunch and texture in your bars.
Is it possible to add protein powder?
Yes, you can add protein powder. Use a mild flavor, like vanilla. Start with one scoop and mix it into the peanut butter and powdered sugar. Make sure to adjust the amount of powdered sugar to keep the texture right.
This post outlined how to make delicious Rice Krispie peanut butter bars. You learned the main ingredients, the steps for mixing and assembling, and storage tips to keep them fresh. We also covered simple ways to customize the recipe to fit your taste.
These bars are easy to make and fun to eat. They’re perfect for snacks or dessert. Try different toppings or flavors to make them your own. Enjoy your sweet treat, and don’t forget to share with friends!