Taco Mason Jar Salads are the perfect way to spice up your meal prep! You’ll love how easy and refreshing they are. Packed with layers of flavor, these salads make lunch exciting and healthy. I’ll guide you through essential ingredients, step-by-step instructions, and tips for the freshest results. Read on to discover how to create these colorful meals in minutes, plus variations to suit your taste!
Why I Love This Recipe
- Healthy Ingredients: This salad is packed with nutrient-rich ingredients like black beans, corn, and avocado, making it a wholesome meal option.
- Easy to Prepare: With just 15 minutes of prep time, you can create multiple servings of this delicious salad, perfect for meal prep!
- Customizable Layers: You can easily modify the layers to include your favorite veggies or proteins, making it versatile for any palate.
- Portable and Convenient: These mason jar salads are perfect for on-the-go lunches or picnics, allowing for easy transport and minimal mess.
Ingredients
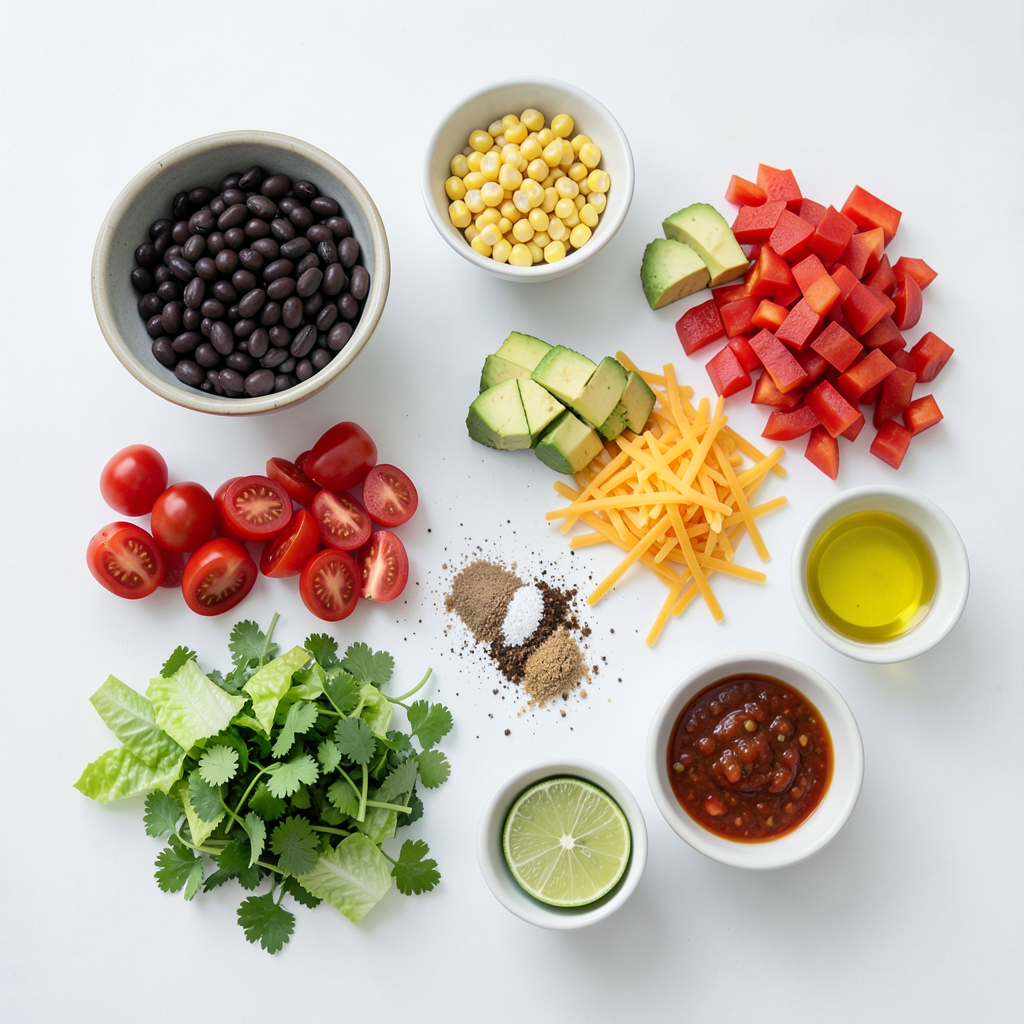
Essential Ingredients for Taco Mason Jar Salads
To make Taco Mason Jar Salads, you need some key ingredients. These ingredients build flavor and texture in every bite. Here’s what you’ll need:
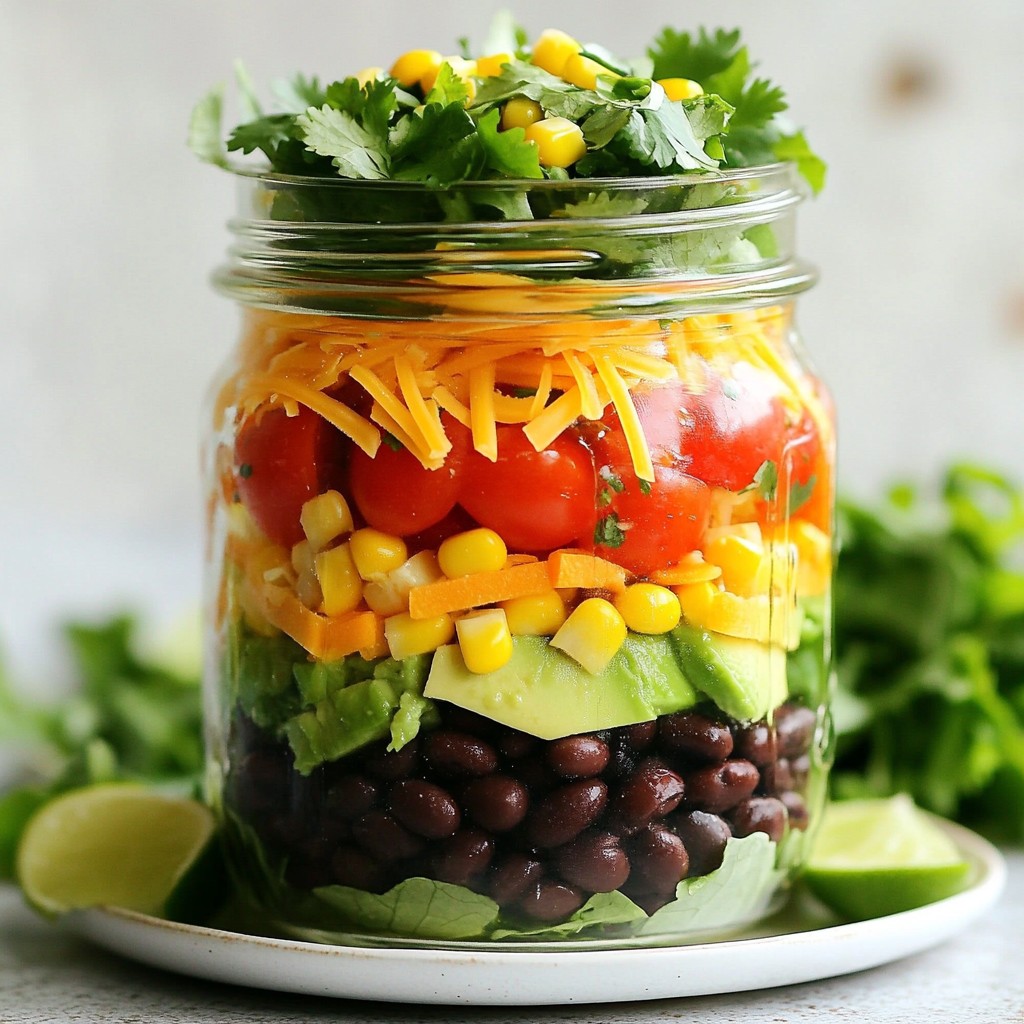
- 1 can (15 oz) black beans, thoroughly rinsed and drained
- 1 cup corn kernels (choose fresh, frozen, or canned)
- 1 cup cherry tomatoes, halved
- 1 red bell pepper, diced
- 1 ripe avocado, diced
- 1 cup shredded cheddar cheese (your favorite variety)
- 1 cup chopped romaine lettuce
- 1/4 cup fresh cilantro, finely chopped
These ingredients create a colorful and filling salad that is perfect for any meal.
Optional Ingredients for Variation
You can customize your Taco Mason Jar Salads with some optional ingredients. Here are a few ideas to mix things up:
- Black olives, sliced
- Jalapeños, diced
- Green onions, chopped
- Quinoa or brown rice for added grains
These options let you add your personal touch!
Recommended Dressing Components
The right dressing brings the salad together. I recommend making a simple yet tasty dressing with:
- 1/4 cup lime juice (fresh if possible)
- 1 teaspoon ground cumin
- 1 teaspoon chili powder
- Salt and pepper, to taste
This dressing adds zesty flavor and enhances the salad. You can also drizzle olive oil over the avocado for extra richness.
Step-by-Step Instructions
Preparation of the Dressing
To make the dressing, start with a small bowl. Add 1/4 cup of lime juice. Fresh juice tastes best, but you can use bottled if needed. Then, mix in 1 teaspoon of ground cumin and 1 teaspoon of chili powder. Finish with salt and pepper to your taste. Whisk everything together until well combined. Set this dressing aside; it will add a zesty kick to your salad.
Layering the Ingredients for Optimal Flavor
Now, let’s layer our ingredients for the best flavor. First, take a mason jar. Spoon in 1 can of black beans at the bottom. This layer keeps the beans from getting mushy. Next, add 1 cup of corn kernels on top of the beans. Then, spoon in a couple of tablespoons of salsa over the corn.
After the salsa, add 1 cup of halved cherry tomatoes. Follow this with 1 diced red bell pepper. These colors will bring your salad to life! Next, add 1 ripe avocado, diced carefully. You can drizzle a bit of olive oil on the avocado for extra flavor.
Now, sprinkle 1 cup of shredded cheddar cheese over the avocado. After that, gently pack 1 cup of chopped romaine lettuce on top. Be sure to leave a little space at the top of the jar. Finally, finish with 1/4 cup of fresh cilantro for a burst of flavor.
Sealing and Storing Your Salads
Once your layers are set, it’s time to seal the jar. Put the lid on tightly. Store the mason jar in the refrigerator until you are ready to eat. It’s best to enjoy your Taco Mason Jar Salad within 3-5 days for the freshest taste. When you are ready, shake the jar to mix the layers or pour everything into a bowl. Enjoy your delicious and colorful meal!
Tips & Tricks
Best Practices for Layering in Mason Jars
Layering your Taco Mason Jar Salad is key for taste and texture. Start with black beans. They form a strong base. This keeps other ingredients from getting soggy. Next, add corn. It adds sweetness and crunch. After that, spoon in salsa. This adds moisture and flavor.
Then, place halved cherry tomatoes and diced red bell pepper. These bright colors make the salad pop. Add diced avocado carefully. You want it to stay intact. Sprinkle cheddar cheese next. It brings creaminess to the salad. Finally, top with chopped romaine lettuce and cilantro. This keeps everything fresh and crisp.
How to Keep Avocado Fresh
To keep avocado fresh in your salad, use a trick. Drizzle a little olive oil on the diced avocado. This helps slow down browning. You can also squeeze lime juice over the avocado. The acid in lime helps keep it green. If you prepare the salad ahead of time, use these tips for the best results.
Suggestions for Flavor Enhancements
Want to boost flavors? Try adding some extras! You can mix in jalapeños for a kick. They add heat and spice to the salad. Also, consider adding some black olives. They give a salty, briny flavor. For a twist, add some corn chips on top before serving. This adds crunch and fun! You can also swap lime juice for lemon juice. It adds a different tang. Feel free to explore and make it your own!
Pro Tips
- Making it Vegetarian: For a vegetarian-friendly version, substitute the black beans with lentils or chickpeas for added protein.
- Storage Solutions: Use wide-mouth mason jars to make layering easier and to allow for a more visually appealing presentation.
- Avocado Freshness: To keep the avocado from browning, consider adding it right before serving or using lime juice on it for extra protection.
- Customize Your Salad: Feel free to add other toppings like jalapeños, olives, or sour cream to personalize your taco salad experience.
Variations
Vegetarian Taco Mason Jar Salad
For a vegetarian twist, start with the same base. Use black beans for protein. Add corn, tomatoes, and bell peppers as before. You can swap the cheese for a dairy-free option if you prefer. Use chickpeas for added texture and taste. Top with avocado and fresh cilantro. This salad is colorful and filling.
Protein-Packed Taco Mason Jar Salad
To boost protein, include grilled chicken or turkey. Cook the meat with cumin and chili powder for extra flavor. Layer the chicken on top of the black beans. You can also add quinoa or farro for more protein and fiber. Finish with the same fresh veggies and dressing. This version keeps you full and satisfied.
Spicy Taco Mason Jar Salad Options
If you like heat, add jalapeños or hot sauce to the layers. You can mix diced jalapeños into the salsa for a spicy kick. Another option is to season the beans with cayenne pepper. This adds depth and warmth to each bite. Don't forget to adjust the dressing by adding more chili powder if you like it hot.
Storage Information
How to Store Your Taco Mason Jar Salads
To store your Taco Mason Jar Salads, seal each jar tightly with its lid. Place the jars in the refrigerator. This keeps the salad fresh and ready for your next meal. Make sure to keep the jars upright to avoid spills.
Shelf Life and Freshness Tips
Your Taco Mason Jar Salads will stay fresh for about 3 to 5 days. After this time, the ingredients may lose their crispness. To help keep the salad fresh:
- Use ripe but firm avocados to avoid browning.
- Keep the dressing separate until you're ready to eat.
- Store jars away from strong-smelling foods in the fridge.
Reheating Instructions (if applicable)
You don't need to reheat these salads. Taco Mason Jar Salads taste best cold. When ready to eat, shake the jar to mix the layers. Alternatively, pour it into a bowl for easy eating. Enjoy your tasty salad as a quick meal!
FAQs
Can I make these salads in advance?
Yes, you can make Taco Mason Jar Salads ahead of time. I like to prep them for the week. These salads stay fresh in the fridge for 3-5 days. To keep them tasty, layer the ingredients correctly. Start with the beans at the bottom and finish with the lettuce. This way, the wet ingredients stay away from the greens.
What can I substitute for black beans?
If you don’t have black beans, you can use kidney beans or pinto beans. Both options work well with the other flavors. You might even try chickpeas for a fun twist. They add a nice texture and protein too.
Are Taco Mason Jar Salads gluten-free?
Yes, Taco Mason Jar Salads are gluten-free. The ingredients, like beans, corn, and veggies, do not contain gluten. Just check the labels of any dressings or sauces you use. Some may have hidden gluten.
Taco Mason Jar Salads are easy, fun, and tasty. We covered essential and optional ingredients, plus great dressings. I shared step-by-step instructions for the best layering and storage methods. Tips helped you keep your salad fresh and flavorful. You explored variations like vegetarian and spicy options to suit your taste.
Remember, these salads are great for meal prep or quick lunches. Enjoy your colorful, healthy creations!