Go Back
- 2 cups of Rice Krispies - 1 cup of creamy peanut butter - 1 cup of powdered sugar - 1 teaspoon of pure vanilla extract - 1 cup of milk chocolate chips - ½ cup of mini chocolate chips (for topping) - A pinch of sea salt These six items form the heart of your Peanut Butter Chocolate Rice Krispie Bars. Each ingredient plays a key role in flavor and texture. The Rice Krispies add crunch. Creamy peanut butter offers richness. Powdered sugar brings sweetness. Vanilla extract enhances flavor. Milk chocolate chips provide smoothness, while mini chocolate chips are for a delightful topping. - Substitute with chunky peanut butter - Add nuts or dried fruit for texture Feel free to customize! If you like crunch, use chunky peanut butter. You can also mix in nuts or dried fruit for added texture. These options can make your bars even more exciting. - Mixing bowl - Electric mixer or spatula - 8x8 inch baking dish - Microwave-safe bowl Using the right tools makes cooking easier. A mixing bowl helps combine ingredients. An electric mixer or a spatula ensures a smooth mix. The 8x8 inch baking dish shapes the bars. Lastly, a microwave-safe bowl melts chocolate perfectly. - In a large bowl, add 1 cup of creamy peanut butter. - Sift in 1 cup of powdered sugar. - Mix until smooth and creamy. This should take a few minutes. - Next, fold in 1 teaspoon of pure vanilla extract. - Now, add 2 cups of Rice Krispies. - Ensure every piece is coated well with the peanut butter mix. - Line an 8x8 inch baking dish with parchment paper. - Leave some paper hanging over the edges for easy removal. - Press the mixture firmly into the dish with a spatula. - Place 1 cup of milk chocolate chips in a microwave-safe bowl. - Microwave in 30-second intervals, stirring after each. - Stop when fully melted and smooth, usually about 1-2 minutes. - Pour the melted chocolate over the Rice Krispies layer. - Use a spatula to spread it evenly across the top. - Sprinkle ½ cup of mini chocolate chips while the chocolate is warm. - Add a pinch of sea salt to enhance the flavor. - Put the baking dish in the refrigerator for at least 30 minutes. - Once set, lift the bars out using the parchment paper. - Cut into squares and enjoy your delicious treat! - Ensure all Rice Krispies are coated. This step is key for flavor. - Press the mixture firmly to avoid crumbling. A strong base keeps bars together. - Use low power settings in the microwave. This helps prevent burning. - Stir frequently to prevent hot spots. Mix well after each interval for smooth chocolate. - Drizzle melted chocolate on top for a fun look. It adds a nice touch. - Serve with decorative garnishes like sprinkles or nuts. They make the bars pop! {{image_4}} You can easily boost the flavor of your Peanut Butter Chocolate Rice Krispie Bars. - Add a pinch of cinnamon for warmth. This spice brings a nice depth. - Incorporate mini marshmallows for chewiness. They add a fun texture and sweetness. If you have dietary needs, there are great options. - Use almond butter instead of peanut butter for nut allergies. It works well and tastes great. - Substitute sugar-free options if needed. This way, everyone can enjoy the treat. Changing the toppings can make your bars even better. - Try white chocolate chips for a twist. They add a sweet contrast to the peanut butter. - Top with crushed candies or sprinkles. This makes the bars festive and fun! To keep your Peanut Butter Chocolate Rice Krispie Bars fresh, store them in an airtight container. This helps keep moisture out and preserves their taste. It’s best to keep them in the refrigerator. The cool temperature will keep the chocolate firm and the bars tasty. These bars last up to one week in the fridge. If you want to keep them longer, you can freeze them. Just wrap them tightly in plastic wrap before placing them in a freezer-safe bag. They can last for up to three months in the freezer. If you have any bars left, don’t worry! You can break them up and crumble them on top of ice cream. This adds a nice crunch and flavor. You can also use the bars in dessert parfaits. Layer them with yogurt and fruit for a fun treat! Yes, you can make these bars vegan. Use a plant-based creamy peanut butter. For the chocolate, choose dairy-free chocolate chips. Replace powdered sugar with a vegan-friendly alternative, like coconut sugar. You can also use almond milk in place of regular milk. To make these bars nut-free, swap the peanut butter for sunflower seed butter. This option provides a similar taste and texture without nuts. You can also use soy nut butter or any other nut-free spread. If you want to change the base cereal, try using crispy rice cereal. You can also use corn flakes or puffed rice. These options will give you a similar crunch and texture in your bars. Yes, you can add protein powder. Use a mild flavor, like vanilla. Start with one scoop and mix it into the peanut butter and powdered sugar. Make sure to adjust the amount of powdered sugar to keep the texture right. This post outlined how to make delicious Rice Krispie peanut butter bars. You learned the main ingredients, the steps for mixing and assembling, and storage tips to keep them fresh. We also covered simple ways to customize the recipe to fit your taste. These bars are easy to make and fun to eat. They’re perfect for snacks or dessert. Try different toppings or flavors to make them your own. Enjoy your sweet treat, and don't forget to share with friends!

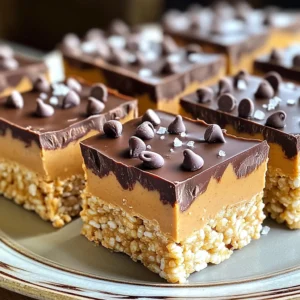
Peanut Butter Chocolate Rice Krispie Bars No Bake

Indulge in the perfect treat with these Peanut Butter Chocolate Cloud Bars! This easy recipe combines creamy peanut butter, Rice Krispies, and rich chocolate for a delightful dessert. In just 15 minutes of prep time, you can create a sweet, crunchy sensation that's sure to impress. Ready to satisfy your sweet tooth? Click through to explore the full recipe and bring this delicious treat to your kitchen today!

Ingredients
  

2 cups of Rice Krispies

1 cup of creamy peanut butter

1 cup of powdered sugar

1 teaspoon of pure vanilla extract

1 cup of milk chocolate chips

½ cup of mini chocolate chips (for topping)

A pinch of sea salt

Instructions
 

In a large mixing bowl, add the creamy peanut butter and sift in the powdered sugar. Using an electric mixer or a sturdy spatula, blend together until the mixture is smooth and creamy.

    Gently fold in the vanilla extract, followed by the Rice Krispies. Make sure each piece of cereal is thoroughly coated with the peanut butter mixture to ensure consistency in flavor and texture.

      Prepare an 8x8 inch baking dish by lining it with parchment paper, ensuring there’s some overhang on the sides for easy removal later. Spoon the Rice Krispies mixture into the dish and use a spatula to press it down firmly, creating an even layer across the base.

        In a microwave-safe bowl, add the milk chocolate chips. Microwave in 30-second intervals, stirring well after each interval until fully melted and smooth. This should take about 1-2 minutes total, but be careful not to overheat.

          Once melted, pour the chocolate over the pressed Rice Krispies layer, using a spatula to spread it evenly across the top, ensuring complete coverage.

            Generously sprinkle the mini chocolate chips on top while the chocolate is still warm, allowing them to adhere nicely. Finish with a delicate pinch of sea salt to enhance the flavor profile and create a delightful contrast to the sweetness.

              Place the baking dish in the refrigerator for a minimum of 30 minutes to allow the chocolate and bars to set properly. Once set, lift the bars out using the parchment paper and cut into squares.

                Prep Time: 15 minutes | Total Time: 45 minutes | Servings: 12 bars

                  - Presentation Tips: Serve the bars on a decorative plate, and for an elegant touch, drizzle some melted chocolate over the top before serving. A light sprinkle of extra sea salt can elevate the visual appeal and taste.